How to add a room to a house made of brick, or from any other material - the principle is the same everywhere. Everyone knows that an extension is good because it does not create additional load on the supporting structures. It is quite easy to build from any available material. Fortunately, frame construction is becoming more accessible and popular. But in this case, a very significant problem arises in arranging the foundation . To prevent a newly erected structure from settling under its own weight and falling apart or dragging down an existing structure, when building a new foundation, two fundamental points must be taken into account:
- Organization of a technological gap (junction). It is designed as a gap between buildings of 200 - 400 mm, where the ends of the reinforcement of the connected foundations are located. Its function is to allow the new foundation to settle down unhindered and sag under the weight of the structure to a stable state. After all, the bearing capacity of the soil directly depends on its moisture content. Hence one more nuance - it is better to arrange the foundation in late summer or autumn, when the soil is drier and therefore does not “float”. Upon completion of construction, the protruding ends of the reinforcement are welded and the joint is filled with concrete.
- The foundation of the extension must be of the same type in terms of depth as the main building. This will allow, in part, to calculate the depth of further shrinkage and the magnitude of the maximum load on the base.
By and large, there are two ways to add a room to your house:
- Attach a room to a new foundation to an existing building.
- You can add a room like an attic-type addition to the second floor.
How to build a mansard roof - step by step guide
An attic, which makes it possible to effectively use the floor space of a private house, is a rather complex design. As a rule, homeowners entrust its construction to experienced roofers. But if you are skilled in carpentry and are not afraid of difficulties, then you can certainly cope with the task yourself. The first step is to obtain theoretical knowledge of how an attic roof is calculated and built with your own hands according to individual drawings. You will find this information, presented in the form of a step-by-step guide, in this article.
Choosing a roof design
To construct an attic floor instead of a conventional attic, the following types of roofs are suitable (shown in the diagram below):
- regular gable with a slope of 45° or more (steep);
- broken roof;
- four-slope, half-hip.
Note. As can be seen from the diagram, various half-hip roofings are complicated gable roofs, so there is no point in considering them separately. In terms of design, the multi-gable structure shown in the photo is of interest, but its construction requires considerable experience.
The gable mansard roof is the simplest to implement and is economical in terms of material consumption. But you will have to pay for this with a smaller usable area and sloping walls of the attached floor, which do not allow the placement of tall furniture. This will not be a problem if you plan to set up a bedroom in the attic - the beds will easily stand near the longitudinal walls. Another way to solve the issue is to raise the rafter system to the required height, as shown in the drawing below.
Roofing with broken shapes is the most popular option, since it allows you to create full-fledged living rooms upstairs. If you do not provide protruding windows on its slopes, then in terms of installation technology such a roof is not much more complicated than a gable roof, although the consumption of building materials will increase. To make your choice easier, we suggest considering and comparing the 3 most common options for an attic superstructure for a private house with standard dimensions of 6 x 6 m:
- Steep roof with two slopes inclined at an angle of 45°.
- A broken structure, where the lower rafters are inclined at an angle of 60°, and the upper ones - 30°.
- The same as option 1, only the trusses are raised to a height of 60 cm, and the rafter legs are at an angle of 37.5°.
For convenience, we depicted all three structures on one drawing, which can be taken as a basis for future construction.
Note. A board with a cross section of 50 x 150 mm was taken as the main building material for the manufacture of rafters and other frame elements.
To choose the best of the three options, we suggest studying the comparison table, which presents the parameters of attic rooms per 1 linear meter of building length.
Knowing the length of the roof slopes indicated in the plate, you can approximately estimate the consumption of building materials for the frame, covering and insulation. The following table makes it possible to estimate the total area of the rooms on the second floor when implementing all 3 solutions in private houses with different sizes.
Types of extensions
They are distinguished not only by their design, the type of foundation used, but also by the material of the load-bearing wall. The following types are distinguished here:
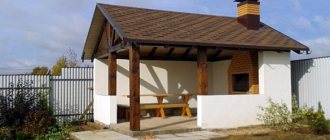
- Made of brick. This is a base that has three or four full walls and can be covered with either wood or a slab. In order to preserve the aesthetics of the structure, builders advise raising the brick extension from the back of the building. It is significant that the brick extension must be structurally calculated correctly. That is, it is important that the base is strong, so if the base is strip, it is buried more than a meter. The outside of the extension can be tiled, plastered inside, or sheathed in wood.
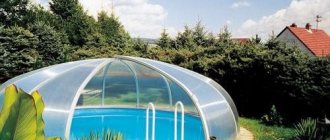
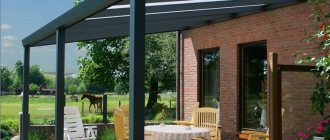
- Using frame technology. This option is considered simple and less expensive from a financial point of view. Frame technology is often used for the construction of summer extensions, which will then not be heated and can be operated with heat. This option suggests installing the base on piles, installing pillars of the required cross-section, and then covering it with wood. Speaking about the veranda for its intended purpose, it should be taken into account that it is usually immediately covered with a roof. This is a single-pitch or gable roof structure.
- From foam block. Such material is considered capital, warm, durable. It is used for arranging extensions, which can and should then be heated in the winter. Kitchens, boiler rooms, and also rooms to expand living space are built from this material. It is advisable to reinforce the foam block every four rows, as this will prevent the appearance of cracks.
A structure made of timber is in similar demand. This is a natural raw material that does not shrink. Using glued technology, it looks aesthetically pleasing, fits without seams, and retains its geometry. Such buildings, like foam block ones, can be used all year round.
Wooden extension to the house
Therefore, they are used to create full-fledged living quarters. They do not need to be further insulated, so you should install heating here, install heated floors and move in. This type involves the arrangement of a pile or strip structure.
Calculation of the rafter system
The rafters of a do-it-yourself attic must withstand the following loads throughout its entire service life:
- own weight;
- weight of roofing and insulation;
- maximum gusts of wind for a given area;
- snow cover pressure.
Reference. When the roof slope is more than 45°, snow practically does not stay on it, and at 60° it is not taken into account at all in the calculations. But wind pressure increases due to the height of the structure and its position, which is close to vertical.
The result of the calculations should be 2 parameters - the cross-section of the rafters with beams (otherwise known as tie rods) and the pitch of their installation. It is a mistake to think that the size of the wooden beams of the roof grows along with the loads on it. Maximum structural rigidity is achieved through the use of trusses made of logs with a diameter of 120-200 mm or lumber with a thickness of 40 to 200 mm, installed in increments of 50-120 cm. If you are not a civil engineer, you will not be able to determine these values more precisely, since the methodology quite complicated.
Online calculators posted on the Internet do not solve the issue, because their calculations still need to be checked. The solution is this: use ready-made data that has been calculated a long time ago. To do this, you will need table No. 1, which shows the cross-sections of rafter legs at different lengths and loads:
We will explain the calculation method with an example. Let’s assume that the snow load on a flat surface (projection of a pitched roof) in your area is 100 kg/m², the slope is 60°, the span length is 4.5 m (before the strut), the pitch of the rafters is 120 cm. The roofing is slate. We count:
- Real weight of snow cover: 100 x 0.32 = 32 kg/m². The slope coefficient of 0.32 is taken from Table 2 below.
- The specific gravity of a slate covering with a regular profile is 25 kg/m².
- Total specific gravity – 32 + 25 = 60 kg/m².
- We calculate the specific gravity per 1 linear meter of rafters, multiplying 60 kg/m² by an installation step of 1.2 m. We get 72 kg.
- We return to table No. 1 and select the cross-section of the beam according to the span length. We accept a load of 100 kg per 1 line of rafters (with a margin). A log with a diameter of 140 mm, a board 40 x 200 mm and other materials whose dimensions are in the same horizontal line are suitable.
Reference. When installing a sloping mansard roof, 2 types of rafters are used - layered and hanging. On a gable roof, only hanging roofs are used; the difference between them is shown in the diagram.
The last table No. 3 will help you correctly determine the installation interval of roof trusses:
The proposed method is suitable for small rectangular houses measuring 6 x 6 m. To build a mansard roof on a large cottage, it is strongly recommended to contact specialist designers for calculations.
The cost of rebuilding and reconstruction of a country house
Work on rebuilding a dacha often requires serious investment. By contacting a construction company, the customer can count not only on a complete inspection of the house, but also on an individual approach when drawing up a project and estimate. Taking into account the owner’s wishes, the most cost-effective option for reconstructing the dacha is being developed. The cost of some types of reconstruction work in the Moscow region:
- Visit of a specialist to the site, inspection and consultation: 4.5-5 thousand rubles.
- Work to strengthen the foundation: 8.5-9 thousand rubles. for m/p. (work, material).
- Roof reconstruction: 6.4-7.5 thousand rubles/m² (work, material).
- Increase in living space (attic): 5.4-6.5 thousand rubles/m² (work, materials).
- Extension of living space: 4.5-5.5 thousand rubles/m² (work, materials).
After perestroika, you can enjoy dacha life all year roundSource plotnikov-pub.ru
Frame making
The simplified method presented below involves the installation of an attic sloping roof in 2 stages: assembly of roof trusses on the ground and subsequent installation on the finished walls of a timber or log house. The structural material is boards with a section of 15 x 5 and 10 x 5 cm with a standard length of 6 m.
Start of assembly - formation of the upper chord of the rafter system
The technology looks like this step by step:
- Prepare the beams of the lower chord of the truss, taking into account roof overhangs of 25-27 cm on each side. If the length of the beam is not enough, it needs to be increased using an overlay of the same section, nailed.
- Lay the beam on the ground and attach vertical posts to it with corners, forming the walls of the attic room. Install the ceiling beam and the ridge support (headstock), then attach two hanging rafter boards to it and the corners of the frame for marking, as done in the photo.
- Cut the elements into place and secure them. From the remaining parts of the boards, make layered (lower) rafter legs in the same way and nail them to the frame. The farm is ready.
- Make the remaining trusses using the same method.
Advice. As a rule, windows or doors to the balcony are provided on the front gables. It is also convenient to make racks and belts for their installation on the ground, as well as to cover the openings with clapboard.
The finished frames are lifted onto the walls and fixed in place one by one, starting from the first gable. To prevent it from falling, install spacers and nail them to the walls of the log house. The second and subsequent trusses are placed in the design position and connected to each other with boards.
After placing the rafters, they must be secured to the walls in the following ways:
- staples to the second top crown of logs or beams;
- on steel corners and galvanized screws, as shown in the photo.
Note. Installation on brick and other solid walls is carried out using a mauerlat - a wooden beam laid on load-bearing structures along the entire perimeter of the building. In turn, the Mauerlat is mounted on studs or anchor bolts, and a waterproofing layer of roofing felt is placed between it and the stone wall. The mounting assembly looks like this:
The roofing covering is laid on top of the sheathing - slate, metal tiles, and so on. The technology of installation and fastening depends on the selected material.
Assembly
In most cases, the construction of an attic roof begins with the installation of a Mauerlat
What is important is a strictly horizontal position, parallel, reliable fastening of its beams
Rafter structure of a mansard roofSource kryshagid.ru
For the installation of a rafter system, two options are practiced: the elements of the rafter system on the ground are assembled into trusses, lifted and installed ready-made. Or everything is assembled separately at the top - “in place”, following the order of actions:
- Floor beams are being laid. This takes into account the pitch of the rafter system and the possibility of installing a staircase.
- A rough ceiling or temporary flooring is immediately laid for safe work.
- Racks are installed. Temporary braces are installed to keep them in an upright position. Purlins are laid on the racks.
- Puffs are laid on top of the purlins.
- The lower rafters are installed.
- Temporary braces are replaced by permanent wind braces in a longitudinal position.
- The upper rafters are installed.
- The frame for the pediment is set up, taking into account the design, openings are organized for: windows, balconies, and other options are provided.
- Next, a roofing membrane is laid along the rafters and pressed against them with a counter-lattice - bars with a cross-section of 50x50 mm. To organize a ventilation gap. These are preparatory measures for insulation. They need to be carried out precisely at this stage. To miss it is a huge omission.
- The sheathing is placed on the counter-batten, with a pitch corresponding to the roof covering.
- The roof covering and its additional elements are installed: wind boards, ridge.
The same house can look different and have different usable areaSource 1dom.kz
About the features of calculating a mansard roof in the video:
Attic insulation
Since the attic space is planned as a residential space, it should be well insulated. Of the thermal insulation materials, mineral wool works best with wood because it allows moisture to pass through and allows it to “breathe.” The layer thickness is at least 150 mm, and in the northern regions - up to 300 mm. Insulation is carried out in the following order:
- Cut the mineral wool slabs and insert them spaced between the rafters.
- To insulate the gables, nail additional posts and lay insulation between them in the same way.
- If the width of the rafter legs is not enough to create thermal insulation of the required thickness, after laying the first layer, nail horizontal counter-lattice bars to them. Insert the second layer slabs between them.
- Cover the insulation from the inside with a vapor barrier film, laying it with an overlap of 15 cm and gluing the joints with aluminum tape.
- Nail the sheathing strips on top for cladding with plasterboard or other finishing material.
Important point. When laying the insulation, make sure that there is a 3-5 cm ventilation duct between it and the windproof membrane. Moisture formed in the mineral wool due to the dew point will be removed through it.
Nuances of interior decoration
Before making an attic with your own hands, it is advisable to think about its interior. It is better to choose lightweight finishing materials for attic spaces that do not create excessive load on the floors. This is wooden flooring, laminate or linoleum for the floor, drywall or wooden lining for the walls.
If the attic space has its own walls and ceiling, then finishing work is carried out in the usual way. If their space is formed by roof slopes, one nuance should be taken into account: facing materials cannot be attached close to the vapor barrier. It is necessary to leave a ventilation gap between it and the cladding, for which a frame of wooden slats or metal profiles is installed on top of the insulating film.
All layers of the attic roof from roofing to finishingSource krysha-expert.ru
Heating of this floor is easiest to do using electric convectors or infrared film heated floors. And all electrical wiring must be laid in corrugated hoses to reduce the risk of fire in the wooden superstructure from an accidental short circuit.
Features of a gable roof with an attic
To determine the design of a gable roof, the following should be taken into account :
- House layout;
- Dimensions;
- Wall thickness;
- The presence of a load-bearing longitudinal wall.
In addition to construction factors, the choice of roof configuration is influenced by the climatic features of the location of the building.
For a house with a width of up to 6 m , located in a temperate climate zone, choose a gable roof with a hanging rafter structure and a slope angle of at least 400 degrees .
A smaller angle of inclination will not allow you to arrange an attic room with a sufficient ceiling height. In addition, the steeper the roof, the less snow and water will stay . From a roof mounted at an angle of 450 degrees , snowflakes slide off under their own weight.
Forms
The room under the roof has a special role so that it can be used comfortably.
For this purpose, a number of requirements are imposed on the attic space:
the shape of the attic should be as comfortable as possible; you need to pay attention to insulation; Room lighting is also important.
Proper planning will help to implement many useful ideas. The geometric shape of the attic has become a classic of the genre. Such a roof can be triangular or broken, with symmetrical or asymmetrical sides relative to the walls of the building. The floor itself can be located either on one side or along the entire width, even going slightly beyond the boundaries of the external walls. Some of these projects involve the installation of additional supporting structures, for example, in the form of columns or walls.
In general, roof structures can be designed as follows:
- in the form of a separate multi-level floor;
- a single floor with a two-level development;
- two-level floor with a mezzanine floor base.
Load-bearing walls of roof structures usually consist of two parts:
- vertical wall (the wall material for the structure can be used the same as for the construction of the lower floors);
- inclined wall (its frame is the rafter system, and the roof serves as the outer cladding).
The relationship between all these elements in the project depends on the design as a whole. The shape of the mansard roof gives the whole house a special look. Residential attic spaces can vary in roof shape.
Basically, it is customary to distinguish the following types:
- single-pitched roof (without sidewalls, with a single roof space);
- gable roof (a complicated design that allows you to design a comfortable attic floor taking into account attic windows);
- a sloping gable roof with a characteristic silhouette (the slopes can be curved inward or outward).
A competent project allows you to “free up” the necessary usable area. It can be increased by installing a vertical attic wall. It is worth considering that the usable area of a hipped roof is smaller than a gable roof. This is due to the large number of bevels, which do not allow free design of the under-roof space. It is optimal to use a standard attic design.
Since the height of the attic floor is important, it affects the usable area. In addition, the type of room under the roof is distinguished by height
For the overall picture, it wouldn’t hurt to study the cross-sectional design of a typical attic structure.
Let's look at what it is.
- If the height of the vertical wall of the under-roof room is more than 1.5 m, then this is already a full floor. In the center of the structure you can move freely without bending over. If the height of the attic wall is more than 2 m, we can talk about a functional room, which in terms of comfort will resemble a standard room.
- If the attic has a single- or gable roof with a height of attic walls of about 0.8 m (maximum up to 1.5 m), then this design is characterized by increased functionality.
- The presence of walls less than 0.8 m high (or if there are no vertical walls) may indicate an insufficiently functional room.
There are several ways to turn your attic into a functional room that is more convenient and efficient. The overall tone is also set by the interior of the under-roof room. Sometimes its arrangement may require extraordinary solutions, but it is better to follow well-known and proven rules in your work. Thus, the quality characteristics of the attic largely depend on the purpose of the room. For example, it is convenient to turn a small, narrow attic into an additional bedroom. The high attic allows you to arrange an entire guest floor under the roof
It is also important what kind of furniture will be in the room and, accordingly, you can build in a wardrobe or install a shelving unit
It is important to comply with two general requirements:
- for a large room, the height of the walls to the floor from the ceiling is at least 2.2 m;
- the height of the attic walls from the bed level is about 1.4 m.
The principle of the rafter system
The load-bearing structure of a roof with hanging rafters does not require complex calculations and design solutions. The diagram shows that the rafters of a gable roof with an attic are installed in the form of triangular arches along the entire length of the house with a pitch that depends on the weight of the roofing material with sheathing and insulating materials. The front surfaces are a continuation of the walls of the house and are made of the same material.
The principle of hanging rafters is based on a spacer system. The rafter legs rest on each other at the top point and are tightened with a crossbar, which is fixed at the height of the attic ceiling. Tightening is performed to balance the thrust load acting on the walls of the house. At the bottom, the rafters are rigidly attached to the mauerlat - a wooden foundation for the roof truss structure.
The Mauerlat is placed around the perimeter of the house, on the upper bases of the walls. Such a foundation is made by continuously laying timber 100 by 150 mm or 150 by 150 mm for waterproofing.
If the length of the beam is not enough to lay in one cut along the entire wall, it is connected in two parts in the center of the fence, driving the fasteners at an angle of 450 degrees . The Mauerlat is secured to the base of the wall closer to its inner edge with anchor bolts and studs.
Vertical supports are attached to the Mauerlat with metal corners for installing rafter legs , on which cuts are made for better support into the Mauerlat beam.
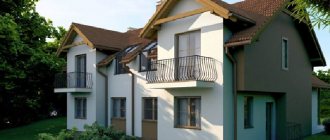
Second floor extension: how much does it cost?
The cost of adding a second floor depends on several factors. It is impossible to determine the required amount without relying on the design of a specific house. When calculating construction costs, you need to take into account the type of second floor, the materials used in the construction of walls (aerated concrete, brick, wood, etc.), the materials used for interior and exterior decoration, the area of the superstructure and some other factors.
Determination of structural dimensions
The length of the rafter beams can be determined without calculations. For this:
- In the center of the front wall, a temporary support with tied twine is installed vertically at the expected height of the roof ridge;
- The twine is taken to the corner of the house, thus determining the size of the roof slope. Add to this value 60 cm for the eaves overhang and get the size of the rafter beam .
The calculated dimensions of the hanging truss structure of a gable roof for a house with a width of 6 m are indicated in the drawing .
Determine the number of rafter arches . For this:
- We divide
length
- buildings on
distance
- between supports. For a small country house
optimal step
- installation of rafters –
1m
- . If the length of the house is 8 m, then the number of arched structures will be:
8/1 + 1 = 9 , and the distance between them: 8/9 = 0.9 m .
Plans for two-story houses: successful projects for comfortable living
The wooden structure is environmentally friendly and naturally beautiful
Even a small width of the walls can retain heat inside the house quite well. The disadvantages of buildings of this type include the need to maintain the assembled box for 3-12 months. During this period, work stops, since it becomes impossible to install double-glazed windows and door structures in openings that can still move to the side due to shrinkage.
Features of the layout of a two-story house 9 by 9: photo and plan of a building made of aerated concrete
Structures erected from brick, foam blocks or aerated concrete, as in the layout of a two-story house 9 by 9 m, are reliable and durable. But this is only possible subject to strict adherence to construction technology.
The construction of such structures assumes that the finished building will have an impressive weight, which means that a thorough approach should be taken to organizing the foundation. It is worth considering that houses made of piece materials will not allow you to save money. A foundation of poor quality will cause the cottage to “walk,” which will ultimately lead to cracks and make further operation not only dangerous, but also impossible.
Installation of truss structure
After determining the amount of consumables, they begin to install the rafter system of the gable mansard roof. You can do this yourself :
- A triangular truss is assembled from two beams and a tie. If the roof slope is
450 degrees
- , then at the top point the beams rest on each other at an angle of
900
- . The upper connection is fixed with a metal plate.
Tightening bolt
- fastened with self-tapping screws at the height of the expected attic ceiling;
Roof lathing and waterproofing
To strengthen the rafter structure and create a base for the roofing material, sheathing is installed on the .
For step-by-step lathing under ondulin, corrugated sheets, slate or metal tiles, use a softwood board. You can use profiled timber 40x50 , 50x50 , 50x60 mm , but it will heavier .
Now let's look at the types of waterproofing for a gable roof. For a gable roof, the following is suitable as a water barrier:
- Bitumen roll material is a traditional, inexpensive, but short-lived roofing waterproofing;
- Reinforced film - polyethylene reinforced with synthetic thread, creates a waterproof barrier between the roofing material and the wooden roof structure;
- Waterproofing film is perforated polyethylene, which has the unique ability to allow moisture evaporation from the insulation to pass through, but does not allow water to pass inside;
- Anti-condensation film is designed to protect metal roofing materials from condensation. The outer layer of the film is made of geotextile, which perfectly absorbs moisture, and the bottom polymer layer does not allow water to pass to the wooden elements of the roof.
Begin laying the roll waterproofing from the bottom edge of the slope. Subsequent rows are overlapped.
Installation of sheathing
Installation of gable roof sheathing is a step-by-step process. The installation steps are as follows:
- The waterproofing layer is attached to the rafters with galvanized brackets with a slight sag for under-roof ventilation;
- To install the sheathing, wooden slats are nailed to the rafters on top of the waterproofing; the sheathing lamellas are fastened with self-tapping screws;
- A cornice is attached to the lower edge of the rafters;
- 30 cm from the eaves;
- The rows of sheathing are attached parallel to the cornice in increments of 60 cm ;
- The wooden lamellas of the sheathing are connected at the intersection with the rafters;
- An additional row is installed 10 cm below the roof ridge;
- Wind trims are fixed to the end rafters;
- Compare the diagonals of the roof slopes.
After lathing the truss structure, they begin to externally cover the roof with roofing material.
Roofing materials and their fastening
For the top covering of a gable roof, modern roofing materials are used - ondulin, corrugated sheets, and metal tiles.
Along with strength and durability, they are lightweight , making them suitable for cladding attic roofs.
The roofing sheets are attached to the sheathing with self-tapping screws, starting from the bottom row. The amount of material is calculated based on the area of the roof slopes with a coefficient of 1.2 for overlapping fastening.
Before covering smooth surfaces, aprons made of metal of suitable thickness or special blanks are installed around chimneys and air ducts.
At the end of the roofing work, ridge elements and end strips are attached.
The roof is insulated from the inside and a vapor barrier layer is laid.
Thermal and vapor insulation of a gable roof of an attic room
insulated by laying a heat-insulating layer in the recesses between the rafters. Mineral wool is used as thermal insulation , which is lightweight, has good vapor permeability and low thermal conductivity.
To avoid mineral wool getting wet due to condensation, it is covered with “breathable” layer of vapor barrier. Perforated polyethylene films, anti-condensation multilayer coatings and diffuse membranes do a good job of vapor insulating the inner surface of the roof.
The vapor barrier is laid across the rafters, along the entire length of the room, with the strips overlapping by at least 10 cm . The seams are taped with special tape . The film is stapled to the rafters using a stapler.
At the final stage of constructing an attic space, the inner surface of the gable roof is sheathed with sheets of plywood, plasterboard, clapboard or other decorative covering.
Read more detailed information about how and with what to properly insulate an attic roof here.
Subject to the basic rules for constructing a gable roof, taking into account the advice of specialists on the selection and fastening of building and insulating materials, the installation of the attic room is carried out independently. A warm, well-ventilated attic will serve as additional living space and improve the microclimate of the entire house.
What can be done in an apartment building
The attic may well become a living space for residents of apartment buildings.
According to Article No. 36 of the Housing Code of the Russian Federation, the attic is the common real estate of apartment owners in multi-storey buildings.
Based on this, before registering ownership of the attic space, the following conditions must be met.
- 100% written approval for the reconstruction of the under-roof space by all apartment owners.
- Obtaining the necessary permits for joining the premises to a housing cooperative, homeowners association.
- After construction work has been completed and the facility has been put into operation, make the necessary changes to administrative as well as technical documents.
- Then comes the actual registration of ownership of the attic, i.e., registration of ownership rights.
It is also possible to obtain attic space for rent or immediate, untimely use.
Then the following is necessary.
- Obtain permission to rent from the apartment owners, as well as from the HOA or housing cooperative.
- Conclude a lease for the attic and register it.
- Obtain an act for the refurbishment of the premises (after it has been refurbished).
- Make changes to administrative and technical documentation.
- Make amendments to the lease agreement, followed by their registration.
You should know before you register your attic as your property that many regions have their own regulations. Thus, in Moscow, you can become the owner of these premises, based on the provisions of local law No. 50 “On the procedure for preparing and issuing permits for new construction or reconstruction of facilities in Moscow.”
After you purchase the attic space of an apartment building, you can count on converting it into an attic.
Types and options of gable roofs: a complete overview of all types of structures
A gable roof is the most standard option. Even small children draw a house with it, and it is the one that first comes to mind. And this makes sense: this roof is simple in its design, at the same time adapted to a wide variety of climatic conditions and has sufficient stability, which humanity has experienced for centuries. But in practice, ideal gable roofs are not found very often - more often with unequal angles of inclination, different lengths of eaves overhangs and unusual designs.
There are usually two reasons for such an “anomaly”: either the homeowners were trying to express a certain architectural feature of the house, or certain operational requirements led to this. Or, different types and options of gable roofs actually offer many bonuses in the form of additional comfort, style and functionality! Shall we figure it out?
A time-tested classic: from 30° to 60°
Of course, the most popular today and yesterday is the symmetrical gable roof. The easiest to build and easy to calculate, with an ergonomic classic design based on an isosceles triangle. The sharp angle removes any precipitation well, snow does not accumulate, and any roofing material can be used.
The classic symmetrical gable roof is also called a gable roof. Essentially, these are two inclined planes-slopes of a rectangular shape, which are installed at the desired angle to the walls of the building. And the functional features of such a roof depend on the angle itself.
A gable roof, depending on the angles of the slopes, can be of the following types:
- Classic with an angle of 45°. The most common option for houses up to 8 m wide.
- Flat, with an angle of less than 45°. It is more common in small houses in particularly windy regions.
- Pointed with an inclination angle of 60°. This is the most expensive construction option, but justified when neighbors’ roofs break due to tons of snow.
- Broken with slopes of different angles: 30° and 60°.
The angle of inclination of such a roof is calculated based on the climatic characteristics of the area. For example, roofs with a steep slope are usually built in regions with particularly snowy winters, and gently sloping roofs in windy regions. Where there is more rain than sun, and there is a lot of snow in winter, this angle should be at least 60°.
It is clear that the steeper the slopes, the easier it is for them to throw off snow and prevent rainwater from lingering on the surface for too long. But such a roof can be torn off by the wind, which is fraught with considerable losses and problems. Therefore, if your area is more windy than snowy (and the wind usually blows snow off the roofs), then the slopes should be made flat. That's the whole difference between these subtypes of the classic gable roof: flat and steep.
Broken roof: everything for the comfort of the attic
Again, of this type (even subtype) of a gable roof there is a rectangle, above it there is a triangle and two more triangles on the sides. The ceiling in the attic is high, the windows can be installed vertically, and in general the space looks cozy and as close as possible to an ordinary living room. Yes, the geometry is still a little unusual, but this is rather a plus. But now you can safely add a balcony to one side of the attic.
A broken gable roof is built when they intend to equip a residential attic underneath it in the future. After all, to make the room cozy and warm, an ordinary gable roof is not enough due to the following disadvantages:
- It is quite difficult to make high-quality roof windows on slopes. These are difficult to open, they leak when it rains and are visually much inferior to vertical ones.
- On such slopes it is impossible to make almost any extensions in the form of a balcony or other additional elements.
- Sloping walls in the interior, no matter how the designers play with them, do not look very cozy. And some people are also under psychological pressure.
- Sharp corners in a room are actually not a bonus, but a problem, and can be quite difficult to navigate comfortably.
- It is more difficult to insulate such a roof than a broken one.
This is why the breaks on each slope are so important: the angle changes, and the interior space of the attic becomes more comfortable and spacious.
As you can see for yourself, it couldn’t be simpler:
Or these broken-broken ones:
Finishing
Original and practical solutions for cladding a wooden or brick attic space give free rein to your imagination. The design of the attic is largely determined by the general design decision, but sometimes the most daring ideas are used. The cladding of the attic floor is primarily related to the features of the finished structure. In this regard, the interior decoration of the attic has a number of features.
You need to pay attention to several points
- The internal appearance of the attic is influenced by the presence of skylights. They are located on the slopes of the roof. An ordinary window is placed on a flat wall; the room receives more light.
- You can come up with an unusual design for the attic walls, for example, in colorful shades that contrast with the color of the ceiling or floor.
- The slopes of the attic roof can be designed in a designer way, emphasizing the uniqueness of the attic room design.
- The special atmosphere of the attic room is determined by non-standard furniture (for example, irregularly shaped). A low, unequal cabinet will fit perfectly in a narrow and low part of the attic.
- A large attic can be divided into functional zones.
See below for more details.
Asymmetrical roof: design and practicality
The basis of the asymmetrical roof, the refraction of which is not in the center, is based on an arbitrary triangle. It just has different angles, and therefore different sides. As a result, one roof slope is already larger in area than the other, and the load on it will also be different. Therefore, an asymmetrical roof is more difficult to calculate: the loads on both slopes are not the same, and there will be few identical elements in the rafter system. Somewhere you will have to make something thicker, strengthen something, and save on something.
The unusual “broken” interior space of such an attic turns out to be quite cozy, and the cut-off walls are hidden behind built-in wardrobes. And psychologically, it is much more comfortable for any person to live in such an attic: there is no pressure from the sharp pitched walls.
The big advantage of this version of the gable roof is that now the windows in the attic will not be inclined, but vertical, and it will be more difficult for water to get into the interior space. Moreover, in such rooms it is even possible to add a full-fledged balcony!
So why such a hassle? Why such complex calculations if classics never go out of fashion? Such roofs, with asymmetrical elements and shapes, are usually not only a whim of architects and designers, but also an excellent opportunity to make the living space under the roof more comfortable and spacious.
The asymmetrical roof itself really looks stylish and can add interest to any boring, drab home. Moreover, with the help of modern computer programs you can easily draw up a detailed design of a gable roof of various variations:
Redevelopment rules
Building a new home from scratch requires having a ready-made design for the entire house, including the attic. The need to equip or rebuild an attic in a house that has been built a long time ago requires compliance with certain rules.
- Redevelopment requires a serious approach, as there are certain building codes and rules. A diagram drawn up before starting work, on which supporting structures and floors will be marked, will greatly facilitate the task. The second thing that needs to be indicated on the diagram is the presence of windows, or the location of their possible installation. And the third important task, which cannot be avoided, is insulation and the availability of necessary communications;
- Roof type. Not every type and design of roof allows the use of a furnished attic space as a residential floor.
Scheme of the roof structure of the attic floorAttics under roofs whose slope angle is less than 35° are not suitable for installation. Broken gables with gables, hip or half-hip are best suited for this purpose if the horizontal beams are not placed too low;
- Sloping walls. Due to the slope of the roof, the walls of the attic floor are of different sizes. It is not possible to place any standard furniture on the beveled side, but this feature can be turned into an advantage if you use some simple tips: Furniture for corners can be made to order in such a way that its back walls follow the bends of the corner;
- Cover the corners with a vertical wall with a parapet, behind which you can hide storage spaces, radiators and other communications. The rational use of corners is especially important for a small cottage, measuring 6x6, 6x9 or 8x6, where it is desirable to maximize the usable area of the rooms.
Layout of the attic and first floor in an 8x6 cottageThe height of the parapet directly depends on the type of roof and its slope;
- Shelves installed in the corners will help to visually increase the area and make maximum use of the space;
- Under the low part of the wall you can place furniture for sleeping and relaxing or low cabinets.
- The roof windows have a special attic design with a special rotation system for opening, but if the redevelopment is grandiose, you can cut off a little part of the roof, which will allow you to install ordinary windows and attach a small balcony;
Interior options and window locations on the attic floor
A more expensive, but also more effective option for combining a roof window with a balcony door;
“Pretentiousness” of gable roof rafter systems
And here we have selected for you the most popular unusual types of gable roofs:
It is not difficult to build such unusual gable roofs: they contain all the same principles, they just connect the rafters differently. The only thing that needs to be done is to carefully calculate in advance the future loads of the roof and how much such rafters are ready to withstand them. And all the time and effort spent on building an unusual roof will definitely pay off with a more interesting design, a spacious and comfortable attic and other functional bonuses.
With and without an attic: we exchange trash for valuable meters
In fact, what is stored in the attics of ordinary private houses? Of course it's rubbish! And all over the world it has long become fashionable to abandon such a part of the roof in favor of a cozy attic or a real second floor, only with slightly sloping walls. And the attic itself, in its more correct concept as a space for under-roof ventilation, remains, however, under the very covering.
But all this applies only to residential buildings. But for a real Russian bathhouse, it is extremely important to create an air gap between the steam-hot ceiling and the top roofing. Otherwise, in winter the snow on such a roof will constantly melt, and then freeze and hang in icicles. That’s why there should be an attic in such buildings!
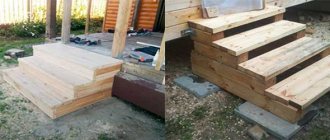
Calculation of steps
The most important stage in the preparatory work of the project is the calculation of the dimensions of the steps. It is these components that ensure ease of ascent and descent and safety of operation. They affect the area that the staircase will occupy in the house.
The first step is to calculate the number of steps. It is necessary to carry out the work correctly before preparing materials and tools. To find out the exact number of treads, you need to divide the total height of the room from floor to ceiling and ceiling by the height of the steps. Round the resulting number up.
Climbing angle
For example, if you plan to make risers with a height of 17 centimeters, and the height of the first floor with the ceiling reaches 290. In this case, the number of steps should be 290/17 = 16. Since the first and last coincide with the level of the floor and ceiling on different tiers, they should be made separately not worth it.
Calculation of winder treads
When drawing up the drawing, be sure to focus on the height of each of the people who will climb the stairs. If there are children in the family, you will have to take into account some nuances, for example, a narrower distance between the balusters.
After which, you need to correctly calculate the length of the lifting platform. This is required to obtain the exact width of the step. To calculate, you will have to divide the total length of the proposed march by the number of steps.
Calculation of the stringer
Levels: attics with scope
Are you planning to make your attic more spacious than just a lived-in attic under a roof? Then decide first how many levels it will have. Yes, yes, attics are (and often are) two-story!
Why is this important to decide in advance? The point is the supports and stability of the rafter system:
- Single-level mansard roofs are the simplest in terms of design. They are not usually considered part of the home structure due to their lightness and simplicity. But at the same time, no one will stop you from making two attic rooms at once and even raising one of them onto a podium.
- Two-level mansard roofs are built as part of the house, the same as the second floor. The weight and load on the foundation is accurately calculated.
The advantages of two-level roofs are vertical walls, twice as much living space, and unusual stylish architecture. And with all this, this is still not a full-fledged second floor, and therefore the costs are not at all the same.
Have you chosen your favorite option? Then start construction, and our website will definitely help you with this!
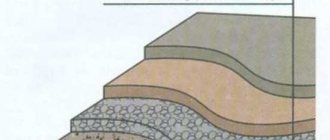
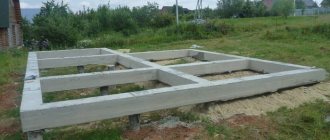
Foundation
A correctly chosen foundation ensures the reliability of the entire building . When laying it, the materials, the planned load and the nature of the soil are taken into account. Sheds or light summer structures can do without a foundation.
There are several types of base: screw, monolithic, columnar, tape. Any base must be waterproofed.
Let's consider the last two options as the most common.
Tape
A massive building made of heavy materials requires a solid foundation. This is what a strip foundation is. It is a closed strip of various materials passing under the load-bearing walls of the housing.
Columnar
Great for a veranda . Supports are installed at the corners of the site. It can be a brick, a log, a metal profile. The holes dug under the posts are filled with sand, creating a cushion. The supports are fixed in the ground and filled with concrete. For complete hardening, 5-7 days are enough.