- April 22, 2020
Owners of private land plots are constantly erecting buildings; it could be a small country house, or maybe a modern cottage.
In any case, they need water for such tasks. And so, while digging a well, the workers come across a floating float. What kind of misfortune is this, what should you do if your soil subsides?
Many people have probably heard horror stories about quicksand that carried away rings, pulled diggers underground... Well, this is possible, if you stumble upon a stormy underground river, life is a little simpler.
What is quicksand and why is it so dangerous?
There are two types of quicksand, let's look at each to understand the difference.
True - in the soil, in addition to sand, there are particles of clay and silt, it is they that envelop the sand particles and act as a lubricant. Such a mass lies motionless until the internal underground pressure changes. Soils where true quicksands predominate contain clay, sand, sandy loam, and loam.
When digging a well or digging trenches for a foundation, there is always a chance of stumbling upon such an uninvited underground guest.
True quicksand has very low water yield due to clay, so the well will have to be dug in another place. The water will look like a clay-sand solution.
Why is a true quicksand dangerous?
- under its influence, depressurization of the well seams is possible
- water becomes undrinkable
- it is also not suitable for technical purposes
- possible shift of rings
- the soil around the well is subsiding
- quicksand under the house can lead to cracks in the walls and foundation
False - this type is not so dangerous; it contains a lot of sand and water. To make it move, hydraulic pressure must be created. If you come across this species on your way, it’s not as sad as with the first option. Since sandy masses predominate in its composition, this soil layer is very rich in moisture. This fact complicates the digging process and will create additional difficulties during operation.
Such layers are found in various soils, regardless of continent. Scientists are still arguing about this topic; no one knows the cause. So-called water saturation processes occur in soils, which are essentially quicksand. Our soils are gradually being washed away by quicksand, which leads to a deterioration in water supply.
Decorating an old well
The site of the old well will not be suitable for construction for several years, so it will have to be used somehow. In principle, there are many options. The simplest is a flower garden or platform. But there are more decorative options. One of them is a small artificial pond. It can be built if part of the well trunk remains protruding above the surface of the earth. In this case, it is necessary to seal the bottom of the reservoir, strengthen it and line it with flat stones from the inside. For example, in the photo below such a pond is shown as one of the options.
Artificial reservoir in place of an old well
Instead of a pond, you can create a flower bed by lining the trunk sticking out of the ground with natural decorative material. For example, a stone. That is, by turning on your imagination, you can get a beautiful and functional object on a suburban area. Although many summer residents simply level the place, adapting it to other needs.
How to identify quicksand on the site
This question can only be answered during the digging process. When carrying out excavation work, a trench or pit can quickly fill with moisture, ground subsidence, and a mine collapse. While the quicksand is hermetically sealed in the soil, it does not perform any action. As soon as a person breaks its insulation, water comes out of it, and the soil above it begins to sag.
The right decision would be to conduct a geodetic examination, but not everyone can afford the cost of this service.
If you have neighbors, you can get acquainted and ask them about this problem, what kind of well they have, what kind of foundation, depth...
Step-by-step instructions for installing a bottom filter with a board panel
Let's consider the process of manufacturing a structure with direct backfill and a special board panel.
Board shield for bottom filter
Arrangement of the bottom filter
Stage No. 1. Making a board shield for the filter
Step 1. First, the internal diameter of the well is determined. It is important that the diameter of the shield itself is somewhat smaller - this way, during the installation process there will be no problems with transporting/laying the element.
Step 2. Select the type of tree. As for oak, it is strong and durable, but at first it will cause the water to have a brown tint. You can take larch - it is cheaper, although not as resistant to water. However, in most cases, shields are made from aspen, since it almost does not rot under water. It is important that the wood has a minimum number of defects and knots - then it will last longer.
Aspen boards
Step 3. A simple square shield is assembled from the boards. What is typical is that the boards do not need to be joined end to end - gaps are acceptable and even desirable. For connections, exclusively galvanized fasteners are used.
Step 4. A circle is drawn on the shield with a diameter slightly smaller than that of the well.
Step 5. The shield is cut along the drawn circle with a jigsaw.
The shield is cut
A jigsaw is used for cutting
The circle is almost cut out
Step 6. If the flow rate is not very large, numerous holes with a diameter of 1 cm are drilled in the shield.
Ready-made shield for the well bottom filter. In this case, holes are not required - water will penetrate through the cracks between the boards
On a note! If there are a lot of sandy impurities in the water, then the shield can be wrapped in geotextiles, thereby creating an additional filtration layer.
Stage No. 2. We lay a shield and equip a bottom filter
After making the board panel, you can work directly with the well itself. You need to go down with the right equipment - put on a helmet, prepare a reliable flashlight, check the condition of the cable.
Step 1. First, the well is cleared of silt and debris if it has been in use for a long time.
Well cleaning
Step 2. The shield is installed on the bottom of the well, after which it is leveled.
Ready to install shield
Step 3. One person lowers the coarse-grained backfill from above, while the second person lays it on the shield below and distributes it evenly. The result should be a layer about 10-15 cm thick.
Large pebbles fall
The pebbles need to be evenly distributed over the shield.
Step 4. Next, the second layer (shungite or gravel) is laid. Its thickness should also be approximately 15 cm.
Next layer of bottom filter
Step 5. After this, the last layer is poured - this is river sand, previously washed several times.
Step 6. It is important that water is drawn from the well from a point that does not reach the equipped bottom filter. For this purpose, the rope/chain needs to be shortened somewhat. If using a pump, it needs to be raised slightly.
Operation of the well can begin a day after installing the bottom filter
After about 24 hours, you can begin operating the well. At first, keep an eye on the quality of the incoming water: if after 1-2 years it begins to smell unpleasant and acquires a sweetish taste, then most likely the wooden panel is rotting and needs to be replaced. In addition, periodically wash and change the river sand, shungite and gravel that were used in arranging the bottom filter
Calculator for calculating chlorine solution for well disinfection
Go to calculations
How to drain quicksand
However, modern construction methods are based on scientific developments, which in most cases make it possible not to leave the selected site.
When digging wells, when there is quicksand in the well, it is necessary to go through it as quickly as possible and go deeper through this layer. In this case, it is necessary to observe some safety measures:
- You cannot dig by yourself; there must be a partner at the top with a safety rope, which, in case of danger, will immediately pull the person out; the quicksand can come into action suddenly;
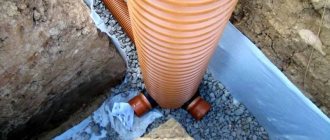
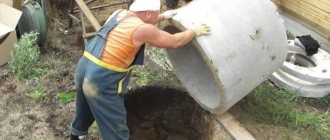
- the walls of the well must be immediately strengthened, or even better, immediately dug in the rings, although this is inconvenient, the thickness of the ring reduces the internal space.
Failure to comply with basic requirements can even lead to human casualties. Quicksand is like a rubber ball of water, and if you handle it carelessly, it bursts to the surface in a matter of seconds, filling everything around with a clayey, dirty mass. The flow of dirty sand is difficult to stop and then clean.
The behavior of an awakened and angry quicksand is impossible to predict; it can be extremely powerful and aggressive, its strength can even carry away a ring. If you hit a false powerful quicksand, strong pumping of water does not always help. In this case, the soil can sink quite significantly; it will simply be washed away by water and sand.
You can drain quicksand by installing a drainage system to remove excess water mass. However, this method is acceptable at shallow depths of quicksand. The drainage system is installed below the problem soil layer and must be monitored all the time.
To stop the quicksand, it is necessary to cut it off as quickly as possible by installing metal shields on the walls of the mine in a turbulent place.
Experienced specialists know that in winter the activity of quicksand is much lower if it is at shallow depths.
In cases where it is not possible to drain the active formation, it is necessary to choose the correct option for constructing the underground part, which will minimize contact with it.
When is cleaning necessary?
The well can be cleaned by inviting a specialist. You have to pay money for their services. You can clean the structure yourself if the following signs appear:
1.if the water flows cloudy after passing through the filter.
2. if pungent odors are coming from the well.
3. if a film of oily consistency has formed on the surface of the water.
4. if the statistical and dynamic levels in the well decrease.
If a clear sign listed above appears, you should immediately begin cleaning the well. Such water can become a great threat to humans. If it is not possible to call specialists, then you can do the cleaning work yourself.
Types of foundations for construction on quicksand
If you find out that there is quicksand on the site, do not despair - there are several proven options for construction. Let's look at them:
- if the depth of the active layer is below the freezing level, you can use a shallow strip foundation;
- A pile-type foundation is suitable where stable soil lies after the quicksand and there are no soil movements or tremors. This type of foundation is based on piles that are installed below the quicksand;
- A slab foundation is the most correct solution if a dense, stable layer of soil is located at a great depth, over 6 meters. But provided that the quicksand is close to the surface;
- in all cases, make the maximum possible blind area around the house.
When building a foundation on quicksand, you should not use heavy tractors, thereby avoiding creating unnecessary pressure on the moving layer.
Trenches are usually dug by hand; although a pile foundation is the preferred option, there is less excavation involved.
The water in quicksand contains a lot of clay suspensions, therefore the soil is heaving. Based on this, seasonal deformations will definitely manifest themselves. A reinforced steel frame built into the foundation will level out soil movements and prevent it from cracking.
When digging a trench, it is important to know that quicksand does not have strength, therefore, the pressure on it should be minimal. In this regard, the trenches must be wide. It would be ideal to install a concrete underground slab along the entire perimeter of the house, but not everyone can afford it financially.
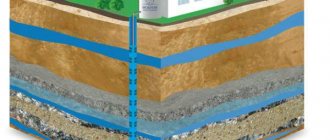
A monolithic concrete strip is poured over the top of the waterproofing onto a strewn layer of sand and gravel cushion. This layer should be at least 40 cm and be laid as evenly as possible. A wide blind area will remove moisture from the foundation, which is already abundant in the depths.
Effective ways to cope
If quicksand is detected, well digging must be accelerated in order to quickly reach the required depth, before the sand mass makes itself felt. In this case, you must follow safety regulations.
Ways to help combat the phenomenon:
- When digging a well on quicksand, you need to make a strong sheet pile - a structure made of beams and boards. Upon reaching the sand layer in the well, it is necessary to install 4 such structures at least 4 cm deep. For installation, use a plumb line. Next, without exposing the edge of the tongue, you should begin to select the soil inside the shaft. Continue digging until solid ground is reached. This method requires a lot of physical strength, but can be done without the help of specialists.
- In the central part of the shaft, upon reaching solid ground, it is necessary to level the bottom. Then, in order to prevent the quicksand from spreading, strengthen the well with casing pipes. The next step is to install a water filter around the perimeter, before filling the bottom with clay or gravel. When quicksand appears, the mine walls must be hidden behind brick or concrete. Through such recesses, water will flow continuously and without contamination. This method is considered costly in terms of finances and effort.
- To fasten the concrete rings of the well, already installed structures are connected to each other with a durable metal plate that does not corrode. After this, the joints of the rings are covered with a solution. This method compacts the concrete structure, preventing moving soil from entering the water.
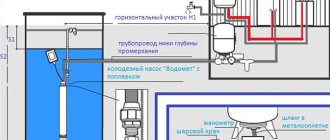
- The Abyssinian well is a method of driving a one-inch metal pipe into the ground, allowing you to achieve a flow of clean water, but the depth will be insignificant. Its disadvantage is the problematic use of the pump.
Well filling technology ↑
Removing fencing material from the trunk ↑
There may be voids on the back side of the trunk that are formed due to uneven shrinkage of the backfill and repeated undermining of the soil (including the clay castle) during winter-spring heaving. It is advisable to reach them and fill them out too. This can only be done if you remove the walls of the trunk and, if voids are found, remove soil about a meter around the well. It is usually recommended to dismantle the blind area, then dismantle the frame to the depth of soil freezing or pull out 2-3 upper concrete rings.
Removing water ↑
How to get rid of a well that has a lot of water, because sometimes it reaches almost to the brim? Do I need to do anything with it at all? Remember the story of Archimedes, who took a bath and discovered a well-known law. If there is water in an old well and its level is high, then when pouring material into the shaft, it will be squeezed out and spread throughout the area. The situation is even more complicated if the well is located inside a house or outbuilding - and this also happens. That is why in such cases it is worth pumping out the water first and carrying out the work at a time when the seasonal water level in the well is lowest.
If the productivity of the source is high (the water rises too quickly), you may have to pump several times, gradually moving upward. Sometimes the only way to get rid of annoying perched water is to build a closed deep drainage from perforated PVC pipes.
Important! It is not necessary to pump out water from small dried sources, since the gradually introduced backfill will be moistened, playing the role of an adsorbent, and the water is unlikely to rise to the top. Moreover, a wet backfill will lie tighter, eliminating unnecessary subsidence, and it will become a good barrier to water.
Laying the first layers ↑
Typically, the user does not know what type of soil is at the bottom of the well that needs to be filled, and how a particular aquifer works at depth. If you use ordinary soil or sand, then such material will gradually be washed away by streams of water, forming large cavities, and the upper layers may simply collapse at any moment. The use of coarse materials that do not dissolve in water will help to avoid troubles.
Practicing craftsmen use relatively large natural stones or broken bricks. To fill the space evenly, they are sprinkled with large crushed stone with a fraction of 20-70 mm. This backfill is raised by 1.5-2 meters, and then crushed stone is added in a smaller fraction (5-20 mm). By the way, previously unnecessary springs dug on floating ponds were filled from below with snags from reservoirs, bushes or tree stumps, which created a kind of traffic jam.