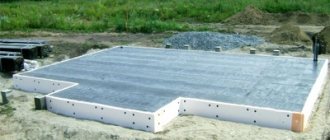
A home thermal imager (IR) is a device that converts thermal energy into visible light to analyze the heat loss of a residential property. The resulting image is called a thermogram and is analyzed using a process called thermography. Thermal imaging cameras are complex devices that process the captured image and display it on a screen. They can be used for immediate diagnosis or processed using specialized software for further assessment and conclusion on the object under study. Thermal imagers raise the level of temperature measurement, instead of a numerical indicator at one point, the user now receives a multifaceted color image showing the temperature difference across the entire surface.
Price and cost of work
Firstly, if this examination is carried out fully, know that it should cost much more than what some private traders offer (5-6 thousand rubles). Those who bought such a device to make money will certainly say that without this examination there is nowhere.
They simply need to recoup their investments. And don’t believe that such work takes literally a couple of minutes. Firstly, this is the specialist’s time wasted on arrival and departure, and the cost of fuel and lubricants.
Depreciation of equipment, preliminary negotiations by telephone. Actually, the shooting itself was done in the winter in the cold, climbing snowdrifts, stairs and bushes. And all this at a certain time of day.
Preparing of report. Delivery of it and a detailed explanation of what's what. After all, information processing, as a rule, costs much more than raw data in the form of red, blue and yellow pictures.
Before leaving, competent specialists request via WhatsApp photographs of the surfaces that need to be shot. And often after this, they even refuse to move out (there is no normal approach, all the walls in the house are filled with furniture, everything is covered with siding).
And if they have already left, then don’t be surprised at what they bill for after such examinations.
In addition, the technical equipment that will need to be used for an energy audit requires much more than just one thermal imager. For example, the same air door.
Although if you use only it alone, then there won’t be much difference. The picture of the angles where the wall meets the ceiling, after plugging all the ventilation holes and creating an excess pressure of +50 millibars or a vacuum of -50 millibars, will have a little more filtration.
In practice, this does not matter much, since in reality we live with neither excess nor insufficient pressure in the house.
Testo 890-2 (Germany)
at a price of 890,000 rub.
The Testo 890-2 device opens the third, most technologically advanced category of devices in our review.
Filming
Like the budget Testo 865, there is a SuperResolution function: it allows you to increase the already high resolution of 640x480 to a cosmic 1280x960. In addition, the device boasts the function of enlarging images 3 times without losing quality. And if your shooting point is very far from the object, use an interchangeable telephoto lens along with the functions: it is included in the device kit.
An unusual feature for thermal imagers is the ability to visualize the surface moisture of a scanned object, such as a wall. To do this, you must manually set the surface dew point temperatures. This feature helps identify areas at risk of condensation and mold formation.
Processing the results
The advantage of Testo 890-2 is the ability to visualize changes in thermal processes over time: sequential images are sufficient for this. And the report on the measurement results will be even more effective and visual if you use the built-in radiometric video recording option.
Large objects like industrial buildings rarely fit into one frame, so manufacturers came up with the Panoramic Image Wizard. You don’t have to worry about the quality of your panoramas—the SiteRecognition function recognizes areas that have previously been captured by a thermal imager. It also distributes and stores images so that the specialist does not get confused in a chain of repeated measurements.
Customer Reviews
Buyers highlight the ability to change lenses for shooting from different distances, adjust focus and create panoramic images.
True, those who are used to working with smaller devices will be unfamiliar with the weight of the Testo 890-2 - more than 1.5 kg. Characteristics of the Testo 890-2 device
| Characteristic | Meaning |
| Detector resolution, pixels | 640x480 |
| Screen resolution, pixels | 480x272 |
| Visible camera resolution, MP | 5 |
| Temperature measurement error | ± 2 °C or 2% |
| Thermal sensitivity, °C | ≤ 0,04 |
| Nutrition | fast-charging Li-Ion battery |
| Operating time of one battery, h | 4.5 h |
| Dimensions, cm | 25.3 x 13.2 x 11.1 |
| Weight, kg | 1,63 |
For specialists, the company has released a brochure “Construction Thermography”: it lists ways to use Testo devices in the construction industry, a detailed description of SuperResolution and other functions, as well as all the advantages of Testo 890-2 and other devices.
Conclusion: Testo 890-2 is an excellent device for filming large objects from any distance. They can scan the enclosing structures of industrial buildings close-up using the Panorama Creation Wizard, if roads or other buildings interfere with long-distance shooting. Use a high-resolution detector if close-up photography is not possible due to a threat to life: for example, near damaged power lines. It is too good for shooting small buildings: for its price you can buy almost 13 Testo 865 copies, which will do just as well.
Energy audit report using a thermal imager
Why do people start asking for such a service? The main reason is that they think they pay too much money for gas and electricity due to high heat losses.
And you need to understand where these heat losses are in order to correct the “jambs” of the builders or, on the contrary, present them as a claim. Regarding the latter, you will have to contact not a private owner, but a professional company that will issue an official conclusion.
Nobody will take a simple report with thermal imaging images from a certain master who has shot through your walls, floor and roof with a thermal imager. And you won’t really know what to do with this data and how accurate it is.
Most often, people who apply for this service are not those who have just moved into new houses, but those who have lived in them for some time. That is, you actually see that your expenses are high, the house is cold and there is no way to properly warm it up.
Invite a person with a thermal imager. And at the same time, he will definitely encounter some problems, about which he may remain silent.
Why conduct thermal imaging?
Inspecting a cottage, cottage or residential building with a construction thermal imager makes it possible to see on a thermogram what is happening inside various objects and structures of the building, without touching them at all. This is called non-destructive testing.
This kind of inspection will show the condition of the heating pipelines in the walls and heated floors without opening the plaster or tiles.
Thermal diagnostics is based on the principle of recording inhomogeneities of the thermal field, which makes it possible to judge the state of the objects under study
The sensitivity of some models reaches hundredths of a degree, thanks to which you can not only see the thermal trace on the surface of structures, but also find out what is happening inside.
The unique advantage of modern thermal imagers over other means of control is precisely the ability to look inside objects without violating their integrity. Even a minimal deviation of temperature indicators from the norm will indicate the presence of problems, for example, in the electrical network.
Checking a private home with a thermal imager will help solve a variety of problems:
- localize heat leaks and determine their intensity;
- monitor the effectiveness of vapor barriers and detect the formation of condensation on various surfaces;
- choose the right type of insulation and calculate the required amount of thermal insulation material;
- detect leaks in the roof, pipelines and heating mains, leakage of coolant from the heating system;
- check the airtightness of double-glazed windows and the quality of installation of door blocks;
- carry out diagnostics of ventilation and air conditioning systems;
- determine the presence of cracks in the walls of the structure and their sizes;
- find clogs in the heating system;
- diagnose the condition of electrical wiring and identify weak contacts;
- detect rodent habitats in the house;
- find sources of dryness/high humidity inside a private building.
A construction thermal imager makes it possible to quickly check the compliance of the parameters of a constructed building with technical requirements, assess the quality of a real estate object before purchasing it, and diagnose the operation of internal communications.
An inspection of the house with a thermographic scanner before laying thermal insulation materials will help to correctly calculate the cost of insulation.
And after the work is completed, thermal imaging will allow you to monitor the final result and detect installation flaws that create heat loss. The check will also show cold bridges that can be quickly eliminated in preparation for the winter season.
Before reconstructing or repairing old structures, a device with an infrared camera will come to the rescue to identify the coldest zones and leakage areas, problems with heated floors, and objectively assess the volume of planned construction work.
Problems and errors in measurements
A competent thermal imaging examination is a technically complex thing. But illiterate research, which is done in 90% of cases, will not give you any useful picture. For several reasons. Here are the main ones.
For example, almost always your house is located on some area, limited by a fence. And the master will not be able to shoot through this house from all sides, because being at one point, he will not physically capture the entire wall with a thermal imager.
Meanwhile, it is very important to have an overall picture. Because if you don't capture the entire wall, then you will be forced to assemble it from individual pieces and then put them together.
It’s not for nothing that different models are equipped with lenses with different focal lengths. In more expensive ones, it is even possible to create a panorama from fragments of the research object.
And individual pieces can give completely different temperatures. Why is this happening?
Firstly, the measurement time will be different. Secondly, different angles and shooting distances.
Thirdly, when measuring one piece, the sun will be behind a cloud, and on the other it will come out from behind it.
And the most important conditions for conducting an energy audit:
- lack of direct sunlight (sun in haze, or early morning and late evening when there is no direct sunlight)
- lack of wind
Because if there is wind, it will greatly distort the overall picture. Moreover, when measuring different walls, the wind speed can also change.
They shot at the center of the wall, the wind was 2 m/s. And when measuring on the sides it’s already 5-7 m/s. And it’s very difficult to take all this into account.
Thus, you will not get a true picture of the temperature state of the surface. As an example, you can take one point on the wall and measure its temperature first from one corner of the house and then from the other.
You will be surprised, but with the same thermal imager settings, different indicators will be obtained. Therefore, if you do not have a complete picture of the entire wall, then a significant error is introduced into the thermal imaging survey.
Testo 865 (Germany)
at a price of 69,000 rub.
Testo is the largest European company producing test and measurement equipment. It was founded in 1957 in Germany, and today includes 30 official representative offices around the world. The company opened an office in Russia in 2006, but Testo devices have been known to domestic specialists since Soviet times.
The Testo 865 device is the most budget option from the line of thermal imagers that the company produces. Despite the low price, this is a professional device for everyday tasks of a specialist.
Filming
The main feature of the device is the built-in SuperResolution function: it, probably due to software algorithms, improves the image quality to 320x240. This is comparable to devices in the mid-price category.
Another useful function is ScaleAssist: with its help, a specialist receives reliable results regardless of temperature conditions. The device independently makes the necessary corrections, increasing the accuracy of the readings: to do this, it is enough to indicate the actual temperatures inside and outside the building.
Processing the results
IR-Soft's own software has a familiar ribbon interface, like Microsoft Office programs: it will not be difficult to get used to the program. It allows you to combine real and thermal images into one picture, create panoramic images and improve the resolution of thermal images. This is a big plus if you are used to working with images on a PC rather than while shooting.
The working window of the program is a combination of an infrared image, a temperature scale, graphs for reports and the real image itself. This division into zones makes it easier for a specialist to analyze survey results and compile reporting documents.
Customer Reviews
Buyers praise the 2.8 GB built-in memory, fast battery charging and the durability of the device: due to its compact size, it can fall out of your hands, but high-quality case material and a double case save the user from trouble.
Characteristics of the Testo 865 device
| Characteristic | Meaning |
| Detector resolution, pixels | 160x120 |
| Screen resolution, pixels | 320x240 |
| Temperature measurement range, °C | -20 to +280 |
| Temperature measurement error | ± 2 °C or 2% |
| Thermal sensitivity, °C | ≤ 0,12 |
| Nutrition | 2 Li-Ion batteries |
| Operating time of one battery, h | 4 hours |
| Dimensions, cm | 21.9x9.6x9.5 |
| Weight, kg | 0,51 |
From the video you can learn about the features of the Testo 865 case, see IR-Soft in action and look into the delivery package.
Conclusion: Testo 865, as the manufacturer positions it, is an affordable device for easy diagnostics. He will be an assistant in examining the tightness of windows and doors, the thermal insulation of walls and especially heating, ventilation and air conditioning systems. However, the power of the device is not enough to inspect large civil buildings and industrial structures - workshops, towers and power lines.
Measurements inside the house
When a house is already residential, it always has stationary furniture that cannot be dismantled.
Therefore, if there is a shower stall, kitchen furniture, wardrobe, etc. near the walls inside the house, then these very places will be hidden from inspection.
And the picture that you see outside at these points may be far from true. This is explained by the fact that with a normal “pie” of the wall, you will only see the surface temperature, which will be influenced only by external conditions.
What will happen from the inside, you will not know. Therefore, for internal measurements you need a “clean” room.
Types of thermal imaging devices
Checking a private home for heat loss with an IR camera makes it possible to carry out the most accurate measurements and qualitative analysis of all temperature indicators. And after that, based on promptly received data, competently carry out repair work and/or modernization of a residential property.
For thermal imaging diagnostics, two types of devices are used:
- stationary thermal imagers;
- portable infrared cameras.
Stationary devices are used mainly in manufacturing plants. They are designed for regular checking of the condition of electrical networks and continuous monitoring of complex technical equipment. Stationary thermal imaging systems are made on semiconductor matrices of photodetectors.
Using portable thermal imagers, energy audits of residential apartment buildings and private buildings are carried out. These devices are used both for one-time local inspections and for comprehensive diagnostics of homes.
Handheld thermal imagers are based on silicon uncooled microbolometers and are ideal for use in hard-to-reach areas.
Thermal imaging is an effective non-contact inspection method, which is advisable to combine with the use of an air door to measure and control the air permeability of buildings
Depending on the functionality, there are three types of thermal imagers:
- Observation devices - provide only visualization of various heat-contrasting objects, often in monochrome.
- Measuring devices - create a graphic image within the infrared radiation and assign a specific temperature value to each point in the light signal.
- Visual pyrometers - designed for non-contact temperature measurements and visualization of the thermal field of specific objects in order to detect areas with deviations from normal values.
The price for good functional thermal radiation receivers starts at $3,000. Purchasing them for a one-time home inspection is simply not cost-effective. Many companies today offer construction thermal imagers for rent for a day. This is a very convenient service.
You can also order a full professional thermal imaging inspection of the cottage/house. The average cost of shooting with a thermal imager is $5 per 1 square meter of private residential property.
Typically, the cost of thermal imagers is an indicator of their functionality. But even budget models effectively perform infrared diagnostics. Therefore, when choosing, you should focus on basic technical characteristics and the ability to solve specific problems.
The functionality of thermal imaging cameras depends on the resolution of the infrared sensor, its sensitivity and operating temperature range
A big plus is the availability of additional functions, namely: digital zoom, laser pointer, annotations for thermograms, customizable color alarms, identification of areas with maximum and minimum temperature values.
Various accessories will greatly simplify thermal imaging diagnostics at home - removable optical wide-angle lenses for viewing the general plan and telephoto lenses for detailing critical areas, folding tripods, containers for storing batteries.
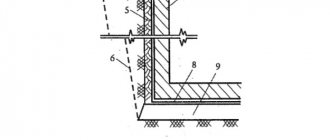
Checking the roof with a thermal imager
A very big problem is the roof. Most often it is this that is poorly insulated.
The standard roof has some slope. And being below with a thermal imager, the master will see practically nothing.
Only by moving somewhere further away, at a very sharp angle, can you somehow shoot through it.
Therefore, to correctly remove a thermogram from a roof, a quadcopter is almost always required.
conclusions
The operating instructions for the infrared camera are individual for a specific model. In other words, the description of how to use a thermal imager to inspect a private home differs from how to use the device for hunting or monitoring a protected object. However, each device supports setup and calibration, which helps you use all the built-in functions to achieve the best results.
Don't be afraid of manual settings - it increases the accuracy of the study. The main thing is to understand the parameters. If the instructions seem unclear, I advise you not to hesitate to contact knowledgeable people who will explain all the nuances. For example, to me.
Temperature difference between inside and outside
Another problem is that thermograms can only be taken when the temperature difference between inside and outside the house is at least 15 degrees. The principle here is that the more, the better. Measurements cannot be taken in warm spring, summer or autumn.
The difference should be at least 15 degrees, otherwise you won’t see anything. What is this 15C?
For example, at +20 degrees indoors and zero outside, measurements can be taken, but it is still better to do this in winter. However, here too, extraneous factors will interfere.
If you are a little late and there is already snow on the roof, then you will not see anything under this snow. Even if it was only 1cm thick, let alone under worse conditions.
Fluke Ti32 (USA)
at a price of RUB 391,000.
The American company Fluke Corporation has been producing control and measuring instruments, including thermal imagers, for more than 65 years. The Fluke Ti32 is a rugged thermal imager designed for use in the harshest environments. It can withstand a fall from 2 meters and is protected from dust and splashing water, class IP54 according to GOST 14254-96.
Filming
The device uses IR-Fusion ® technology (“Picture in Picture”): it combines IR images with images in the visible range. This will help the specialist quickly find deviations in the design and make reports more informative.
To get high-quality photos, use interchangeable lenses: wide-angle for shooting close-up building elements at close range and telescopic for long-range shots.
Processing the results
To analyze the results and generate reports, the user only needs to install SmartView® on the computer. This is the thermal imager software: it, like the manual with instructions, can be found in the kit or downloaded from the company’s official website.
To get not just an image in JPG, PNG or BMP format, but an interactive picture with radiometric data, voice comments and other useful parameters for reports, manufacturers came up with the IS2 format: it opens in SmartView®. This will be useful for those who are used to generating reports on a PC.
Customer Reviews
Buyers highlight the high-quality image of the device, additional lenses, manual focusing and good ergonomics of the body.
One of the disadvantages is that the device cannot be calibrated at temperatures below -10°C. Fluke Ti32 Specifications
| Characteristic | Meaning |
| Detector resolution, pixels | 320x240 |
| Screen resolution, pixels | 640x480 |
| Interchangeable lenses | wide angle and telescopic |
| Temperature measurement error | ± 2 °C or 2% |
| Thermal sensitivity, °C | ≤ 0,045 |
| Nutrition | 2 replaceable Li-Ion batteries |
| Operating time of one battery, h | more than 4 hours |
| Dimensions, cm | 27.7x12.2x17.0 |
| Weight, kg | 1,05 |
In the video review of the Fluke Ti32, the user unpacks the kit, shows how to set the radiation and temperature range, and uses the example of heated floors to show the device in action.
Conclusion: The Fluke Ti32 is a universal device: with it you will not worry about weather conditions, image quality and battery life. Due to the good resolution of the detector, it will be easy to photograph residential, public and standard industrial buildings. And thanks to interchangeable lenses, you can keep subtle heat leaks under control. The device will be difficult to use at industrial facilities of increased responsibility (power lines, nuclear power plants, chemical plants) due to the large survey area and the amount of equipment.
Thermal imager or pyrometer
All masters face the above problems, but as a rule they do not inform customers about the matter. As a result, in 90% of cases, the same thermal imaging image is obtained at different objects.
You have windows and a foundation. Somewhere in the area of the foundation and windows the temperature will be a little higher, and always.
What's the use of this to you? If this was initially clear even without a thermal imager. Thermal imager is an optical device. He doesn’t see what’s going on inside your enclosing structures.
You can buy a good quality pyrometer and conduct the same thermal imaging examination yourself, the only difference being that you will not have a video screen.
On the screen you have a wall where you can move measurement points and visually select the place that interests you.
In order to do the same with a pyrometer, you will have to draw the same wall on a piece of paper and shoot the points manually. After that, transfer the temperature to the drawing.
The difference between a pyrometer for 10-15 thousand rubles and a thermal imager for 500 thousand is only that in the second case you do not need to draw anything.
Therefore, think about it: maybe there is no point in buying such an expensive device for such examinations.
FLIR E8 (USA)
at a price of RUB 399,000.
FLIR is an American company that has been producing thermal imagers, night vision devices and fire protection systems for 40 years. The FLIR product line boasts an unusual variety: there are IR cameras with connection to a smartphone for hobbyists or, conversely, all kinds of sensors for the needs of national defense. You can find out more about this on the company’s website, and we will tell you about the FLIR E8 thermal imager - the first device from the mid-price category in our review.
Filming
The FLIR E8 has a focusless lens: just press a button and point the device at your subject. And for a combination of a thermogram and a real image, the specialist has access to the MSX and PiP functions. The first provides high-quality images that can be used in reports, and the second allows the user, during the shooting process, to select the area of the image on which to superimpose a thermogram.
The FLIR E8 has high sensitivity - the device is able to detect temperature differences of up to 0.06°C. Coupled with the high resolution of the 320x240 detector, this helps the specialist obtain more accurate thermograms and find invisible heat leaks.
Processing the results
Own software - FLIR Tools - is supplied with the device. To transfer pictures to a computer, you need to connect the thermal imager via microUSB. But there is another way: especially for those who don’t want to bother with a wired connection, the manufacturer has released FLIR E8 WiFi - a device with the ability to wirelessly transfer images to any device.
Customer Reviews
Buyers value simplicity and ease of use: the FLIR E8 has a clear interface and is lightweight - 500 grams.
At the same time, owners want the device to have a slot for a memory card. The internal memory of the thermal imager allows you to store up to 500 images. FLIR E8 Specifications
| Characteristic | Meaning |
| Detector resolution, pixels | 320x240 |
| Screen resolution, pixels | 320x240 |
| Temperature measurement range, °C | -20 to +250 |
| Temperature measurement error | ± 2 °C or 2% |
| Thermal sensitivity, °C | ≤ 0,06 |
| Nutrition | 2 Li-Ion batteries |
| Operating time of one battery, h | 4 hours at +25 °C |
| Dimensions, cm | 24.4x9.5x11.0 |
| Weight, kg | 0,58 |
In the video, a representative from FLIR talks about the characteristics of the device, shows the operation of the MSX mode using a real example, and demonstrates the FLIR Tools interface.
Conclusion: FLIR E8 is a more accurate device than budget models. Therefore, it is advisable to use it on more complex and critical objects: this is the inspection of walls and floors, windows and stained glass windows, heating and ventilation in multi-storey residential buildings and office buildings, but not on large industrial facilities.
Energy audit without a thermal imager
As we have already found out, it is advisable to order thermal imaging examinations only in winter or late autumn. But if you have already lived to see winter, then just wait until the snow falls.
You can easily see most of the picture and your problems without any thermal imager. What should you pay attention to and where to look?
As soon as the snow falls, it will immediately show all your “holes” that are on the main cause of heat loss - the roof. And as mentioned earlier, it is the most difficult to examine without aircraft.
When snow falls and there are frosts of 20 degrees, if icicles appear on the eaves, and on the roof itself the snow does not lie in a continuous cap, but only in a separate area, this clearly indicates that the top of the house is poorly insulated.
Snow will outline the place where there is no insulation or where heat escapes outside.
If you cannot fully inspect the roof without a quadcopter, but you clearly see the presence of icicles in winter (not in the spring in March), then why do you need a thermal imager to understand that your roof is leaky.
We figured out the roof, but how can we find out anything about the walls without special instruments? Here it is very good to determine infiltration by the presence of so-called “bugs”. This is what they look like.
These “bugs” form where air exits from the house to the street. Air contains water vapor, which condenses and crystallizes when the temperature drops.
Therefore, if you see such formations somewhere inside the house or outside (under the roof lining, near the windows), you again do not need any thermal imaging device to find out where heat is being lost.
Criterias of choice
When it comes to choosing a thermal imager for inspecting a home or building, there are factors to consider:
- The resolution of the thermal sensor, which determines the clarity and detail of the thermal image. A higher number means it contains more pixels per unit area, and will provide sharper, higher-quality images, especially for small objects.
- Cost, each device has its own budget, so you need to proceed from the measurement area. For example, a home owner who performs an annual inspection of his home for mold and pests should not spend more than 65,000 rubles on a professional high-resolution thermal imaging camera; he can take a simpler device.
- Battery life will also depend on the application. If you plan to purchase a thermal imaging camera for professional use and frequent use, you should not buy a camera with a short battery life.
- Update frequency. Almost all professional thermal imaging cameras on the market today have a refresh rate of 9 Hz. This means it produces images at 9 times/sec, which is fast enough for home inspections.