- Screed for laminate
- Wet screed
The house in Moscow has been put into operation. The keys to the apartment have been received. But the general condition of the concrete slab is depressing. You cannot lay laminate or tile on it. Floor screed in the apartment will help get rid of unevenness and seal cracks in the ceiling. How to do it correctly will be discussed later in this article.
If we talk about the features of repairs in new buildings, one significant advantage should be noted - there are no old coatings. No hammer drill is required to remove plaster. You don't have to take out tons of trash. The buyer receives absolutely free space, often without even internal partitions. Only utility entry points (water supply, sewerage, gas and electricity) are marked.
Selecting a screed based on the scope of application
For most people, screed is a mixture of sand, cement and water, mixed well and poured onto the floors. But it is not so. Dry modifications with the addition of expanded clay are widespread. Manufacturers offer a variety of self-leveling mixtures that harden within a few hours. The existing classifications of screeds will be discussed further.
Screed by type of room
In an apartment, the space is usually divided into a kitchen, bathrooms, bedrooms, living room, and work rooms. There may be loggias, balconies and terraces. In any case, the screed helps solve the following problems in arranging the floors of a new building:
- Providing sound insulation. Downstairs neighbors won't complain that your washing machine is disturbing their lives, or that your children are stomping too loudly.
- Raising the finished floor level if necessary.
- Ensuring concealed laying of pipes.
- Additional insulation on the first floors if there is no basement.
Wet rooms
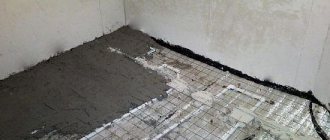
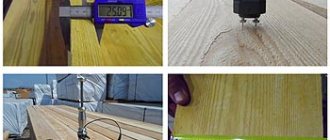
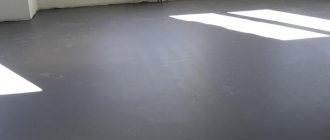
Rice.
1. Any construction team can make a wet screed from CPR in the bathroom. Wet rooms traditionally include kitchens, bathrooms, showers, saunas, and swimming pools. There are water and sewer pipes here, and there is an increased risk of flooding in the event of a breakthrough, water hammer, improper operation or installation of utility networks. The floor is decorated with tiles or mosaics.
Manufacturers of tile adhesives state that the recommended layer thickness should not exceed 2-5 mm. A thicker one is not economically feasible. A screed is required. It makes the process of laying tiles easier and faster. And here it is important to consider the following:
- If the differences in floor heights in a new building are small, do not exceed 3-5 mm, you can purchase self-leveling mixtures. They are diluted with water in the proportion specified by the manufacturer and simply poured onto the floor. No additional leveling is required. If the condition of the slabs does not cause delight, it is better to choose the traditional option - cement-sand. But in the latter case, you can start laying tiles only after 28-30 days. In a shorter period of time, concrete will not gain strength.
- Waterproofing is required. It can be used for coating (the dry mixture is diluted with water) and for painting. The composition is already ready for use. For application use a paint brush. In small rooms, polyethylene film or a special membrane is laid in several layers with the obligatory approach to the walls.
Regardless of which screed is chosen for a new building, it cannot be dried forcibly to avoid the appearance of cracks and internal voids.
Dry rooms
In residential premises, any type of screed can be used: wet, semi-dry or dry, taking into account the following:
- Wet puts a significant load on the base. In addition, careful waterproofing of the floor will be required, especially if the neighbors below have already completed repairs.
- When choosing a dry screed, you can quickly complete the rough finishing and move on to finishing. There is a significant “BUT”. Expanded clay and similar materials provide additional thermal insulation, but do not cope well with high humidity. When flooded, the floor will swell and become unusable. The laminate or other covering will have to be completely replaced. Experts recommend this option for the first floors of private houses with wooden floors.
Additionally, when choosing a screed option for “dry” rooms, the type of finish (laminate, tile, linoleum), the presence of heated floors, the time required for drying, and other factors are taken into account.
Children's rooms
It is difficult to explain to young children that they cannot jump, run or play with a ball at home. If you don’t want to constantly listen to complaints from neighbors below, you need to pay special attention to arranging the screed in the children’s or playroom. These tips will also be useful for those who want to have a gym at home, including for working with weights and barbells.
To reduce noise levels:
- Special soundproofing slabs are laid directly on the floor slab and placed on the walls.
- For pouring, cement-sand mixtures or lightweight concrete are used. The density of the first option is 1800 kg/m3, the second is 1650 kg/m3.
- The screed is reinforced with mesh. Cell size - from 100x100 mm to 200x200 mm. Wire diameter - 4-5 mm. The reinforcing mesh will protect the concrete from destruction in the presence of constant bending load.
- The finishing coating is not tightly bound to the walls. The recommended distance is 2 cm. Skirting boards are attached either to the floor or to the walls. In this case, the knocking noise will not be transmitted to the supporting structures of the building.
Mineral or glass wool, foamed polyethylene, polypropylene, and polyethylene foam are used as soundproofing materials. In all of these cases, waterproofing is required to prevent the formation of mold and fungal colonies.
Balconies and loggias
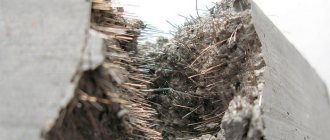
Rice.
2. Wet screed on the balcony. A balcony, loggia, or terrace in a new building often becomes an extension of the living room or bedroom. A relaxation area or study area is set up here. But before you start glazing or covering the walls, fill the screed. It is necessary if you plan to:
- insulation, including installation of water or infrared floors;
- restoration of the slab (almost never required in new buildings);
- laying tiles or laminate.
In accordance with building regulations, the load on each square meter of the slab should not exceed 400 kg. This figure includes the weight of concrete, furniture and people relaxing on the balcony.
Screed taking into account the finishing coating
When arranging the screed, be sure to take into account the method of finishing the floor. Current building regulations regulate work only with tiles or linoleum. Laminate is not listed in SNiPs. All that remains is to use the recommendations of professionals, those who day after day repair new buildings and old housing stock.
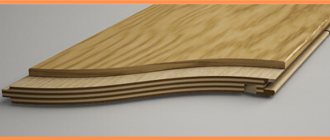
Screed for laminate
Laminate has long replaced parquet, fiberboard, chipboard, planed boards when arranging floors. You should carefully prepare for the installation process. If the base is uneven, the difference will exceed the recommended 2-3 mm per square meter, after a short time the locking joints will begin to collapse, and the floor will creak underfoot. Another problem is related to the possible penetration of moisture under the panels. The appearance of rot and delamination is inevitable.
All of the problems listed above can be avoided if the process of leveling the base is not left to chance. The specific method depends on the problem being solved:
- If you need to raise the floor level by 3 cm or more, use a sand-cement mixture. But it is better to refuse it if a significant load is created on the supporting structures.
- If the height differences are 5 cm or more, leveling is carried out using waterproof plasterboard or plywood. They are laid on wooden logs. The method is labor intensive. In addition, it is difficult to calculate the optimal distance between the beacons in order to avoid deflections of the plywood when walking.
- If there are small problems (cracks, dents), they are eliminated using self-leveling mixtures and self-leveling floors.
Dry screed is rarely used when laying laminate flooring due to difficulties with waterproofing. The same applies to wooden floors. Over time, the boards dry out or become wet and swell.
Tile screed
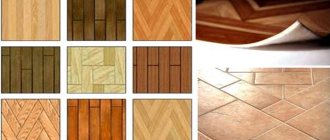
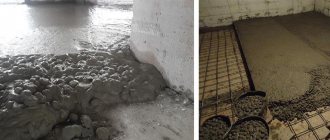
Rice.
3. Screed under tiles in apartments in new buildings. Tiles are the main material for finishing floors in bathrooms and kitchens. It is easy to care for. It does not have to be polished, coated with special mastics or varnish. The main requirement is that the base must be perfectly flat. Otherwise, the finish will look sloppy.
When pouring screed under tiles in a new building, it is important to take into account the recommendations already given in the section for wet rooms. It is worth mentioning separately about self-leveling mixtures. They are divided into:
- Rough ones. Used to level large differences in height. They are distinguished by significant density. Recommended layer: from 4 cm.
- Finishing. They are applied in a layer of no more than 2 cm. They are characterized by greater fluidity.
If you have to fill a screed with a thickness of more than 5 cm, it is better to use a concrete solution to reduce the cost of the process.
Screed taking into account the functionality of the floor
In large new buildings, owners are increasingly abandoning traditional heating radiators in favor of heated floors. On top - traditional tiles or laminate:
- Waterproofing is laid on the base if it is planned to use pipes with hot water for heating. Then - heat-insulating material (mineral wool, technical cork, polystyrene foam).
- The next stage is the reinforcing mesh. Its task is to redistribute the bending load.
- Pipe loops are placed on the mesh and carefully secured. They should not move during operation.
- At the last stage, the screed is poured directly. The thickness of the cement-sand version is 3-5 cm, of the self-leveling mixture - 3 cm.
On average, it takes 30 days to dry and gain strength. Only after this can you do a test run of the heating system. If it turns out that the pipes are laid incorrectly or there are leaks, the screed will have to be dismantled and the installation process must be repeated.
The described method guarantees increased sound insulation, which is especially important if small children live in the house. The only condition is that the finishing coating should not be attached to the walls.
You can read more about choosing the best screed for your home here.
Calculation of the number of components for concrete
The volume of the screed is measured in liters.
To determine the amount of sand, cement and water, we calculate the volume of the screed in liters. To do this, we multiply the average height by the length and width of the room, we get the volume.
Let's say, taking a room with a width of 4 m and a height of 3.5 m, we fill the screed with a thickness of 25 mm at the lowest point and 40 mm at the highest point.
We calculate the average thickness of the concrete coating (25+40) / 2 = 32.5 mm.
We calculate the area of the room: S = length 4 m * width 3.5 m = 14 m.
Volume = 32.5 * 14 = 497 l.
You will need as much sand as the volume of the screed. But sand weighs 1.5 times more than water, so 497 * 1.5 = 745.5 kg.
And you will need 1 part cement to 3 parts sand. 745.5 / 3 = 248.5 kg.
The amount of water used depends on the moisture content of the sand. Add water until the consistency of thick sour cream is obtained.
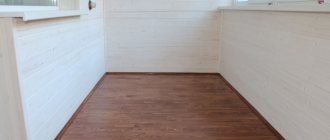
Wet screed
The basis is cement or polymer compositions. Advantages:
- availability of materials;
- low price;
- proven technology (filling does not require special expensive equipment).
Rice.
4. Beacons for wet screed. Among the disadvantages, the following should be highlighted:
- Considerable weight. Leveling this type of floor cannot always be arranged in an apartment, attic or attic. This type of screed is best suited for private homes.
- Long drying. It takes at least 30 days to gain strength. All this time there should be no drafts or elevated temperatures in the room. Concrete must be periodically wetted to prevent cracks from appearing.
- Not always a perfectly flat surface. It has to be additionally filled with self-leveling compounds.
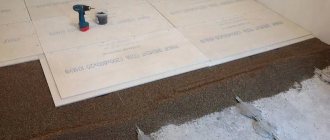
Dry screed
The base is covered with expanded clay or materials with similar properties, followed by careful compaction. Sheets of plywood and drywall are laid on top.
Pros:
- quick installation;
- absence of dirty processes (no cement or gypsum mortar is required, no need to wait for strength to develop);
- minimum weight of the final structure.
The disadvantages include instability to increased loads.
Semi-dry screed in a new building
The base is sand and cement in a certain proportion or completely ready-made mixtures. Water is added in minimal quantities.
Rice. 5. Semi-dry screed.
Advantages:
- Quick drying. After just 12 hours you can walk on the floor, even if you have screeded it under a heated floor.
- Minimum load on floor slabs.
- The surface is smooth. It does not need to be cleaned or polished.
The only drawback is that it requires special equipment to operate. But this minus is completely offset by the listed advantages. In addition, for a mechanized screed, the team that is engaged in its arrangement always has its own set of tools and devices.
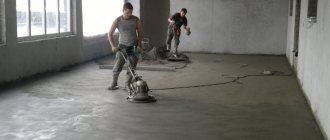
Semi-dry mixtures
For large areas, a machine method of installing a semi-dry screed is used.
This is, in fact, a slightly modified sand-cement mixture. It has a limited water content, which is why the working substance is moistened but crumbly. The lack of moisture is compensated by the addition of plasticizers and some other additives, which enhance the astringent properties of cement. Thanks to this, the strength of the finished base is higher than when using conventional concrete.
Leveling with semi-dry mixtures is now used everywhere. On large areas, the machine method of screeding is used, when almost all work processes are mechanized. On a small scale, a manual method of making screeds using semi-dry mixtures is used.
Working with such materials is done somewhat differently. The semi-dry mixture is laid in layers and compacted. When the level of the backfilled layer exceeds the horizontal line indicated by the beacons, the excess is removed by the rule and smoothed over with it. After a short time (1-2 hours), you can carefully walk on the screed. At this moment, the final smoothing of the surface is done with a metal trowel.
Floor screed - types and why it is needed
Compared with the wet method, the semi-dry method has a number of advantages:
- setting and final crystallization occur much faster;
- the laid layer is much denser, devoid of voids;
- there is no need to reinforce the material;
- There is very little shrinkage during ripening;
- the surface is stronger and does not require topping;
- the screed is flat, smooth, suitable for laying any floor covering;
- the cost of material and labor is almost identical to these indicators of the wet pouring method.
No disadvantages have yet been identified with the semi-dry method of screeding, so this technology can be called the best from the consumer’s point of view. However, building material manufacturers are developing new methods in an attempt to further optimize the process of creating a base for laying floor coverings. One of these technologies is the creation of a surface without the use of water.
Comparative characteristics of different types of screeds
| Options | Screed type | ||
| Dry | Wet | Semi-dry | |
| Technique used | — | concrete mixer | pneumatic blower, vibrating screed, trowel |
| Withstands loads from furniture and equipment | minimum | big | significant |
| Moisture resistance | minimum | average | significant |
| Lifetime | average | big | big |
| Recommended temperature | any | +5 and above | +5 and above |
| When can you walk on the screed? | straightaway | in 3-4 days | after 12 hours, after 2-3 hours you can move around in special shoes |
| When can you lay tiles or laminate? | straightaway | no earlier than 30 days | in 5-20 days |
| Load on load-bearing structures | minimum | significant | insignificant |
| Cost per sq. meters | from 750 rub./sq. meter | from 800 rub./sq. meter | from 800 rub./sq. meter |
Note! When calculating the cost, only materials at average prices from Moscow online stores are taken into account. To this amount should be added the costs of paying workers, servicing this screed, for example, during the drying or post-processing process (leveling, polishing, cleaning, etc.).
Our company offers floor screeding services in a new building at a price of 450 rubles per square meter. Absolutely everything is included in the price!
Type of structures
Types of screed structures for a new apartment can be as follows:
- Connected - it is directly adjacent to the ceiling; in this option, waterproofing and insulation are not installed; these functions are performed by the tightening layer itself. This type is designed for high loads. They are mainly used for installing floors in industrial premises.
- Floating - does not come into contact with the ceiling, consists of several layers. This type is often used in residential areas. Since it additionally provides protection from noise and moisture, as well as thermal insulation.
- Prefabricated - consists of sheet materials that can withstand the required load; materials based on wood, as well as gypsum and polymer components can be used. Which are mounted on a slatted frame. This option is characterized by quick installation and low weight of the structure. It is well suited for residential premises and can be used in wooden houses.
Why is it so important to choose the right materials?
The quality of the result directly depends not only on compliance with the technology, but also on the materials used. If the expiration date of the cement or ready-mix has already expired, it is difficult to expect that the floor will last for several decades. It will very soon begin to dry out and cracks will appear. Repairs in a new building will have to start all over again.
Basic requirements for the material:
- Sand - river or mountain. It can be washed or seeded. The faction is large.
- Cement. The brand and expiration date must be taken into account. If cement in bags has been stored for more than six months, it is not recommended to use it for critical work. The same applies to various mastics.
- Roll waterproofing. There should be no breaks or other defects through which moisture can pass.
- Fittings. Metal elements must be free of rust.
Special requirements are also imposed on sheet materials (plasterboard, plywood). They should be dry, without splinters or cracks.
How to pour a screed: main steps
Installation of a semi-dry floor screed in a new building involves the following steps:
- Dust removal, removal of any debris.
- Marking using a laser or water level for each room. Marks are placed on all walls to facilitate the alignment process.
- Determination of height differences in rooms.
- Attaching a protective coating to walls up to a height of 1.5 meters to prevent cement splashes.
- Attaching the damper tape at a height of 10 cm above the screed. It plays the role of an expansion joint.
- Installation of beacons.
- Pouring the solution with simultaneous compaction and polishing.
Rice. 6. Technology for laying screed in a new building.
How to check the quality of finished screed in a new building
The builders say the floor is ready for finishing. How can you check its quality without any special knowledge? There are some effective tips:
- Visual inspection. There should be no cracks or chips on the surface.
- Measurements. You will need a 2 meter long rail. It is applied to the floor. Standards allow gaps of no more than 2 mm for laying laminate, linoleum or parquet. If the screed is poured under the tiles, the gaps should not exceed 4-5 mm.
- Slope. The maximum permissible value is 2 cm per 10 meters.
- Strength. A wooden block is knocked on the surface of the screed. The sound should be ringing.
- Humidity. If the floor has not yet dried, you cannot start laying tiles or laminate. To check, attach a piece of polyethylene to the screed. After a day there should be no moisture on it.
If the above requirements are met, the screed is poured with high quality. It will last for several decades without replacement.
What is the best screed in a new building?
We talked about the main types of ties and their possible applications. Several conclusions can be drawn:
- Dry is recommended for wooden floors on the first floors. The main disadvantage is susceptibility to moisture. Without high-quality waterproofing, the floor covering will quickly lose its original appearance.
- Wet requires mandatory reinforcement. It is easy to install, but makes the structure very heavy. It is recommended to be used when there are significant differences in heights; it is more suitable for a garage than for a new building.
- Semi-dry allows you to quickly complete repairs. You don't have to wait a month for it to dry completely. Within a few days you can lay tiles or laminate.
If you don’t want to wait six months for the opportunity to move into your own apartment in a new building, when arranging the screed you should choose a semi-dry one. The likelihood of the slab getting wet is reduced; neighbors below will not complain that wet spots are “blooming” on their ceilings.
Self-leveling solutions
Such materials are sold in the form of packaged dry mixtures from which a working solution is prepared. The purpose of self-leveling mortars is to create a thin leveling layer on the concrete surface. The working mixture is poured onto the prepared surface and distributed over it. Due to its properties, the solution self-levels, that is, it forms an even horizontal plane. Thanks to special additives, this material quickly sets and becomes suitable for laying finishing floor coverings.
Important! It makes sense to choose such a material to create a flat surface only in cases where you need to bring an existing screed to an ideal state. The cost of self-leveling solutions, frankly, is quite high, so it is very expensive to form thick layers with such material.