Miscellaneous
Any door that is installed in a house consists of two parts: the door frame and the leaf (leaf).
The box, in turn, has two vertical beams and, depending on the design, one or two horizontal ones. The bottom beam is called the threshold. Also called an interior threshold is a decorative strip that is placed at the bottom of the doorway.
Purpose of the door threshold:
- strengthening the door frame (if the fourth beam is installed in the frame);
- smoothing out differences in height between floor levels in different rooms;
- acting as a decorative element that hides the joint and technological gap between different floor coverings in rooms.
A door with a threshold has a very important advantage compared to door structures that are made without it - it is additional insulation of the room. Depending on which door designs (entrance or interior) it is used in, the threshold allows for additional protection:
- from heat loss, dust penetration, noise and extraneous sounds (for entrance doors);
- from odors of cooking food, smoke and burning (for kitchen doors);
- edges of the floor covering from premature wear;
- adjacent rooms from water penetration (when installed in a bathroom), etc.
However, they also have their disadvantages due to the fact that the threshold has a protruding part.
- this may cause falls among residents, especially the elderly and children;
- if disabled people live in the house, this can also cause inconvenience when moving.
Let's look at the types of thresholds.
Types of thresholds
Depending on the functional purpose, thresholds are distinguished:
- straight;
- multi-level;
- final;
- angular.
A straight threshold is designed to decorate the joint between floor coverings that are located on the same level. Allows you to hide gaps up to 2 cm wide.
A multi-level threshold is used if the floor level in different rooms is different.
Corner thresholds are also used to design the junction of multi-level rooms if there is a step up to 50 mm high between them.
Types of thresholds depending on functional purpose
How to visually increase the height of the ceiling
If the room is low, you can add space to it visually:
- choose the right ceiling finish, such as a glossy finish;
- use materials of the same shade (white, milky, cream) when decorating walls and ceilings;
- highlight the boundaries between the wall and ceiling with a mirror strip;
- cover the walls with a pattern with a vertical orientation (the pattern should not be too frequent and not too bright);
- install cornice lighting (the cornice should be hung at a height of 5-10 cm from the ceiling).
LED lamps and LED strips around the perimeter of the room will visually increase its space and diversify the interior with original lighting effects.
The height of the room affects not only the cost of the housing itself and its maintenance, but also the well-being of those who live in it. This indicator determines the design options that can be used for decoration and is responsible for the comfortable atmosphere and coziness in your rooms.
Add your comment
Types of multi-level interior thresholds
Depending on the material from which the thresholds are made, there are:
- wooden;
- plastic;
- metal;
- from laminate;
- concrete.
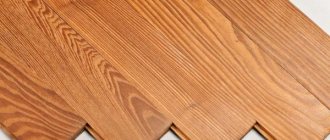
Wooden thresholds
The most common option in residential buildings is a wooden threshold. The wood from which the structure is made must be sufficiently dense, strong and wear-resistant, since it bears a fairly large mechanical load. It could be oak, beech, etc.
Wooden multi-level interior threshold
Concrete thresholds
They are mainly used in the construction of entrance doors, balconies or for bathrooms.
Plastic products
This is the cheapest option. Thresholds are available in different colors, so choosing the right color strip is not difficult.
Attention! Plastic thresholds are the least durable, since the plastic can burst due to mechanical shock, load in case of different floor levels, etc.
Metal thresholds
These are the most wear-resistant products, their service life exceeds 10 years. Different metals are used to make them. On the construction market you can find structures made of steel, brass, bronze, and aluminum.
Metal interior multi-level threshold
Stainless steel structures have a beautiful silver color with a glossy or matte finish. If the threshold is made of ordinary steel, then it is periodically painted. On the construction market there are thresholds with anodized coating.
Bronze thresholds for interior use are quite expensive and can only be made to individual orders.
Brass is also an inexpensive metal. Products made from it have a beautiful golden color.
Aluminum thresholds are light in weight, affordable and have a long service life. To give a beautiful appearance, they are painted, anodized or laminated. When laminating, the product is covered with a durable film that imitates natural materials such as wood, metal or stone.
Depending on the method of fastening, there are different levels of thresholds:
- with open mount;
- with hidden fastening;
- self-adhesive.
Threshold with hidden fastening for multi-level rooms
Threshold with open fastening differs from a product with hidden fastening in that in the first case the heads of the screws that secure the strip are visible.
When installing self-adhesive structures, fastening is done using an adhesive substance that is applied to the bottom of the plank.
Multi-level thresholds allow you to decorate differences in floor height ranging from 5 to 50 mm or even more. Both narrow and wide slats are available. Each type of product has its own permissible height difference.
We enlarge the room with wallpaper with patterns of different sizes and lighting
You can visually expand the overall space of the room using this technique.
Cover one wall with wallpaper with large patterns, and decorate all the remaining walls with plain wallpaper. If your room is not only very long and narrow, but also located on the dark side and is constantly in the shadows, then the minimally lit walls can be made lighter than the rest.
When designing a long and fairly narrow room, you need to remember that bright and very saturated colors are completely unacceptable in it. Also, sharp contrasts or transitions in color will not be appropriate. This will make the room close to a chamber type.
Bright types of wallpaper, which are separated horizontally by panels, can visually “compress” the space.
Dismantling an interior threshold before installing a new one
In some cases, repairs do not require a complete replacement of the floor covering, but only thresholds that have failed. In this case, you need to dismantle them, but you need to do this in such a way as not to damage the floor covering. The algorithm of actions is simple:
- Prepare a hammer, crowbar and hacksaw. We cut out the threshold on the sides and use a crowbar to hollow out its central part. Be sure to ensure that other parts of the door frame are not askew.
- Using a crowbar, we loosen the remaining fragments of the threshold and clear the area of dust and debris. That's it, dismantling has been completed.
Installation tools
Selected depending on the type of threshold. If this is a self-adhesive design, then a pencil, tape measure and a hacksaw are enough. If the design involves fastening to hardware, then you will additionally need a drill or hammer drill, a screwdriver, self-tapping screws and plastic plugs.
Installation of interior thresholds
You can install the thresholds yourself, or invite specialists. But doing it yourself is much more enjoyable. The entire work process is divided into several stages.
Stage 1. Performing markings.
We measure the product to the required length. Using a pencil, make the necessary markings. When using the structure on hardware, we mark the locations of the fastening elements.
Stage 2. Installation of interior thresholds.
If the threshold is self-adhesive, then remove the protective coating from the bottom of the product, install the threshold according to the markings, and glue it.
If thresholds are installed on hardware, then holes are made at the fastening points into which plastic plugs are hammered. The diameter of the holes should be slightly smaller than the diameter of the plugs.
With the open method of fixation, install the bar and screw the screws into the prepared holes.
If the fastening method is hidden, then we drive the dowels into the groove of the sill from the end of the dowel, place them above the holes and hammer them in using a wooden hammer.
It is more convenient to use fastening of interior thresholds with an open fixation method, but recently it has become fashionable to use aluminum thresholds with hidden fastening elements. This is explained by the choice of modern flooring, which includes laminate, parquet, and cork.
Installing a threshold with a hidden fastening
If there is no such hammer, then you can use a regular hammer, but you need to hit it on the bar through a wooden block. With this type of fastening, the main thing is that the holes for the hardware are located strictly on the same line.
Attention! After installation, it is necessary to check that the interior threshold does not cling to the door leaf when it moves.
How to install different types of interior thresholds is shown in the video.
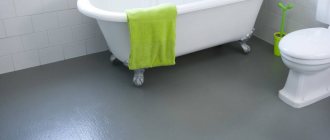
Thresholds between the bathroom and the main room
If a transition is being made between the bathroom and the main room or corridor, then it is better to use thresholds with a silicone insert, or, if a regular product is used, then additionally install it on silicone. In this case, even if there is a water leak from the bathroom, the flooring of the corridor or main room will not be damaged.
Quite often, a low step is used to connect such rooms, which also prevents water leaks from the bathroom. In this case, the edge of the step is decorated with an angular threshold. If your step is made of tiles, then in this case it is best to use a corner self-adhesive structure, since tiles are a rather fragile product and when drilling holes, chips or cracks may form in it.
Tips for new residents - 2
Roof ridge dimensions, height calculation and installation
1.Walls and doors. 2. Floors and doors 3. Bathroom walls 4. Redevelopment
Floors and doors
The slope and unevenness of the floor will also be emphasized by door blocks. With a significant slope, the gap between the door leaf and the floor is often larger at one edge of the door than at the other. This is especially noticeable under a double (hinged) door (the opening width of which is usually about 130 cm) or at two doors located next to each other (Fig. 3). In the latter case, the difference in the size of the gap sometimes seems even greater, because the doors lead to different rooms with different illumination, therefore, the light from there comes through with different intensities. Partial leveling of floor unevenness, especially at the border between rooms, can lead to the fact that the floor level of neighboring rooms will also vary. These differences can be hidden with a decorative threshold, thus a visually aesthetic effect will be achieved, but how convenient it is to constantly step over it is up to you to decide. This is only part of the problems associated with installing doors. Sometimes, with a significant slope of the floor, it is difficult to do without leveling it in the kitchen - at least so that the furniture there can line up in one line after the renovation is completed.
It can be considered a great success if the floor in the apartment has a slope towards the kitchen. Then the leveling screed made there, with a certain skill of the repairmen, can be smoothly brought to the rest of the floor.
Otherwise, there will be a difference in floor level between the kitchen and the corridor. If you try to continue the tiled floor at the same level to the front door, the difference in level with the threshold covering it, which you will constantly have to step over, will end up in the area with the most intense traffic (Fig. 4)
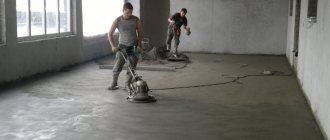
Thus, for future repairs it is important to take into account not only the magnitude of the slope, but also its direction. A radical solution to the problem is to make a leveling screed throughout the entire apartment - 8-15 USD. per m2
The cost of work for a three-ruble note with a useful area of 70-80 m2 will be from 700 to 1000 USD. In addition to increasing costs, this will entail a significant delay in repair time, because... This screed should dry (ripen) for at least 30-40 days, its residual moisture should not exceed 5%. (SNiP 3.04.01-87) As you can see, smooth ceilings and walls have many advantages; in addition to significant cost savings, you don’t have to rack your brains about how to disguise construction defects at the lowest cost. This is not to say that this cannot be done. However, here it is necessary to note one more circumstance - such tasks can only be solved by highly qualified craftsmen. Naturally, their labor will cost somewhat more than the labor of migrant workers.
see continuation - part 3. Bathroom walls M. Verikin www.otk-remont.ru
Private property! This text may be used online or in periodicals only with the permission of the author.
Threshold selection
If you choose a multi-level threshold for installation, then first of all you need to pay attention to the material from which it is made, since the load on such a structure is much greater than on a direct one.
Therefore, it is advisable to opt for a metal product. These are mainly aluminum products. In construction stores you can find models of different colors and levels. The captured surface smoothing range starts from 3 mm and ends at 2 cm. Before choosing a product, measure your threshold and select the appropriate model for correcting the level of coatings.
Aluminum thresholds are distinguished by the fact that, at a budget price, they can be used in rooms with high humidity. He is not afraid of sudden temperature changes. Thanks to the oxide film that covers the top of the product, you can choose the threshold of the desired color for your room. The plank is available in various widths, so they will make covering large gaps less noticeable. However, a wide threshold looks beautiful if its width matches the dimensions of the door frame. Aluminum is easy to process, and during installation it will not be difficult to cut the strip to the desired size.
Products are available with smooth and corrugated surfaces.
Grooved sill
If elderly people or small children live in the house, then it is better to opt for a corrugated surface, as it is less slippery. You can use a product with a rubber insert. Such thresholds are less slippery than those with a smooth surface.
Voted over 266 times, average rating 4.6
Comments
Unfortunately, there are no comments or reviews yet, but you can leave your...
Add a comment Cancel reply
We recommend reading
Miscellaneous Types of extensions for MDF doors and methods of their installation If, when installing doors, a situation arises when the wall thickness ...
Miscellaneous Independent selection and installation of seals for plastic doors Today in homes, doors and window structures made of ...
Miscellaneous Which is better for interior doors: eco-veneer or PVC When renovating an apartment, the question of replacing the door often arises...
Arches, Miscellaneous Types of wooden arches for doorways, style solutions An arch is a way of separating rooms, allowing two different zones ...
Thresholds between rooms in the apartment. 5 ways to eliminate height differences between rooms without a threshold
In the 21st century, renovation has acquired its own specific fashion trends and aesthetics. In modern design, you will not find thresholds, joints, or unnecessary parts protruding from the walls, ceiling or floor. Likewise, thresholds have become a thing of the past century, having been recognized as inconvenient and unnecessary in apartments. To lay a floor without joints, forming a single surface, is not an easy task and requires certain skills, installation classifications and high-quality materials. After all, compliance with all the features guarantees a positive and long-lasting result.
- The easiest way is to cover the laminate with a continuous layer, covering the difference, but before you start work, you should make sure that the joint between the rooms should not exceed more than 2 cm. The laminate should be chosen with a denser base in order to avoid its deformation as much as possible. Manufacturers of this coating do not recommend using laminated coatings in such cases, especially if there is a hole between the joints of more than 5-7 cm. But this option is still allowed and is actively used.
- Use of wide cork overlays. This material is quite elastic, and is perfect for differences of 2-3 cm. Due to its width, it perfectly smoothes the surface and makes the base continuous with an imperceptible defect. The only drawback is its edges; they can be felt under your feet, although not significantly, but still a little uncomfortable.
- The use of T-molding also allows you to smooth the surface; its advantage is that with the help of this plug you can fasten completely two different floor coverings; the difference range can vary from 3 to 9 mm.
- Plug with bevel. This plug allows you to remove a fairly large difference from 3 to 6 cm. It looks like an oblong “peacock” and is chosen to match the color of the material in order to be less noticeable. When installing it, a threshold is not formed, but the difference is noticeably felt.
- Sealed plug or liquid rubber plug. This work is best left to a specialist. The sealed composition, after treating the threshold, is poured into the hole between the two coverings of the rooms and smoothed with a spatula, after which the remaining sealant is removed and left to dry for 24 hours. This plug is durable and practical. The downside is that it is impossible to match it to the color and texture of the floor covering.
The absence of thresholds significantly increases the visual space and allows the interior to look more modern. This practice has long existed and is widely used. But the use of decorative thresholds will well emphasize the texture of the floor and create a cozy delimitation of rooms.
Materials and tools
To install an interior door, you will need the following tools and materials:
- sharpened pencil, carpenter's knife, tape measure and ruler;
- level - professionals use a laser level, which has perfect accuracy;
- a miter box and a fine-toothed hacksaw - the best results when cutting are obtained with a miter saw (without certain skills it can be difficult to make a 45° cut with a hacksaw);
- wood drill, hammer drill, screwdriver, screwdriver;
- screws, self-tapping screws, nails;
- hammer;
- chisel;
- mallet;
- polyurethane foam;
- wedges of different sizes - they can be sawed from the remains of timber.
For convenience, craftsmen use special stands with slots to hold the door leaf in a vertical position. This is convenient when installing hinges and locks.
Stages of work production
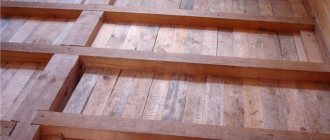
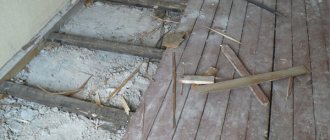
- Determining the condition of a wooden floor. The strength of old elements is checked, only healthy coatings can be leveled. If lumber shows signs of rot, then it must be replaced.
- Measurement of differences in height. To do this, you need to use a laser or water level; measurements are taken along the perimeter of the room and at several points in the middle. The choice of a specific leveling technology largely depends on the magnitude of the differences.
- Counting the quantity and selecting a range of building materials, preparing special tools.
- Carrying out work, checking the final quality of the wooden floor after leveling.
The wooden floor is leveled in several stages
In the article we will look at three methods of leveling, each of them is advisable to use for different slope indicators.
Mirrors to harmonize the space of a narrow room
A win-win technique that allows you to make a room visually wider is the competent practical use of mirrors.
In initially narrow rooms you can often find decorative finishing in the form of volumetric mirrors. You can make the floor plan as close to a square shape as possible using mirrors mounted on a long wall.
But mirrors must be used with caution and in moderation. Otherwise, the room will resemble a gym or dance hall
If you cannot boast of sufficient experience working with reflective surfaces, then it is recommended to entrust this task to a professional for practical implementation.
Floor leveling methods
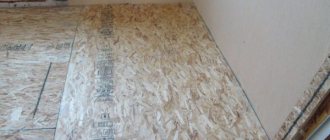
How can I level a wooden floor before laying laminate? This method is called “dry”; in this case, floor screed is not required.
The base is cleaned of putty, paint and dust that could accidentally fall on it. Having purchased an unplaned board, build logs on the base. The board should have a size of 100*40 mm. The logs are secured using anchors at intervals of 300 mm.
You can begin to create the sheathing: the logs should have crossbars that are attached using self-tapping screws. The interval is equal to the size of the sheets. Sheets of chipboard or plywood, previously treated with an antiseptic, are laid on the logs. Seal the seams with caulk.
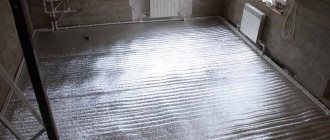
Wet" or self-leveling floor
It is advisable to use it if the height differences are insignificant (up to approximately 30 mm). In the same way, you can level the self-leveling mixture. The mixture is sold in the form of a dry powder, packaged in 25 kg bags.
It is intended for dilution with water in a certain proportion.
Each manufacturer indicates the proportions on the bag, which are important not to “overdo” and not to pour more water than required. The “viability” of the solution is a maximum of 10 minutes
When the floor preparation is completed, you can begin mixing the self-leveling mortar, which is then poured onto the surface in parts and leveled using the rule. These actions must be carried out simultaneously, so make sure that someone will help you.
The self-leveling floor dries in about a day, but this time may be shorter. The main thing is to monitor the level of temperature and humidity in the room in which you have installed the self-leveling floor.
If you are thinking about how to level the floor with a leveler, consider the working conditions in which it can be used. Let's say that the presence of a draft and a change in temperature in the room are unacceptable, otherwise the floor may crack.
Basic principles for installing laminate floors
The basic requirements that must be observed when installing laminate flooring are as follows:
Laminate floors should only be installed on a flat surface. The difference in height of the subfloor should not exceed five millimeters, as required by the installation instructions;
Installation of laminate in the direction of the light source
- Some laminate flooring requires the installation of an additional waterproofing layer consisting of a waterproof film. The price of installation naturally increases;
- The surface for installing laminate flooring must be clean and dry;
- Also, when installing a laminate floor with your own hands, you should not forget about laying a special underlay.