- July 21, 2020
- Repair Tips
- Marina Lobacheva
Tiles are a popular covering used for indoor walls and floors. In the kitchen it is used in the process of forming an apron. But over time, the material loses its original attractiveness. The grout becomes dirty and unsightly, so the question arises of how to update old tiles in the kitchen. To do this, you can use new grout, replace broken elements, or paint the entire coating.
Selecting an update method
Before transforming old tiles in the kitchen, the optimal method is selected. Its choice depends on the condition of the material, so the following recommendations are taken into account:
- if only the seams are dirty, then you can update the grout, for which the old material is initially removed, and then a new high-quality mixture is applied;
- if there are cracks or chips, you will have to completely replace the floor or wall covering;
- if defects appear on several tiles, then only these elements can be replaced;
- If you want to change the appearance of the room, it is advisable to simply repaint the existing coating, for which suitable compositions are used.
Each option is considered quite simple, so anyone can handle it. If you wish, you can decorate old tiles in the kitchen, which will transform the appearance of the entire room.
Why do this
How do you know when it’s time to make changes to your tile cladding? This question is rather individual. Everyone decides for themselves when it is necessary to carry out cosmetic repairs or change the decor in the house. However, it is possible to deduce several general situations that lead to such a decision:
- Pollution. The tile is covered with streaks, plaque or grease. The stains are difficult to remove and the seams change color.
- Obsolescence. The colors have faded and the design is no longer relevant. In addition, over time, the same design gets boring.
- Change of style. For example, you decided to change the bright fusion to a calmer and more romantic style. Bright tiles can be decorated in pastel colors.
- Repair. Replacing furniture leads to the need to select a new apron, floor and walls for it, but it is not always possible to lay new tiles.
- Defect. Chips, scratches and cracks on one or more elements.
Pollution and loss of attractiveness are the most common reasons for updating tiles.
Renewing seams
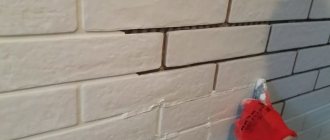
Often the main problem with the coating is the unsightly appearance of the seams. They become dirty and change their original color. Therefore, to decorate the room, the tile joints are re-grouted. Dirt between elements often causes mold or mildew to develop. The grouting process is divided into stages:
- Initially, contaminants are removed, for which special detergents and hard sponges are used;
- Next, the old grout is removed, for which you can use a toothbrush or other suitable tools;
- You can get rid of the material using vinegar, ammonia or a paste made from soda and vinegar;
- after removing the grout, you need to wait until the space between the tiles has completely dried;
- if there are elements that do not hold well or are loosely secured, then it is recommended to immediately replace them during repair work;
- the entire surface is treated with antifungal agents, which will extend the life of the material and prevent the appearance of mold in the house.
Proper grouting of tile joints can significantly improve the coating and get rid of old dirt.
Preparatory stage
The renovation begins with preparation for updating the kitchen tiles. First of all, inspect the surface that requires restoration for abrasions, cracks, chips, etc. Find out how serious the repairs are needed and which upgrade option to choose.
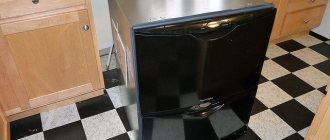
Renovation work begins when the kitchen is ready for it. Depending on what surface you have to work with, you need to rid the kitchen of everything that might interfere - when repairing wall tiles, remove all elements located directly on the tiles or nearby; when repairing floor tiles - completely remove furniture and interior items.
Applying grout
Once all the seams between the tiles have been cleaned, you can create a new grout coating. To do this, the dry mixture is mixed with the required amount of water, which makes it possible to obtain a paste that resembles sour cream in consistency. Apply grout into the space between the tiles using a narrow spatula. The material is pressed in to completely fill the seams.
The seams are smoothed using a rubber spatula. Remains of grout from the tiles are removed with a damp sponge or rag. If you need to figure out how to refresh old tiles in the kitchen, then this option is considered inexpensive and suitable. Seams dry only under natural conditions, so you cannot use a hairdryer or heat gun on them. Usually the process is completed within 5 days, but other periods may be indicated by the manufacturer on the packaging.
Is it possible to glue oilcloth onto oilcloth? Technology of pasting works
First you need to prepare the required amount of film. The calculation is made after all measurements are taken.
Having determined the length, height and width of the walls, all obtained values are multiplied and the quadrature of the treated surface is calculated. In accordance with the obtained result, they buy the required footage of oilcloth. In this case, it is worth considering allowances for material with a pattern. In this case, it is better to purchase more material, since during pasting you will need to combine the images.
Oilcloth in the bathroom interior
Work always begins with dismantling the old coating. Remove the remaining paint and whitewash from the walls, remove the plaster. After this, the surface is leveled with putty, and when it dries, it is carefully primed.
Many people are interested in how to glue oilcloth to the wall in the bathroom. For such material, the well-known types of glue “PVA” or “Bustilat” are usually used. They are easy to prepare by following the instructions on the package. After this, the composition must be left for some time to swell.
PVA or Bustilat glue is suitable for film without a base or with a fabric backing. When finishing with paper-based oilcloth, a special adhesive mixture for vinyl wallpaper is also used.
It is advisable to pay attention to the production date of the glue. The composition must be fresh
Adhesive "Bustilat" for film finishing of walls
As soon as the glue for the oilcloth has infused, you can directly begin cladding the walls. The principle of operation is very similar to wallpapering. The mixture is applied to the cloth in a dense layer. You need to coat all areas with glue well, including the corners. Otherwise, when fixing the film on the wall, air bubbles will form.
Replacing the coating
If the coating is unattractive or has many defects and chips, then you will have to completely replace the material. To do this, the old tiles are broken, and then new elements are laid.
Sometimes it is enough to replace part of the coating, which allows you not only to update it, but also to create an unusual accent by using elements of a different color.
The result is at your disposal
Now you can congratulate yourself on your new achievement - laying tiles yourself. If you follow these rules, the result will definitely be successful. It is important to show attentiveness, perseverance, accuracy and responsibility. And your loved ones will definitely rejoice at the results of your diligence.
Replacing some tiles
If only some elements of the coating are damaged or cracked, how can you update old tiles in the kitchen? To do this, you can only replace damaged tiles. Often, some elements are completely removed to create an unusual pattern using new tiles.
When dismantling individual tiles, it is important to act carefully so as not to damage adjacent elements. It is not recommended to select material of a similar color, as new colors or textures will look more attractive. Features of the work include:
- simultaneously with replacing some tiles, it is recommended to immediately update the seams between the elements, as this will not only simplify the dismantling process, but also allow the new parts to be fixed more securely;
- if there are small scratches or cracks on the remaining coating, they are filled with cement mortar, and the remaining irregularities are removed with ordinary sandpaper;
- tiles repaired with cement can be painted in any suitable shade, for which purpose a paint specially produced for tiles is selected;
- Instead of cement, it is allowed to use alabaster or other building compounds sold in various stores.
When installing new tiles, it is important to use a building level to avoid significant differences.
Alternative options
When deciding how to wallpaper in the bathroom, you can use alternative options, use oilcloth for the walls, self-adhesive PVC film, liquid wallpaper or glass wallpaper. Let's consider these options in more detail.
Oilcloth for walls
An inexpensive but practical solution is oilcloth for bathroom walls. This is a completely synthetic material that is not afraid of moisture:
- To glue the oilcloth, you can use PVA or Bustilat glue.
- The glue must be evenly applied to the entire oilcloth panel, since if you leave areas ungreased, an air bubble will form in this place.
- Before gluing the oilcloth, you need to treat the walls with primer or glue diluted with water.
- Start gluing the oilcloth from the corner; to smooth it you need to use a soft cloth or roller.
Self-adhesive PVC film
This is another inexpensive option for wall decoration. When using this material there is no need to use glue, the film is self-adhesive. Pasting the film is no more difficult than wallpaper; it is cut into strips of the required length, and then applied in place and the protective paper is carefully removed, while smoothing the film.
Liquid wallpaper
This name is given to water-based plaster, which after completion of the work becomes one hundred percent moisture-proof. Liquid wallpaper for the bathroom is applied using a sprayer or manually using a trowel and a plastic grater.
Glass wallpaper
When choosing moisture-resistant wallpaper for the bathroom, you should pay attention to glass wallpaper. The basis of this material is specially processed glass
The raw material is heated to high temperatures, then fibers are pulled out of it, from which the base of the wallpaper is then created.
That is, fiberglass is woven together like threads on a loom. The created canvas undergoes additional processing, due to which the material acquires a stable shape.
Fiberglass wallpaper is created from natural raw materials. The main raw materials for their production are quartz, clay, and dolomite. Therefore, the material is environmentally friendly. Why should you use fiberglass wallpaper in your bathroom? Their main advantages:
- Breathability. Such wallpaper in the bathroom will not interfere with natural air circulation, and this will prevent the growth of mold fungi.
- Hygiene. Walls covered with fiberglass wallpaper can be washed using detergents that do not contain abrasives.
- Durability. If the walls are decorated with fiberglass wallpaper, then the repairs will not need to be repeated for a long time. If you want to update your interior, you can simply repaint the wallpaper.
- Strength. Despite the fact that the basis of such wallpaper is glass, they are distinguished by a high level of strength.
- Moisture resistant. Like ordinary glass, wallpaper based on this material does not collapse under the influence of humid air and is not afraid of direct contact with water.
- Fire safety. This material does not support combustion and does not emit toxic substances when heated.
Waterproof glass wallpaper will allow you to create a beautiful and durable coating with minimal effort, ideal for finishing bathroom walls. This is the most durable option of waterproof wallpaper, but it also costs significantly more than vinyl-based wallpaper.
Wax restoration
If there are small cracks or abrasions on the tile covering, then the question arises of how to restore old tiles in the kitchen. The process is easily done using wax, but this will only cope with minor problems.
High-quality wax restores damaged elements and also protects the tiles from further damage. Before using it, the surface is thoroughly cleaned of dirt and then dried. It is advisable to use a degreaser to increase adhesion. The wax is applied with a fusing agent, with the help of which the mass is heated, which makes it more plastic. When applying the composition to cracks, it is recommended to use the material with a small margin, since shrinkage occurs after hardening.
Once the wax has hardened, the entire tile surface is covered with a special protective material. Varnish is used to add gloss. If you figure out how to update old tiles in the kitchen, you can not only improve the appearance of the room, but also extend the life of the material.
DIY apron for the kitchen.
Good day, dear visitors of the site rems-info.ru.
I want to tell you about a solution to a problem that almost everyone who moved into a new apartment with finishing from the developer has encountered. As a rule, in a modern new building, a protective wall apron in the working kitchen area (which protects walls and wallpaper from splashes of water, grease, etc.) is simply not provided. And if you are not going to make a new renovation in the near future and have already spent a lot on purchasing kitchen furniture, then I will tell you a simple, and most importantly inexpensive option for decorating a kitchen apron with your own hands, which will allow you to forget about this problem for a year or two. To do this you will need:
- Kitchen oilcloth. The one that is usually used to cover the table. We choose medium thickness, any color and shade or colorless - it’s just a matter of your taste. The standard width is 140 cm. The length depends on the size of the kitchen and the width of the desired apron. Prices for this product are reasonable and vary widely.
- Furniture stapler with staples. I already had a stapler, but it is better to purchase staples with a greater depth, for example 12-14 mm. The price for boxes of 1000 pieces is around 100-200 rubles.
- Scissors, stationery knife, measuring tape and other available tools.
- A little imagination.
So, let’s move on to decorating an apron in the kitchen from oilcloth with our own hands.
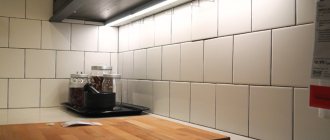
These were the usual nondescript walls in our kitchen.
We went to the store to get the necessary materials. The choice of oilcloths is huge.
Prices are approximately in this range.
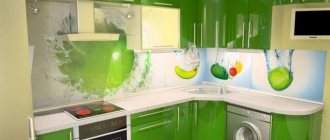
I opted for a bright, kitchen-themed oilcloth.
It all depends on the color of the wallpaper and kitchen furniture. You can lay the same oilcloth on the table, then you will have two bright, well-combined accents.
In the same store we buy furniture staplers and staples.
We bring all this home and move on to the main lesson. You need to carefully measure the length and width of the piece of oilcloth you need. Keep in mind that you need to run along the wall behind the worktop in order to protect our wallpaper there too. Since oilcloth is a very easy-to-work material, you can easily measure the length, cut out sockets, switches and other elements. If the work area is corner, then simply wrap the oilcloth on another wall.
After we have measured and cut out the necessary sections, we begin to attach them to the wall with a furniture stapler.
This is quite difficult, since the walls are not made of wood, but of brick or concrete. It is better to use brute male power. We apply the oilcloth evenly, if you have cabinets hanging, then directly under them, but if the wall is not loaded with anything, then simply along an even line (you can even mark it with a pencil).
We continue in the same spirit with an interval of 10 - 15 centimeters.
When you have secured the oilcloth along the entire length of the working area, secure the joints and edges of the sections in the same way. Cut holes for sockets, switches and other elements that cannot be secured from above.
If you plan to have any shelves, holders, dryers, etc. in your work area, then we attach it all to our finished apron. Again, due to the fact that this is oilcloth, there will be no problems with drilling and screwing in screws.
In this photo you can clearly see how the socket is cut out, and the holders for all sorts of kitchen little things are already attached to the apron.
I advise you to make the protective apron higher above the kitchen stove, since in this area the walls get dirty the most - droplets of fat fly from a heated frying pan, steam from a boiling kettle settles.
This is how we quickly and cheaply made a kitchen apron with our own hands, giving it a bright accent in our kitchen in soothing colors.
As you can see, nothing complicated! A little time, a little expense, a little imagination and such a small but important problem has been solved. I hope your apron will serve you until major renovations! Good luck!
Dyeing the material
If a person is thinking about how to improve old tiles in the kitchen, then painting the surface is considered an excellent choice. For this, water-based or acrylic paint is selected. You can even use different designs or stencils. Often several types of paints are used, which allows you to create accents or unusual color transitions.
Before starting work, the base is carefully prepared, which must be well cleaned of dirt, leveled, and also treated with a degreasing compound.
Glue it correctly
There are different options for attaching such stickers. They can be fixed to the surface with double-sided tape, attached using a suction cup, or any other sticky base. Before gluing, you need to thoroughly wash the walls with a degreaser, then wipe dry or wait for natural drying. If you rush it, the stickers won't stick well.
When the walls are ready, remove the protective layer from the sticker and apply the sticky side to the surface, carefully smoothing it, moving from the middle to the edges. If the sticker is large, make sure that no bubbles form that will ruin the whole picture. If an unevenness has formed, carefully peel off the sticker to this place and glue it again. This can be done several times to achieve the desired effect. Do not pull too hard, otherwise the sticker may tear.
Bathroom
Vinyl stickers with a marine motif look harmonious in the bathroom: dolphins, starfish, fish, palm trees. Pictures with animals, plants, and various landscapes do not lag behind in polarity.
Kitchen
In this room we use a kitchen theme. These could be delicious fruits and vegetables, kitchen utensils. The tea and coffee theme looks especially cute and stylish here (all kinds of cakes, cups of coffee, teapots and coffee grinders).
You can create geographical stories, and you will have a piece of India, France or Scandinavia. Funny animals traveling along the walls or bedside tables will look interesting in the kitchen. These could be characters from your favorite cartoons. It is possible that such pictures will please children more. It will be more pleasant for the kids to dine in their company.
If you choose floral motifs, they will add romance to your interior. There is no need to add anything to them.
Dyeing process
Painting old tiles in the kitchen is a simple process that you can do yourself, even if you have no experience. The procedure is divided into successive stages:
- Initially, the base is prepared, from which dirt is removed, and cracks are filled with cement or other building mixture;
- areas that should not be painted are covered with masking tape;
- a calculation is made on the basis of which it is determined how much paint needs to be purchased for the planned work;
- a coloring composition is purchased, which must be resistant to moisture, suitable for use in residential premises and of high quality, and it is advisable to focus on well-known brands;
- paint is applied using different tools, which include rollers or brushes, and you can also use a spray gun, with which a uniform coating is formed;
- stencils are used to create drawings, and unnecessary areas can be sealed with masking tape;
- It is recommended to create at least two layers, and before applying the second coating you need to wait for the first layer to dry;
- if you need to work in hard-to-reach areas, you have to buy brushes of different sizes.
After the last layer has dried, it is advisable to apply varnish on top to ensure a long service life of the coating.
General information
The oilcloth for the table is made from laminated protective transparent PVC film. Production - South Korea.
The product has a shiny laminated surface and reliably protects the table from any damage. The oilcloth structure is flexible and durable. It is tear-resistant, practically does not wrinkle and cannot be cut with a knife. Soft glass remains transparent for a long time and retains all its properties.
Thanks to the flexible tablecloth, wear and tear on the tabletop is reduced. Dust on the surface covered with a protective film is practically invisible, any dirt can be easily wiped off without scratching or staining the table material.
Flexible glass is intended for use:
- in any office;
- in the kitchen;
- in the dining room;
- in a restaurant (cafe).
Which table is it suitable for?
Protective film is suitable for all types of tables, but is especially relevant for glass and lacquered ones. The tablecloth protects the kitchen table from cuts, the desk from rubbing, and the dining table from accidental stains.
It can also be any table in shape:
- rectangular;
- square;
- round;
- oval;
- non-standard shape.
Main characteristics
Before purchasing the product, you must select the thickness:
- 1.2 mm is used to protect chests of drawers, window sills, children's and school tables;
- 1.8 mm is well suited for the kitchen (protection of tables and countertops), children's (protection of desks) and office (protection of tables and window sills);
- 2.2 mm is designed to protect large surfaces and helps emphasize the premium quality of the interior.
Liquid glass on the table has the following characteristics:
- Duration of operation - up to 5 years;
- transparency - 98%;
- hardness - 37;
- blue pigment that protects against yellowness;
- resistance to sunlight;
- food standard - the material is allowed for contact with food;
- synthetic smell - absent;
- There are no heavy metal impurities in the composition.
Advantages of flexible glass
Main advantages of the product:
- easy to trim after shrinkage;
- has a comfortable temperature range - from –20 to +80;
- merges with the surface;
- just spread out;
- does not slip, lies well under its own weight;
- greasy stains are not eaten away;
- any dirt is easily removed.
If you want, you can decorate the tablecloth. Any stickers can be easily attached to the silicone surface. You can also paint it with permanent paint, or attach fringe around the perimeter.
Decorating with film
People interested in how to update old tiles in the kitchen often choose decorative film. It has an adhesive base, so you don’t have to buy additional adhesives. Typically, this film is chosen for a kitchen apron.
The film is available in different textures and often has unique patterns. Therefore, with its help, the appearance of the room radically changes. Before gluing it, it is necessary to take measurements, and also thoroughly clean the tiles from dirt or grease. The gluing process is considered simple, but the material must be smoothed out quickly to prevent the formation of bubbles.
If voids nevertheless form, they are pierced with an ordinary needle, after which they are carefully smoothed to the base. If you provide this coating with optimal care, it can last for quite a long time. It can be replaced at any time, allowing you to regularly update the appearance of your kitchen.
Prints and designs
A story-based game in the kitchen will be interesting. You can use small vinyl decals for certain areas: workplace, dining room, relaxation area. You can creatively design locations in the form of silhouettes of animals (cats, penguins, curious dogs) reaching for the switch, looking into the refrigerator, simulating a burn over the stove. You can also put funny marks or signs on the stove, like road signs, which will act as signs in the kitchen for everyone except mom.
10photos
An authentic style will be provided by a vinyl sticker in the form of a strip depicting national ornaments of Scandinavia, the East, India, and France. This could be an azulejo, Gzhel, Khokhloma, or paisley pattern. For the Provence, botanical style, it is better to use floral motifs, ornaments based on the Groovy floral motif (cartoon style), tropics. In the kitchen, in the rays of sunlight breaking through the window, the Aztec Tribal print, the New Year's Fair isle with snowflakes and deer, the “emotional” theme of the East with sakura, stylized prints of dragons, tigers and fish will look amazing.
9 photos
Some will be drawn to military shades and camouflage colors, others will be crazy about rainbow stains in the hippie style (Tie-Dye). Also, do not forget about three-dimensional images of flowers, baskets of fruits, vegetables, and sweets. Make your kitchen look like a stylish candy bar with tile stickers featuring cupcakes, lolly pops, muffins, lollipops, gingerbread men, and more.
13photos
Painting
Rarely does anyone think of updating the tiles by simply painting them a different color. And in vain - if everything is done correctly, it will turn out very original and aesthetically pleasing. It is important to develop a concept for the appearance of the future apron. The easiest way to perform geometric elements.
Painting with a roller will be more even and of higher quality than with a brush.
By changing the direction of painting, you can create a pattern of light texture on the tile.
A special paint is chosen for painting tiles - epoxy paint is best suited for this role, which does not spread over a smooth surface and has good waterproof and heat-resistant qualities. Epoxy paint retains its appearance and brightness for almost 10 years.
Important : The tile can be painted entirely or a pattern can be made on the apron. To make the pattern smooth and aesthetic, its contours must be limited with ordinary electrical tape or masking tape.
Before painting, the tiles must be washed, lightly sanded, degreased with acetone and primed. Next, paint is applied. After the paint has completely dried, you need to renew the seams using new grout. This apron will look like new.