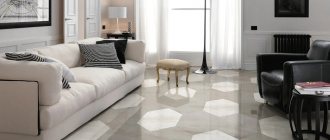
In rooms with high humidity, the best flooring option is tiles. Despite all the advantages of this material, the tiles are not very pleasant to walk on barefoot, as they are quite cold to the touch. That is why installing an electric heated floor in the bathroom is a reasonable and rational solution to ensure the comfort of staying in the bathroom and carrying out water procedures.
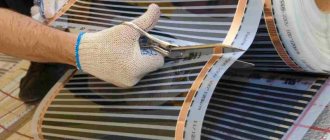
For do-it-yourself installation under tiles, electric mats are most often used - ready-made solutions that are a heating cable attached to a mesh, often self-adhesive, base. Their installation is simple and convenient, and when installing, the mesh can be trimmed and bypassed around plumbing fixtures and furnishings installed in the bathroom.
Types of systems
The main advantage of underfloor heating is to evenly heat a large area, which is necessary with the onset of cold weather. A warm floor can become either the main source of heating the bathroom or an additional one. This solution is much more profitable than using a traditional heater or battery.
There are two main types of heated floors for bathrooms under tiles - water and electric. It must be connected to the central electrical panel; an additional switch will be required.
You can, in principle, heat a tiled floor using any heating system available on the building materials market:
- water;
- electrical, including: resistive (represented by heating cables and mats); infrared (film and rods);
- combined - electric-water.
However, the first system you come across is not suitable for every room. Here it is necessary to take into account various factors influencing the choice of type of heating, as well as the advantages and disadvantages of the listed floor heating systems.
Which, in your opinion, is the best heated floor?
WaterElectric
Installation of an electric heating system
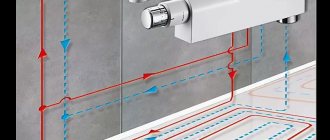
Let's look at the example of a cable-type system, since it is this type that is most often installed in bathrooms:
- the prepared base is marked in accordance with the drawn up diagram. The laying pitch varies in the range from 80 to 120 mm;
- we drill a horizontal recess in the floor to install a temperature sensor between the markings of the future cable;
- we lay profile tapes for fastening the cable;
- To begin with, simply unwind the cable. Its cold end is connected to the thermostat;
- we install the coupling in a recess in the floor so that the cable does not overheat and the connection point to the coupling does not become deformed;
- We lay the cable according to the markings and fix it in the tape, after which we connect it to the temperature controller. When laying, make a distance from the walls of about 5-7 cm;
- testing for serviceability;
- Apply a layer of tile adhesive over the cable and lay the tiles. Apply glue to 1 square meter of surface, since when applying to a large surface, you may not have time and the glue will dry out;
- We wait for it to dry (at least 30 days) and put the system into operation.
Factors influencing the choice of heated floors
The choice of a tile floor heating system depends on a number of factors:
- functional purpose of underfloor heating;
- thickness of cement screed;
- type of heated room;
- costs for the purchase of equipment and operation (it is assumed that installation will be carried out on its own).
Functional purpose. The power and type of underfloor heating is decisively influenced by the type of heating: main or additional. For example, calculations show that even the most efficient infrared heated floors in terms of energy consumption are not affordable for the vast majority of the population when heating a living space on an ongoing basis. There is no alternative to water heated floors.
When using a heated floor as an additional source of heating, on the contrary, you need to install one of the types of electric floor.
Screed. The thickness of the screed is important in apartments with low ceilings, as well as in the bathroom, where the floors, according to SNiP, should be slightly lower than the main floor. For this reason, installing a water heated floor in the bathroom is excluded - it will certainly rise in relation to the corridor and rooms.
Room type. The type of room affects the choice of heated floors in two ways.
1. Calculations show that large areas can be effectively heated with water heated floors . In small rooms it is better to install electric heated tiles.
2. In apartment buildings, the legislation of the Russian Federation prohibits the installation of water heated floors. The reasons are as follows:
- connecting a water floor to central heating disrupts the temperature balance in the entrance apartments;
- a thicker screed together with porcelain tiles increase the load on the floor, which is not designed for such operating conditions;
- difficulties arise in taking into account the consumed thermal energy;
- in the case of a bathroom, the requirement of regulatory documents for a lower floor is violated.
Cost of operation. Comfort always costs money, but not at the expense of the standard of living. Therefore, when choosing the type of tile floor heating, it is necessary to find a balance between the price of the equipment and the cost of its operation with family income. It must be remembered that cheap equipment is not always economical. Sometimes it is better to spend a lot of money initially, but get savings later.
Based on the above factors, as well as the strengths and weaknesses of each type of heating, we will compare all types of heated floors with each other.
Mermen
This type of heating system is suitable for heating large rooms. The main element that creates heat is a built-in network of pipes filled with hot water and located around the perimeter of the entire room. Great importance is given to the material that conducts heat from the pipe to the tile; a concrete or wooden base is usually used.
The main advantage of a water floor is uniform heating of the room, and not just its top layer.
The advantages of this type are also called:
- Safety.
- Provides uniform heating of the room, creates comfortable conditions for people. Maintains optimal temperature – 22-24 degrees. You can walk on this floor barefoot, it does not cause pain.
- Low power consumption and high-quality heating of the bathroom.
- Prevents the growth of fungi and mold, which can cause harm to human health. Dries the air and eliminates high humidity from the bathroom.
- Water pipes are hidden under the tiles, so they do not spoil the interior or make it heavier. There is no interference in the form of radiators.
A water floor, unlike an electric one, will be more difficult to install. Therefore, it is recommended that craftsmen with at least minimal experience in repair work undertake such work. Handle water pipes very carefully as they can burst if not installed correctly.
Electrical
An electric floor is inferior to a water floor in terms of durability and safety: there is, although minimal, the risk of exposure to electric current. At the same time, electric flooring has clear advantages:
- Compatible with any type of flooring. Depending on the thickness of the material, the power of the electric floor changes.
- Simplicity of installation and ease of cable installation.
- Does not spoil the interior due to the lack of visible parts.
- It is possible to regulate the floor temperature using a thermostat.
- Installation does not require special tools.
- Uniform heating over the entire area of the room.
An electric floor is more expensive than a water floor and can create an electromagnetic field. However, this type of heating system is competitive and is very popular.
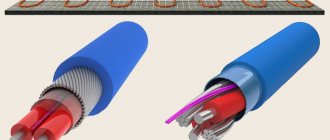
Cable system
One of the simplest floor heating systems. It is an electrical wire with a conductive core characterized by high resistance. The current flowing through it causes heating of the cable and, accordingly, activation of the system.
Cable devices come in single- and double-core types. Cables with one core are cheaper, but their installation is somewhat complicated by the need to pull both ends of the cable to one point when connecting to the power supply. When working with two-wire analogues, this is not necessary, since the two conductive cores located inside are already connected to each other, there is no need to bring them together when connecting. Fire prevention can be prevented by the presence of insulation and a screen on each core.
Speaking about the cable system, it is worth highlighting the self-regulating cable. Instead of a conductor, it contains a semiconductor. Thanks to this design, the cable resistance depends on the ambient temperature. In other words, the heating process is adjusted automatically based on the room temperature. The use of a self-regulating cable prevents system burnout and ensures more economical energy consumption.
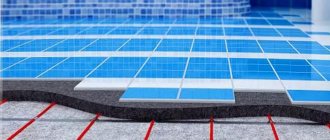
All cable systems are laid on the floor in a snake pattern with a certain pitch, a thin layer of screed (30–50 mm thick) is placed on top of it, after which it has dried, you can begin laying the tiles.
Heating mats
The basis is two-core heating cables, which are attached to a special mesh. The cable pitch is already set, usually it is 9 cm. The average width is 50 cm, the length depends on the brand and model of the material. The convenience of heating mats is due to the ease of their installation, the ability to cut the plastic base and perform the necessary turns and bends of the system. The advantage is the ability to abandon the screed and lay the tiles on top of a thin (8–10 mm) layer of tile adhesive. This is due to the use of small diameter cables in the mats.
Infrared film
This is a relatively new type of heated floor, which is a multi-layer “pie” with carbon strips as a heating element. They are placed on a non-conducting substrate. Electricity moves to the heating strips through conductive wires made of copper or silver; the carbon strips are covered with a top protective layer on top. A characteristic feature of the material is its small thickness - 0.4 mm, the maximum heating temperature rarely exceeds +50ºС. This makes the infrared floor optimal for “capricious” floor coverings that are unstable to high temperatures (linoleum, carpet, parquet).
If we talk about laying infrared film under the tiles in the bathroom, then you cannot do without a pouring system. This is the only way to install infrared heated floors in rooms with high humidity. Not every type of this device is approved for use under a wet screed. A type of infrared heated floor are systems where the heating element is laid out not in stripes, but in a continuous layer.
Infrared heating is considered the safest because the heat emitted is similar to that given off by the sun.
Infrared heating rods
This type of floor combines the features of cable and film flooring. Instead of carbon strips, it uses carbon rods, which are also mounted on a thin, non-conductive base. The finished product does not heat up like a cable analogue, but unlike a film floor it can have a higher heating temperature (+50–60ºС) and several types of installation to choose from (in a screed or on a layer of tile adhesive).
Electrical systems have their positive and negative properties. To make an informed choice of heated floors, let’s put them in a table.
Table 1. Comparative characteristics of electric heated floors.
| Characteristics / Floors | Cable | Heating mat | Film infrared | Rod infrared |
| Laying method | Placed under a cement screed with a thickness of at least 30 mm | Places directly under tile adhesive | Placed under gypsum fiber sheets (gypsum fiber sheets) or under cement screed with a thickness of 8-10 mm | Places directly under tile adhesive |
| Economical | Average | Average | High | Very high |
| Security level | High | High | High | Very tall |
| Warm-up method | Uniform convection | Uniform convection | Heats objects | Heats objects |
| Set price | Depends on the cable. Can vary from low to high | Average | High | Very high |
| Reusability | No | No | Eat | No |
| Electromagnetic field | 0.25 µT | 0.25 µT | Hardly ever | Hardly ever |
| Life time | More than 30 years | About 50 years | More than 30 years | About 10 years |
| Guarantee | 15 years | 20 years | 20 years | Up to 5 years |
Based on the parameters given in the table, you can more consciously determine which electric heated floor under tiles is better.
Preparatory activities
The correctness of the preliminary work determines the reliability and efficiency of the heating system. At this stage, you can clarify the main technical characteristics and additional user requirements for ease of management.
Design
To efficiently heat rooms, a simplified proportion is used - 10 kW of power per 100 sq. m. heated area.
The exact calculation is carried out taking into account:
- climatic conditions in the region;
- orientation of the room relative to the cardinal directions;
- the presence of window (door) openings;
- insulation parameters of external walls;
- ventilation mode;
- ceiling heights.
The circulation pump is part of the water heating system.
The water heating system includes:
- boiler;
- circulation pump;
- pipes;
- manifold with regulators;
- outlet for draining liquid;
- fittings, splitters, taps, other piping components.
To simplify the calculation, data corresponding to typical initial conditions are used. This approach eliminates complex calculations involving pressure, aerodynamic drag and other parameters.
If the diameter of the pipes is 16 mm, the length of one circuit is made no more than 80 ± 10 m. On the heated site, working lines in the shape of a spiral or “snake” are created from these elements. The laying step is reduced (5-7 rows) near window openings and external walls. Empty areas are left under furniture and plumbing fixtures.
The table shows the parameters that can be used for the calculation.
| Laying step, cm | Recommended water temperature, °C | Total pipe length for 1 m² of area in linear meters |
| 10 | 33 | 10 |
| 15 | 35 | 6,7 |
| 20 | 38 | 5 |
| 25 | 40 | 4 |
| 30 | 43 | 3,4 |
A special program will simplify the creation of the project.
With its help you can:
- draw a floor plan with window and door units, a laying diagram;
- examine the 3D layout from different angles;
- calculate the parameters of the heating system using the characteristics of the boiler.
Using a computer, you can create a heated floor project.
A power supply connection diagram, a thermostat and an RCD are added to the project with electrical components.
Preparing the kit
The composition of the functional components determines the type of heated floor. When installing water heating, you need to study the features of the material from which the pipes are made (see table).
| Material | Advantages | Flaws |
| Steel | Low price | Destruction by corrosion, difficult installation |
| Stainless steel (corrugated) | Durability, strength | High price |
| Copper | Plasticity, long service life, resistance to corrosion and temperature changes | High price |
| Polypropylene | Easy installation | Large number of welds |
| Cross-linked polyethylene | Resistance to mechanical damage, tight connections | Large permissible bending radius |
The list of other components is compiled according to the approved project.
Preparing the base
The interfloor concrete slab floors are cleaned and large differences in height are eliminated. Seal gaps and cracks. To create waterproofing, polyethylene film is laid overlapping.
To prevent heat loss, lay a layer of any material:
- polystyrene foam;
- expanded polystyrene;
- mineral wool;
- traffic jams;
- foamed polyethylene.
To prevent heat loss, foam is used.
Foil placed on top will direct the IR radiation towards the room. The perimeter is covered with damper tape. The pipes are fixed with fastening angles.
Comparative analysis of two systems
A comparison of electric and water floors is presented in the table, which reflects the main points that are important during repairs.
| Criterion | Electric | Water |
| Cost price | It wins in terms of installation complexity, but the cost of materials is much higher. You will need to additionally purchase a temperature sensor and the cables themselves. | The main disadvantage is the complex installation (due to lack of experience). You only need to buy water pipes and installation mats |
| Safety | It is comfortable to walk on such a floor not only in shoes, but also barefoot. The risk of electric shock is extremely small and may occur in the event of a rare electrical short circuit. | Water pipes are absolutely safe for human health. Possible leaks |
| Reliability | High degree of strength, durability. The cables themselves cannot fail; over time, it may be necessary to replace the temperature sensor or power regulator | Durable and reliable water circuit. In case of leakage, you will have to completely remove the screed and replace it with a new one. |
| Power | Range from 15 to 30 degrees. | Temperature up to 50 degrees |
Electric water heated floor
For scientists and engineers, all the most interesting ideas arise when they try to combine seemingly incompatible things into one system. This happened when creating an electric water floor. Technically, the solution was presented in two versions of heated floors:
systems (XL Pipe) from the South Korean company Daewoo Enertec, where antifreeze (liquid) was poured into a hermetically sealed channel made of heat-resistant plastic and a nickel-chromium heating cable was placed. The current passing through the cable heats it up, and it, in turn, heats up the antifreeze.
Schematic diagram of XL Pipe underfloor heating. When the set temperature is reached, the power supply stops, and the antifreeze, which is constantly in a static position, maintains the temperature in the room for a long time. Such a heating system allows you to abandon expensive devices and units: pumps, mixing units, boiler, collectors, etc. There is no need for constant maintenance of the boiler, just like the boiler itself. This allows you to significantly save the family budget.
Capillary electric heated floor UNIMAT AQUA (manufacturer Caleo, South Korea). This system is more like water heating. Only instead of a boiler, a special device is used to heat the water, and centimeter-diameter pipes with liquid coolant have replaced thin tubes with a small diameter. The system contains only 6 liters of distilled water, which allows the device to heat the liquid relatively quickly.
The system is closed. The movement of water through the tube occurs due to the difference in pressure at the hot and cold ends. The disadvantage of this system is the same as that of a classic water-heated floor: passing through the tube, the water cools, which leads to uneven heating of the floor covering.
The strengths of such systems are as follows:
- no expensive and bulky components and assemblies are required;
- automatic control;
- overheating is eliminated, and therefore can be mounted under furniture;
- suitable for all existing types of flooring;
- quick access to the specified heating parameters;
- safe operation - no harmful radiation;
- economical consumption of electrical energy;
- quick and easy installation.
Relative disadvantages include a short service life - 5-10 years. It is not yet possible to test it in practice, since the systems went on sale less than 5 years ago. The short service life, only a couple of years, does not allow us to talk about shortcomings.
There are only positive reviews on the forums so far. Naturally, there are also negative entries. But none of the critics gives specific examples and facts, only general reasoning. The editors of the portal also do not take the liberty of giving final assessments of such tile floor heating systems.
Standard laying scheme:
- concrete base or screed;
- waterproofing;
- foil insulation;
- heating system pipes;
- screed;
- glue;
- tile.
Conclusion: the emerging innovative system is of interest for heating small areas due to low energy consumption and the average cost of the set (about 10.0 thousand rubles). However, the short service life makes the use of this type of heating for tiled floors problematic - replacement will be both time-consuming and expensive.
Recommendations
Underfloor heating is an excellent option for maintaining a dry and warm atmosphere in the bathroom. The floor can be either water or electric, it depends on the personal preferences of each person.
Just remember to follow the rules for installing the chosen structure, and if you don’t understand this, then make the only right decision - seek the help of a professional.
- Related Posts
- How to design a heated floor?
- How to choose a wire for a heated floor?
- Pros and cons of heated floors
- How to install Grand Meyer underfloor heating?
- How is xl pipe heated floor installed?
- Which floor covering to choose for heated floors?
What is better to choose
From the analysis of heated floors, several interesting conclusions can be drawn.
- In the private sector, any heating system can be used under the tiles. The apartments have only electric ones.
- Water systems are the most economical for the main heating of a private home. Electric heated floors can be used as additional floor heating in different areas, for example, in the bathroom, on a glazed balcony (loggia) and in the toilet.
- In apartments, the use of electricity for heating on a constant basis is ruinous, only as an additional one.
Advantages and disadvantages
Warm floors in the bathroom under tiles, like any technology, have a number of disadvantages and advantages. Some believe that an electric floor can give a person an electric shock and that ceramic tiles will prevent the room from heating evenly because they do not conduct electricity well. If the warm floor is installed correctly, it will not cause any problems.
Consider each of them in detail in the table below.
| Pros of heated floors in the bathroom | Disadvantages of heated floors in the bathroom |
| The ability to evenly warm the room, and not just its upper layers, and reduce the level of air humidity | The need to install special equipment under the floor to be able to heat the room |
| Heating mats and infrared equipment do not pose a threat to the human body | To install a heated floor in the bathroom, you will have to disassemble the tiles, even if they were laid quite recently |
| The level of electromagnetic radiation is extremely low (for comparison, the EMI of heated floors is lower than that of a TV) | Difficult to install without special experience (this problem can be solved if you approach the task responsibly and strictly follow the instructions) |
| Reduces indoor humidity levels | |
| Full control over the heating level |
Also, do not forget the fact that heated floors in the bathroom under tiles prevent the appearance of mold and mildew, for which high humidity and heat are the most comfortable living conditions. A high-quality floor dries out the air and prevents the proliferation of harmful microorganisms, which is also an undoubted advantage.
The best manufacturers and models of heated floors for tiles
To protect yourself from problems in the future when purchasing heated floors, it is better to buy products from trusted manufacturers. Although a little more expensive, you will have to pay for the brand, but with a guarantee of excellent quality. The ranking of the best manufacturers includes enterprises from Germany, Belgium, Russia, Sweden and other countries.
Valtec. The most famous brand of warm water floors in the CIS countries. The head office and equipment production are located in Russia. The pipes are made in Italy. Valtec products compare favorably with imported analogues due to the price of the kit and a long warranty - 10 years. Liability to customers is insured by VSK.
REHAU. Another manufacturer of water heated floors with an impeccable reputation is REHAU (Germany). Even people far from construction and repair know the company’s brand, since tens of thousands of different products are produced under this brand.
Warm floors produced by the company, according to the manufacturers, can operate uninterruptedly for 50-100 years, thanks to pipes made of cross-linked polyethylene (they withstand water hammer and mechanical stress well, and are resistant to plaque formation).
HENCO. The products of the Belgian company HENCO comply with all DIN standards. The main feature of the company's heated floors is its unusual multilayer pipes. Inside there are welded aluminum pipes with thin walls, outside there is a shell made of PE-Xc polyethylene.
The entire line of manufactured products is presented on the Russian market. However, you can also find fakes on sale. Therefore, firstly, you need to ask the seller for a certificate of conformity, and secondly, remember that heated floors are produced only in Belgium.
THERMO. The Swedish company produces the world's best, according to experts and specialists, heated electric floors. One of the first to form a market for these products in Russia, coming to Russia and the CIS countries in 1991. A wide range of products is provided by several production facilities located in Sweden and Russia (trade mark "Thermo AB").
The peculiarity of the product is that it can be installed not only indoors, but also outside, for example, porch steps.
TEPLOLUX. The production facilities of the Teplolux company (one of them) are located in the Moscow region. Produced electric floors are sold mainly in Russia, Belarus and Kazakhstan. There are sales representative offices of the manufacturer in other countries of the former Soviet Union, but sales there are not so active.
For production, domestic materials are used, but machines and equipment only from the world's best manufacturers, such as Spirka and Dunst (Germany), Nokia (Finland) and Rosendahl (Austria).
A wide range of products allows you to select warm electric floors for any room, both in size and operating conditions. For example, Teplolux Mini models are ideal for a bathroom or toilet, and in cold rooms that require a stronger heating system, Teplolux Tropix heated floors will do the job well.
For all its models, the manufacturer has set a service life of 50 years with a 20-year warranty.
National comfort. Another Russian company formed in 1991. The products are distinguished by high quality and many innovative solutions - we have our own design bureau that conducts science-intensive research.
Important: the listed companies were included in the rating based on consumer reviews and expert opinions, and not as a result of an advertising campaign. The material is purely informational.
Operating rules
Compliance with the following instructions will ensure a high level of safety and extend the life of the equipment:
- repair and diagnostic operations are performed with the power supply turned off;
- eliminate strong mechanical impacts on the surface so as not to damage the temperature sensor;
- do not change the design of serial heating elements.
The maximum temperature of the water heater is set no earlier than a month after the first turn on. This will prevent the formation of cracks in the screed.
Basic principles of installing heated floors under tiles
When installing heated floors, you need to adhere to several basic rules that allow you to obtain an effective heating system.
- Under a warm floor, you do not need a screed on the base. The system can be mounted directly on the ceiling. This will allow you to gain a few centimeters of room height.
- The ceiling must be waterproofed. To carry out the work, you can use liquid glass or bitumen. Particular attention is paid to bathrooms, where a waterproofing film is additionally laid on top of the heating system.
- Foil insulation is laid on the waterproofing. Its thickness depends on the level of the floors in different rooms and the height of the ceilings. It should be borne in mind that the thinner the insulation, the more heat is lost.
- It is advisable to reinforce the screed over heating systems.
- For final leveling of the screed, if the height difference is up to 1 cm, you can use tile adhesive. If the given figure is exceeded, use self-leveling mixtures (self-leveling floor).
Features of laying thermal mats
People who are working with thermal mats for the first time have a question about how to lay the mats, especially when turning. It is impossible to tear the mat along the path of the masonry; the mat is laid as a single sheet on the entire selected floor surface.
This is done very simply. Since the cable on the mat is laid in spirals, you can always cut the mat mesh between the cable spirals without damaging the cable. This cut will allow you to both rotate the mat 90 degrees and rotate it 180 degrees.
Required materials and tools
To install a warm tiled floor, you need to buy a set of heating mats, as well as auxiliary materials and assemble (buy, rent from neighbors, friends) a set of tools:
- a set of mats with a single- or double-core cable, which should contain: the mats themselves; cold ends; corrugated tube; temperature sensor with wires; thermostat;
- waterproofing mastic;
- foil insulation;
- box for thermostat;
- tile adhesive;
- tile.
If the kit does not contain anything from the above list, then such an element of the system is purchased separately.
In addition, you will need:
- terminals in the form of a sleeve (one for each connection) with heat-shrink insulation;
- heat-shrink tubing;
- silicone glue.
The tools you should have on hand are:
- perforator;
- Bulgarian;
- knife or special device for removing insulation from wires;
- Phillips screwdriver;
- tester;
- construction hair dryer or lighter;
- scissors.
First start
You need to turn on the system, water or electric, filled with screed, after heating the top layer of concrete with a heater. If you start the floor with a poorly hardened solution, the concrete may deform and damage the heating element.
When using a mat or rod floor filled with tile adhesive, before turning on the device, you also need time for the glue to dry thoroughly.
The first launch of a water floor should begin with the supply of coolant heated to 20 - 25 degrees, and let it work in this mode for 2 days. Then, every day the water temperature needs to be raised by 10 degrees, and the antifreeze by 5.
Electric floors also turn on gradually. You need to start at low speeds and raise the temperature to maximum over 3 days. Then turn off in reverse order.
When heated, the cable expands, and when it cools, it contracts, thereby leaving a gap between it and the concrete. Within this gap, the expansion of the wire will occur in the future.
How to calculate an electric heating system?
The main parameter that needs to be calculated before installing an electric floor is the power parameters.
Recommended power options for heated bathroom floors under tiles:
- 130-150 W/sq. m, if the bathroom has a main heating source and the heated floor is considered an addition to the heater or radiator. This power is quite enough to evenly warm the room together with the battery and heater.
- 180-200 W/sq. m, if electric heating in the bathroom is the only source of heating.
For further installation, you need to divide the area of the bathroom by the length of the cable used. It is worth considering only that part of the room that is free from furniture and other interior elements - there is no need to warm the floor under them.
Checking the system for functionality
Before pouring the screed, you need to make sure that the system has the proper parameters.
The resistance of the heating cable is checked (it should not differ from the nameplate by more than 10%) and the voltage at the thermostat terminals.
Next, you need to turn on the heating, check the operation of the timer, etc. If everything is in order, lay the screed 3–5 cm thick.
During the heating process, the screed will expand, so before laying it around the entire perimeter of the room, you need to secure the so-called. damper tape.
Block 2
Step-by-step instructions for installing underfloor heating with electric heating
Before laying a heated floor in a bathroom under tiles, it must be carefully prepared. The main disadvantage of a heated floor is the fact that to install the heating system you will have to completely disassemble it and re-decorate it with finishing materials. Installation of an electrically heated floor is carried out using special fastening tapes for installation or using screeds.
For better effect, place an additional layer of insulation under the electric heating system. You may need to attach it with special tape or by the ears on the strip.
Preparation
The first stage is preparatory, necessary to increase work efficiency. To begin with, it is worth repairing all cracks and scratches on the surface to ensure uniform laying of materials. The main task of heating is to provide heat to the bathroom, and not to the finishing materials. This point must also be taken into account when performing preparatory work.
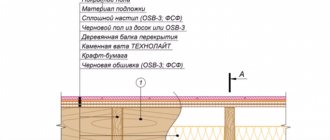
It is necessary to properly prepare the screed, which consists of a variety of materials. The materials are stacked in the following order:
- Waterproofing (polyethylene film).
- Foam plastic with a thickness of 30 mm.
- Heat reflective shield for better conductivity.
- Metal grid.
- New screed with a thickness of 50 mm.
Cabling
The next step is to lay the cable, which will provide heating to the room. First you need to establish the location of the thermostat and the installation of the groove for the electrical cable. In appearance, this design resembles an ordinary plastic box from a switch or socket. The selected location must be drilled using a special box.
The electric floor heating system is connected to the central electrical panel, and not to the distribution box, which also needs to be taken into account when laying the cable. A separate switch should be prepared for the heating system. After installing the groove, all that remains is to connect the plastic socket box using alabaster and run the power supply cables to it.
Rules for installing a heating cable:
- To begin, cut the heating mat correctly: the cut is made along the mesh in an unfolded state, after which the mat is unfolded in any direction. The cut is made with a snake so as not to touch any of the cables.
- The end of the mesh is attached to the base of the floor using tile adhesive. You need to give it time to dry.
- At this time, you need to attach the cold cables using alabaster. It is very important that the wires do not intersect each other and are connected at the ends in a temperature sensor, the installation of which requires a separate groove.
Fill
Filling with a thickness of 3-5 mm is carried out using a concrete-sand mixture. It is important to distribute it evenly before it has time to dry and does not create an artificial unevenness of the floor. You can connect the electric heating system to the electrical network only after the screed has dried completely.
You can ensure quick drying of the screed by additional ventilation or a hair dryer.
Final processing
The final stage of work is the installation of a thermostat. The design should show the installation rules, what should be connected and where. The most important thing is to carefully monitor each wire so as not to connect it to the wrong place and cause a short circuit. Solder the ends of the wires upon completion of work.
We also recommend watching - How to install infrared heated floors under tiles?
Algorithm of actions
To install the system correctly, you need to study typical operating procedures. Instructions with explanations will help you install a heating system without the involvement of specialized specialists.
Installation of a thermostat
The regulator is mounted on the wall in a place convenient for users. The power supply and temperature sensor are connected according to the diagram from the manufacturer’s instructions, removing the front panel.
Laying heating elements
The cable is laid according to the scheme with compliance with the restrictions on the permissible bending radius. Installation of a water system is simplified by the use of specialized insulation boards with protrusions on the top surface. Polymer pipes are installed on metal shaped plates, which reflect heat towards the room and protect the heating elements from mechanical damage.
Installing a temperature sensor
The temperature sensor is placed between adjacent heating elements. Fix with tape. The connecting wire is protected with plastic corrugation.
Testing
You can check the tightness of the water circuit using an air compressor (car pump). Set the pressure to 4.5 ± 0.5 bar. The valves are closed. Leave it for a day. If the pressure drops, air outlets can be found using a soap solution.
In the electrical circuit, the resistance (R) of the heating elements and the voltage (U) at the terminals are measured. Calculate current (I=U/R) and power (P=I*U). Compare the obtained value with the data from the technical data sheet.
Pouring the screed and laying the finishing coating
Semi-dry and wet screed laying technologies are used. In the bathroom, create a layer 5±2 cm thick above the pipes. A reinforcing mesh is installed under the heating elements. The construction mixture is poured at positive temperatures. The finishing coating is installed after the screed has dried.
Step-by-step instructions for installing underfloor heating with water heating
Installing a water-heated floor is more difficult than an electric floor. Particular attention should be paid to the installation of water pipes so that they do not burst from overvoltage and high temperature. This type is inferior to the electric one because it does not have the ability to regulate the temperature. At the same time, it ensures even heating of the entire room.
Preparation
The surface must be perfectly flat so that installation problems do not arise. This is necessary for good water passage. The old floor covering and screed must be removed, the same goes for the waterproofing system.
Preparatory work covers the following stages:
- Installation of a new screed with a height of 3-7 mm.
- Waterproofing system. Polyethylene film will do. Cover the floor with damper tape and lay insulation on top to prevent heat from escaping through the bottom. If a water floor is used as an additional heating system, penofol will be sufficient.
- In houses located on the ground floor or above unheated rooms, it is better to use expanded clay.
- A reinforcing mesh is placed on top to secure the screed.
Connection
Connecting water heating pipes can occur as follows:
- Snail . The pipes are laid around the perimeter of the room, tapering towards the center and forming a so-called snail. Each row is laid with coolant. The method is suitable for shifting the center of the system to the center of the room in large areas.
- Snake . The pipe is installed in waves: it goes along the outer wall and returns back in the next row. Suitable for small bathrooms.
- Meander . A combined scheme that is suitable for standard-sized bathrooms. The loops of the snake are placed in parallel, which ensures the movement of warm and cooled coolant through the pipes.
Installation of a warm water floor
The next stage is laying the pipeline. The pipeline is attached along the marked line, at a distance of about 1 meter. If the wire fastening method is used, it is better to leave a sufficient gap between the rows, otherwise the pipeline may become deformed after a few years. It won't be easy to fix it on your own.
Water heating pipes are installed in one of the following ways:
- Polyamide tension clamp. The pipes are quickly attached directly to the mounting grid.
- The fixing track involves a U-shaped PVC strip that fits under pipes with a diameter of 16 to 22 mm.
- Aluminum distribution plate. Not suitable for tiles, only used when laying wood floors.
- Fastening steel wire.
- Polystyrene mats.
- Stapler and clamps. A method of quick fixation to the thermal insulation system.
Screed
To screed a water floor use:
- A mixture that conducts heat well. The composition can be very different.
- Classic concrete with the addition of a plasticizer.
Screed height – 3-7 mm. The screed must be laid after the water pipes have been completely laid under a given pressure. On average, a concrete screed takes 25 to 30 days to dry.
Connection diagrams
The water floor operates using low-temperature coolant (up to +45°C). Radiators are supplied with liquid heated to +60…+70°C. To solve the problem of correct flow distribution, special connection schemes are used.
Combined
In a heating system of this category, the water heated in the boiler is directed to the mixer. The thermoelement is adjusted to the required response threshold. If the coolant temperature is too high, a valve opens to supply cooled liquid from another line. The circuit with a 3-way valve is supplemented with a bypass, in which flows are mixed. A heated towel rail can be connected to the heated floor circuit.
To the radiator
This option is used when equipping the system with a powerful circulation pump. High performance allows you to pump coolant along a long pipeline with branches. Create 2 ring contours with a common area. Liquid cooled in radiators is supplied to the comb for subsequent distribution into the heating line.
Warm floors can be connected to a radiator.
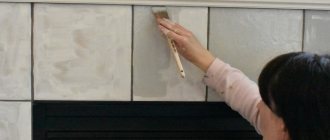
Finishing work
The final stage of laying a heated floor in a bathroom under tiles is finishing work.
A few nuances that are worth paying attention to:
- Quality of tiles and official manufacturer. The tiles should not burst when the room heats up, and also not deteriorate from the release of harmful substances.
- Thermal insulator is not always used.
- Before laying, the tiles should be placed in a regular room for several days so that they warm up to the optimal temperature.
Installation work on laying heated floors in a bathroom under tiles can be carried out independently, without experience. Provides additional heating of the room, which is necessary in the warm season when radiators and heaters cannot cope. It is comfortable to walk on this floor barefoot and wearing slippers.
Detailed instructions for laying heated floors help you do it quickly and efficiently. Attention should be paid to the materials so that they last for many years.
How to do it yourself: detailed instructions
Procedure for installing the system yourself:
- They do heating calculations.
- They draw up a project and collect documents.
- They buy components, tools, consumables.
- After installation, testing checks the functionality of the heaters.
- Carry out the necessary general construction and finishing work.
- Set the settings of control devices.
After installation of the floor, its functionality is checked.
Before checking the functionality, work operations are performed with the power supply turned off.