Surely it happened while doing repairs that you encountered a problem like changing a switch . It doesn't seem like a tricky thing, but
It’s scary, there’s still electricity, suddenly you won’t be able to deal with the wires. Well, it’s not clear what to connect where and what to screw to what.
In fact, there is nothing complicated here and there is nothing to be afraid of, everything is as simple as hammering a nail into a wall. After reading this article, which sets out everything in detail, you will never again have the question of how to change the switch .
So, we have a switch that needs to be changed.
The first step is to dismantle the old switch, and only then proceed to install the new one.
How to replace an old switch with a new one - instructions
Most often, situations arise when it is necessary to replace a switch that has outlived its useful life with a device purchased in a store. In addition, most breakdowns lead to the described process. And it begins with dismantling the old device.
How to remove the switch
First you need to arm yourself with a screwdriver.
If you don’t have such a probe, an ordinary screwdriver with a replaceable tip will do, one in which the iron tip is pulled out of the handle and rearranged the other way around.
In the middle of the metal rod there are slots for fixing in the handle
It’s just that different switches have different bolts - both for a Phillips screwdriver and a slotted one. And since the heads of such screws are initially hidden, it is not known in advance what type of groove it is.
- Suppose we have an old Soviet-type device in front of us. First, unscrew the bolt with which the front panel of such a switch is attached to its base.
- Next, remove this cover. All the insides are revealed to us: one, two or three keys, as well as the mechanism itself. But this applies to old, Soviet devices. With modern devices, you must first “squeeze” the keys with a flat screwdriver and remove them.
And then you also need to carefully remove the front panel, helping from the side with a screwdriver.
- Finally, you need to remove the inside of the device from its socket. For all types of switches this stage is the same. There are two bolts on the sides; they attract antennae that press the device to the walls of the nest. These are the screws that need to be loosened.
- We pull the inside out, but without force, without pulling. Now we can see the electrical wires that are connected to our device.
- In many switches, the ends of the wiring are connected to the device itself using screw terminals. We loosen these nodes with a screwdriver and carefully pull out the wires.
Attention! Before manipulating directly with the wires, you must turn off the circuit breaker that supplies this electrical network to avoid electric shock! Usually the machine is located in a panel on the entrance platform; often it is intended specifically for lighting and is located among other similar ones. Although in Khrushchev apartments there is, as a rule, only one for the entire apartment - both for lights and sockets
Installing a new device
For this operation, you also need to prepare a screwdriver with a replaceable tip or a probe.
- First we turn off the machine in the panel.
- We are preparing a new switch. To do this, use a screwdriver to snap off the keys and take them out. Then unscrew the screw (if there is one) and remove the front panel.
- Before us is the inside of our newly acquired device. We insert the freed stripped ends of the wires into it and tighten the contacts with a screwdriver.
- We recess the mechanism in an old glass, align it with a level or a horizontally attached bottle of water.
- Then we screw in the bolts until they stop, which press the fastening antennae to the walls of the socket.
- Install the front panel and, if necessary, tighten the fastening screw.
- Carefully insert the keys.
We start by turning off the machine
The switch can be used.
The described installation work for a new device must always be carried out with the power supply turned off.
What to do if the switch needs to be moved
In some situations, there is a desire or need to move the switch to another location. For example, when there are children in the family who have already grown up, but cannot yet reach the top switch. Therefore, according to the rules for installing electrical equipment, it is permitted to move the device to another location.
The benefits of replacing the switch yourself
It is allowed to mount the switch at a distance from 82 to 165 centimeters from the floor level. However, in order to begin work on moving equipment, you must first decide on the exact location of its installation. It is recommended to place the switch at a distance of no more than 25 centimeters from the door frame (the side does not matter, but more often the device is located on the right).
The switch can be mounted on each side of the door
Find out how to connect a socket from a switch and a switch from a socket correctly in a special article on our portal.
Moving the switch - step-by-step instructions
Step 1. If you move the equipment within 100 centimeters from the existing position down or up, then make a groove in the ceiling. As a rule, it has a depth of 2 times the cross-section of the cable in the corrugation. So, the wire should not stick out from the opening. You can prepare such a recess using a hammer drill or a special tool for grooves.
Prices for popular models of wall chasers
Wall chaser
This is what a cable groove looks like in the ceiling
Step 2. Now, directly at the installation site of the new switch, you need to make a recess for the mounting bowl. This is done using the same hammer drill and a special round attachment. If the wall is concrete, then the depth of the opening will be about 50 millimeters , and if it is brick or panel, then 45 millimeters . The diameter of the nozzle itself will be about 7 centimeters (selected individually).
This is what the opening for the mounting bowl looks like
Step 3. Now you need to completely de-energize the apartment and dismantle the old switch (using the method we discussed above). Only here, in addition to the switch, the mounting bowl is removed from the wall. To do this you will need the same hammer or a hammer with a flat screwdriver. Most often, socket boxes are fixed with gypsum mortar, which begins to crumble upon impact. It is important not to damage the integrity of the plastic base.
It is necessary to carefully remove the mounting bowl from the wall
Step 4. Now you should extend the cable to the required length. The wires, as a rule, are connected with special clamps or a block, but if this is not possible, then their ends are bunched together and then insulated. According to the installation rules, the cable must be in a special plastic corrugation with a diameter of about 1.6 centimeters. It is also necessary to wrap insulating tape at the junction of the two parts of the corrugation. When extending the cable, you must leave a few centimeters as reserve.
There should be no exposed wires, so they are wrapped with insulation tape
Step 5. Now you need to install the mounting bowl in the new opening; it will be easier to fix it using alabaster, which contains gypsum. Since the plaster begins to harden within a few seconds, it is quickly diluted with water according to the instructions, and then the hole is covered.
You need to work with alabaster quickly before it has time to harden.
Step 6. The grooves in the ceiling must also be covered with the solution. In this case, the wiring should be laid according to all the rules, because it will no longer be possible to change its location. Then the surface of the wall must be finished with finishing putty in order to completely hide the locations of the grooves. When the surface dries, it is treated with fine-grained sandpaper.
Prices for popular types of putty
Putties
The grooves should also be puttied
The switch should be connected only after the solution has hardened. Therefore, you will have to wait a few hours.
Note! Sometimes, when moving a switch, they discover that there is no mounting bowl in the wall. So, switches were installed back in the 50-60s of the last century, so you shouldn’t be surprised, this only simplifies the task of dismantling.
If you plan to move the switch a significant distance from its original location, then most likely it will need to be connected to another box. In this case, it is advisable to seek help from an experienced electrician.
Video - How to move a switch
Main types
Switches are divided depending on the method of mounting on the wall:
- Devices for hidden wiring are installed in a pre-made hole in the wall with a socket box made of plastic or metal in the shape of a cylinder.
- Wooden structures usually have exposed wiring and surface-mounted switches. They are simply fixed to the wall or placed in special plastic cable channels.
Depending on the design of the terminals, switches have different design and installation features. The answer to the question largely depends on this: how to change the switch?
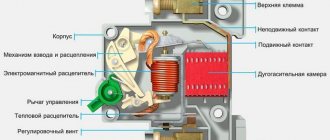
- Screw terminals clamp the end of the stripped wire between two plates. The main disadvantage of this design is that the contacts heat up as a result of the wire being clamped between the plates. Plate material – brass, wires – aluminum. Since different metals are used, a difference in contact is created, and as a result, resistance is created, and the terminals heat up. Therefore, from time to time you need to check how tightly the screws are tightened and periodically tighten them. This problem in itself is eliminated if the wiring is made of copper.
- Terminals in which a clamping spring is installed. There is no need to tighten the screws prophylactically. The brass plate, under which the end of the wire is located, is securely fixed with a spring.
- Switches can also be divided by the number of buttons: with three, two, or the simplest - one-button. A device with one button is used to turn on one lamp or a group of lamps, such as in some chandeliers. These switches are used in bathrooms.
Options with three or two keys are used to illuminate large rooms, where different areas of the room are illuminated separately. Also, the installation of such switches is relevant in the living room, where large chandeliers are used.
Operating principles and types of switches - what you need to know to avoid harming yourself
Replacing a light switch in an apartment is a relatively quick procedure that does not require any additional tools or equipment
However, you must act as carefully and carefully as possible, since you have to deal with electricity. Wrong actions can lead to very disastrous consequences:
- Fire of wiring in the distribution panel and walls;
- Failure of lamps and other household appliances connected to the network;
- Short circuit;
- The saddest development of events is electric shock.
In this regard, before starting work, it is imperative to purchase protective gloves, preferably made of rubber, and strictly follow all the requirements and rules of electrical safety. To avoid mistakes during operation, it is recommended to spend some time studying the design features of electrical equipment, and also remember the connection diagrams in the electrical wiring circuit. In some cases, you can even take a photo with your phone so that there are no problems later after replacing a broken device.
Due to the fact that light switches are used almost constantly, especially in the winter, a huge number of different models have been developed that differ in appearance, design features, and functionality. First of all, there are two groups of switches depending on the mounting to the wall:
- 1. Hidden wiring - a special metal or plastic socket box is used, installed in a recess in the wall. This is where the equipment is installed.
- 2. Open wiring - in this case, you will need surface-mounted switches, which are used in panel board products made of wood. The cable is routed outside, so it has to be hidden in special cable channels so as not to be accidentally damaged during everyday activities.
If we talk about the design of the terminals with which the device is attached to the wiring, then there are also two main groups. The first includes screw terminals - these elements are designed to secure the stripped ends of the wire located between the plates. If you use aluminum wires together with brass plates, a lot of resistance is created, which causes serious overheating of the entire equipment. To avoid this, it is necessary to constantly tighten the screws, which will ensure high-quality contact between the elements. At the same time, copper is not subject to such temperature changes, so wiring made from copper wires does not overheat.
Naturally, changing wiring to copper seems to be a rather complicated process. It is much easier to use clamp terminals, which are equipped with a special spring mechanism. Thanks to this, the brass plate is constantly under enormous pressure, resulting in reliable and high-quality contact. The possibility of fire is minimal, while preventive tightening of the screws will no longer be necessary.
Based on the number of buttons, light switches are:
- 1. Single-button – work with one light source or group of lamps. When pressed, all lighting elements connected to this switch are turned on at once.
- 2. Devices with two or more buttons - with the help of such devices you can turn on individual lamps on a chandelier. Very convenient, especially if the lamp is equipped with a large number of lamps. In this case, you can turn on only a few lamps so as not to waste a large amount of electrical energy.
Speaking about the types of switches, it is impossible not to note modern expensive designs that are becoming increasingly in demand:
- With a dimmer - a rotating element that allows you to smoothly increase or decrease the brightness of the light;
- Touch – responsive to the palm placed in close proximity to the equipment;
- Acoustic – triggered by voice commands or clapping;
- With remote control.
Calculator for calculating the parameters of a current-limiting resistor
When installing it yourself in a backlight switch on an LED or neon light bulb, it is necessary to determine the size and power of the current-limiting resistance. The calculation can be done using formulas, but it is much more convenient to calculate the resistor parameters using a special calculator. Just enter the parameters and get the finished result. The calculator can also be useful for selecting a resistor in a factory-made backlit switch in case the resistor fails.
| Online calculator for calculating the rating and power of a current-limiting resistor |
| Power supply voltage U, V: |
| Voltage drop across one LED or neon bulb, V: |
| Number of LED or neon lamps connected in series, pcs: |
| Maximum permissible current through an LED or neon bulb, mA: |
Reference. On an LED the voltage drop is in the range of 1.5-2 V, on a neon bulb it drops 40-80 V. The required minimum current at which the LED is guaranteed to glow is 2 mA, for a neon bulb - 0.1 mA. This data can be used for calculations on a calculator if the parameters of an LED or neon bulb are unknown.
When choosing a resistance, it becomes necessary to determine its value by color marking. will help resolve this issue.
Features of how to connect a switch: types
There are several types of switches on the market now. The specific type is selected based on the purpose of the installation. The number of lamps that need to be controlled also plays a role.
Main types of lamps:
- With one key;
- With two keys;
- With three keys;
- Sensory;
- Remote.
A single-key switch is considered the simplest device. A metal bracket is mounted in the device body. It controls the shutdown plate. The structure is installed on the box using special claws, which are located on the sides of the bracket. In addition, the case has a compartment for wires.
A two-key switch is two devices of one-key varieties in one housing. There are quite a lot of wires in such a device. This makes it convenient to install chandeliers on a large number of light bulbs or control many lamps. Three-key devices are also arranged.
Touch switches operate due to an electrical circuit located in the housing. Often such devices have a backlight, a diode, and a switch off control. The indicator can adjust to human body heat and turn on the light.
Remote appliances are ideal for large homes. Its design includes a signal receiver and a control unit. For the light switch, you can use a block or a remote control.
Kinds
There are several types of switches, which are most often installed in apartments.
External
Some people use external type switches, which are easier to install than internal ones. These electrical installation products must be used in rooms where electrical networks are laid in an open manner. Some consider them inferior to built-in designs, but this is not true, and they are in no way inferior to other switches.
Rotary
The least common are rotary models of devices. Their features include the fact that they have only two positions. The light bulb is turned off and on after fully turning a special knob mounted on the surface of the housing. Most often, these structures are installed in houses with open wiring. However, some install them in apartments with closed electrical wiring.
Among the advantages of rotary structures are:
- cheapness;
- ease of installation;
- compactness.
Keyboards
Such switches are considered the most common and therefore can be found in almost every home. Keyboard products are manufactured for internal and external electrical wiring. The advantages of these devices include ease of operation and simplicity of design. Another advantage is that one switch can be used to turn on several lighting fixtures.
The operating principle of keyboard products is simple. Inside their body there is a regular switch, with which the electrical circuit opens or closes.
Push-button
Push-button switch models are equipped with a special spring mechanism, which, when pressed, closes the contacts. If you press the button again, the electrical circuit will open. Previously, these types of switches were used only in table lamps, but now this mechanism is also used on wall structures.
Push-button designs are used less frequently than keyboards, since they cost several times more. The advantages of such products include high quality and durability.
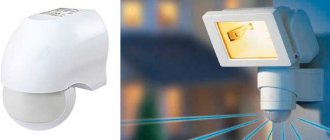
Motion sensors
The most modern are switches that are equipped with special motion sensors. They turn on the light when an object moves near them. This allows you to significantly save energy, since the light will only light for 1-2 minutes, after which it will turn off automatically.
Experts do not advise buying cheap motion sensors, as they are of poor quality. Such devices detect the movement of an object only if it occurs in a perpendicular plane. If you go directly to the sensor, it will not notice anything.
Sensory
These are rarely seen switches that are made from two different circuits. The first models were created using a capacitor circuit. In this case, when you touched the surface of the switch, a special signal was sent, with the help of which the lighting was turned on or off. With the help of such devices it was possible to independently regulate the degree of illumination. For example, if you hold your finger on the surface, the light will turn on gradually.
Wireless
Wireless switches are radio-controlled devices that are capable of independently transmitting a signal. The signal receiver is installed on the power line, through which energy is transmitted to the lighting fixtures. The switch design contains a small energy generator, which is responsible for generating electricity when the button is pressed. The main disadvantage of wireless models is their high cost. Therefore, many people install other types of switches more often.
Dimmers
The name of these switches comes from the English word dimmer, which means darkening. Such dimmers allow a person to manually change the light level from completely off to maximum illumination.
Often such devices are installed inside cinemas to regulate light. However, sometimes dimmers are also found in residential areas. At home, they are used to adjust the light level for watching TV or reading books.
Types of light switches
The switch can be single-key and control one lamp. If it is two-key, then two options are possible: either two lighting devices installed in different rooms (toilet, bathroom) are connected to the product, or in a multi-lamp lamp two groups of lamps are controlled separately, for example a chandelier. There are also more complex three-gang switches and switch/socket combination units.
Single key light switch
Two-button light switch
Three-button light switch
Combination switch
combined unit - switch plus socket
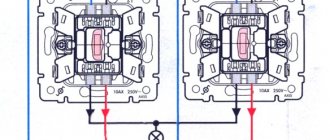
Replacing switches with two keys
When installing a two-button device, you should follow the same sequence as when replacing a device with one button. How to change a switch with two buttons? The difference is that three phase wires are connected to terminal L3, and two wires are connected to L1 and L2. Three-key switches are connected using three contacts and one phase.
When figuring out how to change a switch with two buttons, it is worth remembering the likelihood of wires mismatching in color, like red is phase, and black (blue) is neutral. You can find the same wires in separate houses, but their purpose will be exactly the opposite. You should always check for phase presence using an indicator screwdriver.
Basic requirements for work on replacing electrical equipment
There are a number of requirements for carrying out repair work on electrical equipment. Their implementation will ensure the safety of the entire work process.
- The main requirement when working with electrical equipment is to de-energize the object on which the switch must be installed. To do this, either independently or with the help of a specialist, turn off the electricity from the meter or switchboard.
- After de-energizing the room, it is necessary to check the lack of electricity using a voltage indicator (indicator screwdriver) or a control lighting device (control).
- Next, the old equipment is dismantled and new equipment is installed.
It is important to take into account that each installed device partially differs in installation principle according to its distinctive features
Switch repair
After the switch is removed from the socket box and disassembled, we will begin to repair it:
- Clean the light switch contacts from accumulated carbon deposits with a screwdriver. If the wires are damaged, they must be replaced with new ones. Don't forget to clean the contacts by installing the wires into the terminals no deeper than 2-3 mm. If you find serviceable wires with damaged insulation, restore its integrity in the necessary areas using electrical tape.
- Analyze how tightly the switch parts fit by lightly pulling them. If the wire has slipped out of the clamp, it needs to be strengthened better.
- Assemble the device using the photographs you took. Tighten all bolts carefully. When installing the switch elements, make sure that they “sit” in place.
- Restore power and check that the breaker is working properly. To do this, just turn it on and off several times. If you hear a suspicious noise in the switch itself or in the lamp, the light flickers, or does not light up at all, then you have done something wrong. Try to disassemble it again, or use the help of a professional.
It is advisable, after carrying out all repair procedures, to replace the light bulbs in the lighting fixture. Carbon deposits often accumulate on the contacts faster if the lamps are not energy-saving.
As you can see, fixing an electrical switch is not as difficult as it seems at first glance, and anyone, both a housewife and an office worker, can do it. At the same time, you absolutely do not need to spend money on calling a specialist, or purchasing an expensive replacement for your switch. Now the light in your home will always work.
Practical advice
- If an old-style switch breaks, you can of course fix it, but there is no point in doing so, because... Every part wears out over time, and in electrical work it is very dangerous to use old switches and sockets, especially if they often break down. Today, even such leading companies as Legrand have inexpensive but reliable products, even with lighting, a chain (cord) or a dimmer.
- The reason why the contacts on the key switch burn out quickly is because the light bulbs are too powerful. We recommend replacing incandescent lamps with more efficient and at the same time less powerful light sources - LED lamps. In this case, you can forget about repairing the switch for a long time.
- Before proceeding with complete disassembly of the case, check how well the wires are tightened with screws. You may be able to fix the switch simply by tightening the screws with a screwdriver.
- In order not to confuse the order of assembly of spare parts of a disassembled case, we recommend using a camera: take photographs of each of the disassembly stages one by one and, if necessary, assemble the structure from the photo.
That's all I wanted to tell you about how to fix a light switch with your own hands. We hope that the provided instructions and photo examples will help you repair a switch that does not turn off or turn on the lighting in the house!
Replacing the light switch
Replacing a light switch in an apartment is a completely simple operation that will not take much time and will not require any special skills.
To replace the switch yourself, you must have:
- a new switch of the same type as the previous one (one-key, two-key, etc.);
- a regular screwdriver;
- indicator screwdriver;
- pliers;
- knife;
- electrical tape;
- flashlight.
The following describes the sequence of operation using the example of a single-key switch.
Before you replace the switch yourself, first of all, you need to turn off the electricity in the room where the work will be done (or in the entire house). Next, remove the outside of the switch (decorative panel) to gain access to the electrical wires and the terminals to which the wires are connected. The panel can be mounted with bolts or latches, depending on the switch model.
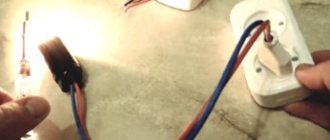
After this, you need to make sure that it is the switch that is faulty, and not the wires of the lamp. To do this, connect the electricity and use an indicator screwdriver to check which terminal has the phase when the switch is off. When replacing a switch with your own hands, touch both terminals alternately with the tip of an indicator screwdriver. When you touch one of them, the indicator light on the screwdriver should light up. Switch the switch to the on state and check again. The light should now light up when you touch the second terminal.
In order to choose a suitable switch for a certain wall, you need to remember that all these switching devices have two types of mounting boxes. The first is a standard box (for brick and concrete walls), the second is an installation box with clamps (for plasterboard walls).
To continue work, the room is de-energized again. The old switch is dismantled by disconnecting the wires from the terminals, unscrewing the mounting screws and removing it from the wall. Then the condition of the wires is assessed. If during dismantling the exposed part of the wiring breaks off, strip off the insulation so that a bare tip of the required length remains for connection to the terminal.
Next, wrap the wires around the terminals of the new switch. The exposed part of the wiring should not protrude beyond the dimensions of the terminal by more than 2–3 mm. If it protrudes more strongly, then isolate this area using electrical tape.
After this, insert the switch into the hole and screw it tightly with mounting screws, and put on the decorative panel. Then turn on the electricity and check the operation of the new switch. If everything is done correctly, the light bulb will light up.
Now watch the video about replacing the switch to better understand how the job is done:
Where to start?
Therefore, before replacing the switch, it is necessary to carefully study the process of connecting wires and observe safety precautions when working with electrical devices. Also, to replace the switch, you need to stock up on the necessary tools and, in fact, the switch itself.
To select a new switch, you must first determine which switch is needed based on the type of mounting
Here it is enough to know whether your wiring is external or internal. Then you should decide what you want to get from the switch and select the required functionality. It is necessary to choose the principle of closing the circuit in the switch, whether it will be an expensive and fashionable touch switch or a regular key switch, with or without the ability to adjust the light intensity, with or without the function of illuminating the lamp itself. The backlight function should be chosen very carefully, since when using diode bulbs with this switch, the bulbs glow dimly in the dark. You also need to decide on the method of fastening the wires, screw or quick-clamp. If you have aluminum wiring, then there are no options, only screw terminals, but if you have copper wiring, you can try modern quick-clamp terminals. Also, in certain cases, it is necessary to pay attention to the maximum load of the switch and the material from which its base is made. According to the maximum load, there are usually 10 A and 16 A switches. A 10 A switch can withstand a maximum of 2.5 kW, that is, 25 100 W bulbs
Plastic or ceramic is usually used to make the switch base. Plastic can withstand 16A, and ceramic can withstand 32A. If you choose a switch for a small room with standard lighting, then these indicators are not so important, but if you have a room of more than 100 square meters. meters with powerful lighting, it is worth calculating the load and taking a switch with a ceramic base. And the last indicator: moisture protection. This indicator is marked with the letters IP and numbers corresponding to the degree of moisture protection. So, for an ordinary room a switch with IP20 is suitable, for a bathroom with IP44, and for the street it is better to take a switch with IP55.
To replace the switch you will need the following tools:
- Voltage indicator. Necessary for safe work. Before starting work, you must use an indicator to check the absence of current in the wires and protect yourself from electric shock or accidental short circuit.
- Screwdriver Set. Screwdrivers are needed to remove the old switch and then install the new switch.
- Pliers. They will come in handy in case the wire breaks while dismantling the old switch and needs to be cleaned.
- Insulating tape. May be useful if the wire insulation is frayed. It is not necessary to have electrical tape when replacing a switch, but it is best to keep some on hand just in case.
- Flashlight. It will be needed if insufficient sunlight falls on the switch.
Preparatory stage
The main thing when working with electricity is safety. If you lack confidence in your own abilities, it is recommended to use the services of a professional electrician.
If you decide to do the work yourself, follow these preparatory steps:
- The lack of light is not caused by problems in the electrical network, but by a burnt-out cartridge. Checking the cartridge.
- Let's see if there is light in other parts of the house (apartment).
- If, based on the results of the check, there are no malfunctions not related to the electrical network, we proceed to dismantling the switch. Before changing the switch, we turn off the power to the apartment. To do this we use a switch. We check the mains voltage with an indicator. We inform family members about the renovation work. No one should use the light while the switch is being replaced.
To carry out electrical installation you will need the following tools and materials:
- voltage indicator (do not use this tool as a screwdriver due to excessive fragility);
- a set of screwdrivers (phillips and a couple of flat tools of different sizes);
- pliers;
- stationery knife;
- insulating tape;
- flashlight for illuminating dark areas.
Basic troubleshooting methods
Most often, when the device is turned on, the contacts burn out, and here it is recommended to simply clean the contact groups. It is better to do this with a small piece of sandpaper. Sometimes the switch does not work due to loose wire clamping, so it is necessary to check the functionality of the fixing screw.
The heavy operation of the switch, especially with the sliding type of contacts, is due to the fact that there is no lubrication, because of this the contact does not turn on the chain. The presence of melted plastic or crumbled ceramic housing means that the device is completely broken and must be permanently replaced.
How to do the work yourself?
Before repairing, you need to learn a few mandatory rules:
- Turn off the electric meter to cut off power to the entire apartment. Everyone knows how to do this: the panel is located in the corridor or in the entrance, you need to press the switch lever.
- Replace the device during daylight hours. Carrying out work at night is advisable in exceptional cases.
- The quality of all tools and the device itself must be of the highest quality.
- If you do not have practice or experience, you should read the instructions before replacing.
Removing the cover
Tip Depending on the type of device being replaced - single, double or triple - the cover may be secured with a similar number of bolts.
- The bolts cannot be unscrewed due to broken threads. In this situation, you need to help them by pulling the lid away from the wall. If there are two bolts, you need to carefully unscrew them and at the same time pull the top or bottom of the cover alternately.
- The cover or decorative trim may “stick” to the wallpaper, which threatens to damage it when removed. A strong tug can tear the wallpaper and damage the base coating of the walls. This problem is especially relevant in the kitchen due to high humidity (how to correctly position one or more outlets in the kitchen?). You can find a solution by carefully separating the lid with a knife.
Dismantling the interior
The internal part can be attached in three possible ways:
- spacer legs;
- bolts;
- dowels.
Finding and removing fasteners is easy even for a beginner:
The bolts will be located around the perimeter of the socket box or there will be spacer antennae. You will only need to make 2-3 turns with a screwdriver. The fastenings will loosen, and the inner part will hang on the wires, which also need to be unscrewed. To remove the wires, unscrew the retaining screw. The wires themselves can be two or three, if grounding is provided
Important The ground wire may be positioned differently from the rest of the wiring. Its integrity must not be violated, otherwise it will affect the quality of the grounding.
Installation of a new electrical outlet
Installation
- First you need to check the wire: if there is poor contact, the core could overheat, and the insulation could lose its ductility. Then you will need to wrap the core with electrical tape. If the vein is broken, it must be increased.
- After preliminary work has been carried out and the masking solution around the socket has hardened, installation begins.
Installation in a socket box
Mounting methods:
- spacer legs;
- dowels;
- bolts.
When inserting the device into the socket, the spacer tabs must be held. Attention Dowels are used in rare cases - if it is impossible to secure the socket in any other way.
hereSockets can be of different types and on our website there is information about the “smart socket”, a socket with USB and Wi-Fi.
We are preparing
Before connecting the switch, it is necessary to prepare it for installation. We will discuss how to do this below.
Remove the key by prying it in the center on the left or right side with a flat-head screwdriver.
Unscrew the two screws located diagonally.
Now the mechanism is available to us. The mechanisms of single-key switches can be of different designs, but they have the same connection principle. There must be two contact clamps and spacer tabs for attaching to the socket box.
In our mechanism, the screws of the spacer legs are located on the left and right.
They set the metal fixation claws in motion.
And two contact screw clamps for connecting wire cores.
By unscrewing or tightening the contact screw, we move the pressure plate, designed to securely fix the core in the contact.
Each contact provides connections from 1 to 2 wires.
Installation recommendations
Before starting electrical installation work, it is necessary to de-energize the desired area. As a rule, batch machines installed in the electrical panel are used for this. You can verify the disconnection using a special indicator probe or a multimeter that works like an AC voltmeter.
The installation location of each switch must be determined and prepared in advance. If necessary, old devices are dismantled. In case of internal installation, the installation boxes must be firmly fixed inside the wall. Each wire connected to the installation site is determined in advance according to its purpose. It is necessary to separate the neutral and phase wires and specially designated wires that supply lighting devices.
Before installation, partial disassembly of the switches is carried out. The front panels and keys are removed. After this, the purpose of each terminal is determined. The connection diagram can be indicated on the case or in the attached instructions.
Before connecting a light switch in an apartment, you need to draw up an electrical energy switching diagram. It is compiled based on the devices used, allowing for the most optimal lighting control.
Pass-through switch circuit
Light switch connection diagram
Connection diagram of a current source, a light bulb and 2 switches
How to change a light switch in an apartment step by step with your own hands: with one key or two buttons, diagrams and tools for replacing it yourself
How to connect a pass-through switch
How to connect a triple switch
Safety rules at work
Although replacing a switch is a simple task, it remains extremely dangerous. Mistakes made can lead to fire, failure of lighting equipment, or even electric shock to the person carrying out the work.
Basic safety rules:
- Power outage . Anyone can accidentally touch a bare wire, so before work, be sure to turn off the apartment’s circuit breaker.
- Studying the instructions . Switches are produced according to standards, but sometimes there are unique options with other connection schemes. Before installation, be sure to read the instructions.
- Protective clothing. Rubber gloves are a must. Safety glasses and special boots will also be useful.
Rubber gloves and suitable tools. - Instrument insulation . It is better to use tools with a rubber handle. They can also be additionally covered with electrical tape.
Installing a switch with a dimmer
If you decide to purchase and install this type of device yourself, there is no reason to worry. It is installed in order to be able to adjust the lighting.
But many are still interested in the question of how to replace a regular switch with a dimmer. This modified device in installation is not much different from the installation of conventional equipment of this type. The only condition imposed by the manufacturer can be considered compliance with the rules for connecting wires to the phase and load terminals on the switch. You will also read about this in the manufacturer’s instructions and in the article on connecting a dimmer.
A little about contacts
Contacts need to be cleaned
The contacts that need to be cleaned are located directly under the switch button on a plastic base shaped like a hemisphere. Those of them that are the suspected cause of the breakdown are very easy to identify: they contain a specific soot of dark shades, which appeared due to sparking in the device. To clean this type of plaque, you can use a special fine-grained sandpaper.
Connecting the switch to the network
When you need to connect a light bulb through a switch, the diagram is not just a recommendation. This is a guide to action. It cannot be changed. The installation location of the latter is a break in the “Zero” cable. And the step-by-step algorithm looks like this:
- Before laying in the contact connector, the core is stripped of approximately 1 cm of insulation.
- The bare part is inserted into the hole until it stops, loosening the bolts in advance.
- The screws are tightened until a secure connection is achieved. The wire is immobilized.
- Perform the same actions with the second cable. The sequence of events is identical.
- The inside of the switch is placed in the cup holder, the spacer mechanism is activated.
When using pliers and screwdrivers, do not use excessive force. The metal is soft, the plastic is fragile. Otherwise, the components may be damaged, which will lead to the need to spend money on purchasing a new device.
However, you cannot clamp the contacts too loosely.
It is important that the cord does not move along the axis of the contact hole, does not fall out, does not break, or twist. Then the switch will last a long time and will not require repair or replacement.
HelpfulUseless
Probable causes of failure
Mechanical failures can be caused by natural wear and tear. There are no eternal components and devices, but the better the quality of the switch is made, the better the materials used in its production, the more reliable its operation and longer its service life.
Malfunctions of the contact group are also caused by wear of the contact surfaces, but for this to happen, the device must operate for a long enough time, and the mechanical components wear out earlier. Most often, the device stops working due to burning of the contacts, which can be overloaded, or the powerful load is of a pronounced inductive nature. Welding of contacts in a household network is unlikely, but is possible when the switching element is switched on for a short circuit.
| Device type | Number of keys | Maximum switching current, A |
| ABB 2CLA220100N1102 Zenit | 1 | 16 |
| EKF Murmansk | 2 | 10 |
| UNIVersal Seville | 2 | 10 |
| ProConnect | 2 | 10 |
| Schneider Electric ATN000112 AtlasDesign | 1 | 10 |
How to remove a socket with a switch
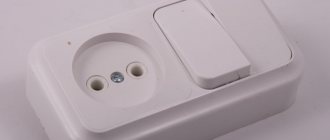
Nowadays, quite often you can find a universal electrical installation design - a socket and a switch in one housing. This is very convenient, as it allows you to power an outlet from one incoming line, and immediately connect lighting fixtures by running the phase wire through the switch.
In the event of a breakdown, which, however, is extremely rare, the entire body is removed, but this is not very difficult, however, you need to know some features when removing such a structure.
Despite the fact that it is quite simple, in addition to the screw that secures the case near the socket connectors, the fixation is also made in the area of the switch, under the key.
The first thing you need to do is remove the switch key by prying it up with a flat-head screwdriver, then unscrew the screws holding the housing that are located under it, as well as the screw on the socket.
It is enough to easily pull the housing towards you, and then inspect the socket and switch to find out the causes of the breakdown or dismantle the device altogether.
Dismantling
We carry out the work in the following sequence:
- We remove the keys from the switch. We do this with a screwdriver, prying off the keys. We remove the double keys one by one.
- Remove the outer panel of the box with the same screwdriver.
- When the panel is removed, the screws that secure the switch itself become visible. Unscrew the screws.
- We take out the switch from the niche.
- Disconnect the wires. It is important to remember the order in which the wires are connected. It is recommended to take a photo of the working field so as not to get confused later.
Installation and connection of a new
After unscrewing the old switch, a new one is installed in its place.
With one button
First, electrical wires are installed in special grooves, after which they are screwed with clamps. Having connected the wiring to the grooves, they begin to install the structure into the wall. To do this, the fasteners are screwed into the wall, after which the upper part of the structure with the button is mounted. Having installed the one-button design, check its performance. If the switch turns the light on and off, the job is done correctly.
With two buttons
When installing a switch for a hidden type of electrical wiring, the structure is connected in such a way that the wiring is connected to a common contact. Then the structure is installed in a special hole in the wall and screwed. If the switch is installed for open wiring, it is first mounted into the wall and only then the wires are connected.
Step-by-step instruction
Let's look at how to change the switch.
Dismantling the old
- First of all, it is necessary to de-energize the wires coming to the switch.
- To dismantle the switch, you need to carefully pry off the switch cover with a flat-head screwdriver (if you can’t pick up the cover from the bottom or top, then try to pick it up from the side; on some models of switches there are special latches there).
- After dismantling the cover, the interior of the switch is revealed to us.
- Now you need to unscrew the mounting screws.
- After this, you can remove the switch from the socket.
- Now that the entire internal space is in front of us, we should use an indicator to check the wires for voltage.
AdviceIt is advisable to photograph, if possible, how the wires were connected; this often helps a lot with subsequent installation.
- You can now loosen the clamping screws or quick-release terminals; in the case of quick-release terminals, you may have to cut the wires.
We suggest watching a video on how to dismantle an old switch:
Preparing for installation of a new
- Before further installation of the switch, it is necessary to inspect the wires for frayed insulation.
- If there are any, then it is advisable to cut off this section of the wire, if the length of the wire allows, otherwise wrap it with electrical tape.
- Also, if you have copper stranded wires and the bundle has become significantly thinner, you need to cut it and strip part of the wire for better contact.