In this article we will look at the general rules for installing an electric floor, and also give some practical tips for successful installation of the structure.
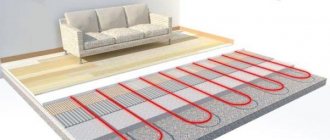
So, a modern electric floor consists of a heating cable, a thermostat, and a temperature sensor .
Sensors and thermostats are standard and, by and large, it is enough for them to simply work; the main role in high-quality heating of the room is given to heating cables.
Resistive cables, single-core and double-core, are very popular. It is believed that two-core cables provide better protection from electromagnetic radiation, which is why they are more expensive .
Self-regulating ones are less popular. They are more expensive than twin-core ones. Self-regulating cables are considered the safest.
Choosing a heated floor
When choosing a heated floor option, be guided by your financial capabilities . What is more expensive is not always the best option.
Conventional cable floors, the most economical option, the second most expensive option, are thermal mats (mesh). These are the same cables, but built into a reinforced mesh.
Installation is greatly simplified and accelerated; each cable does not need to be routed and secured separately. Thermal mats have an adhesive backing; you just need to stick them to a flat floor surface .
The advantage of a regular cable is that you can adjust the installation depending on the heating power per square meter you need.
There is also a film option, here the main role in heating is played not by the cable, but by thermal (infrared film) . The difference is that the film is laid on top of the screed, and not filled with it, as is the case with cables and thermal mats.
Let's consider the most popular options with conventional cables and thermal mats and a concrete base.
Installation of thermomat
Installation of Thermo Thermomat
The process of installing heating mats with your own hands is much simpler than cables, since the wire is fixed to the sheet:
- Draw a diagram of the location of the mat on paper; we must remember that they are not placed under heavy furniture.
- The power of the heating device and the amount of material required are calculated - this is done by analogy with cable floors, taking into account the usable area.
- A place on the wall for the temperature sensor is determined, a recess is made for it, as well as grooves from this area to the sensor.
- The base is prepared - it is leveled and cleared of debris. Then it is covered with a primer - this will improve the adhesion of the floor to the solution.
- The sensor is installed - placed in a corrugated pipe and placed at a distance of at least 50 cm from the wall. It should be placed between the floor turns.
- Mats are laid - they are laid directly on the subfloor to avoid overheating; additional insulation is not necessary. The product is equipped with adhesive tape, so no fasteners are required. Mats should not overlap each other. If you need to trim the fabric, you need to be careful not to damage the electrical wire.
- The connection is made and the system is checked - the resistance of the cable in the mats is checked with a multimeter. The thermostat is installed, the floor and sensor wires are connected to it, after which it is connected to the power supply. A test run of the system is performed.
- The mats are poured with tile adhesive - a layer of 8 - 10 mm, and time is given for it to dry. The grooves are also sealed with this composition.
It is possible to lay mats in concrete or dry screed; this process is the same as when installing a heating cable (described above).
- The finishing coating is laid - when filling the mat with glue, it is often tiles.
Turn on the electrical system only after the glue has completely dried.
Thermal mats can be laid on an old base, similar to a heating cable.
Warm floor scheme
We would like to warn you once again - the electrical circuit of the system is made by an electrician!
He will also connect the system and conduct reinforced wiring lines from the distribution board.
You act as the brute physical force necessary for installation work. When drawing up the diagram, both the characteristics of the cable itself and the characteristics of the base and floor covering are taken into account .
Here is the required network voltage for individual rooms:
- bathroom and toilet – 150-180 W/sq.m;
- bedroom - from 110 to 140 W/sq.m4;
- corridor, kitchen and hallway – 130-160 W/sq.m;
- loggia or balcony – 180-220 W/sq.m;
ETP device made from infrared film
The preparatory stage includes leveling the concrete surface and insulation with a special material - 4...6 mm polyethylene foam (Penofol, Izolon). A prerequisite is the use of insulation without aluminum foil.
The installation technology looks like this:
- Roll out a roll of thermal film and lay it with the copper strip down. If necessary, cut the heater to size using the factory lines as a guide. Leave 10 cm from furniture and walls.
- Adjacent canvases can be laid with an overlap - the width of the transparent edge. Tape the joints with tape.
- Use pieces of bitumen insulation to cover the unused contacts at the ends of each sheet. At the wire connection points, install special clamps (included in the kit) and secure them with pliers.
- Bring the wires to the contacts, insert the bare ends into the sockets and crimp. Then insulate the connection with 2 bitumen strips.
- Attach the temperature sensor with a bitumen patch to the black track on the film (bottom). Cut a hole in the insulation where the meter will hide. Previously connected clamps also need to be recessed.
- Make grooves in the thermal insulation for the wires leading to the thermostat mounting point. Lay the cables in the grooves and cover them with tape on top.
- Mount the thermostat on the wall and connect the wires. Installation is complete.
Recommendation. After assembling the film ETP, check the electrical circuits with an ohmmeter, only then lay the covering. You can do without appliances - just turn on the floors and try heating by hand.
Before installing the finishing coating, cover the heaters with a layer of protective polyethylene film. We put laminate or parquet directly on the film, and under soft coverings - linoleum, carpet - we make a hard backing from plywood. Otherwise, the ETP will quickly collapse during operation. The installation procedure is demonstrated in the video:
Preparing the floor surface
Note that the work that we will perform is well described in two articles - “Leveling floors with a self-leveling mixture” and “Laying laminate flooring and the cost of work”, but there are slight differences.
Let us briefly describe the whole process.
- Standard removal of debris and dust using a construction vacuum cleaner.
- Primer treatment of the base.
- If there are large differences and unevenness, we perform leveling with a cement-sand screed. This is the most economical option. If you need to get the job done faster, use a self-leveling floor. In both cases, the thickness of the screed itself must be at least 4 cm.
- The thermostat is installed after laying the cables, so when preparing the base you only need to mark the location of its future location.
- Then you need to lay a layer of thermal insulation to minimize heat loss.
- After this, we mark the places where floor installation will not be necessary (locations of stationary furniture)
The distances from the walls to the cable must be at least 8 cm.
- We install fasteners if you use regular cables and not thermal mats.
Common Mistakes
How to install electric floors correctly with your own hands - this question often arises for beginners who want to do this heating at home.
The main mistake is installing floors under large furniture. Underneath, the surface is not cooled, which leads to overheating and then failure of the system.
You cannot bend the cable either, as this will disrupt the functioning of the device. When laying cable mats, cutting the wire is unacceptable, so you should correctly calculate the size of the heated area.
A common mistake when constructing electric floors is inappropriate control of the insulation resistance during installation. The indicator should not exceed that specified by the manufacturer by more than 10%.
When using a film heated floor, it may stop heating if the film is damaged. Its current-carrying parts must be properly insulated, otherwise electric current will leak and the system will eventually shut down.
If we talk about the temperature sensor, then you should not pour it into the screed. In case of breakdown, replacement will be difficult. It is placed in a corrugated pipe.
DIY cable laying
After completing all work on preparing the base, we proceed to the installation of heating cables or thermal mats.
Let us clarify: the option with heat cables is more labor-intensive; each cable will need to be installed separately and secured with fasteners.
One way or another, we double-check everything again according to the installation plan, clarify the details, order and step of installation. We carry out a standard cable resistance test.
We enter the resulting value into the warranty card. The difference should be no more than ± 10 percent of the value indicated on the cable label .
Safety requirements for operation
Before using electric floors, read the manufacturer's instructions included in the kit.
Basic safety requirements that apply to all types of electric floors:
- Do not shorten the heating element;
- It is necessary to take only a screed solution or tile adhesive intended for warm polos;
- Opening heat-shrinkable sleeves at the junction of the heating and installation parts of the floor is prohibited;
- Do not lay carpet on heating sections or place furniture without legs.
Laying process
Let us consider in detail the option with a two-core cable.
We begin laying the cable from the place where we will install the thermostat ; the coupling and cable are secured to the floor with fasteners or mounting tape.
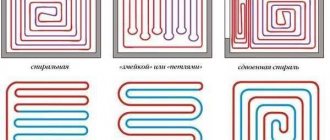
The cable is laid using a so-called snake. Do not forget to ensure that the cables do not touch; we clearly measure each laying step on all segments.
The bending radius of the cable, where it is necessary, is made at least 5 cm . The end sleeve of the cable, like the connecting sleeve, must be completely covered with a tie.
Nothing particularly complicated, we clearly control the installation.
Installing a temperature sensor and thermostat
After laying the cable, we proceed to install the temperature sensor. The temperature sensor is located along the cable near the thermostat.
Before the final pouring, you need to make sure that the electric floor is working . You need to turn on the heated floor and leave it for a while.
The thermostat is installed only when three wires are connected to the junction box:
- heating cable supply wire;
- network wire;
- temperature sensor wire;
- pouring screed onto the cable system.
Layed floor cables must be photographed. The thickness of the final screed is at least 5 cm. When the screed is dry, you can begin laying the floor covering.
Model overview
The modern market offers a wide range of electric heated floors. Many even get lost in such diversity.
How to choose the best heated floor that will provide efficient and high-quality heating?
It is advisable to buy products from well-known companies. Warm floors from Rehau are in great demand. All models are made of high-quality and safe materials. In addition, the price for Rehau electric underfloor heating is quite reasonable - about 1500-5000 rubles per square meter.
The products of Teplolux, Devi, Thermo, Electrolux have also proven themselves well. Many users also choose Nexans warm electric floor due to its excellent quality. However, the average price of Nexans products is quite high and is about 15,000-17,000 rubles. But such financial expenses are completely justified. As a result, the consumer receives a reliable and durable heat supply system.
Cost of work
The exact cost of the work is difficult to calculate; a lot depends on the materials and the cost of installation work . So, we can only talk about the approximate cost - 2000-9000 per square meter, this is for the material.
For laying the cable you will pay 300-500 rubles per square meter, for installing a thermostat and other related devices, you will need to pay separately.
If we add up the prices for everything, then on average it will be 700-1300 rubles per square meter of area.
Example prices for some components
Thermostats:
- digital thermostat Nexans MILLITEMP CDFR-003 – 2500-2800 rubles;
- thermostat OCD-3 – 4000-4500 rubles;
- thermostat TR 510 (mechanical) – 1500-1800 rubles;
- thermostats for heated floors RTC 70.26 – 500-800 rubles;
- thermostat UTH-150 (invoice) - 1200-1500 rubles.
Warm floor:
- Teplolux floors 20TLOE2-170 (3.40 kW) – 10,000-12,000 rubles;
- Teplolux floors 20TLOE2-75 (1.40 kW) – 4000-6000 rubles;
- Teplolux floors 18TLOE2-38 (0.70 kW) – 2000-3000 rubles;
- floors Heating mat Thermo Thermomat TVK-130 – 4000-4500 rubles;
- Arnold Rak floors Heating mat FH-2107 120W 0.5×1.5m (0.75 sq.m.) – 1700-2200 rubles;
- floors Gulfstream heated floor set MGS2-75-0.5 – 2000-2400 rubles;
- floors Twin-core heating cable Nexans TXLP/2 – 4000-5000 rubles.
Peculiarities
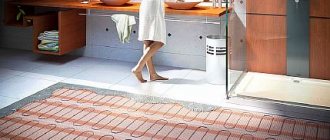
As a rule, heated floors under ceramic tiles are installed in rooms with high humidity, for example, in the kitchen, bathroom, saunas, and swimming pools. Thanks to heating, the floor covering in these rooms becomes comfortable and warm, even if you walk on it barefoot.
Floor tiles themselves are a material that is resistant to moisture and mechanical abrasion. Combined with heating, it becomes even more functional and in demand.
An electric floor heating system is one of the types of heated floors. There are also water heated floors, which are heated by water. This system is only suitable for private houses, since when used in an apartment building, there is a high probability of flooding of neighbors below, as well as interruptions in heating of neighboring apartments.