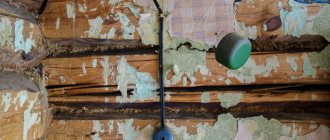
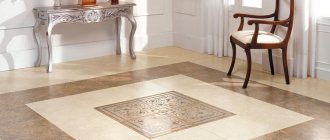
In the process of wall tiling, inexperienced craftsmen often face the problem of laying tiles in the corners. Especially in the bathroom, since this is where such areas are an integral part of the interior. To create a smooth and neat joint, different approaches are used. Some require certain skills and special equipment, others can be used even by a beginner. How to join tiles in the corners - let's look at each option in more detail.
There are several ways to connect tiles in corners
Ceramic borders
It was quite difficult and diligent work: I had to cut small squares from the tiles, which were then used to form the slope from the wall to the bathtub. If the work was done conscientiously, the effect was absolutely decent. Now there is no such need.
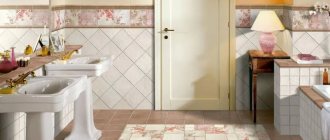
In many construction stores, when you buy tiles for a toilet, they can immediately recommend favorable ceramic borders. But often they still have to be purchased separately. When choosing such a frame, you need to work hard so that the border matches the color of the tile itself.
In exceptional cases, you should choose a white border, then merging with the plumbing fixtures, it will not stand out from the uniform design.
In fact, all ceramic products are considered quite strong and hard. And therefore, of all the options that have been considered, ceramic borders will especially last a long time; they are virtually not subject to deformation and can be used without replacement for many years.
But you need to remember about the disadvantages of this option: it has poor resistance to mechanical damage, i.e. with a strong blow, such an object may prick.
In most cases, this kind of trouble occurs when installing ceramics, and already installed borders add to their own hardness the mechanical strength of the wall and bathtub and are virtually invulnerable.
Working with ceramic components requires specific skills, and therefore the best option is to entrust this process to specialists. If, for example, you personally agreed to take on this task, then it will be useful for you to read how to make a border in the bathroom from ceramic profiles (or baseboards).
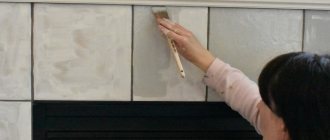
Features of installation work
To work, you need to purchase the required number of blanks. Buy borders with a reserve (in case of damage), and also calculate how many corner-type elements you will need. You will also need specialized tile adhesive (it must be moisture resistant), sealant and grout. All work consists of several stages:
- Surface preparation. They must be very thoroughly cleaned and dried.
- Sealing the gap. If it is small, you can get by with silicone sealant. If, for example, the gap is large, it is sealed with foam for installation.
- Preparation of glue (according to the rules).
- Laying the border itself. How to glue a ceramic skirting board to a bathtub? Using a spatula, glue is applied to the back side of the parts, and they themselves lie close to each other so that there is no gap. Special corner components are placed in the corners. You need to give it a day to dry.
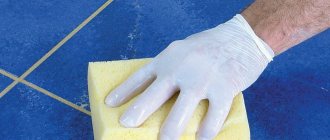
- Grout. The finished grout removes small gaps between the parts, and also between the wall and the baseboard.
Any of these types of borders has both its own advantages and disadvantages. When choosing an option for yourself, consider the entire interior of your bath. In any case, decorating your bathtub with a border will give it a complete and beautiful look.
Tips for choosing
- In order to get an even, beautiful, smooth surface after laying the tiles, you need to be very careful in choosing the necessary materials, including corners.
- When purchasing corners, it is better to take them with a small margin relative to the estimated quantity. The stock is needed for pruning.
- The size of the corner must exactly match the height of the tile.
- When choosing a molding from a specific supplier, it would be useful to read in advance the reviews of customers who have already evaluated these products from different points of view (how the corner behaves during installation, operation, its physical and mechanical characteristics, etc.).
- When purchasing components, you should definitely check the documents confirming the high quality of the products.
This is interesting: How to properly make a border in the bathroom
For more information on installing the corner, see the following video.
Differences between external and internal corners
When carrying out work, remember the difference between internal and external elements. The first option is the space where the surfaces of two walls meet along the perimeter of a standard room. The second is a protruding area.
Examples of designing corners using trims
Also keep in mind that it is easier to glue the internal trim tiles, because in case of deviation from the norms, the situation is corrected with the help of glue and grout. In general, the fugue looks more organic on the inner corners of the walls. In the bathroom this is of particular importance, because external projections, for example, when installing a box, are more susceptible to destruction. Over time, the fugue simply crumbles and is washed out from there. That is why it is better to lay an additional plastic corner on the tile, which will not only protect, but also decorate the surface.
Preparatory activities
Before tiling a corner, you should think about carefully preparing the walls and floor themselves.
- They are pre-aligned so that the material does not peel off over a short period of time.
- Another possible defect in laying ceramic tiles on an uneven base is a poorly executed external or internal corner.
- In addition, the surface at the time of work must be not only dry, but also clean.
- It is important to check the horizontality of the floor and the verticality of the walls. This is done after the old coating has been removed.
- If we are talking about walls, then a plumb line is used in the form of a selected type of load attached to a thread.
A large number of tools can be used to measure angles:
- For horizontality, a building or water level is used. Everything will depend on the preferences of the performer.
- There is also a laser level, but its cost is very high for use in one-time work.
If these works are not completed before laying the tiles, subsequently gaps will form in the corners, spoiling the whole picture.
A layer of waterproofing in the form of a coating mastic is first applied to the cleaned surface, followed by a primer. If there are even minor defects, they should initially be repaired with putty. To create a flat surface, pour the following onto the base of the floor:
- cement-sand screed;
- self-leveling mixture.
We must also not forget about waterproofing and a primer layer.
Other corner design options
Installing a profile is an optional condition for upgrading the ribs between enclosing structures lined with tiles or mosaics. You can perform the same operations correctly in several ways:
- grind the edges of the cladding at 45 degrees;
- lean the tiles overlapping each other;
- Leave space between the tiles for grouting.
The most difficult is the corner on a short box, a podium, formed by three planes at once - two vertical walls, one horizontal plane.
Overlapping method
The perpendicular joining method is used for right external/internal corners. The end of one tile is located at a 90 degree angle to the other, flush.
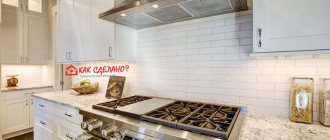
The same seam is left between the tiles as in the adjacent rows. The joint is positioned in such a way that the solid tile masks it when viewing the room from the doorway, as in the photo below.
Burying method
The method is used only for external corners, called the “Kremlin corner”, bevelling, trimming, sharpening, cutting at 45 degrees. The ends of the tiles are cut at 45°, the decorative elements are joined closely to each other without seams or grouting.
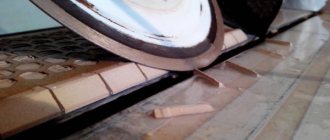
You can grind off unglazed ceramics from the back of the cladding manually with a file or a whetstone. However, it is more convenient to use an angle grinder with a flexible diamond disk “Turtle” with a grain size of 50 units.
The outer corner in a combined bathroom often ends up on the edge of the inspection hatch under the tiles. In this case, instead of regular grout, use silicone sealant of a suitable color.
This material has increased plasticity, even after hardening, it does not fly off the edge of the tile.
Forming an angle at the junction of three planes
An additional element - a capsule plug for an external/internal corner - is available exclusively in collections of metal corners from domestic and foreign manufacturers.
The tiled profile itself is ideal for cladding the ribs formed by connecting walls.
Plug capsule for metal trims.
The plug is designed to fit into a vertex formed by the intersection of two or three edges. One side of the capsule is inserted inside the profile, the other two are adjacent to the remaining layout on the adjacent walls.
Wall-floor joint
To decorate the internal corner formed by porcelain stoneware flooring and tiles on the bathroom wall, the following methods are used:
- embedded profile made of polymer material, metal, ceramics;
- patch corner PVC, aluminum, brass;
- baseboard for tiles;
- ceramic or porcelain stoneware border.
- without a plinth - this is the most aesthetic and correct option; the joint is grouted with tile grout.
A regular PVC skirting board does not fit well with ceramic cladding, however, this is the only option with cable channels inside for electrical wiring, ensuring high maintainability of the wire.
Connecting the wall to the ceiling
The choice of layout for designing the angle of contact between the wall tiles and the ceiling depends on the method of finishing the floor slab:
- whitewashing, painting - overlay polystyrene foam fillet, glued to both surfaces;
- PVC panel - profile made of the same material;
- suspended ceiling - special insert.
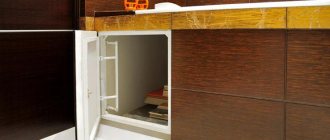
Bathtub connection unit
The main problem with the junction of the bathtub bowl and the walls around it is to ensure tightness. The classic option is to tile the walls entirely along the entire height. There are several methods for designing the junction of the bathtub to the wall:
- sealant is a budget option, but short-lived;
- border tape - heated with a hairdryer, has an adhesive layer for fixing one edge to the wall, the other to the bathtub bowl;
- polymer plinth – F-shaped profile with a long bottom shelf, side plugs included;
- ceramic border - low manufacturability of installation due to the short length of the elements and their large number;
The downside of all of the above options is the lack of tightness of the upper joint, plus the easy dismantling of the bath without destroying the lining. But at the same time, the most reliable technology is wall cladding from the side of the bathtub, when its bowl is partially embedded in the wall.
Laying tiles from the side of the bathtub.
The bottom row is usually trimmed to even out the lack of horizontal lines and to hide other defects. After which, you have to mask the defects of tile cutting. For this, a PVC layout is used, which has elastic properties to compensate for the linear expansion of the bath when heated.
Material for production
Trims are made from various materials.
Metals and their alloys
This group includes:
- aluminum;
- brass;
- stainless steel;
- steel with nickel or chrome coating.
Aluminum, stainless steel and chrome corners look harmonious on cool toned and dark tiles, especially if there is a faucet and other chrome elements nearby. Also, these accessories, thanks to their neutral tone, help to decorate the junction of planes of different colors.
Silver corner
Trims of golden colors - brass and gold-polished aluminum - are combined with warm-toned tiles.
Metal corners have a number of advantages:
- look stylish and noble;
- retain an attractive appearance for decades because they do not deform, do not darken and, due to their high hardness, do not become scratched;
- durable;
- do not collapse upon impact due to their ductility.
The disadvantage is the poor color range.
The cost of different models varies widely: there are both quite affordable and very expensive ones, for example, with gold plated. The latter are used in luxury interiors.
Ceramics
Ceramic corners are supplied complete with tiles. Their advantage is their ideal compatibility with cladding. The elements are painted in different colors, both to match the tiles and in contrast; there are varieties with patterns.
Flaws:
- high price;
- difficulty in installation;
- fragility: impacts may cause chips.
Polyvinyl chloride (PVC)
Plastic corners have their own attractive sides:
- low cost;
- wide palette;
- light weight: you can simply fix it on an already laid tile with silicone sealant;
- ease of processing: easy to cut with a hacksaw or knife;
- easy installation.
But this is still a budget solution, since plastic relatively quickly loses its attractive appearance: it becomes deformed and, due to its softness, becomes covered with scratches. In addition, due to its low strength, it may crack upon impact.
Plastic trims are divided into two types:
- Soft: equipped with silicone pads and suitable not only for flat, but also for embossed tiles.
- Hard: do not have silicone pads. They are not suitable for relief tiles, but they are easier to install than soft ones.
Plastic corners are most often used, with metal ones in second place.
External corners
The most popular type. Used when facing external corners. The sizes on sale are mainly 7, 9, 11 mm (with a length of 2.5 m). One side is a groove for tiles, the other serves as decoration and protects the slabs from impacts and chips. The hidden part is perforated for better adhesion of the tile layout and ceramics. Decorative elements are produced from:
- plastic;
- aluminum;
- brass and other materials;
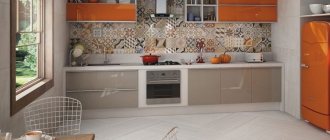
Decorating the end of the tiling near the window in the kitchen using a plastic layout.
Installation of corners
Tile profiles are installed when one of the two walls forming the outer corner is ready. Sometimes trims (layouts for tiles) are left until the end of the work. This happens under unforeseen circumstances: there are problems with delivery, there is a defect, etc. However, such a situation requires the tiler to have advanced qualifications and more serious calculations. The slightest inaccuracy can lead to refinishing or resignation to flaws.
When moving on to the next wall, a tile layout groove is placed on the back side of the finished wall. The product must match the size of the tile. The tiles will not fit into a corner of a smaller format, and a larger trim will force you to use more glue and will dangle.
To start laying the next wall, and the corner for the tiles does not slide, it is attached with tape or tile adhesive is used. The perforated side should be parallel to the tile to allow the perpendicular ceramic to lie tightly and evenly. Be sure to fill the joints with glue - voids deprive the structure of its functional meaning. Without a trained eye, it is better to spend time squeezing out excess mixture than to accept the hollowness. The video shows the installation of the layout using the example of a difficult place - slopes with a double outer corner: https://www.youtube.com/watch?v=b-9JPxPx2ks
Trimming corners
If the ceiling is suspended and rests on tiles, cut the layouts to match the tiles; do not leave yourself or others the need for further trimming. The installation of trims in the area of door and window openings (or in similar situations) deserves a separate discussion. To position the elements perpendicularly, you need to cut their edges at an angle of 45 degrees. Do this very carefully, otherwise there will be gaps or profiles for the tiles and will not lie without bends or burrs.
Trim at 45 degrees at the junction of 3 corners.
Corner repair
It happens that you no longer like the layout for the tiles, or maybe the profile for the ceramic tiles was damaged. In such cases, repairs are needed, but how to remove the trim, much less install a new one? This is a tedious task, but doable:
- Carefully, so as not to damage the tiles, cut off the old outer corner for the tiles;
- prepare a new one;
- trim the back of the trim;
- if necessary, level the area under the profile without touching the space under the tile;
- use liquid nails or silicone to glue the layout;
Elimination of defects
It is not always possible to connect elements correctly and flawlessly, especially for beginners. Nevertheless, it is possible to remove some shortcomings. If you cannot lay a corner with ceramic tiles evenly, try to compensate for the flaws with mortar, for example, by raising the adjacent element to the desired level.
When pruning, it is not always possible to achieve a slope of exactly 45 degrees. If not enough material is cut, the excess can be easily sanded down until you have a smooth angle.
Another point is the presence of defects at the junction. There are two options to fix the problem:
- The first is that installation is carried out in the prescribed manner, and chips and gaps are covered with grout during the finishing process.
- The second option is that after the mortar and fugue have dried, a plastic profile (decorative corners for tiles) is glued to the corner, masking these wall defects. Its installation is done using silicone or liquid nails.
Finishing corners is not an easy job, but it can be done if you correctly follow the tips presented above.
Rules for laying corners with tiles
If you decide to use tiles for wall cladding, you need to take into account all the details of construction work at the planning stage
In this case, special attention should be paid to how to lay out the corners with tiles so that the room looks beautiful. Naturally, before starting work you need to prepare the necessary materials and tools
It is better to think about laying tiles in the corners in advance
To do this you will need to purchase:
- ceramic tiles;
- special glue;
- crosses for joints between slabs;
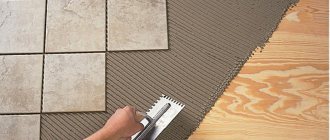
- notched spatula;
- finishing profiles;
- tile cutter and building level.
You will need to count the number of whole tiles that will fit in the area from the first inner corner of the room to the other. It is necessary to take into account: the size of the tile joints (which ranges from 3 to 5 mm); the distance from the joints of adjacent walls, which is approximately 5 mm; choose the so-called “red” place in the room, which, as a rule, should be in plain sight (for example, opposite the entrance).
It is recommended to start cladding from the most visible place
Therefore, it is recommended to start facing work with it. The opposite place on the wall should be less noticeable
When laying tiles in a “dark” place, you need to pay attention to the fact that it is advisable to lay out material larger than half the size on it. If too thin strips are glued, the cladding will have a makeshift appearance.
Therefore, you need to perform all the calculations quite accurately in order to comply with the rules for laying the material on the surface and obtain the visual effect of the integrity of the facing wall. All this must be taken into account at the planning stage.
It must be borne in mind that before tiling begins, the walls must be as level as possible. The quality of the cladding and the appearance of the surface depend on this.
Laying tiles in corners correctly
Before laying tiles in the corners, we decide on the so-called “red” place of the room - usually it is immediately noticeable. You need to start working with corners from this place. When tiling corners, the material must be glued on two adjacent sides - strictly symmetrically, so this must be taken into account and the same tile trims must be used. For cutting, you need to use a special tile cutter, which is equipped with a template that takes into account the required cut size with a seam allowance for grouting.
Making an internal corner
First, glue (mastic) is applied to a wall with an area of about one square meter; you need to start from the floor. The glue is spread with a special spatula over the entire surface to obtain an even layer with equal grooves. The solution is then applied in the same way. Glue the first tile. Then glue the second one.
Constantly check that the cladding is correct
To ensure an even seam, we install special crosses at the joints of the surface. Having glued the first row of tiles, we check the levelness of the cladding with a building level. Next, we continue to lay out the surface in the same way. Having reached the next wall, mark the distance to it, cut off the tile if necessary and glue it.
When starting to lay the material of the adjacent wall, we glue the remaining trimmed part. If the material is made with a pattern or design, then we combine its parts. In this case, we glue the edge of one tile overlapping onto the surface of the other, leaving a gap of about 2 mm. The material laid out in this way creates a feeling of integrity of the tiled surface, as if it were curved. Next, we continue to glue the tiles to the required height level.
Covering the outer corner
Only solid material is used for cladding external corners. When laying, the position of adjacent tiles on both the right and left must be strictly symmetrical, and the laying is carried out overlapping the surface of the tile. In this case, the cladding will look beautiful if the ribs have a rounded or glazed appearance. If the surface has unattractive edges, you can use a special profile for finishing, applying it with cement mortar. Such surfaces will look great. That's the whole secret of laying tiles. Further laying of the coating is carried out according to the rules described above.
When facing external corners, do not forget to maintain symmetry
Summing up the laying of corners with tiles, we can highlight the following important points that are necessary to complete the work:
- calculation of the quantity of ceramic tiles;
- choosing the right “red” place;
- the order of laying facing tiles on the internal and external surfaces of the corner.
Video on how to decorate the outer corner of ceramic tiles:
All that remains is to purchase the necessary materials and tools and begin work.
repaireasily.ru
Perpendicular arrangement
The simplest solution to the issue is direct docking. In this case, the elements are laid perpendicular to each other, that is, so that one cut remains visible, and the other is hidden under the upper fragment.
In this case, the joint in any part of the walls is closed with minimal effort. If adjustment of the tile is necessary, it is advisable to place the cut edge under the bottom. The disadvantage of this method is the presence of a seam at the junction of the tiles in the corners. Later it is sealed with grout, but this still affects the appearance of the surface.
Options for laying tiles at internal joints
There is another way to join tiles perpendicularly. This method is suitable, for example, for finishing curbs or bathroom frames. The main condition is that the cladding should not be visible from below.
The essence of the method is as follows: it is necessary to glue the tile so that the horizontally located (top) tile hangs over the edge. The corner will turn out neat if the width of the canopy is within 3-5 mm. The only condition is that the edge must be solid.
Varieties and sizes
The corner can be installed on internal and external corners.
They completely follow the shape and help level the surface in the bathroom.
At the same time, the tiles look more rich and stylish.
The outer corner must be placed at the junction between two walls. Such protrusions are always connected to each other at right angles. The product has a slightly rounded shape, which prevents injuries from the sharp corners of the ceramic. Thanks to installation, it is also possible to significantly extend the service life of the surface.
Rounded outer profile
When purchasing this item, you will need to pay attention to its main characteristics:
- Width - from 7 to 11 mm.
- Universal length - 2.5 m.
There are special grooves on one side that provide strong adhesion to the tiles. The corner performs not only a decorative function, it also protects the structure from the negative effects of the environment. Today, plastic, aluminum and other types of materials are used to make corners. Most often they are painted white or another neutral color.
Internal elements are necessary to decorate the corners and are mounted in a similar way. Their width is standard and is 1 cm. However, it is possible to adjust this indicator depending on individual needs.
Mounting internal corners to tile material
This allows you to protect the surface from the harmful effects of liquid, fungus or mold. The material is universal, so there is no need to use special cleaning products to clean it.
Profiles for tile coverings fully cope with protection
Additionally, if used, it is possible to significantly speed up the installation process. Manufacturers offer their customers corners that are made in the following forms:
- P. Necessary at the stage of completion of finishing work.
- T. Dividing insert.
- D. Corner option, which can only be fixed at the joints. They can be mounted in a vertical or horizontal position.
- H. Separating insert between floor, ceiling or wall.
When installing the surface, you can do without this element. The choice directly depends on the designer’s idea, which is currently being implemented by the builder. The corner can be wall-mounted or overhead. The last option performs only a decorative function. Moisture may accumulate on its surface during operation. The element cannot fully protect the surface from external destructive influences. However, the overlay element is used when it is necessary to prevent the wet floor from slipping.
External corner for tiles (square) made of stainless steel
L-profile for tiles
T-profile
Peculiarities
Decorative corners are used during the final stage of renovation.
The main purposes of the corners:
- give the finishing touch to the decorative design;
- neat and stylish design of the joints between tiles and plumbing fixtures, especially when it comes to difficult areas of the room;
- Use during refinishing or upon completion of renovations.
Depending on the shape, experts distinguish two types of corners.
- External. Use to design a convex corner. The main purpose is wall decoration. Thanks to them, sharp parts can be covered simply and practically.
- Internal. They are chosen when you need to design a concave (internal) corner. If you need to level the surface between the tiles and the bathtub or create a corner, choose corners of this type.
From a design point of view, corners can be divided into two groups:
- Decorative. During the manufacturing process of these elements, special attention is paid to the appearance of the product. They can have different colors and shapes depending on the style. The material most often used for manufacturing is ceramics or PVC.
- Functional. This is the main group of corners presented on the modern market. They are characterized by increased reliability, stability and practicality.
Existing types and sizes
The width of the corner is 7-12 mm, the length is 2.5 m. External and internal corners, according to their aesthetic characteristics, perform the following tasks:
- decorative, they decorate the cladding of premises and are distinguished by an abundance of color schemes;
- functional, they allow you to design surfaces with complex geometry, mask unevenness and roughness of edges, provide waterproofing of joints, and reduce the risk of injury.
What materials are they made from?
Materials for making corners for tiles:
- aluminum;
- metal alloys;
- polyvinyl chloride;
- ceramics.
For ease of installation, layouts should be 1-3 mm wider than the thickness of the tiles.
External and internal layout
Building materials stores offer a large selection of trims (another name for corners for ceramic tiles) of different shapes, sizes, thicknesses and all kinds of colors. External corner is a material for edging and decorating edges, ends and external corners in rooms decorated with tiles, ceramic tiles, porcelain stoneware. The materials from which the tile layout is made are durable, have good anti-corrosion properties, and allow the accuracy of the angular geometry to be maintained.
Advantages of external aluminum layouts:
- structural rigidity;
- resistance to corrosion and mechanical damage;
- beautiful appearance of the products.
Corners made of metal alloys are available in nickel or chrome plated, often painted gold or silver. This type of trim is considered universal, because they match any interior color scheme. External PVC panels are lightweight, have good waterproof properties, and offer a wide choice of colors. The ceramic profile maintains the aesthetic integrity of the cladding design.
The internal corner, used to design internal corners when joining adjacent surfaces, aligns the joints and hides trimming problems. The internal layout is highly water resistant. This type of trim does not carry a large functional load, so it is often used as a decorative element when decorating a bathroom.
How to choose
When purchasing, take into account the geometric dimensions, color, pattern of corners, etc.
Tile groove width
This parameter should be 1 mm greater than the thickness of the tile. For example, for six-millimeter modules, trim No. 7 is purchased. When the thickness of the tiles on the joining surfaces is different, they are oriented towards the thickest one. The corners without a groove must be equal to the thickness of the tile.
Aluminum corner
Color and pattern
To objectively assess the compatibility of the corner and the tile, you should take a sample of the latter with you to the store. The trim is selected to match the tile, or with a lighter shade. White corners are versatile and look good on any tile.
Number of profiles
To determine the required quantity, divide the sum of the angle lengths by the length of the profile, then round the resulting value up to a whole value and add one. An extra corner is needed in case of damage to the material. With this scheme, you won’t have to buy additional trims and they will all be from the same batch, that is, they perfectly match each other in color and pattern.
The metal edging will also reliably protect the edges of the tiles from chipping
Manufacturer
It is recommended to give preference to well-known brands. They offer quality products that will last a long time. For this, various techniques are used, for example, coating the corner with acrylic varnish.
Quality is also assessed visually: the corners must be even, the same size and free of damage.
Installation technology
Aluminum, plastic and metal trims are attached to the wall surface using tile adhesive. The profiles have a perforated inner surface, which allows them to be slightly pressed into the adhesive layer for better fixation.
Layouts are divided into 3 groups: hard, semi-rigid, soft. To design corners and joints of complex geometry, the best option in choosing profiles would be plastic layouts, since they are easy to cut. Straight and clear joints cover metal products well.
Installation of corners for external joints:
- Make markings on the wall. To do this, cut off the required length of the profile and apply it to the finished joint. Rectangular tiles or products of a different configuration are inserted into the trim groove on both sides. Measurements are taken and the necessary marks are marked on the wall.
- The corner is covered with glue and the elements are laid. The correct installation is controlled by the marks made at the beginning.
- The edges of the tiles are inserted into the grooves and the trim is pressed against the surface of the cladding to remove voids.
- Remains of glue are removed with a rag, and the surface of the cladding is wiped dry.
To prevent the tile from “floating”, it is additionally fixed with masking tape, which is removed after the glue has dried.
The decorative corner for internal joints consists of several parts:
- groove for tiles;
- perforated protrusion;
- concave fragment.
Installation begins after the facing material has been completely laid on the wall. The profile is chosen 2-3 mm larger than the thickness of the tile. Apply glue to the cladding. The elements are applied to the edge of the wall covered with adhesive material, pressing tightly. Place the tile into the groove. The same procedure is done on the other side of the corner. Press firmly to remove voids between the tiles and the trim. After drying, grout the joints.
Particular attention should be paid to the processing of joints. When installing the layout between the edge of the bathtub and the adjacent wall, you need to treat all the cracks with sealant so that there are no large gaps left
This very important procedure is performed using an aquarium protective coating. Laying of trims begins after the glue has completely dried. The use of a PVC profile to seal the joint between the bathtub and the wall is most justified. It cuts well, does not allow moisture to pass through, and quickly sticks to “liquid nails” or tile adhesive. When gluing, the corner is pressed tightly against the wall and the edge of the bathtub.
Pruning
When cutting layouts, it is necessary to take into account the characteristics of the material. Cutting is done with a hacksaw or grinder. When using a hacksaw, you can use a miter box. This carpentry tool is essential for cutting corners correctly.
The solution to all problems: corner tiles
When dealing with the question of how to lay tile corners, it is worth paying attention to the tile lines that the manufacturer produces taking into account the presence of corner tiles. Then the problem is completely removed, since such ceramic corners can not only be easily laid, but will also even out uneven corners.
Many manufacturers offer a wide selection of corner tiles for both external and internal orientation. Such corners are laid out first, and the rest of the tiles are joined to them. Creating solidity and external integrity of the finish, the choice of such a design looks very harmonious, although such a finish will cost a little more, but not so significant as to refuse it.
Preparing for the workflow
Just as there are no 90-degree angles, there are no even adjacent surfaces that would form them. Before laying tiles, it is imperative to lay out the cladding, taking into account all the features and condition of the surfaces on which the tiles will be laid.
In apartments, as a rule, the kitchen, bathroom, toilet and, less often, the floor of the corridor or hallway are tiled. A glazed balcony or loggia can also be tiled both on the walls and as a floor covering. In all these rooms, tilers are faced with internal and external corners, under-window niches for central heating radiators and wall niches.
The external corner is formed when lining window and door openings and the perimeter of niches.
All these nuances are taken into account when laying out tiles in rooms and spaces to be tiled.
An example of tile layout taking into account the sizes, angles and other features of the room.
Layout is the most important operation during facing work. The final result and quality depend on how competently and mathematically correctly it is done. Layout and layout should not be confused. Laying out is a technological process when the tiles are removed from the packaging, sorted by size and color, and laid out “dry” on the surface to select a pattern or ornament.
- Layout is a purely analytical stage of work. When starting the layout, they measure the room and assess the condition of the surfaces on which the tiles will need to be laid. Based on this assessment, a decision is made on the degree of treatment of these surfaces. During laying, the master must inspect all the corners and choose a way to lay the tiles in one corner or another. If the corner is blind and will be constantly filled with furniture, therefore, it can be laid out in a simplified way.
The layout of the entire room and the final calculation of the amount of required tile material and building mixtures for laying, processing and grouting the tiles will depend on how the tiles are laid on the corners.
Using Trims
The most popular method, perhaps, is the use of special inserts - trims. They are a plastic profile that forms the angle of the desired direction. An L-shaped pad is used for external projections. And the inner corner looks like a concave arc. Narrow convex models can also be used.
One more important issue needs to be resolved: how to glue the plastic corner to the tile. Several options are possible:
Often, such trims have a special design that allows them to be laid on the solution. A special plate is driven under the tile and fixed with tile adhesive. This installation is extremely simple, the surface acquires a neat appearance, and the joints are protected from moisture and bacteria.
Some types of trims for facing external and internal corners
The outer plastic corner and trims at the junctions with the plumbing (curbs) can be fixed differently, for example, using silicone or acrylic sealant. How exactly to glue the plastic to the tiles in the bathroom does not make much of a difference. This type of finishing of walls or corners of the box is suitable for almost any type of tile.
Preparation stage
Before you start gluing tiles in the bathroom, you should lay out the tiles. The quality of the work performed will depend on the correct execution of this process. When starting the layout, they measure the bathroom space, then inspect and evaluate the surface of the walls on which it is planned to glue the tiles.
Before you begin, it is important to measure the bathroom space.
If necessary, additional preparation of the base is carried out. During the laying process, all wall joints are subject to inspection to select a ceramic laying method. When the corner is not visible due to furniture or plumbing in the bathroom, the installation method can be simple.
To ensure that the intersection of walls is perfect and flawless, several methods are used. It should be noted that some of them can be implemented only with special equipment, and having experience in the work will not be superfluous.
Docking methods
There are several methods for finishing wall corners. In this article, we suggest you consider the following options:
- Direct docking.
- Edge trimming.
- Using trims.
- Corner tiles.
Each of these methods has its own differences. We are confident that one of the listed methods will help you lay tiles.
Direct docking
You can lay tiles at right angles. This is the easiest way without any hassles. That is, it is assumed that the tiles are joined to each other without any trimming. As a result, one slice will be hidden, and the second in plain sight.
This method allows you to level a corner in any part of the wall, even the most inaccessible, with the least effort. If the tiles converge into a corner and one of the edges is cut off, then think about it so that it is not visible. It is better to have a factory cut on the outside.
Another method that involves perpendicular joining can also be included in this category of joining tiles. This method is only relevant if a special border is used to cover the protrusions.
The principle of joining tiles is as follows: the tile is glued to the surface so that the top tile, located horizontally, hangs over the edge. In this case, the joint of the tiles in the corner will be neat (provided that the canopy reaches no more than 5 mm). In this case, it is important that the overhanging edge has a factory cut.
Laying tiles in an internal corner - video
Edge Trimming
We can safely say that this is the most difficult way to decorate the corners of ceramic tiles. It is mainly used by those who have special equipment for cutting tiles or by experienced tilers.
The idea is that the sides of two tiles are cut at 45°. The result is a perfect 90° angle. Mostly the tiles are placed so that there is a small gap near the walls. A tile at least half the width of the whole is placed in it.
And laying it is not difficult, because it has a rectangular shape. To form such a clear angle, you need to understand that the walls must be perfectly aligned. If the angle of the wall, both internal and external, does not have 90°, then cutting 45° corners on the tiles does not make sense.
As for the cut, it is best done with an electric tile cutter. The cutting element should be a diamond-coated circle. Due to high speeds, a perfectly even and smooth cut is obtained.
The only thing is that the guide on the bed must first be set at 45°. After such a cut, you will not need to further process this side of the tile.
Some craftsmen have adapted to using a budget option, making the cut with a regular tile cutter and adjusting the edge with a grinding machine. However, this method has its drawbacks. It is extremely difficult to make a perfect cut, as is the case with an electric tile cutter.
If you already have a tile cutter, and it has the ability to change the cutting angle, then you can beautifully design the internal and external corners of the walls.
A visual example of tiling a corner with cutting tiles at 45 degrees
Using Trims
This decoration of wall corners is in great demand. Joining tiles using trims greatly simplifies the tiling process. They exist both internal and external.
One of the main advantages is that it is possible to choose trim of a wide variety of colors, which will be most suitable for decorating a corner. They can be plastic or metal. Accordingly, they differ in cost, the first ones are much cheaper. Among workers, trims are also called corners.
So, to finish the outer corner, an L-shaped corner is used. It has a slight bulge. Corners for internal corners have a concave shape. They are often used as a transition from tiles to a bathtub.
The advantages of such corners:
- Excellent aesthetic properties.
- Excellent protection of corners from possible mechanical damage. If you accidentally catch a corner with a heavy object, you will have to replace not the tile, but just the corner. And if the corner is metal, then no damage will be visible at all, except perhaps a small scratch.
- Trims are convenient for finishing wall corners. There should be no difficulties during laying the tiles.
- When forming a tile corner, there is no need to use expensive equipment, such as a tile cutter. It is enough to have a level at hand.
- The trim is glued using liquid nails or silicone. Special adhesives can also be used. Some specialists can lay such corners on the same mortar that is used to lay the tiles.
Options for correct installation of tiles on external and internal corners - video
Corner tiles
Ordinary corner tiles are often used to decorate wall corners. But not all manufacturers produce tiles of this shape. By far, this is the easiest way to trim corners. In appearance, they are presented as two tiles connected at 90°.
However, they are used primarily for external corners. When laying tiles of this shape, glue is used, onto which the remaining tiles are laid in a straight line.
The result is beautiful. Using special corners made of metal or plastic cannot even compare with this method.
Washed down the front part at an angle
The most difficult way to lay tiles is in the inner corners of the floor surface. It is used by experienced craftsmen, as well as in cases where the angles deviate greatly from 90 degrees.
On the floor, work on laying tiles begins from the center to the corners.
With the classic layout of tiles on the floor, walls and corners are approached in whole tiles, leaving a gap for laying edges. With this layout, there remains a distance between the whole tile and the wall surface that is greater than the width of half the tile, so laying the edges is not difficult even for beginners. All edges are rectangular in shape and, depending on the type and thickness of the tile, can be obtained either using a glass cutter or using a manual tile cutter.
The sequence of laying tiles on the floor surface is as follows.
- With the classic layout, the center of the floor is first determined and whole tiles begin to be laid from there towards the walls. Having finished laying the whole tile, they begin to lay the edges along the walls, while laying occurs up to the penultimate edge in the inner corner.
- The last two cuts, which will form the corner, require cutting at a certain angle along one of the smaller sides of the rectangle. With an internal angle of 90 degrees, and such an angle can be obtained when leveling walls using sheets of drywall, trimming occurs with an angle of 45 degrees of both mating edges.
As already noted, straight internal (and external too) corners are extremely rare, therefore, individual markings of edges are made in each corner.
Sawing down the corners of end tiles is a complex process that requires high precision tools.
To do this, the edge is applied flush to the corner and a line is drawn along the front side of the tile from the inner corner to the outer corner of the last intact corner tile. The same actions are carried out with another section, but along another wall.
It is best to cut tiles using this method of laying corners using an electric tile cutter mounted on a stationary bed and with a diamond cutting roller. Then the cutting line will be smooth and will not require additional processing.
However, such tile cutters are quite expensive, and their rental is also not cheap. For small amounts of cutting at an angle, you can use a manual tile cutter, but make the cut with a small tolerance. Tolerance is necessary in order to use a grinding machine to level the cut line and adjust the edge of the tile to the place of masonry.
When marking corner edges or solid tiles, it is necessary to take into account the width of the tile seam so that it does not stand out among the row seams.
Installation methods - nuances
First of all, you need to find out what methods are used to lay tiles in corners and which are applicable in specific cases. Currently, the following methods of working with angles can be distinguished:
Tiling masters divide these methods into easy and difficult ones. But for such an assessment it is necessary to first familiarize yourself with them in detail.