After repairs, gaps up to 40 mm wide often remain. The gaps between the wall and the floor are ventilation, which helps the underground space to dry after completion of work. If you leave gaps, then over time the defect will become very noticeable and a draft will begin to circulate. In this review I’ll tell you how you can get rid of holes between the baseboards.
How to remove cracks in glued-on skirting boards made of different materials: a review of methods
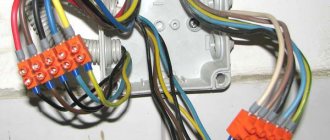
Home renovation involves significant costs.
Therefore, many of its owners try to carry out construction on their own so that the price of the work decreases. However, if you do not have skills in this area, you will not be able to get good quality work. For example, after an amateur repair, immediately or after a certain period, the question arises: how to seal the cracks in the ceiling plinth that appeared in the areas where it joins the walls. One thing needs to be said – don’t panic. Our article will help you cope with this problem.
Such gaps often arise when installing skirting boards.
Choosing a skirting board
The plinth under the laminate must have a fastening that ensures its adhesion to the wall, and not to the coating. For the mobility of the covering, the baseboard should not restrict the movement of the board.
Considering that a gap of about 1 cm is usually made, the width of the plinth should be at least 1.5 cm, since in practice it turns out that the width of the gap is slightly larger. In addition, the baseboard should completely cover the gap so that no gaps along the baseboard are visible. When installing, do not tighten the screws too much so that the baseboard strip is not deformed and is level.
Thus, laying laminated flooring largely involves following simple installation rules. If you do not adhere to them, then the mistakes made will lead to deformation, damage and a short service life of the coating.
An important nuance in the installation of laminated boards is the provision of a gap between the wall and the coating. This way you can avoid lifting the boards and deforming the flooring material.
What methods can be used
The photo shows sealing the gap with sealant.
There are several effective methods for masking gaps between walls and baseboards, the most popular of which are:
- filling the space with sealant, silicone or acrylic;
- filling cracks with putty;
- making inserts from plinth fragments.
Note! At first glance, the above methods do not seem particularly complicated. However, it should be borne in mind that the success of the repair and its difficulty depend on several circumstances. Firstly, your accuracy. Secondly, the nature of the cracks and their size. Thirdly, the method of eliminating them that you choose.
What is taken into account
When thinking about how to seal the gaps between the wall and the baseboard in order to correct the resulting defects, you need to proceed from the size of the gaps:
- So, gluing in a piece cut from the baseboard itself will help if the gap is relatively large.
- Here you need to take into account that you are unlikely to be able to prepare a segment whose shape will ideally match the space being repaired.
- Based on this, the edges of the hole being sealed will most likely have to be adjusted using a knife so that the fragment fits tightly into it.
Covering gaps with putty.
You will also have to widen the gap if you determine that it is necessary to apply putty or sealant.
- To prevent the repair mortar from falling off over time, to improve adhesion it is necessary to increase the area of its contact with the base.
- For this purpose, the best option is to clean the gap and give it a cone-shaped shape with an extension at the top.
- It is best to fill the prepared gap with putty using a rubber spatula. It is convenient for them to remove excess mortar and give evenness to the joint being sealed.
- Using sealant to correct defects is even easier. It must be carefully squeezed out of the tube, while simultaneously filling the space being repaired. Then you need to use a plastic spatula or a finger dipped in water to create an even and smooth joint.
Note! The sealant should dry a little. Therefore, the seam should be formed some time after it is filled. It will be best if you practice performing the operation on some unnecessary object.
If the case is non-standard
If the gaps are small, they can be filled with this glue.
Often, special construction adhesive is used to install upper (ceiling) skirting boards. When such a composition hardens, it is very difficult to cut it with a knife in order to widen the gap and give it the desired shape with your own hands.
And wide cracks do not form when using such a material. Based on this, it will be quite enough to apply a layer of Moment-Montazh adhesive to the gap.
Not in all cases, the reason for the appearance of cracks at the junction of walls and baseboards is non-compliance with technical installation requirements.
Here it is necessary to take into account that planks made of different materials can be used to decorate the perimeter of the top of the walls:
- Thus, slats made of polyvinyl chloride are included in the package of plastic suspended or suspended ceilings.
- Analogues made from expanded polystyrene are best suited for concrete, plastered, wallpapered walls or partitions, partitions constructed from gypsum plasterboard.
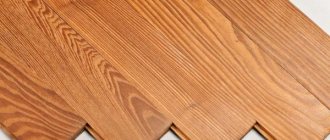
- Wooden plinths are good for corresponding walls - cobblestones, log frames or surfaces lined with wood.
There are no cracks on smooth walls.
Note! The instructions warn that if the plane of the ceiling and its junction with the walls are completely flat, then no problems will arise when installing the skirting boards. Especially when the work is carried out by a competent specialist.
However, in older houses, the walls often have such a curvature that stuns most modern builders. There won't be enough money to level them out.
Based on this, when sheathing ceilings, between walls and baseboards used as initial planks, gaps of different sizes inevitably form. It is impossible to hide the gap with a ceiling plinth in such conditions. All that remains is to seal it with sealant.
Do-it-yourself laminate installation instructions
Laying laminate flooring with your own hands. Download.
Laminate is thin sheets with a thickness of 6 to
11 mm, from one to one and a half meters long and about 20 cm wide. At the edges
panels have “locks” with which they are joined together.
The top layer of the laminate is a durable film, which has the function of protecting the panel from sunlight, moisture and mechanical abrasion during its operation. The next layer is paper, on which
which is applied with the texture or color of various m
materials: wood, stone, sand, etc. Next comes a load-bearing layer of high-density fiberboard, which determines the strength of the future coating. And finally, the final layer is made of paper impregnated with various resins, which serves to protect the base layer from moisture.
Surface preparation
After you have bought the laminate and brought it home, you need to keep it indoors for several days so that it adapts to humidity and temperature and takes on the appropriate dimensions. So, the purchased laminate is already in the apartment and is waiting to be installed. First you need to evaluate the quality of the surface. If you have an old wooden floor, then you need to use a building level to check its horizontalness. Over a length of about 2 meters, differences of several millimeters are acceptable. If the unevenness exceeds the limit, then you will have to level out the unevenness with a grinding machine. It is also necessary to check its rigidity. If the boards sag even from human weight, then they need to be replaced or strengthened. When laying laminate flooring on concrete, it is necessary, as in the case of a wooden floor, to check its horizontalness. If any small deviations are found, apply a self-leveling screed. Next, you need to lay waterproofing made of polyethylene film on the surface perpendicular to the direction of laying the laminate. In this case, the overlap of adjacent strips should be at least 20 cm. In order to avoid moving individual strips during the installation of the laminate, MirSovetov recommends connecting them in several places with self-adhesive tape. To increase heat conservation, the surface of the concrete can be covered with sheets of 10 mm plywood. Laminate flooring can also be laid directly on linoleum. To do this, you just need to check the rigidity and evenness of the base underneath. In this case, waterproofing may not be installed. You can also use cork as a backing. This is a more environmentally friendly material, however, and more expensive.
Laying laminate.
Next, you need to choose the direction of laying the laminate. If the windows are on one wall of the room, it is recommended to use direct laying of the laminate along the direction of the sun's rays. This is due to the fact that when laid across the direction of the light source, the shadows from the joints of the panels will be more noticeable and can slightly spoil the appearance. According to the connection method, laminate can be divided into glued and glueless (locking). Locking laminate is generally divided into 2 types, depending on the snapping system. The first type is prefabricated locks, or “Click” locks. The second is a latch lock, or “Lock” locks. Also, “Click” locks are often called a 45-degree lock or a “double lock.” The main difference in these locks is the peculiarity in the installation of the coating. The main advantages of “Click” locks are considered to be, firstly, the low probability of damage to the panels during installation, and secondly, the high strength of the connection. “Lock” locks are a more economical option. Typically, laminate with this type of lock costs a little less, but the quality of adhesion of the panels is also lower.
Laying interlocking laminate, “Click” locks.
Let's consider the process of installing a coating with “Click” locks. To begin, use a tape measure to measure the width of the room and calculate the width of the panels of the last row laid out along the wall. If the width is less than 5 cm, then it is necessary to cut the boards in the first and last rows so that their width is the same. In this case, you need to take into account the gap from each wall, which should be about 10 mm. Installation usually begins from the far left corner of the room in the direction of light along the wall surface with the long side of the laminate panel. In this case, as already mentioned, spacer wedges with a thickness of about 10 mm are installed near the walls, which will serve as a future gap. After finishing the work, the wedges are removed. Gaps are necessary to ensure that the laminate does not “stand on end” as a result of thermal expansion. MirSovetov would like to draw attention to the fact that in rooms longer than 12 meters the gap must be increased. Its size is calculated based on the ratio of 1.5 mm per meter of length.
So, we place the first board in the left corner of the wall. Next, the next panel is inserted into it from the end (shorter) side at an angle of about 30 degrees with a groove and snaps into place by pressing the panel towards the floor. We continue like this until the end of the wall. The end seams of the next row must be shifted at least 30-40 cm relative to the previous row in order to achieve a checkerboard pattern. This is required to distribute pressure evenly across the panel. There are possible options here. If you had to cut a laminate panel to the required length at the end of a row, the remainder of that panel can be used as the first panel of the next row to be laid. If there is a whole number of panels in a row, then in order to get a staggered laying order, it is better to start with a laminate panel cut in half. Starting with the cut panel, we also connect the second row together with the shorter end sides, without joining the first row. Then we connect the rows to each other. To do this, we lift the already interconnected panels of the second row above the floor by a few centimeters, insert them into the ridge of the first row (also at an angle of about 30 degrees) and click them into place by pressing them towards the floor.
Also, laying the next row can be done by first connecting the long sides of the panels, and connecting the end parts by knocking the panels with a hammer. At the same time, in order not to damage the panel, it is necessary to attach a small block to it. We lay subsequent rows using one of these methods.
Laying interlocking laminate, “Lock” locks.
When using “Lock” locks, the tongue of one panel is inserted into the groove of the other. In this case, the panels should lie horizontally to each other. Next, using a hammer and a block, the panels are knocked together. Now let's look at the process itself. Just as in the case of the “Click” lock, we calculate the width of the last row of panels taking into account the gap. When the width of the panels of the last row is reached, we again saw the boards of the first and last rows so that they are equal in width.
We begin laying the laminate from the far left corner. Laying the first panel. Next, we bring the second panel strictly horizontally to it from the end side, insert the tenon into the groove of the previous panel and knock it down with a hammer and a block. In this way we lay the entire row. When starting to lay the next row, do not forget that the joints of the panels in the row also need to be shifted to obtain a checkerboard pattern, which will ensure uniform pressure on the entire surface of the floor being laid. Bringing the first panel of the second row horizontally to the first row, we connect the tenon into the groove. We also connect the second panel of the second row to the first row, while slightly retreating from the end seam of the first panel by a few centimeters. The end seams are connected by tapping the second panel to the first.
Laying the last row and the last panels in a row (laying against the wall) is done using a clamp. In this case, you will need to cut the panel exactly to fill the space that is left between the wall and the second to last panel (including the gap for the spacer wedges). In order to cut off the required part of the laminate panel, MirSovetov recommends the following method: we place it on top of the penultimate panel so that their edges overlap one another. We place another, third panel on top of them, but this time so that one of its edges is adjacent to the wall. Along the edge of the third panel opposite from the wall, we draw a line on the second panel - this will be the part we need for installation. We lay the entire floor surface using this method.
Laying adhesive laminate.
The main advantage of an adhesive laminate is the reliable protection of the panel joints from moisture penetration, which results in an extended service life of the coating. Disadvantages: more complex installation and additional costs for glue. You can begin using the floor only 10 hours after installation. Due to the fact that the panels are rigidly attached to each other, the coating can no longer be disassembled and reused. In addition, adhesive laminate is not recommended for use on heated floors.
When laying adhesive laminate, a special water-repellent adhesive is applied to the ends of the panels. The panels are then connected using the tongue and groove principle. Here it is important not to save money in any way, for example, by using regular PVA glue. It is made on a water basis, and its use will most likely lead to swelling of the surface of the laminate, and as a result, disruption of the joints. You can buy special water-repellent glue at a hardware store or ask about its availability at the place where you buy the laminate. The amount of glue applied is selected according to the manufacturer's instructions. The best option would be to apply glue along the entire length of the groove, both on the short and long sides of the panel. All recommendations for laying direction and gap setting are the same as for glueless laminate. Let's start installation. First, we lay the first row of panels with the established gap. To do this, we lay the first panel with the groove against the wall. Then apply glue evenly to the upper edge of the end groove of the second panel. MirSovetov recommends applying glue in excess to ensure a reliable connection. We insert the tongue of the next panel into this groove and carefully tap it with a hammer and a block; wipe off any remaining glue that appears on the surface with a damp cloth. We repeat the process until the row is completely laid. After the first row of laminate is laid, we proceed to the second row. We cut the first panel of the second row in half in order to move the end seams. We coat the side of the groove of the second row panel with glue and attach it to the panel of the first row. We tap the panel using a block and a hammer. Next we attach the next panel. We apply glue to the side and end grooves and, moving slightly from the first panel of the second row, we match this panel to the first row. And then we match the second panel to the first. Remove excess glue again with a cloth or damp sponge. After laying the first 3 rows, it is recommended to wait 2 hours for the glue to dry. We continue the process until the surface is completely laid. When laying the last row, it is recommended to use a crowbar to connect the rows. They need to work carefully so as not to damage the laminate panel or wall. If heating pipes pass through the floor, it is recommended to make a template from paper, which is transferred to the panel being installed. The holes are cut using a jigsaw. We also do not forget to leave a gap at the junction of the panels with the door frame. Once the laminate installation is complete, the spacer wedges are removed and the gap is closed by installing a baseboard. Important! The plinth must be attached to the wall, not to the floor. That's all, good styling.
What to do with wooden planks
It is better to repair wooden slats with such putty.
Wooden floor skirting boards also often need adjustment. The problem of this natural material is well known - it changes its shape under the influence of the environment. In this regard, a reasonable question arises: how to cover the gaps between the wall and the baseboard.
In this case, the best option is to use putty. It can be gypsum, or even better, use a special polymer-based composition for wood. Then you can choose the color of the solution that will best match the tone of the walls.
How to cut a plinth at any angle and without gaps - 3 working methods from a practitioner
There are now more than enough tips on how to cut a baseboard at 45 degrees on the Internet, the only bad thing is that most of them are given by people who have never done this. Next, from a practical point of view, I will tell you how to cut skirting boards at the corners with your own hands in 3 options, and you will learn about both traditional methods and folk universal recipes.
The science of how to properly trim ceiling moldings in corners is not as complicated as it may seem.
Preparation for work
Filling such cracks falls into the category of cosmetic repairs. Preparation depends on what decorative elements your walls or floor are decorated with. If there is a baseboard, it must be removed, the wallpaper removed, the paint layer cleaned and removed, and the whitewash washed off. In the latter case, you need to let the wall dry completely. Remove all dust and dirt that may interfere with the quality fixation of the sealing materials.
If the sealing takes place in a room where you do not plan to carry out a complete renovation, then you need to remove the wallpaper only partially, or try to carefully tear off the strip from the wall so that after finishing the work you can glue it back, returning the wall to its original appearance. All surfaces that may get dirt during the repair process must be protected with film, paper and secured securely - this will avoid additional costs when putting things in order. Such measures will protect the floor and walls from polyurethane foam, plaster and paint. Paper or newspaper should not be used if there will be a lot of water in the workplace - it is useless as a protective material in this case.
What does the manufacturer write on the packaging?
Each manufacturer uses its own marking system for laminated panels. However, there is a unified system of symbols that both Russian and foreign laminate manufacturers must adhere to.
Regardless of the brand of coating, an important indicator of the service life of the coating is the designation on the packaging. This is a number that is inscribed either in a square or in a circle.
In addition, to designate an industrial premises, a drawing of a house is used: with a triangular roof for residential premises, a rectangular residential building for commercial premises, and the same rectangular house with a chimney for industrial premises. The abrasion class can be designated in ascending order AC3-AC5.
- The drawn little men indicate the level of load: the more figures, the higher the wear resistance.
- Numbers from 31 to 33 indicate the class of coating, from 8 mm to 12 mm - the thickness of the board.
- The anti-slip symbol is indicated by an icon with a description: R9 – R13. The lower the number, the higher the anti-slip rating.
- The symbol with up arrows indicates the possibility of installing the covering on a heated floor system.
- The clock and styling element symbolize the possibility of quick styling. And if there is an icon with a roller, then this indicates the need to mount the coating on an adhesive base.
- The ECO icon symbolizes the environmental friendliness of the material.
- If there is a square icon with the letter E1, then this indicates the absence of harmful impurities in the composition of the board.
- Harmless use and environmental friendliness are indicated by CE marks.
- If the coating is moisture resistant, then it is marked with a sign in the form of one or several drops (in different interpretations).
- The symbol with a speaker, horn, or ear indicates the ability of the coating to absorb sound.
- A foot on the floor in the form of an icon indicates the thermal insulation properties of the material.
- UV resistance is indicated in the form of a sun.
- Light weight is indicated by a balloon.
- Shoes (boots or women's shoes with stiletto heels) indicate resistance to abrasion when wearing shoes.
- An animal's paw print also indicates increased abrasion resistance.
- Spilled products or a glass of drink indicate resistance to chemicals and liquids.
- The icon with a cigarette butt on the floor means that the surface of the coating is resistant to an accidentally dropped cigarette.
- The antistatic surface is indicated by a double arrow.
Each manufacturer's designation symbols may differ, but the understanding of the symbols should be reduced to a single designation system for the floor covering.
The goal is a large gap
To fill the hole, the ideal option would be suitable sized pieces of brick, polystyrene foam, polystyrene foam or plastic. If the parts are large, then they need to be broken or broken - small filling components guarantee that they will fit inside the hole as tightly as possible and thoroughly fill the cavity. Be careful that when filling the gap, you do not deform the existing hole or expand it.
These materials will help you save expensive mounting foam, which should be poured into the gap after the previous materials. Practice shows that using bricks or other fillers, only one container of polyurethane foam is required to restore even very large damage.
You should not fill it to capacity, because it tends to expand several times. Fill the remaining space by about a third, in very severe cases - by half. If the layer turns out to be very large, then apply it not at once, but in parts, allowing the previous layer to completely expand and harden. This will reduce the risk of overfilling and subsequent falling out of rags of foam, and as a result, will save its volume.
Application of wooden slats
Working with such material is difficult; it requires perseverance to achieve the desired result. By the way, in terms of efficiency, this is the most successful solution, because there are small boards inside the cracks, and with this solution, creating thin holes is simply impossible. But if you need to seal the seam between the parquet and the wall, this is an ideal option.
You need to do the following:
- Use a milling cutter to process the side edges of the gap to widen it slightly. Remove the old layer of wood from the surface.
- Drive the dowels into the crack to level it. Sand the end elements of the floor covering with sandpaper and cover the top with adhesive.
- It is better to choose slats with a thickness smaller than the hole. First you need to lubricate them with glue, and then nail them between the surfaces.
- The surface should be treated with glue and sanded. Thanks to this, the repair site will become invisible.
The target is a medium or small slit
The ideal option for filling such holes would be soft, plastic materials with high density - tow or construction felt. To prevent such materials from becoming a haven for insect pests, before filling they must be thoroughly impregnated with insecticidal substances, most often formaldehyde.
The material is rolled into small rolls, the diameter of which should be slightly larger than the size of the gap, and applied to the gap. Next, using a small rubber or wooden hammer, the roll is carefully but confidently driven into the hollow space of the damage. It is advisable to fill the void with a single piece of material, without small parts, so that unnecessary cavities do not form between them.
If the gap is so small that you physically cannot drive tow in there, then a soft spatula and a plastic gypsum mortar will come to the rescue. The technology is simple - apply a strip of plaster to the tip of the spatula and apply it to the damage, then gently press. This will allow the mortar to fill the entire cavity and immediately finish the wall surface to minimize finishing preparation.
To protect the surrounding area from dirt, you can use self-adhesive construction fabric (which will not work if you already have wallpaper) or the above methods. After the gap is completely clogged, the formaldehyde dries - you can decorate the seam.
Why do gaps appear at joints?
The nature of the occurrence of cracks between lamellas is divided into two groups: installation and operational.
The first is caused by violations of the technology for working with laminate, the second by non-compliance with operating rules or natural phenomena. If a gap formed during laying of the coating and was discovered immediately, then, in most cases, it will not take much effort and time to eliminate the gap.
Uneven base
The most unpleasant and difficult reason to correct is an uneven foundation. There is only one option - remove the laminate and level the base. Continuing the work, there is a high risk of damaging the lamellas by trying to fit them tightly together.
The gap between the baseboard and the wall or floor
It usually forms when old walls become warped or wooden baseboards dry out. Such an error can be repaired very simply - using acrylic sealant; modern stores provide a choice of any colors and shades. The cylinder is installed in a special device for supplying sealant and applied over the distance between the elements.
Useful tips for installing skirting boards
Craftsmen who professionally renovate residential premises have many proprietary techniques for performing complex work.
Floor plinth
If the plinth blank is shorter than the distance from the corner to the other wall, then the two pieces should be joined. Moreover, joining along an oblique line is considered preferable than joining along a perpendicular one.
After cutting along the markings, fine adjustments are made using medium-grit sandpaper.
PHOTO: chudopol.ru Splicing two pieces
Ceiling plinth
Craftsmen give advice on making it easier to mark the cutting line. You can make two blanks from scraps with an approximately marked cutting line, and then successively approximate to obtain the exact angle. The baseboards themselves are marked according to the specified samples. The method is very convenient for beginners.
Another good method requires the use of a laser level. The plinth is placed in its regular place, and the laser beam draws an exact cutting line on it. Do the same with the other plinth.
The plinth should be glued to the ceiling and wall using putty to which PVA has been added. The mixture is applied to the edges of the baseboard with a pistol. Cutting corners - using a test sample, applying it, using a laser level.
Experts recommend an option that does not require precise and painstaking adjustment of the “cuts.” Both plinths are cut at right angles, and the joint is covered with a special cover.
PHOTO: svet-stroymvmeste.ru Overlays for the joint of the ceiling plinth
Related article:
How to glue ceiling plinths correctly at corner and intermediate joints, how to correctly cut the corners of ceiling plinths, what to glue wallpaper or ceiling plinths first, criteria for choosing adhesive for plinths - in our publication.
Rules for working with polyurethane foam
Two thirds of cases still require the active use of polyurethane foam, even in small quantities. Therefore, it is important to figure out how to use it correctly. The recommendations are:
- Before filling the cavity, its surface must be slightly moistened with ordinary water. To do this, it is advisable to use a mechanical spray bottle or a bottle with holes in the lid. This is done to better fix the foam inside the damage.
- When filling, be aware of the foam's ability to expand. In addition, moisturizing the surface will only enhance this effect. The foam must be applied carefully, carefully, little by little.
- Ideal working conditions with it are from five to twenty-five degrees Celsius. The cylinder must be heated in water at the appropriate temperature.
- Before use, the container with foam should be shaken thoroughly.
- Carry out work only with protective glasses and gloves - the foam is very caustic and firmly sticks to all things and objects. In case of accidental contact with finishing surfaces, it is recommended to remove foam only after complete drying; wipe off foam that has not yet hardened with a special solvent.
- Hardened foam is removed with a sharp knife.
Complex cases
Here we are talking, first of all, about wooden products that are secured with nails or strong adhesives. To successfully remove such a profile, you will have to work hard. Start removing the baseboard from the corner or door.
Putty and strong adhesive
Polyurethane and wooden profiles for floors and ceilings are removed with a mallet and a thin spatula:
- First, run a putty knife along the joint several times to create a small gap.
- Now rest the spatula from below, holding the handle close to the wall.
- Gently tap the trowel handle with a mallet until the tip of the trowel fits between the wall and the lath.
The plinth appears to be cut from the wall.
Nails:
- To begin with, before removing the plinth, unstitch the seams where the profile meets the floor and wall. As a rule, they are filled with varnish and paint.
- Insert the chisel into the gap formed and hammer it in deeper with a hammer.
- Now insert a wooden corner into the widened slot.
- Repeat all manipulations after one meter, gradually tearing off the baseboard.
Important! If manipulations with a chisel are not successful, use a nail puller (crowbar). But do not overdo it so as not to damage the profile.
The force with which you will act on the crowbar is quite large. Therefore, in order not to damage the floor covering, use thin plywood as a backing.
If the wooden profile is to be disposed of, then you can do it even simpler: using a chisel, make a hole near the nail, and then use a nail puller.
Self-tapping screws
To dismantle skirting boards secured with self-tapping screws, it is important to find all their caps. Found it? So, then everything is simple: unscrew them using a screwdriver with reverse or a screwdriver.
Wooden chopsticks
Is the profile fixed with wooden choppers? This mount looks like rounded wooden caps located at the same distance from each other. Wood chips can be removed using a chisel or drilled out.
Finishing the wall after repairing the damage
Excess foam should be removed so that a small depression remains at the seam site. It will be filled with a small layer of putty or plaster using a spatula and brought to the same level as the wall. After the layer of mortar has dried, not a trace will remain of the gap. The top of the wall can be finished in all sorts of ways - attaching a plinth, painting, adding wallpaper, finishing with tiles, plastic, wood, and so on.
How to remove a plinth from a stretch ceiling (foam, polystyrene)?
Foam and polystyrene strips are usually mounted with glue. To dismantle such products:
- Direct a stream of warm air at them to soften the adhesive.
- Run a knife or spatula along the joint and, carefully prying up the profile, remove it.
Important! The ceiling plinth must be removed with maximum care, without touching the front side where the decor is applied. Under the influence of warm air, the material becomes pliable and can be damaged by even minor mechanical impact.
To fasten the MDF profile, special mounting fasteners or latches are used.
Important! When using fasteners, the profile is put on top of them. The latches are screwed to the wall. After this, the plinth joins them.
To dismantle the MDF structure, one spatula is enough:
- Push it under and lift it up slightly.
- If the profile remains in place, it means it is secured with latches.
- Run the spatula along the wall from below and gently pull it towards you.
The profile can be easily detached.
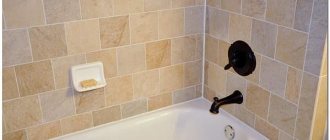
How to seal the gap between the wall and the sides of the bathtub: 7 simple ways
Renovating a bathroom is such a difficult task that even minor mistakes of builders sometimes baffle. For example, what should you do if, when installing a bathroom, it turns out that there are wide gaps between its sides and the already lined walls? We offer 7 ways out of this situation
Cement-sand mortar
The easiest and cheapest way is to seal the cracks with cement-sand mortar. But this method cannot be called ideal (or even good). Quite quickly, under the influence of moisture, the porous material begins to mold, crack and crumble. Protection is required - painting, sealing, etc. And this is additional trouble. So they resort to cement only when the gap between the walls and the bathroom is too large (more than 0.5-0.7 cm) and a high-strength seam is needed.
Polyurethane foam
Another option for sealing relatively wide seams is polyurethane foam. But not just any one. For extreme bathroom conditions, only a one-component polyurethane composition is suitable. It is strong, elastic and moisture-resistant enough to cope with the task.
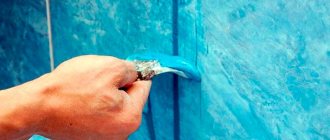
The sealing job is simple enough that you can do it yourself. The sides of the bathtub are thoroughly cleaned and degreased, and then masking tape is glued around the perimeter, trying to lay it as close to the crack as possible. After this, the gap is filled with foam and left until it hardens completely. Finally, cut off the excess material with a sharp knife and remove the tape.
Is it possible to do without tape? You can, but then you will have to spend a lot of time and effort to scrape off the foam from the edges of the bathtub. This is quite difficult to do, and most likely you will have to resort to washes.
So, closing the gap with foam is quite easy. But you can’t leave it in its pure form. Firstly, this material does not look very good, and secondly, over time it will turn yellow and deteriorate. Needs additional finishing.
Sealant
One of the most common materials for sealing joints is silicone sealant. It performs well in cases where it is necessary to close a seam no more than 0.5 cm wide, and does not require any additional finishing.
Before sealing the surface, you should thoroughly wipe it with white spirit, then place the nozzle of a container with sealant in the gap and run it along the entire perimeter, gradually squeezing out the compound. Then wet your finger in soapy water and coat the joints. This will both seal and level the sealant.
This protection usually lasts for several years. Then the sealant begins to darken and become moldy. You have to remove it and apply a new one.
Only silicone sealants should be used in the bathroom. Acrylics do not have proper elasticity
Plastic border strip and plinth
Self-adhesive border tape
One of the common options for sealing joints is a flat tape with a longitudinal seam, which is folded and laid in the joint area. Many manufacturers apply glue to the reverse side of products, trying to make installation as easy as possible. But experienced craftsmen strongly recommend buying clean tape and fixing it with reliable moisture-resistant glue or liquid nails purchased separately. Factory self-adhesive often does not stick well. However, it also has a right to exist, especially if the joints need to be repaired quickly.
To ensure a better fit of the plastic tape with a self-adhesive layer, its back surface can be heated with a hairdryer before laying.
In addition to tape, there are also plastic borders (fillets, strips, corners)
. You can choose corners and end caps for them. Obviously, products of this kind are more expensive than tapes, but they also last much longer. And they look more aesthetically pleasing.
In any case, almost anyone can lay a plastic product in a seam. You need to clean and degrease the sides of the bathtub, measure them and cut pieces of tape/border of the required length with scissors, a sharp knife or a saw with fine teeth.
The tape or plinth with glue applied is pressed tightly to the surface and left for 24 hours. After this period, the bathroom can be used.
Plastic tape and border are inexpensive and easy-to-install materials. But you shouldn’t expect that such a finish will last for decades. After a couple of years, even the best glue will lose its useful properties and the seam will have to be sealed again.
Acrylic baseboard
Acrylic border
A more reliable, durable and aesthetic analogue of plastic plinth is acrylic plinth. This is a rigid monolithic product of white color that does not turn yellow over time. Dirt does not settle on its smooth surface, so no special care is required. It is enough just to wash the border occasionally with soapy water or a gentle cleaning agent.
Why is it needed?
Modern laminate is easy to install without the use of adhesives, which allows installation work to be completed quite quickly. However, installation must be subject to compliance with all rules for laying laminate flooring.
When laying laminate flooring, the gap between the laminate flooring and the wall should be taken into account. This is due to the ability of organic material to expand and contract with temperature changes and changes in humidity levels in a room, in accordance with its woody structure.
Clearances are ensured by special gaskets (liners), which should be removed after installation. Compensation gaps are closed with skirting boards - near the walls, or with a special threshold - when joining with another floor covering.
IMPORTANT! Without a gap between the wall and the laminate, the coating may rise at the joints as a result of temperature changes.
Such a defect will have to be corrected by cutting off the edges of the coating elements near the walls.
Preparatory work
To quickly and effectively eliminate defects suddenly discovered after dismantling the baseboard, you need to purchase a suitable arsenal:
- polyurethane foam (+ protective gloves);
- putty (+ spatula);
- pieces of brick;
- Styrofoam;
- tow;
- moss;
- jute felt (+ formaldehyde);
- spray (+ water);
- caulk;
- knife;
- hammer.
However, for effective sealing, the gap needs to be slightly widened. When using polyurethane foam, the hole must be moistened to achieve better adhesion.
How to remove a corner of a baseboard
Installing PVC floor plinths does not require any special skills from a home craftsman, but achieving a good result will require some care. This article will help you avoid possible installation mistakes.
| ATTENTION! All materials presented on the site belong to the site mastertim.ru and are written for people. Full or partial copying of text and (or) images, posting on other sites, use for personal gain is PROHIBITED! |
The principle of sealing a joint
In fact, everything looks very simple: you need to fill the gap with suitable material, foam or cover it. When dry, cover the joint between the floor and the wall with a plinth.
The material, first of all, is selected depending on the depth of the cracks and the severity of the damage. Mostly putty, plaster and polyurethane foam are used.
Defects that appear at the junction of the wall and floor vary in complexity:
- Small (up to 3 mm);
- Medium (3-5 mm);
- Large (5-10 mm);
- Huge (over 10 mm).
To protect the surface from accidental damage, you need to use plastic film, and also be careful during the work process and remove excess putty and foam in a timely manner.
What material is best to work with when sealing joints?
Before deciding what is the best way to seal the joints of the installed ceiling plinth, you should understand what products are suitable for processing certain materials.
For foam and polyurethane curtain rods
For foam and polyurethane ceilings, acrylic putty is best suited. This material is stable and durable. In addition, it dries quickly and is practically not affected by moisture. Acrylic putties are very technologically advanced. In the process of sealing seams, especially in corners, the cornices will need to be sanded. To get a flat and smooth surface at the joint, use sandpaper of minimal grit for this purpose.
p, blockquote 15,0,0,0,0 —>
The white color of the material allows the putty to be safely used for working with baguettes that are being prepared for painting.
p, blockquote 16,0,0,0,0 —>
p, blockquote 17,0,0,1,0 —>
Today there is a huge selection of finishing building materials on sale, among which finishing putty is quite widely represented.
p, blockquote 18,0,0,0,0 —>
Note: polystyrene foam and polyurethane have a natural white color. The structure of the materials goes very well with acrylic putties. Often this type of putty is used for installing ceiling moldings. When painting, the putty does not show through, especially when white paint is used.
It is necessary to remember this point too. Large cracks, up to 3 mm, are recommended to be sealed with gypsum-based putty. To prevent the plaster from hardening quickly, add a little PVA glue to the solution.
For wooden skirting boards
When working with wooden baseboards, the seams have to be sealed more thoroughly, since wood is much more difficult to install in the desired position. Finishing acrylic putty, gypsum-based solutions and PVA glue are also suitable for these purposes. Small joints and crevices are easily touched with mortars and then sanded to make the fillet surface uniform.
p, blockquote 21,0,0,0,0 —>
p, blockquote 22,0,0,0,0 —>
Before sealing the joints of the wooden ceiling plinth, it is necessary to carefully prepare the walls. The large curvature of the walls creates the preconditions that the gaps between the cornice and the wall can increase as the wood dries out. Otherwise, you will have to use a large amount of putty to seal the gap. This does not look very aesthetically pleasing, and over time, the dried putty may fall out of the crack.
What to do with a large gap
You will need material of suitable sizes to fill the voids that appear. In this case you will need:
- Brick fragments;
- Pieces of wood;
- Styrofoam;
- Polyurethane foam.
At the same time, it is important to select a material for filling of such dimensions that it does not widen the gap, but is not too small.
First, we place a piece of foam plastic or brick into the hole, then we blow it with foam or plaster it. In the latter case, wood cannot be used, since under the influence of absorbed moisture from the solution the material will begin to swell, rot, and also provoke the appearance of mold.
When using foam, you must first of all take into account the fact that it increases in size and hardens in 8–10 hours. If it gets on the skin, it should be quickly washed off with a special composition before it damages the surface.
It is worth noting that polyurethane foam is difficult to wash off from hands, so you need to use special protective gloves. Under the influence of ultraviolet it is destroyed. So if decoration with a baseboard is not provided, then you will need to additionally putty or plaster the surface.
When is the need for repair work?
Before you seal the gap between the floor and the wall under the baseboard, you need to find out where it came from, because this is very important to avoid problems in the future.
Cracks form more often for the following reasons:
- The boards are subject to excessive stress. That is why floors are often additionally strengthened, especially when it is planned to furnish the room with heavy furniture.
- The appearance of rodents. These creatures can even chew through concrete. As for the tree, there are no obstacles for them at all. If this is why cracks appear, then before sealing the concrete is additionally processed, metal or glass chips are added to it.
Important! The poison is not added immediately, since the death of rodents can cause an unpleasant odor.
- Using boards that are too fresh. Natural wood is filled with moisture, and when it is laid on the floor, it dries out too quickly. It is because of this that the volume of the structure is reduced. Therefore, the boards must first be dried naturally. Wood must contain no more than 10% moisture before use.
- Wrong type of wood. Externally, maple, ash, and cherry look the best, but they have too much flexibility. That is, it is better not to use them for finishing the floor. It is recommended to choose breeds with the maximum level of rigidity. These include pine, spruce, oak.
- Poorly executed floor installation. It is important that the boards do not diverge, so they are laid on logs. Wood begins to deteriorate from moisture only when, due to the height of the room, it is impossible to use this technology. In addition, the screed requires careful drying. It is imperative to use waterproofing protection for wooden materials.
- Strong temperature fluctuations. As previously mentioned, wood contains too much moisture; in winter, the air inside the material dries out under the influence of heating devices. As a result, the tree releases the moisture that has accumulated in it during its life cycle. Because of this, the wood dries out and its volume decreases.
Important! The reduction in wood volume remains completely unnoticeable as long as it maintains relative humidity. But the cracks become increasingly wider throughout the entire period of operation.
In order not to encounter such a problem, it is necessary to ensure that the humidity in the room does not exceed 40-60%, but does not fall below these levels. Special air humidifiers help with this, which, among other things, are very good for health. The cracks make the room not only unsightly in appearance, but also dangerous, because it becomes cold in it, and odors from other apartments begin to penetrate into it. That is, the risk of biological contamination increases. But in fact, you can easily and simply seal cracks in the floor yourself.
What to do with a small and medium gap
Minor defects can be eliminated without any problems, for example, using putty. Depending on the room (wet or dry), the grouting solution can be cement or gypsum based.
You can seal a medium-sized gap between a wall and a floor using tow or felt, which is hammered into the gap in the form of a rolled sausage and compacted with a caulk or spatula. When the hole is filled, plastering or blowing with foam is done.
The appearance of cracks between the wall and the floor, first of all, has various causes. To eliminate the consequences, you need to find out why the defects appeared, as well as find the source of the problems. This is the only way to effectively seal the cracks without causing new ones to grow.
Sealing cracks using compaction method
Repairing the floor using slats.
If the boards “play” and the width of the gaps exceeds 1-2 cm, it is recommended to use inserts. They will help firmly fix the floorboards and remove squeaks. The first and long-proven remedy in this case is thin wedge slats.
How the compaction is carried out:
- The gap must be cleared of debris and slightly expanded. There is no need to remove baseboards or other decorative moldings.
- Measure the width and make a wedge of appropriate dimensions from the slats.
- Apply PVA or wood glue to the floorboards and insert.
- Drive the lath tightly into the seam with a mallet or a regular hammer using a tamping block.
- Remove the protruding surface with sandpaper or a plane.
- Sand the sealed floor with a fine-grained sanding belt and cover it with varnish or paint.
Sealing cord can be used as a temporary solution before major floor repairs. It is designed to seal cracks in log houses up to 3-5 cm wide. It is a kind of rope made of foamed polyethylene, rubber or tow. Working with this type of material is not difficult: the product must be carefully compacted into the gap using a chisel and hammer. And so that the seam does not stand out too much from the rest of the floor, a thin layer of tinted sealant, putty or a mixture of sawdust and PVA is applied to the surface.
In conclusion
The use of special corners for the plinth makes installation much easier and makes the joints simply perfect. A small drawback of such decorative elements is that only 90ᵒ angles can be found on sale, but a little ingenuity and “straight” hands will allow you to get around this limitation. The information provided will help, if necessary, to beautifully lay the plinth not only in the corners, but also along a curved surface.
In the video in this article you can find answers to questions about installing non-standard corners.
In the comments to the article you can always ask any question about the installation and selection of skirting boards.
How to glue ceiling plinth
Start working from the corners of the room, as they are easier to work with, then move on to other parts of the room. Seal the corners in such a way that, if possible, no gaps are formed or, if unavoidable, defects are minor. For plastic skirting boards, finishing putty is used.
Water or soil is applied to the fastening areas. After the putty mixture has dried, all cracks must be sealed - various sealants are used for sealing (professional builders recommend choosing acrylic-based products). In general, one package is required per room. Installation using sealant is carried out in the same way as when using putty.