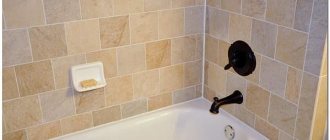
Everyone wants their apartment to be cozy and to feel comfortable living in it. It’s good when you have the opportunity to arrange everything the way you want. There are usually no problems with living rooms, but with the bathroom and kitchen it is more difficult. The situation is aggravated if there are design features that are unsuccessful from the user’s point of view. So, many people do not understand why a window is needed between the kitchen and the bathroom, and whether it is possible to get rid of it. We'll figure out.
Why were windows made before?
Old houses had their own characteristics that some people liked, while others struggled with them in every possible way, changing everything inside on their own. In Soviet apartments, especially five-story buildings, a common bathroom was initially built, which took up a minimum of space, but at the same time allowed you to enjoy the comfort of your own communications. Each house was designed taking into account certain rules that were considered necessary at that time.
One of these was the window between the bathroom and the kitchen in the Khrushchev and other houses of the 50s and 60s of the twentieth century.
The size of this window was approximately the same - 50x70 or 60x40 cm, depending on the dimensions of the wall. The presence of an additional product was due to several factors.
- Protection of the premises in the event of a blast wave from a gas water heater. The designers assured that the presence of a window would help minimize the impact on the wall, which would make the damage minimal. In fact, this is not so, and if a gas water heater explodes, a wall with or without a window will collapse in the same way.
- Ventilation in the toilet and bathroom. This function is not the main one, since most of the structures were solid and could not help in ventilating the bathroom and creating an additional draft in the apartment.
- Possibility of saving electricity. In sunlight during the daytime, it was possible not to use a light bulb in the bathroom, since the room was quite well illuminated by the sun's rays. By the time the “Khrushchev” buildings were built, there was often no light in the houses, and the presence of at least a small light source in each of the rooms was a great advantage, but this reason was also not the main reason for installing a window between the bathroom and the kitchen.
- The main task of erecting an additional window structure in Soviet times was to combat the tuberculosis epidemic, which was spreading at a rapid pace, and it was necessary to solve the problem by any possible means. Thanks to sunlight, it became possible to disinfect the bathroom, which had the most favorable environment for the proliferation of microorganisms, due to the warm and humid environment. Even with a minimum of two hours of light exposure throughout the day, it was possible to significantly improve the morbidity situation thanks to the prevention of housing in each apartment.
In modern realities, there is no longer a need to place a window between the bathroom and the kitchen, since the tuberculosis epidemic is already a thing of the past; it is successfully combated by medications. Modern houses are built without additional structures in the walls; a good hood, which draws out all excess moisture, helps to achieve cleanliness and comfort in the bathroom. Old apartments that still have windows between the bathroom and kitchen can be remodeled depending on personal wishes and needs. Those who consider the presence of such a product appropriate simply replace the old window with a plastic one.
In place of the deaf person, you can install an opening product.
Seal the window with cement mortar
One of the most common options for sealing a window between the kitchen and bathroom is using cement mortar. To prepare it you will need cement grade M-500 or M-400, sand and water. Considering that relatively little cement is needed to prepare the solution (no more than 6-7 kilograms), it will be enough to purchase a small package, or use leftover cement from other repair work.
In addition to the mortar, you will need a shield to hold the plaster on (a sheet of chipboard cut to fit the window is perfect for this purpose) and a metal painting mesh.
The work of sealing a window with mortar consists of three stages.
Removing the old window
First of all, of course, it is necessary to dismantle the old window. First, take out the glass. This must be done carefully so as not to damage your fingers . After this, using a nail puller or a large screwdriver, carefully remove the trim from both sides. As for the window frame, whether to remove it or not will have to be decided on a case-by-case basis. The fact is that the interior walls in Khrushchev-era buildings were made from “I don’t understand what”, so when you remove the frame, you risk taking out a piece of the wall along with it (this is especially true in cases where the wall between the kitchen and the bathroom is quite thin) . Therefore, we recommend that you leave the frame in place, especially since attaching the protective screen and plaster mesh to it will be much easier.
It is advisable to clean the remaining frame from paint residues and treat it with water-repellent mastic or primer.
Installation of sheathing
Before installing a chipboard panel into a window opening, it is necessary to attach a plaster mesh to it on both sides, which will help the solution to better “grip” to the surface of the panel. This can be done using small nails or self-tapping screws. When the mesh is secured, we proceed to install the shield in the window opening. The easiest way to secure it is with narrow glazing beads nailed to the remaining window frame.
“Filling” the opening with mortar
Mix the cement mortar with sand in a standard ratio of 1 to 3.
To make the solution set faster, you can add a little gypsum or alabaster to it.
When the solution is ready, we begin to apply it to the plaster mesh using a trowel. Please note that the mortar must be applied in thin layers, since a thick layer of raw mortar is almost 100% likely to fall off the sheathing, so the whole work will have to start over again. And only after the next layer has dried can the next one be applied. Thus, on each side you will have to apply at least 4-5 layers of solution.
After the final layer is almost dry, you can begin to level it. For this, it is best to use a painting mesh. It can be mounted either on a special handle-holder or simply wrapped around a suitable piece of wood.
In order to get a perfectly smooth surface, after the “rough” leveling with a mesh has been done, it is recommended to spray a very liquid solution over the surface and level the surface again using the finest mesh or just a coarse rag.
After the solution has completely dried, you should have a completely smooth surface, practically indistinguishable from a regular plastered wall. Now you can lay tiles or wallpaper on it.
Several versions of the origin of the design
Now it is difficult to say unambiguously what exactly this window was intended for. There are several versions, each of which has a right to exist.
Technical opening for gas evacuation
This version dates back to the period when gas boilers were actively used in the apartment. In this case, the window opening between the bathroom and the kitchen was used as a technical opening through which part of the gas was to be evacuated when the balcony exploded.
Part to increase space
In addition to its technical use, the window visually increased the area of the bathroom, which was valuable considering the standard size of a bathroom in a Soviet apartment. During the Soviet period, when large apartments were a rarity, and a large bathroom and toilet were almost a fantasy, it was necessary to visually increase the space of the apartment for greater comfort. In this case, the problem was solved using the play of light and special materials used in the window construction.
Energy saving tool
Another undeniable advantage of this design was the energy savings that occurred due to the additional lighting of the space. Thus, a simple Soviet citizen could enjoy a shower or take water treatments without turning on the lights, and thereby greatly save energy.
Additional ventilation for sanitary needs
Additional ventilation of spaces with high humidity. The bathroom is a place where, for obvious reasons, it is always very humid. Therefore, in order to avoid the formation of various pathogenic fungi and bacteria, additional ventilation of the room is necessary, which was provided by an additional window. This was especially important in the fifties of the last century, when the fight against the tuberculosis bacillus was going on throughout the Union. The window played the role of an additional preventive measure.
Emergency exit from the bathroom in Khrushchev buildings
In case urgent access to a locked bathroom was needed (for example, to get out a person who became ill or for any other reason), the window between the bathroom and the kitchen was used as an additional entrance to the enclosed space. It cannot be said that it was used especially often, but its presence gave the apartment owners confidence that they would always be able to help their loved ones.
It is not known exactly who and when came up with the idea of making an additional opening between the kitchen and the bathroom. This invention had many functions and was used in a variety of cases. Today there is no urgent practical need for it, so every apartment owner can eliminate an unnecessary hole or turn it into a decorative interior detail.
The choice of material for finishing the window sill and window glass
In general, the window opening is designed in the general style of the entire bathroom, consistent with the interior in color and finishing materials. To decorate a window sill, the following are usually used: wood, natural stone, as well as tiles and other moisture-resistant materials.
Most often, frosted or decorative glass with sandblasting is used. If desired, transparent glass can be completely or partially tinted using decorative film. Stained glass decoration looks very stylish and original, as well as installing a mirror instead of window glass.
The presence of a window between the bathroom and the kitchen, structural features and purpose
The presence of this element in old apartments is explained by various reasons. The window was built so that in the event of a gas leak or explosion, it could be used as a technical opening.
An emergency route during evacuation work to access the bathroom. There may be a child in the room who cannot open the door on their own, or someone may become ill while taking a shower.
To avoid knocking down the door, you can get in through the window. The design feature is that the opening is located very high on the wall, so it does not interfere with using the bathroom or taking a shower.
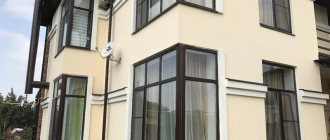
Window facing the street
Unlike the interior option, this window opening is located more successfully and makes it possible to obtain excellent natural light and ventilation in a private house or in a modern multi-story building.
Related article: Standard distance from floor to window
Various layout options are possible:
- bathtub opposite the window - any shape of bathtub from rectangular to asymmetrical will do;
- a window opposite the entrance - all plumbing can be placed along the free walls, installing a corner bath or shower stall, which will free up space for a washing machine, furniture, etc.;
- washbasin near the window - in this case, the mirror can be installed on the opposite wall;
- bath near the window - it is recommended to insulate the window opening and the adjacent wall so that there are no drafts and the temperature during water procedures always remains comfortable.
Positive aspects of having a window
The light source is of natural origin, saving energy. If there is a network outage, you can simply use the natural light coming from the window.
Also, excess condensation, steam, dampness and other physical phenomena can negatively affect the air and condition of the room. Mold does not form in the bathroom if there is a window opening. Fresh air will enter the room and quickly ventilate the room.
The tiny bathroom will be slightly enlarged with the help of light flow due to the fact that the window faces the kitchen, and there is plenty of light there. Space is necessary, you need to create free space.
Having a window from the bathroom to the kitchen will effectively combat high humidity. There is no need to seal the opening, damaging the structure of the wall, which is thin in thickness and can significantly deteriorate during repair work.
What is the meaning of a window
To be honest, I looked through a lot of different sources, but I never found a documentary answer that would contain references to some regulations and explain why the window was made. Therefore, we can only be content with a selection of relatively professional opinions from construction forums:
- Ventilation. One of the main opinions is that a window is needed for additional ventilation in order to remove excess moisture from the bathroom. This opinion is absolutely unfounded, I myself grew up in Khrushchev and I know for sure that the window was solid and there can be no talk of ventilation here. Although now some owners make an opening window there just for drying;
The window between the bathroom and kitchen is great for additional drying of the bathroom.
- Fire exit. It is believed that the window was made for emergency evacuation from the bathroom in case the doors were blocked during a fire. It is extremely unlikely, firstly, the opening is at the top and you need to be an acrobat to get through it, secondly, it is glazed, and broken glass is another source of danger;
- Reducing the cost of construction. The version with savings in building materials also does not stand up to criticism, the frame, glass and labor costs for arrangement are several times more expensive than a dozen bricks;
- Design decision. The opinion that the additional window opening visually made the bathroom a little larger is also unfounded. In those days, the task was to provide people with housing and no one thought about such design delights as increasing visual volume;
It is not known for certain why a window into the kitchen was made in the bathroom.
- Shock wave compensation. The next version looks more plausible; according to it, such a hole served to compensate for the shock wave in the event of a domestic gas explosion. True, houses with electric stoves also have windows;
- Additional lighting. This explains why the bathroom has a window into the kitchen. I believe, and most professionals agree with me, that the window was made for additional lighting. In those days there were power outages, and the window in the partition is located directly opposite the kitchen window, so during the day you can take a shower without turning on the light.
Effective solution
The light will shine well into the bathroom, but it will not be possible to open it from the kitchen, which will protect you from intrusive glances.
Redevelopment with illumination looks fashionable and stylish, however, it will take up money. The owner of the apartment can independently decide on the desired option.
The need to cover a window with furniture may be caused by an external inconvenience that residents do not like.
A person, after weighing all the nuances, must decide what is best. The design feature will not disappear, but you cannot cover the window with plasterboard; excess moisture and dampness will fill the bathroom. The solution is to properly decorate the space. In old houses, a window is provided for air exhaust.
Currently, builders do not install such windows in apartments; inconveniences exist, but they can be eliminated.
Modern models of hoods and new equipment allow you to leave the window, but not use it.
Collected air will escape through the glass, even if the window is not ventilated.
Additional decor
On high floors, tinting or special finishing is usually not performed - it is enough to cover the glass with curtains or a screen. Roller blinds, nice textile curtains, wooden shutters and simple budget blinds will help isolate the bathroom from the outside world and complement its interior. Both simple curtains and Roman blinds, heavy and light airy fabrics can be used - the choice depends on the overall style of the interior.
Often the window sill is decorated with all kinds of plants that love moisture, and turns into a real green oasis. It is not at all necessary to cover the windows themselves - hanging curtains around the bathroom will look original, which will protect this area from the rest of the space and give the interior some vintage style.
Is it possible to remove it?
In modern houses there is no window between the bathroom and the kitchen, so residents do not need to clean it. In old houses, during renovation, many people ask to close or even remove the niche from under the window, but for such drastic measures it is necessary to obtain permission from the BTI. In houses with gas water heaters, they are not allowed to dismantle such structures, arguing that this is a violation of safety. In cases where there is a boiler instead of a water heater, there should be no problems with repairs.
Let's consider the options that you can resort to when transforming the wall between the bathroom and the kitchen.
- Covering an opening with plasterboard is one of the most budget-friendly and easiest ways that anyone can do. To work, you will need a piece of moisture-resistant drywall equal to the window opening, as well as putty. The platbands on the window must be completely dismantled on both sides in order to level the wall; it is better to remove the glass. A sheet of plasterboard is cut into two pieces that will cover the window from the outside and inside, after which they are attached to the frame using self-tapping screws, plastered and finished with wallpaper or tiles.
- You can fill the niche with bricks - this is the most thorough option, which does not involve returning the hole if necessary. Masonry can be done by anyone who is familiar with the basics of this procedure, or it is worth hiring a professional to do it. Brickwork allows you to isolate the room from moisture, drafts and noise that could come with any other finishing options. After laying, you need to wait a few days until the cement sets and plaster the wall, on top of which you can glue wallpaper or lay tiles.
- The most budget-friendly and often temporary option is to use plywood . It is very simple to sew up a window opening using this material, but such repairs will not last long due to the poor resistance of the material to moisture.
If you have a firm decision to completely remove the window between the bathroom and the kitchen. There are a number of methods and materials for doing this, but before you get started, you should weigh all the positive and negative consequences. There are much more creative solutions that involve converting the window opening into decorative elements or shelves.
They decorate the space and serve as a convenient place to store small items.
How to close
If designing a small wall window seems like a waste of time and effort, you can cover it with masonry or cover it with moisture-resistant material. Finishing materials are often used: covered with plasterboard or plastic panels. Then the cladding occurs over the opening and the frame with glass does not have to be dismantled.
You just have to remember the position of the window and never try to mount anything on the wall in this place.
How to seal to hang a cabinet in the kitchen
In Soviet apartments there is not much space in the kitchen. It may happen that you can place the kitchen unit fasteners in no other way than at the location of the window. It will not be possible to get by with finishing materials.
Then the structure is removed, and the opening is filled with brickwork on cement mortar or filled with concrete, constructing formwork and installing reinforcement. The same procedure will be most appropriate when laying tiles.
Window between bathroom and toilet
The window in the toilet has the same purpose as the kitchen and bathroom: insolation, ventilation and safety. It is also possible to remove such a window if it is not shown on the plans in the apartment passport. Repair and construction procedures in the case of a toilet are identical.
Check out or delete?
Openings between the bathroom and the kitchen have been preserved in many apartments. Many owners wonder what to do with them.
There are two options:
Give the window a decorative look and expand its functionality.
Remove the window and seal the wall tightly.
Both options have their pros and cons. Sometimes it is not easy to choose the more preferable one.
For example, it is not easy to seal an opening if the premises have expensive and high-quality finishing. There is a serious risk of ruining it, wasting time and materials. However, the decorative design of the opening can also spoil the finish of adjacent sections of the wall on both sides.
Therefore, any work on the window is recommended to be carried out during a major renovation that affects both the bathroom and the kitchen.
Deciding whether to seal or decorate a window is not easy. Today there are a lot of materials and designs that allow you to decorate the opening and expand the functionality of the window. Preserving a source of light or fresh air is becoming an important and practical option for many apartment owners.
However, privacy advocates try to completely seal the opening, make a convenient niche in it, and install shelves.
Often the reason for sealing an opening is the desire to make a solid wall, decorated with beautiful tiles or panels. Often the reason for sealing is the installation of a kitchen unit - wall cabinets cover the opening and make the presence of the window useless.
Sealing the opening
If you decide to get rid of a window, you must first choose the appropriate method of sealing the opening.
The choice depends on the reasons for this decision, the availability of skills, the type of decoration of the premises and other factors. We need to decide what material will be used to solve the problem. If the former opening will bear the weight of cabinets or other loads, it is necessary to ensure the strength of the seal and the ability to withstand mechanical stress.
This is not easy; most experts recommend not planning any loads on the area of the sealed opening. We must also not forget about the decorative side of the issue - if tiles have already been laid around the opening, you will have to maintain the plane of the wall.
You can close the opening in different ways:
- completely lay it with bricks and then plaster it;
- fill with sand-cement mortar;
- install a board made of plasterboard or OSB;
- close the opening with plastic panels.
Installing panels is the easiest and fastest way to seal an opening. However, this is more of a decoration - the hole in the wall remains and requires response from the adjacent room.
You can perform a similar procedure on the other side of the wall, but this usually contradicts the design and style of the room decoration.
Full bricking is a convenient and quick method of sealing, providing a durable and massive patch. In this case, it is necessary to use reinforcement elements - at a minimum, install gratings and secure them in the opening so that the brickwork is securely fixed in it.
Pouring concrete is a more complex procedure. The formwork will need to be assembled, and the pouring itself will have to be done in several stages.
In addition, you must first install reinforcement - a grid or at least several vertical or horizontal rods.
Otherwise, cracks may appear in the patched area, and the patch may sometimes fall out. In addition, we must take into account that pouring concrete is a very dirty procedure, and it will take several days to harden until the formwork can be removed.
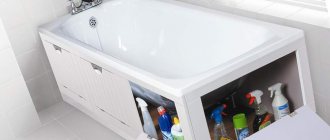
Installing a board made of OSB or plasterboard is one of the fairly quick and convenient options. You can make a plane on the side of the kitchen on which the tiles will be laid. A shallow niche is formed in the bathroom, in which shelves are made and shampoos, gels and other bath products are placed.
It is located at a high altitude and is inconvenient for taking a bath. However, for a person under the shower, this height of the shelf is optimal - the flow of water from the shower head does not fall on the shelves.
Expert opinion
Sergey Svistunov
Specialist in the design of buildings and sewer systems. Knows everything about construction and renovation.
A complete window seal can be done by removing the old frame, or using it as a support structure for a plasterboard panel or other material. This is the most convenient option - you can adjust the height of the support so that the plane of the shield completely corresponds to the plane of the wall.
This will allow you to lay the tiles without a visible difference in height and create an even finishing plane. On the other side of the wall you can do the same, or create a niche. The most successful option is selected in each case individually, depending on the capabilities, time and other resources available to the apartment owner.
The procedure for filling an opening with concrete
Let's consider one of the most difficult options - completely sealing the opening with sand-cement mortar.
Procedure:
- Removing the old frame . Carefully remove the glazing beads and remove the glass. Then, using a hacksaw, they saw through the lower part of the frame (until the hacksaw teeth begin to touch the concrete). Using a mounting tool, the middle part is torn off and broken, after which the frame is torn off in parts and removed.
- Cleaning the opening, preparing for installation of formwork . Holes are made in the sides or top and bottom of the opening using a hammer drill. They install pieces of reinforcement, which are tied with annealed steel wire to form a rigid frame. If possible, the rods are welded - this will ensure maximum rigidity of the reinforcement.
- Installation of formwork begins on one side . A flat and smooth (preferably) shield is attached to the wall using dowels and screws. Sockets for fasteners are made using a hammer drill. The size of the shield must exceed the size of the opening by at least 10 cm on each side.
- The counter part of the formwork is installed on the reverse side . Its height should reach a maximum of half of the opening, so that there is somewhere to pour the solution.
- Concrete is poured . Half of the formwork can be removed no earlier than after 3 days. This is the minimum period for concrete to gain strength. On the reverse side (where the shield is full) the formwork is left in place. Then the half shield is moved up and installed so that there is a gap of about 4-5 cm for pouring concrete. Fill the formwork again with mortar, if possible filling the upper gap between the edge of the formwork and the upper part of the opening. If the concrete is too liquid and leaks, you should wait until it sets and seal the gap with a thicker material.
- Once the concrete has hardened sufficiently, the formwork can be removed from both sides of the wall . After this, the casting must be kept for several more days for the concrete to completely crystallize. After this, you can begin finishing.
The procedure is quite lengthy and labor-intensive. Because of this, most owners prefer simpler and faster sealing methods that are not as durable but do not require as much effort.
How to apply?
If you don’t want to remove the window in the wall between the bathroom and the kitchen, you can make it beautiful and original. The easiest way to change the appearance of this element is to replace the rectangular frame with a non-standard one, for example, round or in the shape of a semicircle. In addition, the design of the room may require original color solutions. The most popular is imitation wood or lavender shade. If the frame of the old product is still strong and will last quite a long time, it does not always make sense to change it, but you can improve the glass itself by replacing it with stained glass. Original designs that match the bathroom concept or are a continuation of the kitchen decor will become a real highlight. You can order stained glass from a specialist or try to make it yourself if you have the proper experience in this matter.
If the window does not have a ventilation function and does not open, then instead of ordinary glass you can install glass blocks that resemble three-dimensional glass ceramic tiles. This material allows sunlight to penetrate into the bath, but reliably hides those in the room from prying eyes. You can decorate such a window using colored glass blocks, which are arranged either in a clear sequence or chaotically, creating a color ensemble. The picture, which is made up of many elements, looks very beautiful. They turn into a seascape, a forest clearing, or something original that matches the design of the room.
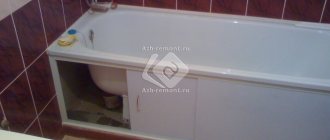
If the window is not used for its intended purpose, but there is no desire to remove it, you can use a niche for shelves for small items. There are always enough things in the bathroom that need somewhere to go, so having this kind of storage will be very valuable. During the renovation, you can remove the glass and close the window on the kitchen side using fiberboard or plywood, and organize one large or several shelves in the bathroom. If a thorough transformation is planned, then the niche is completely lined with tiles or other finishing material that does not allow water to pass through, which means it will serve for a long time. For creative people, an unnecessary window between the bathroom and the kitchen can serve as a pane for creating creative works that, like paintings, can be changed from time to time.
Important! There can be many options for finishing the window and the opening itself, the main thing is to decide what exactly should be in the room and find the most successful options for implementing the plan.
Put up a stained glass window
The simplest and most budget-friendly way to decorate your interior. Window trims are removed and carefully inspected. If they are in good condition, they are cleaned and painted. Perhaps they change their shape. Damaged parts are thrown away and new ones are put in their place. It is better to choose plastic, it is resistant to changes in humidity and temperature. Then they move on to glass design. It is taken out and replaced with a stained glass window purchased or ordered to the required size. You can do it yourself. To do this you will need the ability to draw and special stained glass paints. If the ability to draw is completely absent, but the desire to create is present, a good solution is self-adhesive film with any decor. It is glued to the glass over its entire surface or in fragments. There are several examples in the photo.
Niche in the bathroom
You can create a functional niche from a window in the bathroom. Thanks to this, you can make the most of the usable space. For this purpose, the window from the kitchen area is covered with plasterboard. In this case, in the bathroom you just need to level the recess using a cement solution, and then finish it with exactly the same material as the entire room. If you don’t like a small niche, you can easily enlarge it.
To do this, you need to disassemble part of the wall. An oval shape would look ideal. It can be created using plasterboard sheets. To make the niche look more attractive and more comfortable, designers advise using lighting for this area.
Beautiful examples
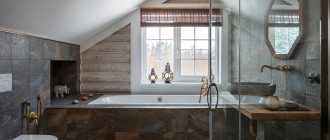
Having a window in the bathroom that leads to the kitchen is not always a problem. In some cases, this makes it possible to take a shower in the daytime without turning on the light, and for those who like to steam, there is a chance to quickly ventilate the room and refresh it. In order for a window opening to fit into a modern design, you need to be able to decorate it correctly and use it based on your own needs.
Using glass blocks instead of regular glass is a good way to keep the room light, but at the same time decorate it and give it a completely different look. The drawing should fit into the design of the room and complement it. The color range of glass blocks can be different, everyone has the right to choose what they like.
Stained glass is an equally beautiful option for finishing a window opening in a bathroom. The use of original and custom designs can be captivating and promote relaxation while taking a bath. The stained glass pattern should be such that it looks equally good in the bathroom and kitchen, otherwise one of these rooms will look awkward with stained glass.
The shape of the window plays an equally important role in interior design. If the apartment is designed in a modern style, then a round window opening will be a real find and will complement the concept of the room. The size of a round window can be any size, from small, about 30 cm in diameter, to large, 60 cm or more. The use of stained glass or other decorative elements in this case will be unnecessary, as it will distract from the originality of the frame itself and the illusion of being on an underwater or ordinary ship.
If there is no possibility or desire to change the size and shape of the hole for the window, but you want to make it special, then the simplest solution would be to choose platbands in a non-standard color scheme. The most common color is white, so many people want to install a window in any other color to stand out and make their apartment unique. The wood-colored frame looks very beautiful, expensive and stylish, and goes well with almost any interior, which is very convenient.
For those who do not see the need for a window between the bathroom and the kitchen, it is possible to transform a niche into a useful space and instead make a shelf for useful small items or decorative elements.
The finishing of such a shelf can be made of various materials, the main thing is that the resulting product is beautiful and functional.
Supporters of creativity can decorate the window in an original style, showing all their resourcefulness and talent. Each option deserves consideration, so it's worth considering all the possibilities before making any decision regarding a bathroom window.
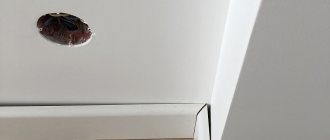
Window to the kitchen or toilet
Often a small opening is located at the very top of the wall above the bathtub. Initially, its purpose was to illuminate the bathroom during the day, but over time, the functional component was lost and the need for it disappeared. This type of window opening can be closed or decorated. In the first case, it is usually covered with plasterboard, on top of which tiles are laid directly to the ceiling.
If you decide to turn the window into a decorative element, several options are possible:
- The opening is ennobled by inserting stained glass or an original painting instead of glass, for example, with an image of the sea.
- Remodeled for a niche. In the deep window opening there is enough free space to equip it with a decorative niche, shelves or a small built-in cabinet. Moreover, the window opening at the junction between the bathroom and the kitchen can be expanded - you will get a large window, the window sill of which can be used as a functional shelf for various bathroom accessories.
- They equip a wide window sill-tabletop into which a washbasin is built. You can install, for example, a washing machine under the countertop, thus further increasing the functionality of the room.
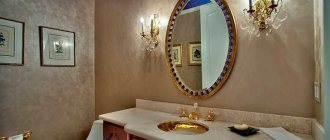
Advice! In a niche, instead of a former window, you can install a mirror with bright lighting - such an extraordinary solution will provide the room with additional light.
Three ways to seal a window opening
Not all owners want to get rid of this window; there are people who like this architectural solution. Accordingly, it would be unfair to talk only about sealing the opening, so first I will tell you how to decorate the window from the bathroom to the kitchen.
Method number 1: decorating the opening
You won’t be able to build an opening window made of metal-plastic with your own hands; it’s better to order a complete replacement from a company. The only thing you can somehow save on is dismantling the old structure yourself (I’ll talk about this a little later).
The plastic design is considered a good solution for those who do not want to part with a window in the bathroom.
But replacing an old window with a plastic one is not so much expensive as it is problematic. After all, to do this you will have to re-tile the tiles or install some other finishing, which already constitutes a full-fledged renovation.
It is much easier and cheaper to decorate old glass. The most affordable way out is to buy self-adhesive film. It is sold on any construction market and the price there is cheap.
Self-adhesive decorative film can be installed quickly and is not expensive.
The instructions are similar to installing a tinting film on car windows:
- First, wash and degrease the glass well with an alcohol-containing solution;
- Then take a soap solution and, using a foam sponge, generously lubricate the glass with it;
- Remove the protective coating and carefully apply the decorative film to the glass;
- Next, take a plastic spatula for wallpapering and expel all the liquid and air bubbles from under the film;
- Now all you have to do is trim off the excess film around the perimeter with a blade or sharp knife and wipe everything dry.
It is advisable to glue the film on the bathroom side, since on the kitchen side a greasy coating will constantly settle on the window, and it is easier to wash it off the glass.
It is convenient to expel the air from under the film using a wallpaper spatula.
Possible design options for windows in sanitary facilities
I think the above information is quite enough, and I have convinced you that a window in the plumbing room is an excellent solution. All that remains is to figure out how to make it.
And this is where I ask for your help. Below I will give several different options, and then tell me in the comments which one is better and why. I promise that I will implement the best solution, and I will definitely report on it.
Flowers in the bathroom are a good idea, but someone will have to water them.
The only point: don’t just offer to buy flowers for a bathroom with a window. The fact is that the premises will be built in a dacha where no one will live permanently. Therefore, there will be no one to water the plants. I immediately reject this option.
Configuration
I'll start with the window shape. Most often, I have seen projects where the window configuration completely matches the shape of the bathtub. That is, the window opening was rectangular. In principle, the solution is obvious, but too boring and official.
A rectangular window is a standard option for a plumbing room.
Moreover, there are not only rectangular bathtubs on sale, but also oval, round, and triangular ones. And their price is quite affordable. No one is stopping me from making the same window opening, because I will lay the walls myself.
There are no less questions with the window sill. I'm thinking of making it wide so I can immediately use it as a shelf-stand. I won’t put tropical palm trees on it (I described the reason above), but I think some fashionable accessories would be quite appropriate. What do you think?
By the way, regarding the location of the bath. I want to place it right next to the window. It will turn out very impressive, I have seen it in several projects that have already been implemented.
The window shape can be any, the main thing is that it is combined with other design elements.
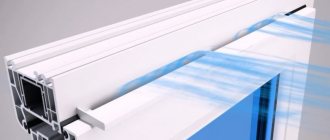
Given the high level of humidity, I am going to buy plastic frames for the windows. They withstand external influences much better and do not change their size during operation (unlike, for example, wood). Moreover, it is easy to install a ventilation mechanism in them, which is then connected to a temperature and humidity sensor.
In short, there are a lot of plans. The main thing is that you have enough strength to realize it.
To prevent the window from becoming covered with moisture, which interferes with admiring the scenery, I will disguise the heating element under the window sill. Thanks to it, water will evaporate from the surface.
Color solutions
Now let's think about the window color. Actually, I’ve already decided everything completely, so I’ll tell you about those points that can guide you when choosing a color scheme for a window in your own bathroom:
- Window frames painted in solid crimson or frivolous lavender shades will add more luxury and richness to the plumbing rooms.
Red shades in the interior give the bathroom a luxurious touch.
- Red window frames look organic only in large rooms. They will make the room very elegant, but in cramped bathrooms they will dominate too much.
- You can make frames of the same tone with the decoration of the walls and ceiling. As a result, the design of the room will be as holistic and harmonious as possible.
- The classic white color of the frames is also a good solution, but to avoid a bureaucratic look, I advise you to decorate the window opening with curtains with a control mechanism. For example, Roman.
White color is a universal option.
- One of the bold decisions is to play with contrast. When the trim and frames on the window use bright colors that stand out from the rest of the decoration.
A lot can be said about the colors of walls, windows and other accessories in the bathroom. And there will still be an option that I didn’t mention. Therefore, everyone will remain with their own opinion. You can send photos of your own interior solutions in the comments, and then we will organize a competition for the most interesting and unusual design.
The contrasting shade is very bold and unusual.
Textile design
Before moving on to describing specific stylistic solutions, I want to dwell on such a moment as draping a window opening with textiles. This must be done not only to create a spectacular interior, but also to ensure the privacy of people who take a bath or wash in the shower.
I will give a few popular solutions. I have selected them as the most interesting, but have not yet leaned towards any of them. Waiting for your suggestions.
So:
- Roller blinds. They take up little space, are easy to control using special mechanisms, they are height adjustable and can be installed as simply as possible. At the same time, they do not take up much space.
Roller blinds are perfect for decorating bathroom windows.
I consider this solution to be purely utilitarian and leave it as a last resort, since it is unlikely that a spectacular appearance of the bathroom can be achieved with the help of roller blinds.
- Textile curtains. They allow you to decorate a window, but do not tolerate the air in the bathroom, which is characterized by high levels of humidity and significant temperature fluctuations. Perhaps I will buy such curtains for a bathroom with a window in the country, but then I will have to take care of very effective ventilation. Most likely, using several powerful fans with humidity sensors.
Curtains in the bathroom are a luxurious but impractical option.
- Stained glass. An original solution that will give the bathroom unique features and will not allow any individuals to observe how someone takes a bath. The difficulty here is that you need to choose a stained glass design that organically fits into the style of the bathroom. And I can’t do it myself, but I want to build the whole house myself. Here's an idea.
Stained glass windows in the bathroom help provide the desired level of privacy.
- Blinds. A practical and economical solution. Plastic blinds feel great in humid hot air and perfectly protect from indiscreet views from the street.
Blinds are a practical and inexpensive solution for decorating a window.
This option is still a priority, especially since it can be easily combined with other methods of decorating a window opening.
Interior styling
Now about the most important thing. About the design of a bathtub with a window. There are also many options here, but I will focus on describing those that caught my attention.
Method 1 - Marine motifs
Naturally, the marine theme in the interior decoration of the bathroom is emphasized by the blue shades of the finishing material and round windows. I’m also thinking of using mosaic masonry on the walls that imitates sea pebbles. You can completely finish one of the walls or lay it with a decorative wave.
A marine-style bathroom is an interesting interior design option.
You can buy plumbing fixtures, the color of which matches the ceramics on the walls, and also dilute the interior with several accessories in a similar style. You can buy some kind of compass or model of a sailboat.
Chrome elements go well with blue. Therefore, you can’t do without silver faucets, a heated towel rail and handles on the window frame (I saw these in the store). You can also find spotlights with chrome rims.
Method 2 - Ladies' room
You can please your son’s wife (well, in the sense of daughter-in-law) and decorate the room in the so-called feminine style, turning the bathroom into a kind of boudoir. Naturally, in this case, the walls need to be made in pink tones, diluted with turquoise, gray, and so on (so that men don’t feel uncomfortable there).
The lady-style bathroom is reminiscent of a medieval boudoir.
For example, I plan to lay gray tiles on those sections of the walls that will get wet, and plaster the walls and paint them with special paint. Instead of traditional tiles, the floor can be finished with waterproof laminate panels.
The central element can be a mirror that will match the window frame. It will be very organic and beautiful.
Method 3 - Strict geometry
My son leans towards strict geometric designs. We are talking about buying square and rectangular sanitary fixtures, and using large ceramic tiles for wall decoration. Naturally, in this case the window also needs to be made strict (square or rectangular).
A bathtub in a strict geometric style will not tolerate rounded shapes.
In this way, you can beautifully and effectively zone the bathroom, dividing it visually into several parts:
- shower area;
- toilet area;
- location of the washbasin.
My son wants to separate the first and second zones from each other with vertical stripes of tiles of a different shade, and decorate the area near the wall-hung toilet with a contrasting material.
The result will be a distinctive and unusual design that will infuriate the beautiful part of our family (mine and his wife). I would like to ask you to be an arbitrator and express your opinion on this matter in the comments.
Method 4 - Modern Styles
As a compromise, my son suggests decorating the bathroom with a window in a modern style. In principle, modernism is characterized by experiments in design. The main features of this style are:
- asymmetrical placement of windows, plumbing fixtures and accessories;
- using a rich color palette when decorating walls;
- unusual shapes of sinks, toilets and bathtubs.
A modern style bathroom takes on an interesting appearance if it has a window.
At the same time, too much use of additional design elements is not encouraged, which I, for example, also do not like.
Here you can buy and install a stained glass window, which will be complemented with mirror mosaic with mineral grout. The floor can be made from either tiles or laminate by purchasing slats of some unusual color.
By the way, I read that a person rests well if he receives different impressions. In this case, you will lie in a Jacuzzi bathtub installed in a room with a minimalist interior, admiring the rich natural world outside the window. Who knows, maybe great thoughts will come to mind.
Minimalism is another way to design a bath with a window.
When choosing design options in a minimalist style, do not forget that the room should fulfill the tasks assigned to it. So don't forget about the sink and toilet.
Method 5 - Classic
My family and I decided to resort to this option if we do not agree on other options.
I consider a classic in a bathroom with a window to be a room decorated with solid wood. Well, or, as a last resort, veneered panels. Naturally, the natural material must be impregnated with hydrophobic and antiseptic materials that help maintain cleanliness in the room.
Classics will never lose their relevance.
To fit the window organically, it is better to make the frame from solid wood or cover it with a special film that imitates natural materials. Even better is to install shutters, which, among other things, will provide the necessary privacy.
As for plumbing, I decided to buy expensive porcelain products without wasting money on plastic and earthenware. I can already see a beautiful clawfoot bathtub standing next to a wooden window.
I have an idea in my mind to make a marble podium for the bathtub, but here my imagination is limited by a limited amount of money. Therefore, I will limit myself to artificial stone or high-quality tiles.
If you're going for the classics, you don't need to skimp on expensive accessories. It is better to use furniture with expensive finishes, which helps you relax and unwind in the bathroom. The result will also be a kind of combination of a boudoir and a plumbing room.
Such an interior solution requires considerable financial expenditure.
The window can be decorated with textile curtains. Naturally, you should not forget about ventilation so that the fabric does not get wet.
What fabrics are suitable?
For sewing Roman blinds, as well as curtains of classic length for the bathroom, polyester-based fabrics are suitable, as well as mixed fabrics with a predominance of synthetic materials (approximately 85-90%) in the composition (acrylic, polyester, polyamide) and the addition of natural ones - cotton, linen, cambric, muslin. Such compositions will prevent the fabric from shrinking, withstand moisture and repeated washing, and will not fade in the sun. Rolled options are usually purchased ready-made, and here it is important to check with the seller whether the canvas is impregnated with special water-repellent compounds. This option will extend the life of the system.
Design: Factor Design Build
Design: Factor Design Build
Design: Accent Window Fashions
Design: Accent Window Fashions