Providing a site with water is the first task of its owner. The more ambitious the plans for improving your territory, the more acutely the lack of water supply will be felt. Water is needed for construction work, for the garden you are planning to create, and for your own daily needs.
If you make a water well with your own hands, your dream of water supply will not only come true, but will also allow you to save significantly. We will tell you the best way to drill and what kind of equipment independent craftsmen will need. Taking into account our advice, you will easily arrange your own water source on the site.
Main types of water wells
There are several real ways to obtain life-giving moisture, which we will tell you about. There are several technologies that can be used to independently extract water in a suburban area.
You will have to choose the appropriate option yourself, since it depends on the landscape of the area, as well as on the technical equipment, finances and skills that you possess. Let's look at the main well structures.
It is difficult to give preference to any one design: each has its own advantages and disadvantages, so the choice depends on the landscape of the area and the capabilities of the owner of the site
Abyssinian tube well
If there is a spring on your site, then installing a well is an excellent option for extracting water. The shaft of this structure will act as a liquid storage tank. If the source is active enough, up to 2 cubic meters of water will always be at your disposal.
The Abyssinian well is essentially the same well, but narrow and long. Due to the fact that its length can be approximately 8-12 meters, no pollution from the soil surface gets into the water that fills it.
The Abyssinian well is often called a needle well, because the pipe driven into the ground when creating this structure really resembles a needle
The following video will introduce you to the technology of punching and constructing a needle well, otherwise known as an Abyssinian well:
Sand well (filter)
The deepening of this structure to 15-30 meters is carried out by any method: auger, shock-rope, core. The walls of the well are formed using a pipe with an average diameter of 100 - 180 mm.
The buried end of the wellbore is equipped with a filter. A stainless steel mesh is used as a filter, which is welded or soldered to the first link of the pipe string before immersing it in coarse sand mixed with pebbles.
So you can schematically imagine the design of a well “on sand”, where number 1 is the casing pipe, number 2 is the statistical water level, and number 3 is the mesh filter
This design can satisfy the water needs of a small country house with two water points. If the operation of the structure is seasonal, it will last about five years. With constant use, you can count on 15 years of water supply.
When the well does silt up, you can try to wash it out. If resuscitation measures do not give the desired effect, a new shaft will have to be drilled. Place it next to the previous one.
Artesian well without filter
This structure does not require a filter. Such a well can reach a depth of 100 meters or more. The water produced using such a structure is contained in limestone cracks. The liquid accumulated in them due to condensation can be not only crystal clear, but also mineralized.
Light mineralization is acceptable for everyday use. If the extracted water is classified as mineral water in its composition, then it cannot be used for domestic purposes.
Diagram of an artesian well: 1 - conductor, 2 - statistical water level, 3 - intermediate column, 4 - production column with perforation
It is difficult to determine in advance the depth of the well that will have to be drilled in search of water. You can only roughly get your bearings by talking with neighbors on the site and finding out from them what parameters similar structures have on their territories.
The soil layers are uneven, so the information obtained still cannot be considered accurate for your area. For this reason, casing pipes are purchased taking into account the correction of the obtained data.
↑ How long should the casing be?
Rice.
7 Before you, (Fig. 7.), is a shortened version of the hydrogeochemical section.
(full version is in the article “Review of the hydrogeological and hydrogeochemical situation in the vicinity of Lake Kolpanskoye.”). On the right is the lithological column of well No. 050 (in the range of 0-7.5 m - glacial deposits; 7.5-16.2 m - variegated sandstones; 16.2-18.5 m - siltstones with clay interlayers; aquifers are marked in blue). The contents of elements that determine the chemical composition of water are shown in the center. On the left, numbers in circles indicate the numbers of aquifers.
If you drill a well 7.5 m deep and install 7.3 m pipes, you will get iron-free, fairly hard water, enriched with oxygen and magnesium. (Aquifer (1)).
If you drill a well 9.2 m deep and install 9.0 m pipes, you will get iron-free, soft, oxygen-enriched water with a high content of nitrates. And this is an indicator of sewage pollution. (Aquifer (2)).
If you drill a well 12.2 m deep and install 12.0 m pipes, you will get iron-free, very hard water with a moderate oxygen content and a high nitrate content. Apparently, sewage also gets into this layer. (Aquifer (3)).
If you drill a well 13.2 m deep and install 13.0 m pipes, you will get ferrous-manganese (exceeding the maximum permissible concentration for iron by 9 times, for manganese by 2 times), depleted in oxygen, and quite hard water. (Aquifer (4)). Please note: the separation between waters is only 1 meter
. Such water quickly turns yellow in air with the formation of brown sediment.
If you drill a well 16.2 m deep and install 15.4 m pipes, you will get ammonia, ferromanganese (exceeding the maximum permissible concentration for iron by 3 times, for manganese by 2.5 times), oxygen-depleted, medium-hard water. In addition, it contains the strongest reducing agent hydrazine (N2H4), 7 times higher than the maximum permissible concentration. For reference: the lethal dose of hydrazine is 200 mcg.⁄l. (Aquifer (5)). Such water has an unpleasant odor and quickly turns yellow when exposed to air with the formation of a reddish-brown precipitate.
If you drill a well 18.6 m deep and install 18.2 m pipes, you will get iron-free, moderately hard water with moderate oxygen and magnesium content. (Aquifer (6)).
As shown in the figure, the best water in the studied interval is the water of the aquifer (6).
We made exactly this water by installing an 18.2 m casing pipe, carefully “rubbing” it with a carbide bit into the covering crust of the aquifer, thereby preventing the influx of ammonia-iron-manganese, hydrazine-containing water.
Now imagine that other drillers arrived, knowing nothing about water, and they built the well “like everyone else.” They drilled 10 meters with augers, and threw a rusty pipe there and another 6 meters of “sump” so that the water could settle better. They threw all sorts of rubbish into the gap around the pipe and squashed it down with a shovel. They asked for a lot of money - 2500 rubles multiplied by 16 meters. And they disappeared into the distance without a trace. And no one saw them again.
We're not kidding, this is how 90% of drilling companies operate.
Now let’s return to Fig. 7 and analyze the results of such “work”.
So: the well bore was drilled to a depth of 10 meters with an auger, therefore the bore diameter is 150 mm. A pipe of the appropriate length with a diameter of 127 mm is installed inside. Therefore, the side gap is 150-127 = 23mm. Since annular cementation was not carried out, and the wellbore crossed 2 aquifers (at levels 7.5 and 9 m), an influx of water, mainly from the aquifer (2), cannot be excluded. That is, waters enriched with nitrates, apparently of sewer origin.
Then an open shaft was drilled - a “sump”, with a diameter of 98 mm, which crossed the aquifer (3), containing very hard water enriched with nitrates; aquifer (4) containing ferruginous-manganese waters; and an aquifer (5) containing ammonia-ferruginous-manganese waters enriched with hydrazine.
As a result, from the outlet of the pump, we will have foul-smelling water that quickly turns yellow in the air, exceeding the maximum permissible concentration for iron by 5 times; for manganese – 2 times; for hydrazine – 3 times, with a carbonate hardness of about 1g⁄l.; and inflow of nitrate-containing sewage water.
All the fun – 40,000 rubles!
And when you present a claim to drillers with twenty-two years of experience, they will throw up their hands and say: “This is the water!”
Gradually you will get used to this water, having invested a lot of money in water treatment. Your neighbors will find cheaper drillers, for example, for 2400, who will hang the pipe on a welded scrap. Then a “new Russian” will appear, for whom a well will be made deeper and cheaper, say at 1800, using Euro technology, lined with an environmentally friendly plastic pipe. And they will ditch the last good water. In Fig. 7 - aquifer (6).
And a legend will develop that there was no good water in your area, and no.
We're not kidding. This has already happened in the Volosovsky district in the villages of Ozera, Pyataya Gora, Selo, Dontso, Kargalozy, Glumitsy. And many more places.
From the above, the conclusion is: “You shouldn’t be chasing cheapness, priest!” "The Tale of the Priest and His Worker Balda." A.S. Pushkin.
How is a typical well constructed?
If you don’t focus on the nuances, the essence of installing a water well for a country house is the same: it is a long narrow vertical shaft that reaches the depth of the water. The walls of the mine are reinforced with casing pipes. Wells differ from each other in width, depth and additional devices that increase their productivity and reliability.
In addition to casing, wells are equipped with equipment for forced lifting of liquid and its distribution. To choose the right pumping equipment and storage tank, you need to know the characteristics of the well, the most important of which is its depth and flow rate.
The flow rate of a well is an indicator of its productivity: the maximum volume of liquid obtained per unit of time. It is calculated in cubic meters or liters per hour or day.
Image gallery
Photo from
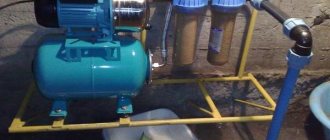
Surface pump for shallow well
Pumping station on the needle well
Deep well pump
Installation of a well pump
Functions of casing pipes
Casing pipes are the main element of the well. The casing is carried out using separate sections, soldered, welded or screwed together. Particular attention should be paid to their equal diameter: the entire structure should create a straight, even column.
If the casing pipes have external threads, the links are connected with couplings, due to which the diameter of the penetration increases.
Casing pipes are needed to:
- When drilling the well, the shaft did not collapse;
- the barrel did not become clogged during its operation;
- the upper aquifers did not penetrate into the structure.
Casing pipes made of steel alloys and polymers (PVC, uPVC, HDPE) are widely used. Cast iron and obsolete asbestos-cement products are used less frequently. The space between the pipe and the ground around the mouth is filled with concrete if the excavation was drilled in loose soils or the aquifer lies at a considerable depth.
Only after this work is completed, all other equipment is installed. Sometimes during the operation of a well, a slight “squeezing” of the pipe to the surface may occur. This is a natural process that does not require any additional measures.
The most popular are metal and plastic casing pipes with threads. The photo shows the installation of a blue plastic casing pipe
Inner pipe with filter
A pipe with a filter is lowered into the borehole of a double-casing well. Through its perforated first link, filtered water will flow into the head and then be extracted by a pump to the surface.
After the pipe is installed to the desired depth, it is advisable to secure its mouth. For this purpose, a clamp is used to prevent spontaneous subsidence of the pipe.
Image gallery
Photo from
Production of a well filter
Wire for attaching the filter mesh
Attaching a homemade filter mesh
Attaching the filter mesh
Well head device
The upper part of the casing pipe is equipped with a head. The basic design of this device is the same for any type of head. It consists of a flange, a cover and a rubber ring.
Different types of heads differ from each other in the type of material from which they are made and additional options.
The heads are made from cast iron and plastic. This is a sealed device. It is used to secure the pump cable and water pipe outlet.
Due to the low pressure created by the pipe head, the water inflow increases and, as a result, the well flow rate.
Caisson, adapter, packer
To prevent high humidity from affecting the operation of instruments connected to the well, a special tank is provided for them - a caisson. It is made of either metal or plastic.
Metal caissons, unlike plastic ones, can be repaired; they are better adapted to climates with significant temperature changes. In addition, a metal product can be assembled independently from parts that are sold separately. But plastic models are cheaper and do not rust.
Those who want to build a caisson for a well with their own hands will find detailed instructions on its construction on our website.
To tightly connect the ground water supply and the well, you will need a well adapter. This device is usually placed in the place where all the equipment that needs protection from water is collected. Most often this is a technical room. One part of the adapter is attached to the casing, and the hose from the pump is screwed to the other part.
A metal caisson is an expensive thing: its price reaches 40 thousand rubles, so you can buy it in parts and assemble it yourself, which will reduce the cost of the purchase
Sometimes there is a need to allocate a local section of a deep artesian well, where, for example, repair work will be carried out. For this purpose, packers are used - seals for wells.
The listed elements are part of the well design, having a great influence on its functionality.
Break through the ground or drill
The most common method is to drill a well using a pipe with a filter. to which a cone-shaped tip is welded.
Such designs are sold in specialized stores. The filter-needle is placed in a shallow starting hole made with a hand drill, and they begin to drive it into the ground, hitting it with a sledgehammer, a suspended cast-iron “woman” or other heavy object. When this structure almost completely goes into the ground, an extension pipe is connected to it using a coupling, and the next one is connected to it, and the excavation continues until the aquifer is reached.
Conclusions and useful video on the topic
The video will clearly present the process of drilling a well manually with the installation of casing and a filter in the casing pipe:
Each type of water well has its own advantages and disadvantages.
Now that you have an idea of the type of wells, their design and construction methods, it will be easier for you to make a choice in favor of one design or another, based on the characteristics of your site and your own financial capabilities.
If you have ever drilled a well with your own hands, tell us how difficult or simple the process was. Please write comments in the block below. Ask questions, share your impressions, post pictures related to the topic of the article.
Purpose, nuances of the device
Compared to a well, the well has smaller dimensions, allowing you to save the working space of the site. The mouth of the source is sealed much easier; precipitation and dirt do not get inside. There is no need to remove large amounts of soil or transport it from the construction site.
Comparison of well and borehole
You can build a well yourself without equipment in several ways:
- by eroding the soil with water;
- extracting rock with a hand drill auger;
Auger removed from the well
- or a bailer of a homemade device.
Drilling a well with a bailer
The most economical method is the Abyssinian well, from which the soil is not removed at all. The soil becomes compacted when the expanding pipes are clogged, the column becomes operational, and water flows through it into the pressure line.
The principle of constructing an Abyssinian well
Equipment
To drill a well on a site with your own hands, you need to prepare the following elements:
- Tripod: assembled from three steel pipes or logs with a diameter of 16 cm. At the top point, the structure is connected by a pin.
- The following types of drill bits: a spoon drill (for sand and clay), a chisel (can be straight and cross-shaped) for hard rocks, as well as gravel and pebble layers, and a serpentine drill bit for clay. The quicksand pass with the help of the already mentioned bailer.
Different types of drill heads - Motor pump: used to supply the washing solution to the soil development area.
- Drill rod: assembled from 3-meter sections connected by means of a coupling or thread. A specially made rod can be replaced with water or gas pipes.
- Swivel.
- Winch.
- Geared motor.
- Pump.
- Steel or polymer pipe for casing. Its diameter is selected so that there is a gap of at least 5 mm (preferably 10 mm) between the walls and the pump installed inside.
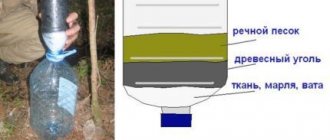
- A filter column, which is a pipe with a filter and sump attached to it. You can make the filter yourself using the same scheme as for the Abyssinian well.
- Caisson.
Scheme of a household installation for drilling a well
Read about the characteristics and advantages of HDPE casing pipe with threads for wells in our separate article.
A comparison of wells and boreholes is available on this page of the site. All the pros and cons of these water intake sources.
How to connect a hydraulic accumulator to create a complete water supply system is described here https://okanalizacii.ru/vodosnabzhenie/nasosy-i-stancii/shema-podklyucheniya-gidroakkumulyatora-dlya-sistem-vodosnabzheniya.html
Difficulties to be faced
The very first difficulty is getting to the layer in the soil where the water is. Since the thickness of the earth can be either minimal - 3-5 meters, or reach 10-15 meters. Therefore, in order to reduce drilling costs, it is necessary to conduct geological exploration (there are cases when the drilling depth in different places with a distance of 3 meters from each other reaches 7-10 meters). However, once you get to the water, the next problem arises. Soil of any density will crumble into the formed well, since water under pressure will rise to the top and wash it away. To avoid this situation, be sure to use a casing pipe into which a pipe of smaller diameter is inserted. The second pipe is called the service pipe, which is often plastic.
Advantages of hydraulic drilling over driving an Abyssinian well
There are clear advantages of hydraulic drilling technology over driving a needle into a well.
Firstly, the process is simpler - no gigantic physical effort is required to hammer steel pipes with a headstock.
Secondly, the soil is constantly washed out to the surface, that is, the driller clearly understands whether he is passing through clay or sand.
Thirdly, it is clearly determined that the pipe has reached the aquifer - this layer absorbs water, which is supplied to the pipe to flush the well, and the driller sees that the water has stopped coming to the surface.
The only disadvantages of hydrodrilling include the need to have a reserve of several hundred liters of water, and the difficulty of working in cold weather - the water in the hoses freezes.
The video describes the process of hydraulic drilling, but we are looking at a simplified process - a well in sand.
Preparation for drilling
Before you start drilling, you need to prepare all the structural elements of the needle:
- main pipe;
- tip;
- filter.
The main element of a driven well is a pipe, so you should not skimp on it. Ideally, it should be made of stainless steel. The diameter is taken 1-1.5 inches - there is no need for more.
Preparatory work is carried out in the following sequence:
- the pipe is cut into sections of 1.5-2 meters;
Pipes - then you need to make a filter. Its length ranges from 500 to 1500 mm. To do this, on the first section of the pipe, holes with a diameter of 5-6 mm are drilled in increments of 10-20 mm in a checkerboard pattern;
- after this, the area with drilled holes must be wrapped with mesh along its entire length. It would be better if it was also made of stainless steel. For reliability, it is soldered to the base. If there is no mesh, then you can wind thin wire around the column - this will not affect the quality of work;
- The next important element is the tip. It is made in the form of a cone from a metal pillar. The easiest way is to contact a turner - because... It won't be possible to do it without a special tool. When manufacturing, you need to adhere to two rules - the diameter of the needle must be larger than the main column, and it is better to make it from the same material, i.e. made of stainless steel;
- Now you need to prepare parts of the pipes - you need to cut threads on them, because This is the best option for connection.
Tip with filter
Another option
At this point, the preparatory work ends and you can proceed to drilling work.
Where to drill
Before starting any work, the hydrogeological situation should be clarified. The best source of information is the owners of surrounding properties , especially if they already have wells or have once tried to build them.
The second way to properly make a water well, or rather, choose a place for it, is to search for hydrogeological maps of your area, which can be stored in design organizations or relevant departments.
If it was not possible to obtain a clear idea of the presence and nature of aquifers, you will have to take the most expensive step - order exploratory drilling . However, before this you can try one of the folk methods , for example, dowsing, which, according to some evidence, can indicate with acceptable accuracy the presence or absence of water underground.
When choosing a location for a well, you should beware of neighborhoods in the form of septic tanks, cesspools, landfills or livestock farms. If they are still nearby, then they should be at a distance of no closer than 30 m. Of course, the well should be located closer to the house. The optimal distance is 3 m.