One of the most vulnerable and problematic areas of kitchen furniture is the small space between the countertop and the upper tier of cabinets, called the apron. To protect the apron wall, you have to use tiles, mosaics, and even glue panels with photo wallpaper. Therefore, it is not surprising that the idea of making a kitchen apron from laminate with your own hands appealed to many apartment owners.
The most important thing is to choose the right texture and color
Pros and cons of using laminate for a kitchen backsplash
Laminate with the highest precision conveys the texture of natural wood and stone and creates the necessary atmosphere
Most people are accustomed to the fact that laminate is used exclusively for flooring. However, in recent years, designers are increasingly using it in other places, because the result is inexpensive and high-quality. But such a popular finishing material has its advantages and disadvantages.
The advantages include:
- ease of cleaning - just wipe it with a soap or chemical solution to get rid of any dirt, and it will not lose its properties or deteriorate externally;
- ease of installation - the laminate is installed quickly and without problems, leaving little dirt and debris;
- moisture resistance of moisture-resistant laminate;
- resistance to mechanical damage, durability;
- low price;
- wide range and ability to imitate almost any material;
- Contains environmentally friendly materials.
Disadvantages include instability to high temperatures (that is, the laminate cannot be placed close to the slab, otherwise it will quickly deform) and moisture, if the material is not specialized. Otherwise, this is an excellent option for decorating a kitchen apron.
Design ideas
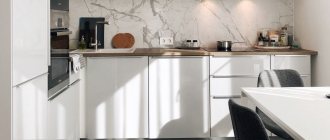
In order for such a finish to look stylish and not cheapen the interior, it is better to pay attention to options with natural wood finishes: wood, marble, stone, brick. A light sheet with marble “veins” looks especially relevant. The main thing is to choose textures and images that are as close to natural as possible. In one version, imitation wood can look very natural, but in another it can look completely unnatural. The colors should not be too bright, and the top layer should not be glossy. Matte surfaces look better because glare and reflections will give off unnaturalness. As for texture, there are options for panels with a rough finish. In this design, the imitation of rocks looks quite natural.
Instagram @schmidt_officiel
Instagram @rkply01
ShutterStock
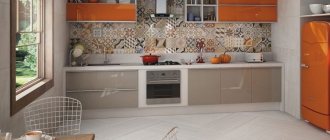
You should also give preference to monochromatic options or simple geometry, imitation tiles, bricks. It is better to choose sheets that cover the entire length of the working surface, so that there are no unnecessary joints (it is simply impossible to glue sheets so that the seams are not visible, but it looks ugly, besides, moisture will get into the joints, and the coating will quickly become unusable) . For this reason, it is worth abandoning PVC tiles, which are glued to the wall like ordinary ceramic ones.
Instagram @tepian.living
Instagram @riko.ua
Instagram @demiliodesign
Instagram @_magnoliahome
Polycarbonate cladding can be used in different ways, by gluing it on top of wallpaper, a painted wall, or masonry made of natural stone or wood. The glossy glass finish looks good in minimalist and modern kitchens.
ShutterStock
ShutterStock
Instagram @rkply01
- Kitchen
How to decorate the walls in the kitchen: 11 materials and examples of their use
Which laminate to choose
For a kitchen apron, you should choose a laminate with environmental safety class E1
There are several types of laminate, differing in composition and installation method:
- Laminated chipboards are durable panels fastened without sheathing. They are not resistant to moisture and will require a special profile during installation.
- MDF is inexpensive and can be installed on any type of sheathing, but, like laminated chipboard, it has low moisture resistance.
- Floor-mounted - quite durable and suitable for covering on the wall. Mounts either on the sheathing or on a wall with a flat surface.
- Laminated hardboard - has a high density and is resistant to moisture, installed on the sheathing.
For a kitchen apron, it is recommended to select a laminate with high resistance to humidity, strength class 31–32 and resistant to high loads. Preferably from environmentally friendly materials.
When choosing, you should consider the shade of the laminate. It should match the style of the kitchen itself.
User reviews
Sergienko Anton Pavlovich, 59 years old, Kemerovo: “I would like to compare laminate flooring with lining, which is made of larch. Polished fresh wood is much more beautiful, and if it is installed correctly, then when heated from the heat of the stove, the aroma of resin is formed. One of the disadvantages is that larch quickly turns black from water. I suffered for a long time and looked for a laminate with a specific pattern and color. I made an apron from lamellas near the sink, and from larch near the slab. Everything has been fine for four years now, there is a characteristic aroma, and the apron looks like new. In terms of money, everything cost the same as for Turkish tiles.”
Larik Nikolai Andreevich, 33 years old, Volgograd: “My advice to you is that as soon as the apron is laid, you should immediately cover it with a monolith or glass. No varnish compositions or polishes can save you from moisture. Because of the drawers, steam will not escape, and the water will hang in drops on the wall. There is neither the energy nor the time to constantly wipe and dry. It’s not for nothing that the apron was invented earlier; it’s a great phenomenon. It will be a little more expensive, but it will last for 30 years, and no less.”
Installation methods
There are two ways to install laminate: adhesive (the laminate is attached to a bare wall) and with lathing (attached to a pre-prepared structure). You should not start work immediately after purchasing the material; it should “get used” to the conditions of the apartment (humidity, temperature). It is necessary to keep the laminate indoors for 48 hours. Otherwise, the material may become deformed after installation.
Before installation, it is necessary to remove all furniture and trim and polish the wall surface with putty. There should be no switches or sockets on the wall.
To lay laminate you will need the following tools:
- hand saw or jigsaw;
- hammer;
- Ruler and pencil;
- building level;
- electric drill;
- wooden block;
- wooden slats (for sheathing);
- silicone or liquid nails (in the case of the adhesive method);
- screws, nails.
With sheathing
First of all, you need to create a structure. The bars for the sheathing should not exceed the size of 4x4 cm.
Work order:
- Using dowels, secure the bars at a distance of 30–70 cm from each other and at least 2 cm from the floor.
- Check that all elements are on the same level.
- Start laying the panels from the lower right corner. During installation, the laminate sheet must rest on the sheathing.
Panels can be attached to the sheathing using liquid nails - Press the next panel into the end groove to the first at an angle of 45°.
- Continue installing rows upward.
- Adjust the panels to each other (you can use a hammer), fix the laminate with screws.
Without sheathing
For this method, the wall must be perfectly flat. You need to make sure of this by checking it with a level, and in case of any violations, level it, for example, using cement-sand plaster or drywall.
Fixing the laminate to the wall using liquid nails with locking locks begins from the very bottom of the surface, while the panel is positioned so that its ridge is located at the top. If panels with click locks are used, then they are mounted, on the contrary, with the groove up, and the ridge located below is pre-cut with a jigsaw or a circular saw with a fine-toothed disk.
Then you can start installation:
- Apply liquid nails to the first panel, then press it tightly against the wall and press it for a while with heavy objects at hand.
Liquid nails are applied to the back of the panel in the form of a snake, avoiding the adhesive getting on the locks - The second and subsequent panels must be attached to the wall after 1-2 days, since the first panel will serve as a stop for all subsequent ones and it must dry well. For each panel, you need to machine the ends and groove, then carefully attach the next panel to the left of the first at an angle of 45°, connecting them. Moving in the same way, from right to left, from bottom to top, glue the second row.
- Wait 1-2 days again.
- Continue installation. If cracks form, they must be treated with a sealant.
- Before fixing the last laminate panel to the wall, it is first sawn to length in accordance with the existing gap.
All you have to do is wait until all the glue sets.
It is important to remember that when trying to complete the job in one go, for example when gluing panels in the middle of a wall, the bottom laminate may move away from the wall.
Required Tools
tool for laying laminate on an apron
To carry out the work, you will need tools that are available to almost any home owner:
- roulette,
- level,
- ruler,
- putty knife,
- screws and nails,
- glue,
- hammer,
- screwdriver,
- electric drill,
- jigsaw
How to care for a kitchen apron
The easiest kitchen apron to clean is made from ceramic tiles.
After installation, the apron must be cleaned of dirt: just wash it with water or detergent if necessary. In the future, clean in exactly the same way. You can use industrial soda; it removes almost any dirt and has a whitening effect (if the apron suddenly darkens).
The most difficult thing to clean is the seams; dirt gets stuck in them much more often. Bleach or lemon juice will help with this. The solution should be sprayed onto the seams from a spray bottle, left for half an hour or an hour, and then rinsed off with plain water.
You should also not wash your apron too often, otherwise it may lose its properties over time.
If scratches appear, you can polish them with a wax pencil. Wax can also be used as a preventative measure by applying it to the entire surface of the apron for additional protection. For deep scratches, use a special putty.
Unsuccessful options for a plastic kitchen apron
Manufacturers are proud and boast about the variety of images on plastic sheets, but is this such a plus now? It is quite difficult to imagine a situation in which a still life, flowers or huge fruits, or a seascape will fit into the interior and will not return the modern kitchen far into the past. It is also worth abandoning bright and flashy shades of plastic.
Unsplash
Pixabay
Before you start
Installation of the material can be carried out in several ways: on the lathing or using the adhesive method. Regardless of the method chosen, the preparation measures for the material and surface are the same.
Installation tools
- Jigsaw or hand saw.
- Hammer.
- Building level.
- Pencil and ruler.
- Wooden block.
- Electric drill.
- Wooden slats for sheathing. If the glue method is used, then liquid nails.
- Nails, screws.
Ceiling decoration
The use of panels is not limited to floors and walls. You can even decorate the ceiling with them. The thinnest lamellas are suitable for this; they need to be attached to the sheathing. The advantage of the material is additional sound insulation.
The choice of colors and shades is huge. You can decorate the kitchen ceiling from neutral light panels, use smooth transitions and contrasting combinations. You can lay the lamellas in one direction or in a pattern, make several levels, or combine laminate with other materials.
The kitchen ceiling made of laminate can be used as a zoning element. One option is to decorate part of the wall and ceiling with identical panels to create the letter “G”. This technique can be used to highlight a dining area or relaxation corner.
Expert opinion
Eduard Radikhovsky
She has been working at the Decorico design agency for 14 years. Shares his experience on the old days of our online magazine.
Ask a Question
Important! The laminate on the ceiling is attached to the lathing, so the height of the room will be reduced. In low kitchens, losing even a few extra centimeters is undesirable.
Preparatory stages
You can install the laminated apron yourself. First you need to prepare the material and tools for work. In the process, the master will need a jigsaw, a building level, a screwdriver, spacer wings and a soft spatula. A pencil, ruler and tape are used as accessories. You will also need a hammer for this work.
Before installing a laminate backsplash, you need to carefully prepare the surface. The whole process begins with leveling the wall. For this, standard putty is used. It is worth noting that the composition helps eliminate all defects and irregularities on the surface. After applying the putty, you need to start creating the sheathing. You can use small wooden beams for this.
Comparison with wallpaper
Manufacturers offer a large number of wallpapers that differ from each other not only in appearance, but also in technical characteristics. Roll materials have a presentable appearance. Presented in a large assortment. Manufacturers offer canvases that imitate various natural materials, including wood. However, in terms of their characteristics, they are significantly inferior to laminate. They cannot be used to create an apron, since the material is not able to resist fire and moisture. Washable models allow for periodic cleaning. However, only some of them allow the use of detergents.
Laminated boards can be washed multiple times. Contaminants that appear on their surface are more easily removed. Manufacturers offer a large number of detergents designed specifically for cleaning laminated surfaces. Using them makes it easier to remove settled dirt. As a result, the formed surface retains its original appearance longer.
Manufacturing form
Wall panels for the kitchen can be made in three forms:
- Slatted - an inexpensive panel made of plastic, its width is 10–50 cm. The slats are connected to each other using a special groove connector, and the panels are attached to the wall using sheathing. A small kitchen can become visually larger if you use light-colored slatted panels. A vertical arrangement will make the ceiling visually higher, and a horizontal arrangement will make the kitchen longer.
- Tiled. Common shapes are square and rectangle, their size is 30 × 30 cm or 30 × 60 cm. If a wood pattern is applied to the tiles, changing the arrangement of the squares can create a unique design.
- Sheet products are solid oblong slabs, their size is 1.20 m by 2.40 m. At the moment, this is the most common and practical option among buyers. Due to the large shape of the sheet, installation is easy and convenient, and finishing does not take much time.
What are kitchen wall panels?
A kitchen wall panel is the vertical space from the countertop to the beginning of the kitchen's top drawers. The standard height of the apron does not exceed 60 cm.
The kitchen apron is the second zone of the kitchen, which is exposed to water, temperature changes and food contamination. Its functional duty is to protect walls from oil drops, but it also has a decorative component.
Expert advice
When decorating, you can embody any ideas, but the resulting environment should look harmonious.
The kitchen should be cozy and pleasing to the eye, especially if it has a dining area or is combined with a living room.
The following tips will help you create such an environment:
- The combination of dark panels and a light, plain main background of the walls looks elegant.
- If you need to leave dark plastered walls, then a light laminate will provide an advantageous contrast. You can choose a cream, milky or linen shade.
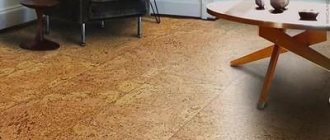
- Laminate flooring in the kitchen will be in conditions of high humidity, so you need to immediately choose a moisture-resistant material or apply a varnish coating. The second option may end up being cheaper.
- It is necessary to take into account the influence of the color of the environment on the mood. Blue and green tones calm, yellow invigorates, and an abundance of red can cause aggression. People usually spend a lot of time in the kitchen, so the atmosphere in it is very important.