In this article we will tell you how to make a plasterboard partition with a door with your own hands. Such a partition made of plasterboard sheets is erected very quickly and with almost no debris. It has sufficient strength and good sound insulation. And when finishing gypsum plasterboard, the wall is very simple, because it turns out perfectly flat. This is ideal if the work is performed by a person with no experience.
Another undeniable advantage of a plasterboard partition is that dragging sheets and metal profiles to the upper floors does not cause problems, because they have a variety of sizes and are light in weight. Here is an incomplete list of gypsum board sizes: 3000*1200, 2500*1200, 2000*1200, 1500*1200, 1500*600. Metal profiles come in lengths of 3 and 4 m, they are very light.
Is a plasterboard partition considered redevelopment?
Quite often, owners of studio apartments or multi-meter apartments divide the space using plasterboard partitions and other lightweight structures.
They do not have high strength and are not soundproof, but they are quickly installed and easily take the desired shape. With their help, the room is divided into comfort zones. But if you have redeveloped or are planning to redevelop your property in this way, then you need to take into account several important nuances. Dear readers! The article talks about typical ways to resolve legal issues, but each case is individual. If you want to find out how to solve your particular problem for FREE , contact a consultant:
It's fast and free !
The Housing Code gives the right to residential property owners to use housing without breaking the law. Unauthorized redevelopment or reconstruction of premises is a violation of the law. But not everyone knows whether a cardboard partition is a redevelopment.
Finishing
- How can you clean a partition??
Anything: all finishing materials without exception are compatible with drywall. I used the following finishes:
- Painting with water-dispersion paints (acrylic, silicone, latex and so-called “rubber”, providing complete waterproofing of the base);
For painting, it is better to use a medium-nap roller. Each layer is applied perpendicular to the previous one.
You can paint the walls only two weeks after puttying. If you hurry, the seams between sheets of drywall will show through with any number of layers of paint.
- Sticker on gypsum board laminate. This solution was applied in the nursery. Anyone who has swam knows: there is no element more dangerous than a child exploring the world, therefore the relatively fragile wall material was provided with the most reliable protection from any conceivable mechanical influences;
The lower part of the plasterboard wall in the nursery is protected with a laminate glued to silicone sealant. The trim edging is made with a 10mm plastic corner.
- Wallpaper sticker. In dry rooms they can be glued with regular wallpaper glue. In humid conditions, moisture-resistant wallpaper is pasted onto the already familiar PVA - in its pure form or diluted with water;
- Laying tiles. It can be glued to both ordinary cement tile adhesive and more exotic adhesives. In particular, when laying a tiled splashback above the bathtub in the attic bathroom, I used a spot-applied silicone sealant.
Laying tiles on a plasterboard wall. Use regular tile adhesive.
Features of modern real estate redevelopment
In Art. 25 of the Housing Code of the Russian Federation, the concept of redevelopment is defined as making changes to the configuration of the structural elements of a room in order to increase or decrease the area of the room.
To take measurements, contact the Bureau of Technical Inventory. BTI employees draw up a conclusion, on the basis of which new technical documentation for real estate is developed, taking into account changes to the technical passport.
Data on the redevelopment are recorded in the EBN of the Russian Federation. From a legal point of view, transformations are attributed to redevelopment, as a result of which the purpose of the room changes according to the functions performed or the technical aspects of individual components of the structure.
Housing redevelopment means the following types of work:
- Installation of doors in load-bearing walls and stairs.
- Construction of partitions, entailing additional load on load-bearing walls.
- Changes in the shape and structure of the floor covering, as a result of which the load on the main elements will increase.
- Installation of additional windows or their dismantling, changing the size of window and door openings.
- Glazing or construction of balconies and loggias.
- Replacing gas equipment with electric equipment.
- Rotation of rooms according to functional purpose with relocation of utilities.
Installing a plasterboard partition will be considered a redevelopment. If the structure does not affect the load-bearing walls in any way and does not increase the load on them, it can be classified as a repair or reconstruction. But the lines between them are very thin. Before installing a partition, it is better to consult with experts. It is important to find out in a timely manner whether specific changes need to be made to the technical data sheet. Plan all partitions and other changes in advance so that in the future a small redesign of the room does not result in big problems.
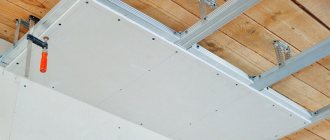
Sheathing
After the base is completely assembled, they proceed to covering it with gypsum parts - this is done according to the standard scheme. The caps of the screws should not protrude above the outer plane of the attached element after tightening, but not damage the part. The order of fastening the front and horizontal elements is chosen based on the ease of installation and cutting the fragments to the required size - sometimes it is easier to cut the part right on the spot, after fixing it.
Important: jumpers must be placed at all joints of plaster parts so that the edges of the parts can be secured. In this case, the joints should run apart.
When the entire area of the composition is covered with gypsum boards, they proceed to puttying and installing perforated corners on the corner joints of the parts. They give strength to the connection and provide the corners with a beautiful and neat appearance. After the putty has dried, the entire structure is sanded and painted.
Documents for registration of redevelopment
In order for the work carried out to renovate a residential premises to be considered legal, you will need to collect a package of documents to obtain permission to carry out redevelopment work. You must provide the Housing Inspectorate with:
- Statement from the owner, drawn up according to the state model.
- A sketch of a room after “renovation or a project drawn up by a construction organization with a development license.
- Papers confirming ownership of residential property.
- Consent of all family members registered on square meters.
- Consent of neighbors if the new layout is very different from the old one and may affect the condition of the surrounding apartments.
- BTI technical passport.
The absence of one of these documents is grounds for refusal to issue permits.
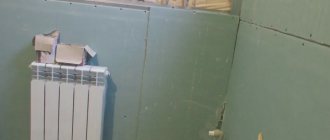
Conclusion
Now we know that attaching heating radiators to a plasterboard wall, as well as installing other heavy objects, is not impossible. I hope that as a result of independently installing heavy objects on plasterboard sheathing, you will receive high-quality and reliable fastening. To make the task easier, I recommend watching the video in this article.
Did you like the article? Subscribe to our Yandex.Zen channel
October 28, 2021
Plasterboard systems, Fasteners, hardware, meshes and membranes
If you want to express gratitude, add a clarification or objection, or ask the author something, add a comment or say thank you!
Stages of legalization of redevelopment
If the idea arises of making changes to the configuration of the residential premises, the preparation of design documentation will be required. For its development, they turn to architectural organizations specializing in creating projects or to BTI. The customer expresses the essence of his thoughts, and the performer transfers it to paper, taking into account the requirements of GOSTs and SNiPs.
Next, the necessary documents are collected and the created project is agreed upon with the Housing Inspectorate. She decides whether to give permission for redevelopment, erection of partitions, or consider it impossible and refuse.
Redevelopment work begins only after a positive response from the Housing Inspectorate. All manipulations are carried out strictly according to the project, since the slightest deviation entails rework.
Upon completion of the transformation process, changes are made to the documentation. To confirm the correspondence between the project and the work, a commission is invited to the premises. If the documents are identical to reality, a work completion certificate is drawn up. With this act, the owner goes to the technical inventory bureau, where he receives a new registration certificate for the housing. Changes are also made to the cadastral passport and a new certificate of ownership is issued.
General rules for carrying out such work
Finally, pay attention to a number of simple rules, the implementation of which will help you get a high-quality result:
Always choose only high-quality building materials from trusted sellers
- Before you start work, carefully take measurements; this will help you avoid the lion's share of mistakes and you won't have to redo your work several times. When taking measurements, use a level;
- Choose your material carefully. Take only high-quality hardware, dowels and other components for work. Buy them from trusted sellers who can provide product quality certificates upon your request, and the result of your work will be protected from sudden breakdowns;
- Make sure you haven't forgotten anything and get to work.
When working, do not forget to use protective equipment, in particular construction glasses. This will protect you from possible injury. And best of all, trust the experts.
Responsibility for unauthorized redevelopment of housing
Illegal redevelopment and construction of prohibited partitions are administratively punishable. A property owner who has carried out redevelopment without permission from the relevant authorities will be subject to penalties. The fine ranges from 2000 to 2500 rubles. Housing, the redevelopment of which has not been legalized, cannot be sold, exchanged, donated, or inherited until the actions taken are legalized. If the fact of unauthorized re-equipment of housing is revealed, the authorized bodies have the right to demand from the owner (in the form of an order indicating a deadline) to return to the premises the type corresponding to the technical passport. In case of failure to comply with the order, the matter may go to trial, the verdict of which may be the sale of the property at auction.
To legitimize the unauthorized reconstruction of the premises (construction of load-bearing partitions), you will need to contact a specialized organization to create a project. This is followed by coordination with the Housing Office, Sanpin, Housing Inspection, Bureau of Technical Inventory. After approval and confirmation of the project’s compliance with existing standards and GOSTs, permission should be obtained from the Housing Inspectorate.
Reinforcement and puttying
- What and how to reinforce seams and corners?
Traditionally, the joints between sheets are reinforced with serpyanka. It is glued along the seam, after which it is filled with gypsum putty directly through the cells of the fiberglass mesh. The final layer of putty covers the seam along with the reinforcement, hiding the texture of the fiberglass mesh.
Thanks to the adhesive layer, the sickle sticks to the surface of the kraft paper. True, not very durable.
Fiberglass is glued onto PVA diluted with water over a joint filled with putty and dried, after which it is smoothed with a spatula or sponge. Before sticking, it is more convenient to cut it into pieces about a meter long.
Do not smooth the glued fiberglass with your hands. Small glass fibers remain in the skin and cause pain during any activity. Tested from my own experience.
Corners are usually reinforced with a special corner profile - galvanized or plastic. It is covered with a thin layer of putty. I prefer another way to protect the corners of walls, shelves and openings: after finishing, I cover them with a decorative plastic corner sealed with silicone sealant.
The reinforcing corner profile is covered with putty.
- How to putty drywall correctly?
The seam is filled with a 10-12 cm wide spatula using crosswise movements: in this case, there are no cavities left inside the seam that could cause cracks to appear in the future. Using a crosswise motion, cover the screw heads with putty: with the first movement you fill the cavity above the head, with the second you remove excess putty from the surface of the plasterboard.
It is more convenient to cover the reinforcement with a spatula 30-35 cm wide, onto which the putty is first applied with a narrower spatula. It moves in a sliding motion along the seam.
The second layer of putty should completely hide the texture of the reinforcing material.
Using the same spatula, the gypsum board is puttied over the entire surface area. The final thickness of the uniform coating should be about a millimeter. If you are not confident in your ability to apply putty in an even layer, apply two layers as thin as possible (“scrape”) over the drywall.
A uniform coating about a millimeter thick can be obtained by applying two as thin layers of putty as possible.
We are remodeling an apartment using plasterboard partitions.
If you decide to remodel your apartment or simply add a wall, then you can go in two ways. The first is to build brick walls. However, this path has a number of disadvantages. Firstly, such work is physically very difficult. Secondly, it requires some skill and experience in bricklaying. Thirdly, the costs of such a partition are quite high. An alternative is to use plasterboard slabs for these purposes. Making a partition from plasterboard is much easier even for a beginner; the work is dry, which means it can be done even in renovated rooms. In addition, drywall is not inferior, and even outperforms in such characteristics as thermal insulation and sound insulation. In such a partition you can hide electrical wiring, ventilation and other elements of engineering communications. Let's take a closer look at how to make plasterboard partitions with your own hands.
- Selection of tools and materials.
- Marking the room for the partition and installing the frame.
- Plasterboard cladding.
To install the partition we will need the following tools:
1. Tape measure, square, level, construction pencil and an even block more than 1.2 meters long. As you understand, these tools will be needed for marking the room and working with sheets of drywall.
2. A knife with a trapezoidal blade or a hacksaw for drywall, metal scissors. We will cut drywall with a knife or hacksaw, and metal profile scissors for lathing.
3. Impact drill or hammer drill, as well as a screwdriver. The first is for drilling holes in the walls, and the second is for screwing in self-tapping screws.
4. Metal self-tapping screws 3.5*25 - 45mm, flea beads 9.5mm (screw with a screw) and driven dowels 6*40 or 6*60 mm.
5. Hammer, pliers, screwdriver.
The materials you will need are drywall and profiles for mounting the frame. Also, if you plan to install thermal insulation, stock up on mineral wool.
It is advisable to buy plasterboard for partitions with a thickness of 12.5 mm, since, unlike ceiling plasterboard with a thickness of 9.5 mm, it is more resistant to mechanical damage. It is quite simple to calculate the quantity for purchase - you need to double the total area of the planned partition (since the frame is sheathed on both sides) and subtract the area of door or window openings, if provided.
The profile is a little more difficult to calculate. For installation, two types of profiles are used - UW and CW. In addition, the profiles differ in thickness: 50, 75 and 100 mm. The thickness is selected depending on the thickness of the insulation that will be laid in the partition. The footage is calculated based on the following rules: the UW profile is a guide and is laid where the partition is installed on the floor and ceiling. Father-in-law, if our partition is 3 meters long, then it is necessary to purchase 6 meters of this profile - 3 meters for the ceiling and 3 meters for the floor. The CW profile is rack-mount and is mounted vertically, with its ends facing the UW. Its footage will depend on the height of the ceilings in your room. The racks are fastened at a distance of 60 cm from each other, so that a sheet of plasterboard with a width of 120 cm is fastened in three places: along the edges and in the center.
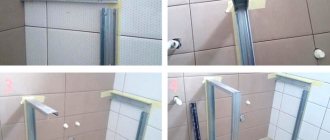
To properly mount the partition, it is necessary to lay the guide profile on the floor in the place where the partition will stand. Use a square to check the perpendicularity to the adjacent walls. After the profile is laid and secured either with self-tapping screws if the base is made of wood, or with driven dowels if the floors are concrete, you need to secure the profile to the ceiling. A building level will help in this matter. after that we proceed to attaching the rack profiles. They are screwed to the guides using “fleas”. CW profiles are installed in increments of 60 cm. If a door or window is planned, then the profile is also attached along the perimeter of these elements. If the ceiling height is more than 3 meters, it is also recommended to make horizontal lintels from a rack profile to add rigidity to the entire structure.
Once the frame is assembled, you can begin covering it with plasterboard. To do this, apply a sheet and screw the screws into it. The pitch should not exceed 15-25 mm. Then they are attached to the door or window profiles, and the drywall is puttied and painted or covered with wallpaper.
As you have seen, interior partitions are installed quite simply and in the shortest possible time.
What you need
For such work you will not need many unusual or complex devices, as well as materials. The main tool that you may need in the process of creating a partition is available to any “home” craftsman:
- Screwdriver
- Metal scissors
- Sharp knife
- Construction, or better yet, laser level
- Plumb
- A set of devices for finishing - spatulas, sandpaper or graters for sanding, rollers and ditches for paint
The set of building materials is also simple:
- Drywall
- Metal profiles for frame
- Serpyanka - seal seams and joints
- Perforated corners
- Putty mixture
- Dye
- Primer
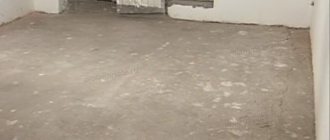
Installing a plasterboard wall on laminate
Andreyko If you are confident in the strength of the base under the laminate, then you don’t have to disassemble it. But if there is a possibility that the base will sag or sag, then it is better to install a partition without a laminate. To disassemble this is perhaps radical; I would make markings on the laminate, along the width of the partition, and cut them out with a hand-held circular saw.
The depth of immersion of the circle is adjustable, install a disk with a fine tooth and cut. Question from a thread on the forum: You need to make a partition on top of the laminate. We decided that it would be made of plasterboard. Simpler, lighter, faster.
Do I need to remove the laminate before installation, or just put it on top and that’s it? If you can do without dismantling, then how? Neformal75 No, I prefer to disassemble. If you cut in the middle, the question is whether the wall being installed will pass at the junction of the laminate boards, then on both sides you will still have to attach the laminate to the wall or floor. If the wall is attached to the laminate, over time it will deform and pull the rest of the floor structure or the locks will break. Yes, there can be a lot of jambs. With skillful hands, you can really disassemble it in about 15 minutes.
It will take half an hour to collect, taking into account the new cut. Seryoga D-k It depends WHAT laminate. And how they laid it, in the sense of where the beginning of the laminate was. There are types that are impossible to remove without damaging the locks. Besides, how is the partition attached? If the profile is mounted in addition to the floor in the ceiling and walls, then what is the point of cutting out and disassembling the laminate?
Two degrees of protection are enough (ceiling and wall) and your partition will not go anywhere. Don’t touch the laminate, it’s unnecessary.curt You shouldn’t attach the starting profile with dowels to the base through the laminate, the laminate will be rigidly attached to the fill and sooner or later it will come together like an accordion. I would advise you to attach the profile, draw 2 cm from it to the sides (the gap between the laminate and the profile is at least 1 cm + the thickness of the drywall) and cut out a strip of laminate with a chisel. The starting guide is attached to the floor, the gap to the laminate is 1 cm. According to the technology, the laminate should lie freely, without resting against obstacles. what kind of coverage? if there is a floating floor (laminate for example), then a small problem may arise; it will float only in one direction. From the point of view of perfectionism, it is necessary to disassemble or cut through it at this point and place it on concrete. But since this is not always easy, it can be neglected. From the course on construction: partitions cannot be placed on floor coverings, they are placed only on a rough foundation. Put it on the laminate, after some time, something will happen to the laminate, and what? Zoya Kasyanova, well, that’s what I understand. And I want to install a partition on the rough surface and lay laminate on both sides. The question is how to do it aesthetically. So far they have only suggested that I put an aluminum profile on both sides of the glass around the perimeter and the laminate will go under it.
It will look so-so, I think.
GKL fastening
- How to sheathe a frame correctly?
Installation of drywall begins on the side of the partition where the distance between the adjacent wall and the axis of the first rack is exactly 60 centimeters. The sheet is placed vertically and pressed against the frame, after which its edge is aligned in the middle of the rack.
Then the gypsum board is hemmed with four to five self-tapping screws in the upper part, after which the securely fixed sheet is pulled to the guide profiles and posts along their entire length in increments of 15-20 cm.
To avoid having a ruler handy, use a span as a measure of length - the distance between the tips of your thumb and index finger as far apart as possible. In SI, a span is translated as 17.78 cm.
The Old Russian length measure will help you do without a ruler when screwing in self-tapping screws.
The self-tapping screw must be screwed in at a distance of at least 2 cm from the edge, otherwise there is a risk of tearing out the edge of the sheet. The cap should sink about a millimeter below the surface of the kraft paper. If it goes right through the sheet, screw another screw next to it.
Additional sheets are attached in the same way. After installing the sheets cut to size, the seams between them are unstitched: chamfers are removed from both adjacent edges at an angle of 45 degrees to half the thickness of the sheet.
The embroidered seam will be filled with putty as tightly as possible.
Don’t be afraid to make a mistake with the size of the additional sheet by a few millimeters: the main thing is that it is securely attached to the frame. Gaps of any reasonable width can be hidden with putty.
With a two-layer sheathing, the first layer is fastened with a minimum number of screws 25 mm long - as long as the drywall does not move and fall. The second layer is sewn with longer self-tapping screws (45 mm) with a standard step of 15 - 20 cm, while the seams of the first and second layers should not coincide.
Wallpapering
The simplest finishing method is wallpapering. Before you start gluing, you need to putty the partition. To do this, use tile adhesive. In the case of wallpapering, it is enough to go through the putty once. Then the surface is sanded twice. There is no need to prime the partition before gluing. Any wallpaper will do. They will look great, because the plasterboard partition is a perfectly flat surface. This method is the least expensive. The work is carried out quickly.
Be sure to putty the places where there are heads of screws and self-tapping screws. The joints between the sheets also need to be removed.