The reinforcement of aerated concrete partitions is similar to the reinforcement of load-bearing walls, the only difference is the amount of reinforcement per row. Next we will look at some of the stages of construction and reinforcement of partitions.
Stages of construction of partitions:
- Marking for the project.
- Installation of the guide profile.
- Waterproofing on the floor.
- Laying the first row on the solution.
- Reinforcement.
- Bandaging with walls.
- Sealing damper joints.
For the construction of partitions indoors, a thin aerated block is often used. Its thickness is minimal, as a rule, it reaches only 100-150 mm. If you try really hard, you can find a block whose thickness will reach 75 mm or 175 mm. These blocks are identical in width and height and have standard dimensions, namely:
- width 600 mm and 625 mm;
- height can be 200 mm, 250 mm, 300 mm.
Density of aerated blocks for partitions
When choosing aerated concrete blocks, you should pay special attention to the marking; it should not be lower than D 400. This density is the minimum that can be used in the construction of internal partitions, the height of which will reach 3 meters.
The most optimal option would be blocks with a density of D500. In addition, you can use blocks with a higher density, for example, brand D 600. They have a higher load-bearing capacity, and therefore, you can hang large items on the wall using special anchors. Also keep in mind that aerated concrete partitions do not insulate sound well. The thicker the wall, the better the sound insulation, and the greater the density of the wall, the better the sound insulation.
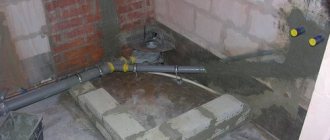
Waterproofing of the floor is done using a bitumen primer; roofing felt is used as waterproofing. Sheets of roofing felt are laid with an overlap of 10 cm.
Next, the outer blocks are placed on the mortar, aligned along all planes, and the string is pulled. The entire row is aligned along the lace.
Step-by-step instruction
Self-construction of a partition consists of several technological operations :
- markings;
- waterproofing;
- installation of anti-vibration pads;
- laying blocks and attaching them to walls;
- reinforcement according to the layout of the rows;
- production of doorways, through niches and lintels over openings;
- arrangement of connections to the ceiling;
- finishing.
Each stage is performed in compliance with technology.
Marking
It is convenient to use a laser level for marking.
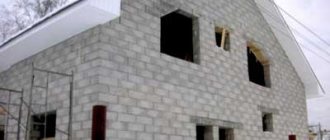
Most often, aerated concrete partitions are built after the construction of the building frame . If done earlier, at the stage of installing the interfloor ceiling, damage to the blocks or destruction of the entire partition may occur.
Use a laser plane builder or make do with a bubble level and plumb line:
- At the intersection of the ceiling and opposite walls, mark two points . One of the sides of the partition will be located in these places in the future.
- Use a paint cord to mark a straight line connecting the previously marked points.
- Using a plumb line, project the markings onto the floor .
- The upper and lower marks are connected by a line, which will indicate the junction of the partition with the walls.
Valera
The voice of the construction guru
Ask a Question
To prevent mistakes, check the accuracy of drawing the line on the floor. To do this, control measurements are taken several times across the entire width of the room using a plumb line. The marks on the ceiling and floor must match along the entire length.
Waterproofing and vibration prevention
If the partition is installed in a damp room, waterproof the wall from the floor. The surface is cleaned of dirt, concrete layers left by masonry mortar. Use roofing felt or other bitumen-based material. It is simply laid on the floor or glued with rubber-bitumen mastic for reliability.
A vibration damping layer is attached over the waterproofing and along the walls . It serves as protection against cracking of blocks and plaster from vibrations, and also reduces the level of noise penetrating into neighboring rooms.
as a vibration damping pad :
- mineral wool cardboard;
- sheets of expanded polystyrene up to 5 mm thick;
- pieces of cork lining;
- soft fibreboard.
If the gasket is not installed on the walls in advance, after the construction of the partition is completed, the cracks are foamed with assembly adhesive for aerated concrete blocks.
Laying the first and subsequent rows
If for horizontal alignment it is necessary to lay a layer of glue more than 20 mm, use a cement-sand mortar.
The level of adjacent blocks must be maintained when laying the first row ; glue consumption and, to a greater extent, the reliability of the entire structure depend on this.
Algorithm for laying aerated concrete blocks:
- A straight strip is nailed along the mark on the wall , which will provide convenience when aligning the partition vertically.
- Along the floor markings, a construction mesh made of polymer or metal - this will reduce the likelihood of cracking the walls.
- Work begins from the load-bearing wall , at a distance of 1–5 mm from which the first block is installed. For leveling, apply gentle blows with a rubber hammer.
- After laying the first row, the mortar is allowed to harden , since when installing the second row, movements are possible that violate the geometry of the wall.
- The block is attached to the wall using soft metal suspension. Rigid corners and rods embedded in a load-bearing wall are not used, since vibrations will gradually destroy the block.
- To ensure ligation of rows , one block is sawed in the middle. If there is a doorway in the partition, then markings for cutting are carried out taking it into account. In some cases, the block will have to be cut differently.
- Before laying each next row, the previous one is leveled with metal floats . Protrusions and irregularities between adjacent blocks are cut off. The surface should be flat and horizontal, which will prevent excessive stress in the blocks.
- Stretch the marking cord to facilitate alignment of the second and each subsequent row.
- A special adhesive for aerated blocks is used as a binding solution . The composition is distributed using a purchased or homemade carriage. After each application, the body of the device is cleaned of glue, as it sets quickly.
- After three rows lay the first reinforcement layer. A recess is made in the surface into which glue is placed. Reinforcement is placed in the groove along the entire length of the partition and the recess is filled with glue.
- Continue laying out rows until they reach the ceiling.
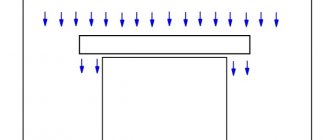
- Between the last row and the ceiling a compensation gap of 15 - 20 mm is left, which is filled with polyurethane foam upon completion of construction.
The blocks are adjusted to size using a file. Cutting with an angle grinder creates a lot of dust, which is difficult to completely remove before applying glue to the block.
The procedure for making openings
Layout diagram
Aerated concrete partitions are not load-bearing walls, therefore reinforced concrete lintels are not installed above doorways .
To place blocks above standard doors with a width of 600 to 800 mm, use a steel corner with shelves of 30–50 mm. The corners should be 50–60 cm longer than the opening to ensure reliable intersection with the walls of the partition.
If the width of the span requires the installation of two blocks, they are cut so that the seam is above the middle of the doorway.
For long arches, they use not a corner, but a channel with a width suitable for the block. The channel is embedded in the wall. Supports are installed under the arch partition so that the channel or corner does not bend. The support is removed after the glue has dried.
An alternative option for arranging the floor is the production of a reinforced belt :
- A wooden box is made as wide as a partition and 4–5 cm high.
- Lay three reinforcement rods with a diameter of at least 12 mm.
- Fill the box with glue or cement-sand mortar.
- Install aerated concrete blocks without waiting for the solution to dry.
- The formwork is removed after 2-3 days, when the glue has completely hardened.
The rows above the lintel are installed last.
Before finishing, if necessary, the partition is grooved, electrical wires are laid, and socket boxes are installed.
Scheme of reinforcement of aerated concrete partition
Typically, reinforcement of partitions is done every 3-4 rows. But in zones of high seismic activity, every second row is reinforced (1-3-5-7-9-11).
The row reinforcement itself is a rod with a diameter of 8 mm. Using a wall chaser you need to make grooves. The grooves must be cleaned of dust, moistened with water and filled with glue. Next, the reinforcement is laid and the plane of the block is leveled. Remember that the reinforcement at the corners is always bent.
Installation benefits
The advantages of using gas blocks are as follows:
Ease and high speed of masonry, as well as processing (surface grinding, chipping, sawing with a hacksaw).- Good thermal insulation and sound insulation characteristics.
- Economic benefit and practicality.
- Excellent combination with reinforcement.
- Environmental friendliness and fire protection.
- Possibility of using any finish.
The disadvantages of using gas blocks are considered:
- Allowing only minimal operating loads.
- Arrangement using flexible and rigid anchoring (tapes), which must be performed several times.
When characterizing aerated concrete partitions, buildings have more advantages than disadvantages.
Gap between partition
To avoid cracks in an aerated concrete wall, it is necessary to leave a compensation gap of up to 20 mm between the ceiling and the partition. It must be filled with mineral wool, polyurethane foam or low-density polystyrene foam. This will fully protect against mechanical influences when the floor deflects.
To prevent cracks from appearing in the corners in the future, a special damper seam is made between the wall and the partition. Various materials are used for its manufacture, the most popular are mineral wool, thin polystyrene foam, and damper tape used when laying heated floors. To avoid moisture getting into this seam, it is necessary to treat the seam with a vapor-proof sealant upon completion of the laying of the blocks.
Soundproofing of aerated concrete
Aerated concrete itself, which has a porous structure, has good soundproofing properties, but they depend not only on the density of the blocks, but also on the thickness of the masonry. But it is small for partitions: if a wall 400 mm thick can insulate 50 dB, then with a thickness of 100 mm, the insulation index is only 39 dB.
Therefore, if in one room there is a children’s room, and in another, for example, they listen to music or a sewing machine chirps, you have to think about soundproofing. In this case, it is most convenient to combine it with finishing - cover the wall with plasterboard, boards or decorative panels, with polyethylene foam placed in the sheathing.
Connecting the partition to the walls
It is very important to correctly connect the walls and the future partition. It is best to secure it with anchors made of stainless steel. One anchor must be installed per meter. If there are no anchors, they can be replaced with galvanized punched tape.
Necessary materials and tools for installation
To build partitions from aerated blocks, you need to determine where to place them. You can use a sand-cement mixture, with a good grade of cement M400-500 and a polymer additive . The composition is purchased in dry form or prepared from the components yourself. As you use the mixture, dilute it in the required quantity. The solution is always used for the first layer of masonry.
The second and subsequent layers are faster and easier to install using foam or adhesive. The first holds the material together within 10 minutes, and the glue within 1-2 hours. For example, 1 bottle of foam replaces a bag of glue, which, like sand-cement mortar, must be diluted as it is used.
In addition to the materials presented above for laying composition, the following are used in the construction of partitions:
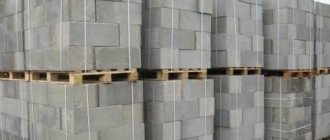
- Aerated concrete structural and thermal insulation blocks of the required size, indicating factory markings and quality certification.
- A container for diluting the solution, a shovel, sticks, a concrete mixer and a hand-held construction mixer.
- Waterproofing (roofing felt), any plaster (dry or ready-made in buckets).
- Electric drill, wall chaser, regular hammer, rubber mallet.
- Spatula, trowel, carriage, grater, saw, square, construction square, cord, gripper, plumb lines, laser meter.
- Reinforced rods, without signs of erosion.
- Fastening elements (anchors, strips, screws, nails).
You will also need work clothes and gloves . It’s easy to install the partitions yourself, or you can contact a construction company, which, according to the estimate, will provide consumables and tools.
Important ! If you plan on long-term cooperation with a construction company, you must conclude an agreement according to which the customer will receive guarantees for the work performed.
Load on floors
If you use floors made of aerated concrete slabs, this will ensure good thermal conductivity. And the weight of aerated concrete slabs is less than those made from other materials.
It is better to use a monolithic floor, as it provides additional support for the walls during seismic vibrations.
The thickness of the ceiling depends on the reinforcement and load-bearing capacity of the walls. To do this, take slabs up to 3 m with a load-bearing capacity of up to 800 kg per 1 m2.
Buy foundation reinforcement from the manufacturer
Every person in our company treats business honestly and with conscience, because the sale of reinforcement for foundations is the main link of our business. In St. Petersburg you can find many companies engaged in the sale of fittings, but their prices can be much higher, and the quality of the product is questionable. We offer you composite fiberglass reinforcement from a reliable manufacturer, the quality of which is beyond doubt.
Our company brings to your attention an environmentally friendly building material - composite reinforcement for foundations. The reinforcement consists of heavy-duty rods with a ribbed spiral profile, the diameter of which is from 6 to 12 mm. The fittings are sold in coils of 100 m.
In order to buy composite fiberglass reinforcement in St. Petersburg, just contact us at the phone number indicated on the website. Also on the product page you can fill out and send a special form, after which our employee will receive the application. He will contact you at the telephone number you left during business hours and clarify the details of the order and delivery.
Existing disadvantages
- High hygroscopicity, requiring reliable waterproofing to prevent the accumulation of moisture in concrete pores. Let me give you an interesting experiment: a test sample with a density of 800 kg/m3 was left in a state of complete immersion in water for 18 hours, during which time its mass increased by 47%. Eight days later, after being removed from the water, the weight returned to its original weight.
- Susceptibility to cracking due to low prismatic strength. Easily leveled by plastering.
- The appearance of a large amount of dust during drilling and sawing.
- When installing heavy parts on walls, you will need to use special anchors.
The existing disadvantages are more than offset by numerous advantages, which makes the use of the material more and more in demand.
Recommendations from experts
Partitions are usually erected after the external walls are completed. If the length exceeds 8 m and the height is 3.5 m, the frame must be additionally reinforced with reinforced concrete elements. When using cement-sand mortar as a masonry mixture, it is necessary to provide a layer with a thickness of within 3 mm. It is important to exclude mutual deformation stresses between products.
In addition to the compensation gap at the top, it is necessary to ensure that the edges of the new structure meet the load-bearing fences. The partition will need to be connected with reinforcing elements, which are installed at a distance of a meter from each other. In order not to measure the correct displacement of blocks in horizontal rows, you need to focus on half the length of the product. Usually the last block in a row is not the size of the space for it. You can trim the products with a hacksaw. During masonry work, moisture should be avoided.
You should not blindly trust the seller when purchasing material. This is especially true if high density material is required. When you weigh the block, you will understand what purpose it has. If the thickness is 10 cm and the weight varies from 14 to 18 kg, this is a construction material. If the weight turns out to be less, they are trying to sell you thermal insulation products with low strength.
Fast house construction
Construction is facilitated by the technology of producing large block sizes.
Due to this, much less blocks and mortar are used compared to walls made of brick or ceramic blocks. For comparison: to lay a square meter of wall we use 7 aerated concrete blocks or 16 hollow ceramic blocks. Construction is made easier by aerated concrete floor slabs, lintels, a tongue and groove connection system and carrying handles.
Another advantage is ease of processing; aerated concrete is cut with a hand saw.
Aerated concrete is classified as a non-combustible material. When exposed to fire, porous concrete does not emit harmful substances and does not heat up. Thanks to these properties, this building material protects against the spread of fire.
Aerated concrete is frost-resistant, resistant to fungi, mold and bacteria, and vapor-permeable - thanks to which the walls can “breathe”.