The average cost of a finished swimming pool in a construction center can reach several thousand dollars. Therefore, in the hope of saving money, developers decide to build a permanent brick pool with their own hands. To implement such a project, it is not at all necessary to be a licensed builder and have many years of experience working on a construction site. However, you shouldn’t count on quick and easy results. There will be many technological nuances in the developer’s work, the observance of which is necessary in order to ensure that the pool meets a number of requirements:
1. Protection of the building from groundwater
Flooding of a brick bowl with groundwater can lead to its premature destruction. In view of this, it is important for the developer to achieve sealing of the bowl from their influence.
2. Sealing the bowl from the inside
Water will have a destructive effect on the wall material from the inside, so it is important to work on insulating the walls with special materials.
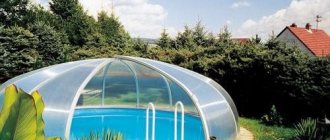
Pool design diagram
3. Focus on durability
A considerable volume of water will exert pressure on the walls of a brick pool (we are talking about 12-18 cubic meters of liquid, which a medium-sized bowl can hold). The developer must take this point into account and correctly calculate everything at the project development stage.
4. Soil heaving
The brickwork from which the walls of the bowl are built is also influenced by soil heaving forces. Therefore, if there are any defects or if the brick laying technology is not followed, the wall may collapse.
5. Organization of water drainage
It is important for developers to properly organize the water drainage system. To do this, a pit is dug next to the bowl, and a pipe from the drain hole and equipment for filtering it are placed in it.
6. Arrangement of overflow holes in the walls
To control the water level in the pool, overflow holes will need to be installed in the brick walls.
As you can see, there will be many difficulties in the process of work. A bowl built from brick consists of separate fragments and is not monolithic, so it is important to ensure its rigidity. The porous structure of the brick also adds problems to developers. Because of this, you will have to work hard on high-quality and reliable insulation of the pool both inside and outside.
Specifics of building a brick pool
The average cost of a finished swimming pool in a construction center can reach several thousand dollars. Therefore, in the hope of saving money, developers decide to build a permanent brick pool with their own hands. To implement such a project, it is not at all necessary to be a licensed builder and have many years of experience working on a construction site. However, you shouldn’t count on quick and easy results. There will be many technological nuances in the developer’s work, the observance of which is necessary in order to ensure that the pool meets a number of requirements:
1. Protection of the building from groundwater
Flooding of a brick bowl with groundwater can lead to its premature destruction. In view of this, it is important for the developer to achieve sealing of the bowl from their influence.
2. Sealing the bowl from the inside
Water will have a destructive effect on the wall material from the inside, so it is important to work on insulating the walls with special materials.
Pool design diagram
3. Focus on durability
A considerable volume of water will exert pressure on the walls of a brick pool (we are talking about 12-18 cubic meters of liquid, which a medium-sized bowl can hold). The developer must take this point into account and correctly calculate everything at the project development stage.
4. Soil heaving
The brickwork from which the walls of the bowl are built is also influenced by soil heaving forces. Therefore, if there are any defects or if the brick laying technology is not followed, the wall may collapse.
5. Organization of water drainage
It is important for developers to properly organize the water drainage system. To do this, a pit is dug next to the bowl, and a pipe from the drain hole and equipment for filtering it are placed in it.
6. Arrangement of overflow holes in the walls
To control the water level in the pool, overflow holes will need to be installed in the brick walls.
As you can see, there will be many difficulties in the process of work. A bowl built from brick consists of separate fragments and is not monolithic, so it is important to ensure its rigidity. The porous structure of the brick also adds problems to developers. Because of this, you will have to work hard on high-quality and reliable insulation of the pool both inside and outside.
Preparatory process
As an example, let's consider the most cost-effective project that will require only your skills and strength - a pit pool with a steel base.
Before starting construction, you must have tools and building materials, as well as fittings and, of course, a steel pool design approved by specialists. Prepare:
- Ruberoid.
- Concrete grade M350-M400, frost resistance index F200, water resistance W6.
- Cement grade 400.
- Sand of medium granulation.
- Fiber fiber.
- Plasticizer.
- Reinforcement (steel, rigid - rolled I-beams, channels, angles, flexible - individual bars of smooth and periodic profile, welded or knitted meshes and frames). For the formwork and the area around the pool, reinforcement of wood origin (bamboo) is suitable.
The following tools should be available:
- Master OK.
- Meter.
- Level and plumb.
- Shovel.
- Construction tape.
- Sharp knife.
- Hacksaw.
- Container for mixing concrete.
- Construction mixer.
- Welding machine.
How to build a brick pool with your own hands? Technological aspects
If all the difficulties do not frighten the individual developer, he can roll up his sleeves and begin work on building a brick pool bowl. It consists of several main stages:
1. Construction of a pit
Once the size, shape and configuration of the pool are approved and the design is drawn up, developers begin work on the site. It begins with marking the area for digging a pit. Use a measuring tape to measure the boundaries of the pool, and then mark them with pegs and rope.
After marking, a pit is dug. Its dimensions should be 50-80 centimeters greater than the width and length of the pool, and 30-40 centimeters greater than its depth. The walls of the pit are carefully leveled, and the bottom is thoroughly compacted manually or using special vibrating equipment.
Digging a pit
2. Digging a pit for laying communications
Do not forget that communications will have to be connected to the pool in the future. This is a water supply and drainage system, as well as pumping and filtering equipment. These units are placed in a pit, which is dug next to the pit. The pit and pit should be connected by a ditch into which the pipes will be laid in the future.
3. Preparing the pit for installation of the bottom slab
The first step stated that the depth of the pit should exceed the depth of the pool. This is necessary then to place a special plate on the bottom. But before laying the bottom slab, the pit needs to be prepared - lay pipes for draining the water, level the bottom with a slope towards the drain, compact the soil. Then a layer of geotextile is laid out. Despite the fact that this material is lightweight and has a fine structure, it solves many problems - it prevents the destruction of the bowl as a result of soil displacement and protects it from destruction.
A bedding of crushed stone and sand is poured onto the leveled bottom.
A layer of bedding is poured onto the geotextile, which is compacted thoroughly. On top of it, a layer of 15-20 centimeters is filled with crushed stone of small and medium fractions, and then fine-grained clean sand (layer thickness is about 10 centimeters). The resulting base must be compacted and placed on a waterproofing layer. Ideally, use special membranes that are installed overlapping.
Introduction
Every summer resident wants to have his own swimming pool on his property, where after hard work he can swim and relax. Also, your own pool is not only a place for swimming, but also a decoration for your house.
An artificial pond is not only a favorite place for adults, but also for children. I really want a reliable, functional and economical reservoir. There is a solution - build it yourself. You are the one who knows what you want for yourself and will bring it all to life. If you decide that building a pond on your site should be quick, cheap and very simple, then the best option is a metal pool. Now we’ll tell you in more detail how to build your own water corner.
Types of pools in the country with your own hands
A swimming pool on a personal plot is the dream of many summer residents. But many people think that making such a structure with their own hands is quite difficult. But, nevertheless, it is possible. Construction begins with determining the type of structure. It is the type of pool that determines the materials and construction technology itself.
Types of pools:
- Frame - can be purchased ready-made;
- Plastic – seasonal option;
- Stationary – durable and strong design.
The frame pool is made of metal. A covering material in the form of polyethylene film is also provided. Suitable for installation in a country house for one summer. The finished factory design may include a staircase, a filtration system, or a pumping system. The device is easy to assemble and simple to use.
Inflatables can be used as a swimming pool at the dacha. But this is not a very convenient option with small sizes.
A plastic pool is a polymer bowl. These projects can be purchased ready-made. This design is unlikely to survive the winter, so it is considered a seasonal option.
The stationary view is a full-fledged swimming pool. Its installation requires more effort and finances. But the end result is a durable structure that will last for many years.
Selecting a location
The construction of the swimming pools with your own hands, shown in the photo, begins with the selection of the ideal place for their placement . Be sure to take into account the following points:
It would be great if the chosen location consists of clay soil, which, in the event of a waterproofing failure, can stop water leakage.
- The site should have a natural slope of the soil. In this case, it will be easier to carry out the work of digging a pit and you can immediately decide where it is better to install the drainage system.
- Tall trees should not grow near the future pool, the root system of which can sense the moisture nearby and begin to reach towards the walls of the structure. As a result, the waterproofing can be easily damaged. The greatest danger is posed by trees such as poplar, willow, and chestnut. Therefore, if trees grow in the chosen location, they should be eliminated in advance so as not to subsequently restore the damaged structure.
- It is undesirable for low-growing trees to grow in the selected area, the leaves of which will constantly fall into the bowl, and during flowering, the pollen that gets into the water will turn it yellow.
- You should pay attention to which direction the wind blows in your summer cottage. The pool should be placed in such a way that air movement is along the bowl. In this case, debris and dirt will begin to stick to one side, along the edges of which the drain system should be installed.
- Construction of a pool on a site with your own hands should be carried out closer to the water supply to facilitate its filling.
Where to place a DIY pool in the yard
Purchased options can be placed at your discretion, since this is still a building for the season. But a permanent pool must be installed according to certain rules. Basically, many rely on personal preferences, but one should not neglect the recommendations that will help install the structure correctly.
Factors influencing pool placement:
- Soil properties. Clay soils, which provide natural waterproofing, are considered ideal. In addition, when building a pool, you need to take care of the foundation pit. If the ground is rocky, this process will be difficult.
- Direction of the wind. An outdoor pool will be an excellent place to collect any debris that is blown into the pond by the wind. In order to protect the building, the prevailing windy part is determined and isolated.
- Presence of vegetation next to the pool. If there are trees or bushes nearby, the roots can easily damage the frame.
Determining the size of the pool depends entirely on personal wishes. It is important to understand what kind of reservoir the owner can afford, based on the scale of the site. You need to sensibly assess your strengths.
For swimming along one path, a reservoir width of 2.5 m and a length of 5 m is enough. Two paths add width up to 4 m.
The normal depth of the pool is 1.4 m. But this figure may vary depending on the purpose of the construction. For children, the pond is made shallow. And for those who like to dive, the depth is increased.
What is it for?
When ordering the construction of swimming pools for their dachas, people, first of all, want to add comfort to their dacha holiday. It’s no secret that today growing garden crops is, first of all, not a way to provide yourself with food, but an active recreation that allows you to forget about problems at work, the bustle of the city and get as close to nature as possible. And such a vacation is doubly pleasant if you have the opportunity to swim after useful work or simply lie down next to the surface of the water in a sun lounger.
What to consider at the very beginning
Before finding out how much it costs to build a pool on a turnkey plot, you need to analyze a number of points that directly affect the cost of the pool:
- what will be the functional purpose of the pool
(decorative, children's, for adults);
An inflatable children's pool is the most inexpensive and simplest option for a summer cottage.
- will it be stationary or collapsible
pool;
- opportunity deepening the structure
in terms of groundwater levels;
- how will it be organized drain system
and water treatment;
- how much is free area
, suitable for placing
a tank
; - which form
will be at
the bowl
.
Stationary or prefabricated
The type and size of the pool directly determines how much it costs to build a turnkey pool on a site. Permanent structures tend to be more expensive than comparable sized prefabricated bathing tanks.
In addition, maintenance and operation of collection tanks will require less money. It should be understood that if the pool is being installed for a long time and will be used frequently, then you will have to invest in a stationary structure. If you need it for short-term use on a small summer cottage area, then you can get by with a prefabricated pool.
Inflatable structures can be quite large in size, sufficient for bathing adults and children.
Non-stationary structures
These types of bowls are small or medium in size. Depending on the characteristics of the selected type of pool and the option of installing equipment (on the surface or with recess), the installation time of the structure can range from several hours to three days. There are the following main types of collapsible bowls for a summer cottage:
- rod frame
;
- sectional frame
(plastic, metal, wood);
- inflatable
.
If you need the most economical option, then it is easier to buy a ready-made inflatable bowl than to make a pool at your dacha. Its price is minimal and ranges from 2 to 16 thousand rubles. The diameter of the inflatable bowls does not exceed 5 meters, and the depth ranges from 50 cm to 120 cm. They are made of PVC film; for large-sized products, the structure is reinforced with a frame of thin-walled aluminum tubes.
Large inflatable bathing tanks may have additional supporting sides of the structure.
Some models are equipped with filters for water purification. The small volumes of the bowl allow the water in it to quickly heat up to ambient temperature. The weaknesses of inflatable products are:
- high risk of mechanical damage
due to a puncture or cut;
- the need to resolve the issue storing the bowl in winter
;
- exposure to negative influences ultraviolet
which can cause
PVC to crack
.
The next in increasing cost are prefabricated rod products. On average you will need to pay from 4 to 20 thousand rubles for them. The frame in them is a structure of vertical and horizontal posts with special fastenings. The water is retained by a PVC cover; these pools are supplied with a pump equipped with a filter. The weaknesses of rod frame tanks are the same as those of inflatable products.
To install a rod frame bowl, you need a flat base and 2-3 hours of installer work.
Sectional frame products or rigid frame pools are among the most reliable prefabricated structures. Metal, plastic or specially treated wooden elements are connected by locking, bolting or gluing. The depth of such bowls ranges from 1.2 to 2.4 meters.
Their advantage is the absence of the need for dismantling during the cold season. It is enough to simply remove the polyvinyl chloride tension element. A typical pool kit includes a pump with a water filtration unit and a skimmer (cleaning device). The average cost of frame products ranges from 40 to 100 thousand rubles.
Sectional frame pools are similar in performance to stationary bowls.
Stationary
Stationary pools are made from various materials, this in turn affects the cost of constructing the pool and its operational properties. In particular, bowls are made from:
- concrete
;
- red ceramic brick
(walls) and
concrete
(base); - metal
;
- multilayer
(composite)
fiberglass
; - polypropylene
.
Building a swimming pool with your own hands from concrete
After determining the type of reservoir and installation location, proceed to marking. It is performed using pegs and a stretched rope. After this, excavation work begins.
For large volumes of work, it is worth hiring professionals who, using special equipment, will quickly dig a pit of the required size.
Digging a pit is the most difficult process of work. It requires a lot of effort and time. All design parameters must be increased by 0.5 m. This space will be used for formwork. After this, construction of the bowl begins.
Stages of bowl construction:
- The surfaces of the pit are well compacted.
- A sand cushion is being erected. It is enough to pour 20-30 cm of material on the bottom. After this, compaction occurs again.
- Waterproofing is installed. Roofing felt and bitumen are considered a cheap option. First, a layer of roofing material is laid on all surfaces, and then bitumen is applied in several layers.
- The drain is installed. These works are carried out before installing the formwork. Drainage depends on the size of the pool and its shape.
- We are building formwork. Here you can use available materials.
- Pouring concrete. Reinforcement is required. Concrete must be strong enough and reliable.
When the concrete has hardened, the formwork can be removed. Then the entire surface is treated with a solution of water and concrete. An alternative to this is ironing. This is where the pool is installed. It remains to take care of the aesthetic part and convenience.
Welding work
Stainless steel sheets can be connected in two main ways: welding and profile fasteners. When welding work, which should best be done by a specialist, it is necessary to provide all openings for communication - pipes for drainage, water intake, filtration, etc. Welding must be accurate and subsequently the steel bowl must clearly fit into the dug pit. Welding seams must be made with high quality to ensure tightness and not lead to leaks over time and, as a result, interruption of the operation of the pool. During welding work, all technologies for processing sharp edges and wrapping steel sheets to dimensions corresponding to the project must be strictly observed.
IMPORTANT! The seams on the inner surface of the pool bowl are best treated using electrochemical etching. To ensure that the welds have an aesthetic appearance on the visible parts of the upper edge of the pool and overflow tray, they are ground flush with the surface.
When using a fastening profile, all technology must be taken into account and accurately executed; all clamps, brackets, rivets, chemical fasteners must be made in accordance with the instructions. In any case, you can’t cope without consulting specialists.
And the final stage is a facing polymer film, which is hermetically attached to the surface of the bowl.
Source
Do-it-yourself pool lining at home
Before starting the lining, install an additional layer of waterproofing. At the same time, each crack is sealed so that liquid does not penetrate into it. For this purpose, various impregnations, mastic or polyethylene are used.
Then they move on to finishing work. Ceramic tiles are used for these purposes. The material is moisture resistant and easy to care for.
An alternative to ceramics is plastic film.
The choice of lining materials for the pool is quite wide. You can choose not only a practical lining, but also one to suit any design. It is also necessary to take care of additional equipment for the reservoir.
Additional equipment for the pool:
- Filtration. Such equipment makes the water cleaner. This makes pool maintenance much easier.
- Heating. Allows you to heat the water to a comfortable temperature and swim even in cold weather.
- Lighting. Lighting is a fairly practical solution. This way you can use the pond in the evening.
The area around the pool will also have to be specially developed. The surrounding area is tiled. It is important that it has an anti-slip coating. You can also arrange a border made of decorative stone.
Advantages and disadvantages of such a homemade product
The advantages should be considered:
- the size and shape of the bowl can be chosen arbitrarily, based on the characteristics of the site;
- you can make a cascade of several bowls for people of different age categories;
- the type of blocks is chosen at your discretion;
- the cost of construction will be much lower than when purchasing (or ordering) a ready-made bowl;
- the ability to carry out work at a convenient time;
- freedom in choosing the type of finish, materials, equipment elements and circulation piping of the pool.
Disadvantages of such a homemade product:
- when planning construction, it is necessary to take into account that there is an extensive scope of work ahead, the main part of which must be done manually;
- in addition to building the bowl itself, you will have to install communications and power supplies, and solve a lot of problems with the placement of equipment;
- the cost of such a pool is much lower than that of a ready-made model, but still quite high.
DIY pool made of concrete or polystyrene blocks
Expanded polystyrene is a lightweight and easy-to-use material. A homemade pool is made from the largest blocks. This way you can quickly build a pond and a Roman staircase.
Step-by-step guide to building a pool using polystyrene foam blocks:
- Excavation work - digging a pit. The length of the pit should be 50 cm longer. The bottom is filled with crushed stone and compacted.
- Filling the bottom of the pool. First, the reinforcement is installed. Metal rods are inserted and tied together using thick wire. Next, concrete is poured and the surface is leveled.
- After the concrete has hardened, waterproofing is carried out using agrofibre. Next, a polystyrene foam pillow is installed. To connect materials, use paper clips or construction tape.
- Bowl installation. Blocks are laid. The material is easy to work with; if necessary, you can cut the polystyrene foam with a hacksaw. Each block is equipped with grooves for joints, thanks to which the material adheres to each other.
- Drain installation. All pipes are removed and filtration equipment is installed.
- Strengthening and lining of the structure. To do this, metal rods, stairs and facing tiles are inserted.
Often, concrete blocks are used to build a swimming pool. The installation technology is similar to the installation of polystyrene foam material. The blocks are secured using concrete mortar.
For structural reliability, every third layer of blocks is reinforced.
After the structure has hardened, the bowl is covered with film. It is secured around the edges and the pool is filled with water. This is how the polyethylene is leveled. Next, finishing begins. All work can be easily done with your own hands.
Operation and Maintenance
The operation of pools made of blocks does not have any specific features.
The main monitoring is carried out on the circulation equipment, and the bowl is only periodically cleaned of debris.
During the water change, a general cleaning is carried out with cleaning of all surfaces.
Reference! If the pool is not used in winter, preservation is carried out in the fall with the reverse procedure when warm days arrive.
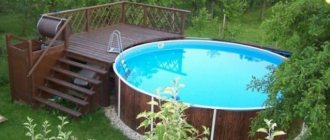
How to build a frame pool
A ready-made purchase option will look good in the courtyard of a country house. At home, it is advisable to install the structure next to all communications. You can choose a mini pond that will not take up much space and will fit perfectly into the overall appearance of the yard.
A small pool is assembled in the following sequence:
- The installation location is selected and markings are made;
- Fabric flooring is made, and the strength elements of the frame are installed;
- We connect the frame;
- Installation of sewerage, supply of all pipes;
- Checking the structure for strength.
Models of frame pools are sold with instructions that describe all the steps in detail. The main thing is to properly stretch the fabric base. You need to make sure that the material is strong enough and does not leak.
The product kit includes a filter with a circulating pump. But these are rather weak devices, so it is recommended to purchase additional filtration equipment.
But you can create a frame pool with a fabric bowl yourself. The material is created by welding or stitching. In the first option, a hairdryer is used, and in the second, a sewing machine. In this case, the frame is made of banner or plywood.
Defining parameters
There are no special conditions for the size of the reservoir; a lot here depends on the preferences of the person and the capabilities of your summer cottage. So, if you have a lot of space in your dacha, then it is better to build a large metal frame pool with your own hands; if it is not much, then it is advisable to build a small one! So, for example, a small tank can be built in the following dimensions: approximately 5 meters in length and 2.5 meters in width, if larger, then the width can be doubled. When choosing a depth, you need to understand who will most often be in it - children, adults, or both. If you have children, then it is better to build a shallow “paddling pool”. For older children and adults, a pond with a depth of no more than 1.4 meters is suitable. It will be comfortable for both children and adults.
Reinforcement
Reinforcing the bottom of the pool is a mandatory step. In this case, the height of the concrete layer should be about 20 centimeters.
In the reinforcement process, ribbed reinforcement is used. Its cross-section should directly depend on the operating conditions of the pool. But the diameter should not be less than 12 millimeters. The spacing of the twigs should be 20x20 or 30x30 centimeters. It can be equipped with one or two belts. The second option is often chosen in the presence of soil heaving forces.
NOTE! The reinforcement should be recessed into the concrete by 5 centimeters. That is why it is laid on bricks, which give the desired size. The distance between layers should be 10 centimeters.
Other Important Details
The recess around the perimeter of the pool can be filled in various ways. For this purpose, soil dug during the construction of the pit is often used. But in cases where the soil is quite heaving, crushed stone can be used. It needs to be poured into the hole and compacted quite firmly.
On top of the perimeter of the pool, you can fill it over crushed stone, on top of which you should lay a tiled covering. It is best to use a material with a matte surface. This will increase the level of safety near this hydraulic facility.
Pit preparation
Before starting work on digging a pit, it is worth clearing the area of any existing vegetation. First of all, this applies to a variety of shrubs and trees, if available.
Preparing a pit manually with the help of human resources and appropriate equipment in the form of a shovel is advisable only in cases where the pool is quite small.
If the thicket of such a structure is large enough, it is best to resort to the help of an excavator. Renting this equipment often costs as much as hiring a team of workers. That is why there will be no additional expenses in this case.
It is worth noting that the dimensions of the pit should be slightly larger than the dimensions of the pool bowl . This is due to the fact that various equipment, formwork and cushions must be placed in the additional space.
IMPORTANT! To prevent the earth from collapsing from the walls of the pit, experts advise digging at a certain small angle to the vertical.
Waterproofing
Waterproofing the pool should be done in the same way as this work is carried out in relation to the foundations. The easiest way is to use a coating material. It is enough to apply it on the outer wall of the structure, after which you just need to wait for it to dry.
Film waterproofing material can also be used, but in this case you should choose the highest quality and most expensive products. This is due to the fact that the operating conditions of the pool are quite difficult.
In cases where the soils are quite heaving, it is necessary to fill the walls with a metal section before waterproofing work. The top can be plastered with a small layer of mortar.
Basic kit
This is quite possible if you have the desire and basic skills, as well as a special set of materials and equipment supplied by swimming pool manufacturers. The required set includes wall materials for the construction of a swimming bowl, waterproofing, facing film, embedded parts, fittings, flange assemblies, underwater nozzles, a skimmer, a pump, a filter and a ladder for descent. The basic kit can be supplemented with various accessories: underwater lights, a counterflow device, a protective coating, and a tool for cleaning the bottom and walls of the bowl.