Anyone who has ever had to deal with a frame or inflatable pond knows firsthand about the problem of periodic punctures of the PVC membrane and breakage of the sides. They try to strengthen and close the supporting structure, most often with varying degrees of success. It is much more efficient and reliable to assemble a podium for a frame pool with your own hands. In this case, you can be sure that the side of the reservoir will not be broken in the event of an unsuccessful attempt to climb into or out of the reservoir. You can build a podium for a pool quickly, on average from one day to a week, depending on the design.
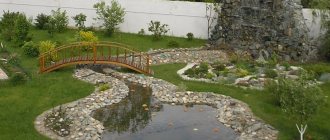
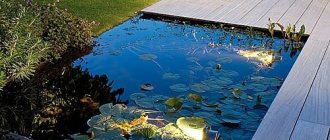
With a deck and stairs, using the pond is much more convenient
Requirements for a swimming pool site
To choose the right location, think in advance about how the pump and lighting equipment will be connected, and where the drain will be located. The requirements that we list must be observed, including for frame pools.
- The place should be level, without changes in height, slopes, or potholes. This is necessary for uniform distribution of water and durability of the structure. The maximum deviation is 2-5 mm per square meter.
- Small stones, driftwood below, construction waste, and remnants of the root system (it quickly grows again) are not allowed.
- The soil at the site where the structure is installed must be compacted tightly. Preferably with gravel.
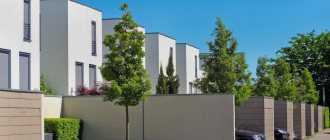
- It is better to place the platform or pit at a sufficient distance from the house and other buildings so that in the event of damage to the system, the foundation will not be flooded.
- Do not place the base for the bowl next to trees or bushes. The water will become polluted faster.
- The place under the destroyed building is not suitable for the podium. There may be cavities left in it, which will contribute to rapid destruction.
- Also, do not use foundations intended for other objects. It has different characteristics and this will affect the stability of the tank.
- The soil should not be loose or creeping; river cliffs and places near a railway or highway are not suitable.
Let's summarize. When choosing a site, it is important that it is level, cleared of all kinds of debris and plants. It is advisable that the soil be compacted, outbuildings and residential buildings, wires, trees, and roads should be far away. It is better to build it in a sunny or half-shaded place that does not block the passage for people.
Instagram @ideiipodelkidliadachi
Instagram @dnevnikmaikla
Along the perimeter, the platform should be larger than the tank itself. So that the water that splashes out of it does not form a puddle. We'll tell you what you can use to make a platform or podium for a swimming pool at your dacha with your own hands.
- Baths, saunas, swimming pools
How to make a swimming pool at your dacha: 3 types of structures and methods of installing them
How much does a turnkey service cost, where can I order it?
The best option is to order installation work at a service center. Most often, this is a condition of the warranty agreement. Errors made during self-installation are most often considered non-warranty cases.
Installing the bowl by technicians from the service center will help eliminate danger and ensure competent and reliable installation.
The cost of installation depends on:
- size,
- pool designs,
- site conditions.
Firms performing installation charge up to 25% of the cost of the structure.
The most important and useful information about frame pools is presented here.
Base materials
The tank can be installed on ground covered with film or sand drainage (SGD). But such a foundation will not be reliable. It would be better to strengthen it. Here's how you can do it.
- Concrete or sand-cement mixture. Durable, moisture-resistant screed does not dry out over time. It is easy to obtain a smooth surface of any shape. Suitable for both removable and stationary pit pools. An excellent option for large areas.
- Boards. Easier to handle material. It’s also easy to get a flat area, but without maintenance, boards can dry out, swell, and rot.
- Decking (terrace board, garden parquet). Wood-polymer modules that do not require special processing. Decking is not afraid of rain and snow - it will not dry out or rot. Laying garden parquet can be difficult; it can fade in the sun or float in the heat.
The photo shows options for different platforms.
Instagram @khayakdolf
Instagram @gvk2008
Instagram @vintovayasvaya
So, the place and materials have been chosen. Now you need to prepare the area.
- Baths, saunas, swimming pools
5 Stunning Pool Sites You'll Love
Difficulties at the planning stage
When equipping a swimming pool at your dacha yourself, you need to clearly plan your actions and always calculate the financial burden with a reserve. Most long-term construction and unfinished projects are stopped precisely because they did not calculate the money or made a plan for expenses back to back.
Looking through the instructions on how to build a swimming pool at the dacha, photos and videos on this topic, it seems that everything is done easily and simply, but do not deceive yourself, there is a lot of work to be done. The first thing to do is determine which type of pool is best to choose; this is greatly influenced by how much effort and time the owners can spend on its construction and maintenance.
Types of swimming pools that can be equipped at the dacha:
- Frame.
- Plastic.
- Stationary.
Stationary pool
If you are planning a deep pool for your dacha, a stationary option is best suited, because despite the fact that it is more difficult to build, it is much easier to maintain, you do not need to put it away for the winter and look for a place to store it.
To build it, you will have to dig a large pit; it makes sense to think about hiring special construction equipment to make digging the hole faster and easier. When choosing a place to install a pool, you need to make sure that there are no trees or bushes growing nearby. The roots of these plants can even grow through the foundation, in which case the pool will soon be damaged. Plants have the following property: to direct the growth of roots in the direction where there is more water.
And most importantly, when arranging a stationary pool, work must begin either at the beginning of summer or in the middle; at the end of the season, having built a pool, you may not have time to try it out. Although nothing will happen to it during the winter, it is still much more pleasant to swim in your pool immediately after it is built, rather than wait a whole year until the next warm season.
Construction plan
When planning to build a pool, the action plan needs to include the work to create a pit, then you need to compact and strengthen the walls and bottom of the pit, build formwork, and later fill it with concrete and install reinforcement, and when everything hardens, facing work and wiring some devices for convenient pool maintenance. These are the main stages of building a permanent pool.
Pool based on a plastic bowl
It is much easier to organize a plastic pool for a summer residence than a stationary one, but there are some difficulties in caring for it. For example, it will need to be removed at the end of the warm season, and installed when it starts again. This is done so that the plastic does not crack due to temperature changes.
Simple inflatable pool
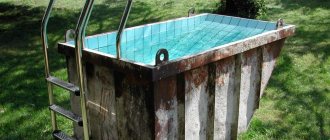
The easiest option is to purchase a regular large inflatable pool, especially if the pool is to be organized for the entertainment of mostly children. This pool is convenient and practical; it is easy to install, folds quickly and takes up very little space, so it is convenient for storage.
Over time, it may turn out that the owners no longer need the pool, or other plans have appeared for the place where the pool is located; if a plastic bowl, frame or inflatable pool is installed, there will be no difficulties in disassembling the pool.
Preparing the site
Territory marking
There are several marking methods. In any of the proposed options, add 0.15 meters or more to the size of the structure if you plan to build a wide platform.
- Rectangular, square. Stick four sticks into the ground and stretch a rope between them so that the corners are right.
- Round. Where the middle of the tank is supposed to be, dig a post into the ground and tie a long rope to it. Tie paint in a can to its second end, and then draw a circle. Instead of paint, you can take a bottle of sand and mark the boundaries with it. Or tie a sharp stick to the free end of the rope and draw a circle on the ground. Another option is to pierce the ground, and install other pegs in place of the punctures, stretching a rope between them.
- Elliptical. Draw three or two circles and then connect them by eye using one of the methods listed above.
Instagram @family_build
- Landscape
6 useful and beautiful ideas for decorating a swimming pool on your property (you’ll want to repeat them)
Clearing the area
If you are preparing a ground area, use a bayonet shovel inside the marking to remove the turf. Stick the shovel completely into the ground - 30-40 cm. However, experts do not recommend making a hole more than half a meter. It is recommended to fill deeper holes with concrete and lay brickwork around the perimeter.
The removed turf can be used to create lawns on the site. Remove remaining roots, herbs, and stones from the cleared area. Then treat it with drugs that slow down plant growth.
For a stationary pit pool, dig a hole to a depth of 2.5 meters - if you plan to jump into the water from the side and 1.5-2 meters - for structures with steps. Use a level so that the bottom of the pit has a slope of 4 cm by 1 meter towards the drain.
Large frame tanks are always made in a small recess. This way they will be more stable, and less water will accumulate around them. This installation option is also suitable for loose soils.
Instagram @catdigger177
Instagram @fauxfarmhouseranch
Leveling and compaction
Make a 20-25 cm sand cushion at the bottom of the pit or on top of the ground. It will become an excellent shock absorber if there is a busy road nearby. Level and compact it with the help of construction beacons, a level, and rules. Tamping can also be done with a vibrating plate or ordinary water. Water the future platform several times with water from a hose and sprayer, and then level it. Sand can be replaced with ASG and cement. The ratio of components in this mixture is 10:1.
For a small tank, such a pillow is often enough. Geotextiles or thick film are laid on it, and a bowl is placed on top. If it is more than 1-2 cubes, the prepared area is strengthened using one of the methods described below.
Instagram @rspools
Instagram @liudmilachurukevich
Calculating the dimensions
The length and width of the pool are correlated with its intended purpose. If you are going to seriously swim in it, then choose a rectangular shape. It will just be much more comfortable to splash around in a round pond. If you need something exotic, install bowls of unusual shape.
Round shape is optimal for small pools
A very important criterion is depth. If you like to jump from the side or dive, then the bottom should be at a distance of one and a half meters. A deeper bowl will be needed if you are going to install a springboard or tower. Here the depth indicator should be at least 2.3 meters. True, you can only make that part of the bowl so deep where the jumps will be made, and then smoothly bring the bottom to a level of 1.5 meters.
Standard pool depth 1.5 meters
Is the pool organized at the dacha exclusively for children? Fabulous! Half a meter of depth will be enough for your little ones to have fun without the risk of an accident.
The depth of the pool for children does not exceed 0.5 m.
The greatest difficulty will be a combined pool, built for all household members at the same time. The children's and adult areas will need to be separated by a strong partition extending from the very bottom. Thus, children will be protected from accidental exposure to great depths.
Important! In a combined pool with differences in depth, you need to create a flat bottom that will smoothly lead to deeper places. Sudden jumps in the bottom and step structure are strictly prohibited for safety reasons
Walking along the bottom, you can daydream and miss the line beyond which the bottom disappears from under your feet. It’s a trifle to choke in such a situation, so don’t take unnecessary risks. Water does not forgive negligence.
Do-it-yourself concrete platform for a swimming pool at the dacha
Making a foundation pit
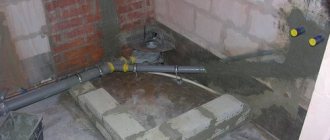
For work, frost- and water-resistant concrete of grade M100 or M300 is used. If you prepare the mixture yourself, take coarse sand, crushed stone, cement and additives to increase water resistance. The latter are sold ready-made. Conduct all communications in advance.
- Lay two layers of roofing material overlapping on a sand or sand-gravel cushion.
- Seal the joints with mastic or sealant.
- Lay another sheet of roofing material on top.
- Cover the joints again with mastic or sealant.
- Lay the reinforcement on the bricks so that you get a grid with 20x20 cm cells. Bend the ends of the rods onto the walls.
- Start pouring the mixture. The recommended layer thickness above the mesh is five centimeters.
- Level the mixture and pierce it in several places with a sharp stick so that there are no air bubbles left inside.
- Cover the bottom with film or spray it every day to prevent the concrete from cracking as it dries.
- When the bottom hardens, install the formwork on the walls. You can build it from plywood.
- Make a reinforcing mesh at a distance of 5 cm from the formwork. Tie the new rods to the ones that are bent at the bottom.
- Secure the mesh with diagonal slats.
- Pour the concrete.
- When it dries, plaster the surface.
Check if the waterproofing is done well. Fill with water, mark its level and leave for two weeks. Taking into account natural evaporation, no more than 2 cm should go away. If all is well, you can begin finishing. This is also additional waterproofing. Instead of roofing felt, you can use geotextile fabric, thick film, or polypropylene.
Instagram @ekskavatorpogruzchikizhevsk
Instagram @oazis_ul
Instagram @oazis_ul
Making a podium
For work it is recommended to use concrete M100 or M300. Hydrophobic additives, cement, crushed stone and coarse sand are added to the mixture, made independently.
- Lay overlapping sheets of geotextile, film or roofing felt on a sand or sand-gravel bed.
- Seal the joints with mastic or sealant.
- Place reinforcing mesh on the bricks with a cell size of 20*20 cm.
- Make the formwork the desired height.
- Pour concrete or cement-sand mixture (1:3) and level it.
- Pierce it in several places with a sharp stick so that there are no air bubbles left inside.
- When the mixture sets, remove the formwork and wait until it dries completely.
- Cover the surface with plaster, primer and, if desired, waterproof paint and tiles.
Instagram @konakovokolodec
Instagram @svetlanaelshankina
Instagram @_natashik_1804
Creating a recess
Large frame structures are placed in such pits halfway or slightly lower. They become more stable, more aesthetically pleasing and you don’t need a ladder to climb inside. The approximate depth of the hole is one and a half meters. When calculating the width of the pit, take into account the need to erect retaining walls.
- Pour a layer of 20-30 cm of ASG onto the bottom and compact it.
- Make a thin screed from a cement-sand mixture. It will separate the main slab from the ASG.
- When it dries, place a reinforcing mesh on top with cells no larger than 25*25 cm.
- Fill with M100 or M300 concrete. The recommended slab thickness is 10-15cm.
- Cover the slab with film while drying.
- Once the surface has hardened, build retaining walls for the frame. They are made from bricks or cinder blocks.
- Plaster the walls.
Instagram @maxim_jcb8030
Instagram @sp.petuhov
The video shows another way to strengthen the frame structure.
- Deepening and leveling the site.
- Installation of the frame.
- Strengthening the walls with blocks.
- Adding gravel.
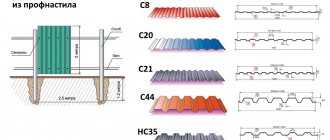
If you decide to bury a small tank, you can do without a screed. In this case, they make the same pillow from ASG, and support posts for the frame are dug in around the perimeter to a depth of 50-60 cm. Crushed stone is poured into the holes with them, and the racks themselves are covered with liquid waterproofing or bitumen. A shalevka is nailed to them horizontally.
Instagram @zemelnye_raboty_zp_ukraine
Instagram @sp.petuhov
Nuances of care and operation
No matter how clean the water is, leaves, branches and dust always get inside the pool. To avoid this, you can sew a cover from a fine mesh, which must be stretched over the water. Another option, more suitable for mini-pools, is to weave a cover from wicker. This will be beautiful and at the same time effective for protecting against large particles. Debris that gets inside can be easily removed using a sap, and algae growths can be easily removed using brushes. In this case, the water must be changed every 2–3 days. For this water to be beneficial, it can be used to water plants in the garden. We must not forget that chemically treated liquid is unsuitable for these purposes. It is convenient to use a vacuum cleaner to clean the bottom of small pools.
When a pool is built and beautifully decorated, it will last as long as you use it correctly
If not properly cared for, it will quickly turn into an ugly, bad-smelling swamp, no matter how large or small the swimming area is. It's all a question of time. In order to prevent such cases and enjoy swimming in your yard, you need to understand the methods of water purification, which are:
In order to prevent such cases and enjoy swimming in your yard, you need to understand the methods of water purification, which are:
- physical cleaning;
- chemical;
- electrophysical.
Physically cleaning a pool involves removing debris of various sizes from the water. The following devices will help you do this effectively:
- An ordinary net.
- Vacuum cleaner designed for underwater cleaning.
- Brushes of varying hardness.
- Water filters.
From the specified list of devices, special attention should be paid to filters. They are most effective because they remove contaminants that are invisible to the human eye. However, this method requires periodic monitoring
However, this method requires periodic monitoring.
Water filters differ in the quality of filtration and constituent materials. In this regard, they are divided into types:
- sand;
- cartridge;
- diatomaceous.
The functioning of a sand filter has a main component - quartz, crushed into small particles. Through them, water is purified from particles of at least 20 microns in size. This option is considered the most budget-friendly. Most suitable for water purification in inflatable pools.
The cartridge filter is more efficient than the previous one, as it is able to capture particles smaller than 10 microns. The cost of this equipment is higher than previously indicated.
A diatomaceous earth filter is a compressed plate made from the remains of fossil microorganisms that are capable of trapping dirty particles ranging in size from 3 to 5 microns. This feature makes it highly efficient among devices of this type. Cleaning the filter is quite simple; you only need water pressure in the opposite direction.
Chemical pool treatment involves the use of special substances. With this type of purification, pool water:
- disinfected;
- has a normal pH level;
- does not contain the smallest dirt and grease particles that filters cannot remove;
- prevents the development of algae.
The following are used as disinfectants and antibacterial substances:
- Chloride preparations, which are sold in the form of powder, capsules or tablets. When using this product, you must follow the dosage. Otherwise, when swimming, you can get poisoning or damage to the skin. This product is low cost and highly effective, so it is purchased for cleaning large pools.
- Preparations containing bromine, like the previous remedy, are very effective. They do not have a strong odor like chlorine, so buyers often choose it.
- The most convenient method of chemical cleaning is disinfection with active oxygen. The use of this method does not entail the appearance of foam and unpleasant odors in the water.
Electrophysical purification involves the use of ozonizers, ultraviolet rays and equipment capable of releasing silver and copper ions into the water. The presence of this cleaning system makes chemical treatment unnecessary. Electrophysical cleaning does not cause allergic reactions or odor, which makes it the most effective way to remove dirt from water. Ultraviolet rays and silver fight organic matter, and the presence of copper destroys algae.
Compact versions of pools are full-fledged places for swimming, which in their functionality are no different from stationary options, therefore the methods and methods for cleaning them are similar.
Installation on wooden floors
When installing plank flooring under a pool, you should take into account its configuration, which, as a rule, has a curved shape, taking into account a number of points, such as:
- wooden logs must be installed at intervals of up to 50 cm, and supports should be installed between each other at a distance of 75 cm;
- when laying wooden boards on concrete pillars, do not forget to install waterproofing;
- the boards should not be sawed off exactly to the size of the structure, but their ends overhanging the water should not be longer than 25 cm;
- the timber must be etched with an antiseptic;
- boards that are closer to the shore and may come into direct contact with the soil must be insulated.
Filling methods
According to the type of filling, pools are:
– overflow;
- skimmers.
For overflow options, a special grate is installed around the perimeter of the tank, through which the water that overflows over the side is sent to the storage tank. The presence of such a system allows you to visually increase the size of a pool built in a country house, and also allows you to fill it to the very brim.
Overflow pool at the dacha
You can't fill skimmer pools like that. The water level should not reach the sides by at least 15 centimeters. Such tanks do not have storage tanks, so you should not simply spill the contents. The water supplied to the tank is purified through a skimmer. The option is inexpensive, therefore in demand in the private sectors.
Skimmer pools do not have overflow protection