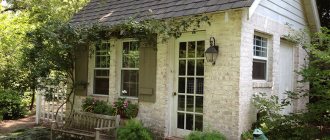
Finishing facades with natural stone is a traditional, proven way to create a decorative or protective shell for walls.
At the same time, the cost of both material and work significantly limits the capabilities of many home owners and forces them to find alternative options.
Among them is artificial stone, which in many ways can compete with natural samples.
The qualities of the stone correspond to human ideas about what external cladding should be like:
- Durable.
- Aesthetically attractive.
- Durable.
- Resistant to all atmospheric and mechanical influences.
- Non-flammable.
These qualities are most preferable for facing a house with facade stone.
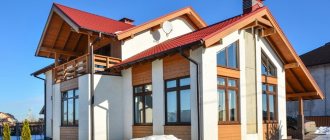
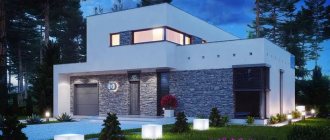
Artificial stone for facade
The complexity and high cost of finishing with natural stone have long been a serious problem. The appearance of artificial stone on the market dramatically changed the situation and made it possible to create facades that are outwardly indistinguishable from natural ones .
Moreover, artificial stone has more attractive properties from both operational and aesthetic points of view. For example, the weight of artificial stone is much lower than natural cladding.
This happens because the panels are thinner and do not create a large load on the foundation . In addition, natural material can have a completely different appearance - it all depends on where the stone was mined, under what conditions the layer was formed, etc.
The surface can be very beautiful and expressive, but it can look faded and gray. This problem does not exist with artificial stone; the decorative side of the issue is under the special control of manufacturers.
There are many types of panels that imitate different types of stone and different types of masonry, which allows you to choose the option you like best. In addition, you can combine different types of panels, achieving a high decorative effect .
Main types of artificial stone for facades
Artificial stone is a collective name for several types of material. Most often, this term refers to Portland cement panels with various additives, the surface of which imitates natural masonry.
But there are panels made of other materials, which are also called, but the material of manufacture is different:
- Clinker . These are usually tiles made to resemble clinker bricks and are used to reduce the weight of the cladding. All its properties are practically indistinguishable from clinker bricks; the appearance also completely follows the shape of the material. Clinker tile masonry is indistinguishable from brick, so the classification as artificial stone here is conditional and relates more to the mechanical qualities of the material.
- Ceramic . Facade panels made of baked clay. The surface texture imitates natural stone. Durable, resistant to atmospheric and temperature influences, low susceptible to water.
- Porcelain tiles . Facade tiles (panels) made of porcelain stoneware are very resistant to all types of influences and have a wide choice of colors. Imitates different types of natural stone panels. The surface is smooth, glossy or matte, installation is carried out using clamps.
- Casting stone . It is produced by casting into molds a mixture of marble chips, quartz sand, polyester resin and other additives. The material is very durable and abrasion resistant. It is used for a variety of needs - facade panels are just one of the options for using cast stone.
- Fiber cement . Panels created from cement mortar reinforced with cellulose fibers. Durable, resistant to temperature changes, easy to install. appeared relatively recently, but the high cost prevents the material from spreading on the market.
- Polymer . These materials are very indirectly related to artificial stone, since in this case there is only an external resemblance.
These types have similar technical characteristics - strength, resistance to temperature changes, mechanical stress, etc. The difference between them is only in appearance, which makes it possible to choose and implement different design ideas .
IMPORTANT!
The variety of shapes and types of artificial stone sometimes leads to some discrepancies and confusion, so you should always clarify the type and material from which certain panels are made.
Selecting the type of installation
The exterior of the house directly depends on the style of installation. Often people confuse two completely different concepts - “masonry” and “stone cladding”, which can lead to disagreements if the work is carried out by a hired construction team. Thus, “masonry” is the capital construction of walls, extensions, and partitions. But when you use artificial stone for facade cladding without changing the size of the room and without erecting block structures, this is called “stone cladding.”
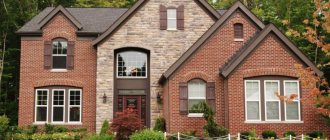
From the die
Facade cladding under brick masonry
The style is close to natural. The cost of such cladding is affordable, but you will have to work hard with it. It is quite difficult to adjust the size of the tiles to avoid gaps and holes and to ensure that small tiles alternate harmoniously with large ones.
"Castle"
Stonework Castle
"Castle" is translated from English as "castle". Indeed, the appearance of this masonry is reminiscent of medieval castles. Tiles of this type are created in the shape of a rectangle with an angular texture . Their dimensional parameters can be very different, so when laying stones, you should select stones not only in height and width, but also in texture, so that the design looks natural.
"Plateau"
Stone masonry Plateau
This type of cladding does not pretend to have an exceptional natural look and is installed as a decorative cladding. Most often it can be found on corner and basement designs. You can often find such masonry used as decoration for windows and doors. Although this stone for finishing facades has a regular and even shape - a rectangle or square, it is difficult to lay them. The nuance is this: out of ignorance, slabs in the shape of a square or rectangle are immediately used, but they should be distributed evenly over all the walls that need to be tiled.
"Shahriar"
Shahriar masonry
A simple and common facade masonry. All the plates in it are the same shape and size. A huge advantage is the ease of the process, since all you need is to lay the bottom layer and corner elements evenly , and then everything is quite simple.
"Assol"
Assol masonry
This is a rather voluminous style, characterized by uniqueness and unusualness. The material has the form of thin plates , which have a relief structure on the outside. Laying such a stone is also not easy, but this look really looks very chic.
"Rondo"
Rondo masonry
This is a kind of marine theme. However, few people cover the entire façade with this style. Usually it is used only as decoration for windows, corners or bases and looks quite nice.
Installation of "Rondo" is quite simple - large elements are laid first, and the space between them is filled with smaller ones.
Advantages and disadvantages of the material
Artificial stone has a lot of working qualities, both positive and negative.
So, the advantages include:
- High decorative qualities of the material, wide choice of colors and textures.
- Durability, resistance to all types of external influences.
- Moisture resistance.
- Possibility of self-installation.
- Availability of different installation options, the possibility of creating a ventilated facade.
- Durability, wear resistance of the material.
Negative qualities include:
- Relatively high material weight.
- The need to use “wet” solutions during installation.
- Relatively high cost of material.
Both the advantages and disadvantages of the material are specific properties of artificial stone and can be successfully used or bypassed if the cladding is used correctly.
Production
The production process for making artificial stone depends on the type of material. So, for some types, pressing with firing (ceramic granite) is used, others are made by casting the mixture into molds, followed by drying and processing .
Most types of material are created in this way, which is more economical and allows you to create different textures and colors. Moreover, it is quite possible to create artificial stone yourself, you just need to purchase molds from silicone (or make them yourself from plaster), mix the solution and get facade panels.
Sometimes this method becomes the best option, reducing costs, time spent searching for the right material and allowing, if necessary, to make the required number of panels, for example, for repairs.
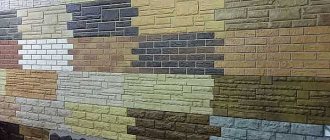
Fill the seams with grout
To keep the tiles on the wall, you need a grout mixture. Its shade can blend in with the tiles or be contrasting.
The grout is diluted with water to a paste-like consistency, drawn into a syringe and the mixture is squeezed out, moving it through the space between the tiles. After this, all that remains is to align the seams using jointing.
Material composition
The most common composition of artificial stone includes the following components:
- Sand.
- Cement.
- Water.
- Plasticizers.
- Pigments, dyes.
There are other recipes for mixtures, including gypsum, alabaster, polymer resins, marble chips, additives to increase strength or give a certain color.
What is better – natural or artificial stone?
The choice between natural and artificial stone can be made according to various criteria. If we talk about technical characteristics, the capabilities of both materials are almost the same, but natural stone is much heavier.
In terms of decorative qualities, artificial material is also ahead of natural material, since it has more even, constant parameters . The most compelling argument remains - the price. Here, natural stone has no chance at all, since one delivery can be estimated at an amount that is more than enough to completely cover the house with artificial material.
And yet, natural stone does not give up its position. Natural beauty, strength, and simply the awareness that the house is lined with natural, real, natural stone makes it a popular and widespread material, albeit expensive.
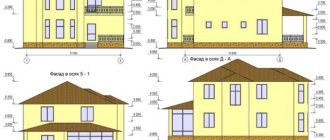
Quantity calculation
The amount of decorative stone is calculated using a simple formula. Firstly, you initially need to find out the area of all surfaces that need to be covered with the material. To do this, the height of the wall is multiplied by its width. Window and door spaces are not taken into account in this calculation. Next, the area of the entire house is determined by summing the areas of all walls, which is divided by the area of one tile. This method of calculation is applicable only when you plan to buy tiles of the same size.
When purchasing a stone, take into account unforeseen circumstances, so make sure you have a supply in advance.
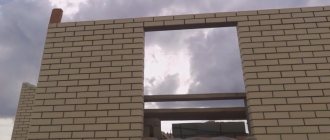
Preparing the surface for installation
Installation work begins with surface preparation. It depends on the material from which the walls are made . If it is brick, concrete or similar materials, then installation can be done immediately, you just need to clean the surface of the walls from dust or dirt.
For wooden or asbestos-cement surfaces, you will first need to install a fiberglass mesh and level the wall with plastering. However, this operation will also be needed for concrete or brick walls if they are uneven or have many potholes.
On top of the layer of leveling plaster, it is recommended to apply a layer of deep penetration primer that can bind the plaster, protect it from peeling or falling off, and also strengthen the adhesion of the adhesive composition for panels and plaster.
NOTE!
On smooth metal, plastic or other surfaces that are unsuitable for applying adhesive solutions, you should first apply a layer of concrete contact primer, which will create a durable coating that is quite suitable for installing panels.
Granite
In terms of price and external characteristics, it is on par with marble. It comes in both glossy (polished) and matte (not polished). It looks very impressive next to nature.
Granite can be divided into three types based on color scheme:
- Plagiogranite - gray shades predominate;
- Alaskite - reddish-pink shades predominate;
- Porphyritic granite is a cross between the other two types.
How to attach to a surface
There are several options for attaching panels to the facade:
- Laying on adhesive mortar, like tiles. One of the most common methods of installing artificial stone panels.
- Installing panels on the sheathing using self-tapping screws. This technique is applied to special types of panels that have fastenings for panels or special holes for installation. Typically this method is used to create a ventilated façade for external insulation.
- Installation of panels on clamps. This also requires lathing, which makes it possible to obtain a ventilated façade. The panels are fixed using metal elements - clamps, bent metal “tongues” that prevent the panels from separating from the sheathing strips. This method is typical for materials with a smooth surface that is unsuitable for applying adhesive solutions, for example, porcelain stoneware.
Questions about choosing one installation method or another usually do not arise, since most materials are intended for any one option; the use of other installation methods is not allowed . Therefore, when choosing a material for cladding, you should take into account the method of fastening in advance in order to decide for yourself how suitable it is for a given facade and what it will look like.
Cladding the facade of a private house with artificial stone - photo:
Ventilated cladding
Photo: White Hills
The Ronson House facade system together with White Hills products allows you to install decorative stone all year round, at any temperature and humidity, without using wet processes. It combines the advantages of a suspended ventilated façade (effective heat conservation, leveling out uneven walls, durability and fire resistance) with the advantages of finishing stone, which is environmentally friendly, durable, has low water absorption, frost-resistant and non-flammable. The facade system is attached to any load-bearing walls, including frame walls and those assembled from SIP panels (a structurally insulated panel consisting of two oriented strand boards OSB or OSB with an insulation layer).
Photo: White Hills
Of course, installing a ventilated facade with facing stone requires knowledge and time for preparatory work. First, using geodetic surveys, the exact parameters of the house are determined. Then, in accordance with the project, metal profiles and brackets are installed on the facade. And only after this they begin to install the cladding. The price of 1 m² of specially shaped facing stone is from 1,490 rubles. The cost of cladding services for 1 m² starts from 1,500 rubles. For qualified craftsmen, tiling a house using this system does not take much time, only 1.5–2 months.
Installation technology
Let's consider all the options for possible installation work with your own hands:
Installation with adhesive composition
- Installation of the starting bar . A horizontal line is drawn along the perimeter of the house, indicating the lower edge of the facing sheet. A starting (support) bar is installed along it, on which the first row of panels will rest.
- The first row is being laid . The adhesive composition is applied to the surface of the wall and, at the same time, the panel. It is installed on the wall, pressed down to obtain full contact of the adhesive layers.
IMPORTANT!
Some experts only apply glue to the wall, but if you lack experience, it is better to apply glue to the panels as well.
- Gaps of 6-10 mm in size are left between the panels, which are subsequently filled with grouting material. To obtain even or equal gaps, special plastic crosses are used.
- Grouting is done with a special elastic composition that allows the canvas to compensate for temperature expansion.
Installation on the sheathing
- Installation of the sheathing is carried out on the prepared wall surface . First of all, the corner vertical strips are installed. The vertical and the distance from the surface of the planks to the wall are checked.
- A cord is stretched between the slats , along which all other slats are installed. The distance between them (step) is the width of the insulation boards (usually 60 cm). The surface of the planks should form a flat plane.
- Insulation is being installed . It is installed side by side between the sheathing strips and is additionally attached to the wall with disc-shaped dowels. There should be no voids or gaps between the slabs.
- A layer of waterproofing is laid , on top of which horizontal counter-lattice strips are installed. The distance between them is equal to the size of the panels (height).
- A starting rail is installed , along which the first row of panels is attached to self-tapping screws.
- All panels are installed . The gaps between them are filled with grout mixture.
Mounting on clamps
- Installation of the sheathing and insulation is similar to that described above.
- Clamps are installed along the axes of the panels.
- The installed panel is fixed by bending the clamps. The canvas is completely folded in this way; the interpanel seams are not filled with anything.
Pasting
Laying tiles begins from the corner.
Before installation, the back of the tile must be inspected. If there is a white coating, remove it with a stiff bristle brush.
If the apartment is hot or humid, the back side of the stone is moistened with water. Then a layer of glue is applied.
The fragment is pressed against the surface of the wall, achieving the desired position. By moving it slightly from side to side, they achieve tight contact with the wall and position the fragment in the desired position.
When working with tiles, adhesive may get onto the surface. It needs to be removed immediately.