Home / Types of ceilings / Wooden / Shingled ceiling - how to repair?
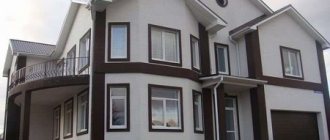
Long before the advent of modern materials, the method of plastering over shingles was widely used for finishing ceilings. Such coatings are encountered by those who have apartments in so-called “Stalin buildings” or who live in their own old houses. Until a certain time, the shingles hold up the plaster perfectly, but over time everything becomes unusable and the ceiling is no longer pleasing with its appearance, which means repairs are necessary.
Design features
Such ceiling structures are a grid of wooden slats - shingles, attached to wooden floor beams. The shingles serve as the base on which the plaster composition is applied. The design is quite reliable and after finishing it looks great, however, exposure to moisture and mechanical stress can render such a coating unusable.
The shingles begin to sag, and in cases of leaks from above, it may simply begin to rot. A thorough renovation is required, which will require a lot of time and effort. This is mainly due to the fact that you will not only have to clean and plaster the damaged area, but also replace part of the wooden mesh, which always creates a lot of problems.
What can you use to plaster?
You can prepare the finishing composition yourself. For plastering the surface, gypsum, cement and lime bases are used. Sand is used as filler.
- 3-4 parts sand;
- 1 part cement;
- water (the amount is regulated independently, i.e. the liquid is added gradually until the required consistency is obtained).
- 1 part lime;
- 1 part sand;
- 2 parts sand;
- water.
Lime-gypsum plaster is used for finishing rooms where there is a low percentage of humidity.
- 1 part cement;
- 1 part lime;
- 2-5 parts of sand (adjustable independently);
- water.
Repair stages
The complexity of the work is due to the fact that it is necessary to thoroughly clean the ceiling. In brick and concrete houses you only need to remove a fairly thin layer of material and that’s it, but here more work will be required. The old coating is applied in a fairly thick layer and it takes a lot of time to completely remove it. A lot of garbage is generated.
In addition, it is necessary to gain access to the upper part of the ceiling - from the attic side, to eliminate the causes of the leak. If your neighbors flooded you, then you need to make all the repairs on your own, which is always more difficult. Repair work is carried out in the following order:
- The first step is to eliminate the cause of the damage - leakage
- After elimination, all debris is removed from the upper side of the ceiling, and the gaps between the floor beams are sealed with mastic or other composition that provides protection against leaks
- From the side of the room, loose pieces of plaster along with damaged slats are removed
- In their place, either new slats are attached, or a plasterboard sheet of a suitable shape and size is mounted
Advice: restoring a ceiling based on shingles is a long and difficult task. Therefore, it is better to completely replace the ceiling covering in the entire room with more modern plasterboard, saving yourself from such problems in the future.
- Next, the joints of the repaired area are sealed and the entire surface of the structure is plastered.
- After the repaired area has dried, the entire ceiling area is painted or wallpapered
Figuring out how to repair a ceiling if it is based on shingles is not difficult. However, a very large front of work awaits you. Partial restoration of damaged areas will not completely eliminate the problems. Over time, other parts of the coating will require repairs. Therefore, it is better to immediately save yourself from further troubles by replacing the entire ceiling covering.
Specifics of preparing wooden surfaces
Plaster shingles can be purchased at a hardware store or you can use existing slats at home. To perform finishing work, it is recommended to take planks that are as even and equal in size as possible. Plaster on shingles that have been severely deformed, for example due to moisture, will be thick. It will not be possible to make it thin, because... The curvature of the slats will not allow you to create a flat wall surface.
What material to use
Wall shingles can be made from any type of wood. Most often, the walls are covered with pine, spruce or aspen. The timber is placed in a special machine, which uses knives to split the wood into chips of the required thickness and width.
After purchasing, you should sort the planks. You can lay out the protile (first or bottom) layer from the curved shingles. The thickness of the material should be within 3-5 mm, and the width no more than 2-2.5 cm. Wider and even strips are applied on top.
Shingling can be made from thicker and wider slats, but it is not recommended to use them due to the fact that wood intensively absorbs moisture. During the finishing process, the lathing will absorb a lot of water, which will lead to prolonged drying of the surface. Another disadvantage of thick slats is that if excess moisture is absorbed, the slats will sag.
- hammer;
- nails (length up to 4 cm);
- level;
- knife.
In addition to making it yourself, you can buy a ready-made design. The advantage of such a grid is that it saves time.
Manufacturing algorithm
The planks are packed diagonally in 2 rows. The shingles should lie across the top layer. It is recommended to keep the distance between the slats the same. It should be equal to the width of 2-3 slats. In most cases, shingles for plaster are laid in 2 layers, but wooden lathing can be more (3-4 layers).
Installation technology
Finishing begins with priming the wooden surface. If the wall needs insulation or noise-reducing material, then the next layer is insulation. When there are no additional building elements, installation begins immediately after the primer has dried.
The first plank must be nailed at an angle of about 45° (relative to the floor). The nail is driven in completely, perpendicular to the wall. The last fastener, which is located at the bottom (end) of the strip, is driven in halfway. It should prevent the bar from falling, but there is no need to completely fix the bar. All intermediate nails begin to be driven in at an angle so that the tip points down and the head points up (in the direction of the slats).
When the first layer is completed, begin stuffing the second. It is performed on the same principle as the forgiving one.
If a ready-made sheathing was purchased, then it is immediately applied to the wall and then secured with nails or self-tapping screws.
Complete replacement
There is much more work to be done than with partial restoration of the coating, but this method allows you to forget once and for all about sagging ceilings and possible rotting of the shingles due to moisture. The main difficulty will be getting rid of the old structure. It will happen like this:
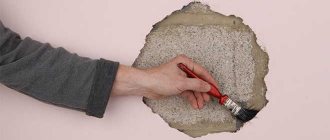
- All existing plaster on the ceiling must be knocked down. To do this, they use special softening compounds, and simply brute force, knocking it down with a hammer and chisel. Particular attention should be paid to the junction of the structure and the wall.
- Next, all damaged parts are replaced and the rest of the lathing made of wooden slats is strengthened. The best assistants here are a nail puller and a hammer.
- The beams are treated with an antiseptic and primer to remove mold and eliminate the possibility of its occurrence in the future.
- After this, the gaps between the floor beams are sealed and, if necessary, layers of sound and thermal insulation are laid.
- The final work will be the construction of a new ceiling structure. This can be a tension covering or a plasterboard composition.
We purchase the necessary material and tools
You should have at hand:
- spatulas (wide and narrow), grater;
- sandpaper (coarse and fine grain);
- putty (for dry rooms gypsum dry mixture);
- primer (preferably deep penetration, especially for wet rooms);
- reinforcing mesh (self-adhesive serpyanka tape);
- a brush and a container of water (a spray bottle is an option);
- PVA glue;
- new generation fillers (sealant, foam) and a gun for applying them.
The last item on the list is relevant for particularly wide cracks in the ceiling.
Basic principles of plastering work
The quality of plaster application depends on the preparation of the base and the prepared mixture. It is necessary to follow the manufacturer’s recommendations and be guided by SNIP. The human factor is also important: the qualifications of the master.
As a result of treating walls with plaster, the surface should be smooth and free of cracks. The mixture recipe largely depends on the base material: brick, wood, concrete. An important factor is the operating conditions of the structures: the exterior decoration or the interior of the room. Plastering various surfaces involves applying the mixture in several ways:
- By throwing method.
- Spreading method.
Choosing putty for wood
There are the following types of ceiling putties:
- Gypsum putty is characterized by plasticity, good adhesion to a wooden surface and an affordable price. Due to their many advantages, these compositions are used most often.
- Acrylic composition has the same properties as gypsum, but its cost is higher. Such mixtures are allowed to be applied only in a thin layer.
- The peculiarity of adhesive putty is that it comes in different colors.
- Latex mixtures are very similar to acrylic and gypsum, but in terms of price they are much superior. Only thin-layer application is permissible.
- Oil putties are used in places with high humidity.
All putty compositions are divided into finishing and starting. In addition to them, there are universal dry mixtures on sale, intended for both initial leveling and finishing application.
When choosing putty, take into account its durability. The better the adhesion of the solution to the base, the longer the coating will last. Give preference to plastic solutions, which are much more convenient to apply and distribute evenly. Consider drying speed. High-quality mixtures dry quite quickly.
Advice! Putty for residential premises should not contain toxic components. When diluting the dry mixture, follow the instructions on the package.
Lonely Master
Recent Entries
Popular articles
| Mon | W | Wed | Thu | Fri | Sat | Sun |
| « Jan | ||||||
| 1 | 2 | |||||
| 3 | 4 | 5 | 6 | 7 | 8 | 9 |
| 10 | 11 | 12 | 13 | 14 | 15 | 16 |
| 17 | 18 | 19 | 20 | 21 | 22 | 23 |
| 24 | 25 | 26 | 27 | 28 | 29 | |
Preparation of plaster
Once the surface of the ceiling has been prepared and all defects have been eliminated, you can proceed directly to plastering work. There is no need to confuse plaster and putty. The first is intended for leveling surfaces with differences or defects, in a thick layer - our case, and the second provides leveling of surfaces only in a thin layer of up to 3 millimeters.
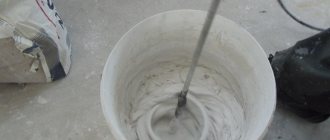
Whatever plaster mixture is chosen, you will need a lot of it. Therefore, a dry composition is purchased, which is subsequently diluted with water to the desired consistency. Directions for preparing the mixture are always on the package. But, regardless of the type of plaster, there are several universal rules that will help you prepare the composition correctly:
- Water is poured into the container first, and then the dry mixture is poured.
- Thorough mixing is the key to the quality of the solution and therefore, it is better to do this with a special attachment for a drill
- The mixture must sit before use.
- Before use, the solution is thoroughly mixed again
How to prevent cracks and holes from appearing?
Any house shrinks, on any soil. It is not recommended to plaster walls for at least 1 year after building a house. This can be done during the construction of a private country house, but in commercial construction this approach is not encouraged.
- Firstly, you need to try by any means to insure the walls from the appearance of cracks. Proper preparation of the base will help. They need to be cleaned of dust and moistened with a glue solution. Small fractions of sand and concrete will be securely glued to the wall and will not create air pockets in the future.
- Secondly, it is advisable to use reinforcing mesh. It is available in different thicknesses, so you can choose it for even the thinnest basting.
- Thirdly, the mixture for plastering the base must be prepared according to technology (how to dilute the mixture correctly?). A small amount of cement will weaken the plaster, and excess will destroy the crystal lattice of the coating.
- Fourthly, the drying regime must be maintained in accordance with the brand of cement. The room temperature should be from 5 to 20 degrees, drafts are unacceptable.
- Fifthly, when plastering the ceiling, it is advisable to use a quick-drying mixture or add alabaster or gypsum to it yourself.
Anyone can do a job like plastering walls or repairing them when cracks appear. Of course, there are special educational institutions that train professional plasterers and molars, but still this work is not as specific as, for example, flying an airplane.
Anyone can master it. You just need to not be afraid of manual labor and remember that during repairs, not everything goes smoothly, something always has to be completed or redone. Only long-term practice guarantees excellent results .
Plastering technology
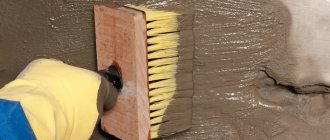
Now let's talk about how to plaster a wooden ceiling. To begin with, the base wooden ceiling is wetted with water or impregnated with a primer to ensure better adhesion to the applied solution.
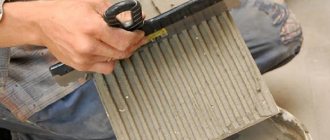
All wooden bases cannot boast of evenness and smoothness, so plastering will be carried out in three stages:
- First, using plaster mortar, fill all the voids, irregularities, cracks and holes in the ceiling. This is essentially a rough leveling, so there is no need to carefully level the mixture. Use a spatula to remove only significant deposits.
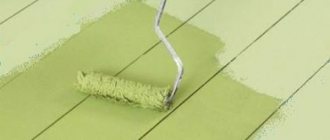
- Without waiting for the first layer to dry, the next stage of work begins. The second layer of plaster is applied by machine or manually. In the first case, a construction gun or machine is used, and in the second, spreading or throwing. This layer is also called the primer layer. It is carefully leveled and tried to be applied with the same thickness, using beacons or a building level. If necessary, apply a second primer layer, but its thickness should be less.
Attention! The result of the work depends on how even the second layer is.
- When the previous layer has set, they begin to make the covering layer. The requirements for its implementation are as follows:
- When making relief plaster, the top layer will be the finishing layer. The surface relief is formed during the plastering process.
- If, after plastering, the ceiling is planned to be covered with tiles, stone or panels, then a covering layer is not needed. It is enough to make an even primer layer.
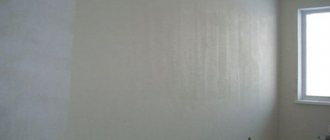
- A high-quality covering layer is needed for painting the ceiling or covering it with wallpaper. The plaster is well leveled, smoothed, and sanded after drying.
Tools needed
Installing suspended ceilings is not new. Almost everyone can do the work themselves. The process will require the following tools:
- roulette;
- level;
- drill;
- square;
- hacksaw;
- pencil;
- special knife;
- fishing line;
- putty knife;
- emery;
- putty;
- reinforcing tape.
The step-by-step instructions described above will help anyone without special construction skills to finish both a square and rectangular ceiling. It is important to prepare the necessary tools in advance so as not to be distracted during the process by purchasing goods.
The following video presents options for decorating walls and ceilings using plasterboard:
Reasonable planning and preparation will help to avoid unnecessary costs for the work of an invited master. If you buy materials and tools in advance, the installation can be completed in a few days. A beautiful ceiling will delight the residents of the house and invited guests for a long time with the comfort and warmth it creates.
The tiles are mounted on the ceiling using heavy-duty adhesive, which will firmly hold the coating on the ceiling surface even if there are uneven surfaces. To make the ceiling more original, experts recommend installing tiles diagonally.3. A chemical method that involves the use of a special solution to remove paint, after application of which it will come off easily.
Finishing a plastered ceiling
The plastered ceiling needs finishing decorative finishing. Traditional whitewashing is considered the most budget-friendly finishing option, but it is short-lived and does not have high aesthetic appeal.
Technology of ceiling insulation from the inside and outside of a wooden house with polystyrene foam
A smooth ceiling surface can be decorated with decorative Venetian plaster. A smooth, even base can also be painted or wallpapered. However, when painting or gluing thin paper wallpaper, the ceiling must be perfectly smooth and even. In this case, the covering layer is performed in compliance with the rules for manufacturing high-quality plaster. Before finishing, the surface is coated with a primer.
Types of drywall
When thinking about how to make a beautiful ceiling with your own hands from plasterboard, without having certain skills, it is worth understanding the nuances of choosing the right material for the work.
The modern market offers the following types of drywall:
Each type of material has its own characteristics, structure and properties. GCR is a material where gypsum sheets are covered with soft cardboard. The length of the canvas can vary and range from 2-3 meters. The width is usually either 1.2 m. Sheet thickness is 12.5 and 9.5 mm depending on the model and manufacturer. Most often, thinner blades are used to facilitate work inside residential premises, especially at heights.
Important! The thinner the canvas, the lighter its weight and the easier it is to work with at height.
GKLO is a material that should not be purchased for finishing a residential apartment. Experts know that such material is used exclusively for production purposes and then only for finishing ventilation shafts. The material is not flammable.
GKLV is plasterboard, which is preferably purchased for finishing rooms with high humidity. So, if you decorate the ceiling from such material in the bathroom or kitchen, there is a greater chance that it will be preserved. Most often, this material is produced in green.
Proper design of the ceiling with plasterboard material in the kitchen
GKLVO is an expensive sheet that is resistant to both fire and moisture. It is rarely used at home.
GVL is a gypsum plate that is covered not with cardboard, but with dissolved waste paper cellulose. The sheets are fire resistant and usually slightly thicker in size.
GLVL is a type of drywall that is resistant to moisture.
In domestic conditions, plasterboard such as GKLO or GKLV is most often used for self-repair. When purchasing material, it is important to carefully look at the labeling.