A metal apron in the kitchen looks very impressive. As a rule, it is supported by other metal elements - countertops, faucets, and sometimes by facades. The materials chosen are stainless steel, brass, copper, aluminum. The practicality of this finish is debatable. On the one hand, the material is resistant to mechanical damage and durable, on the other, some types of metal are susceptible to oxidation, and it is difficult to maintain the material in a neat, streak-free state. But if the prospect of some imperfection (and this is typical of natural materials) does not bother you, this option is for you. Let's look at interiors where we weren't afraid to make a metal apron.
Tabletops
Like flooring, choosing a kitchen countertop is based on a number of different factors, from appearance and cost to service and maintenance. A number of materials can be used for countertops, such as granite, marble, glass, stainless steel and engineered quartz. Tiles can also be used in a variety of places, from backsplashes to floors to counters, and we've got 6 tips for choosing the perfect tile application for your kitchen. For primer on materials ranging from classic to obscure, check out our guide to 10 kitchen counter materials.
Negative aspects of the design
The disadvantages of an MDF apron are:
- The material does not tolerate high temperatures. Therefore, it is best not to install such a screen behind the stove or to install a protective layer of heat-resistant glass on top of it.
- The ends of the panels are the weak point of the MDF screen. If they are not covered with an edge, then moisture gets inside, leading to the destruction of the entire sheet.
- Insufficient surface strength. It can be damaged if accidentally hit or dropped.
- Not completely natural origin.
However, these reasons should not stop buyers from installing beautiful wall protection in the kitchen. Finishing with tiles is more labor-intensive, and glass tiles are expensive and require care during operation.
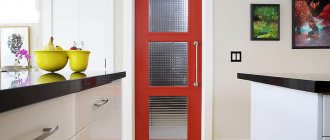
Copper back strips
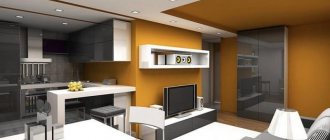
Designers have come up with many ways that can be used to decorate a kitchen. A copper panel, even a small piece of it, can add personality to the interior through a wonderful metallic shine of a warm shade.
The most popular design is the penny pattern. It is the most beloved because, in addition to comfort, it brings a sense of uniqueness to the interior. The tiles have a peculiar pattern in the form of large square and rectangular parts.
The interior, called Danish, looks great. It is an art that combines stainless steel, wood and copper parts very precisely.
Look, isn't it lovely? In such a kitchen you want to cook three-course lunch and dinner for a large number of guests.
Decorating on a budget
If a full renovation isn't in your price range, redecorating is one way to breathe new life into a space without spending a small fortune. A light, bright room feels larger, so painting the walls or changing lighting fixtures is an inexpensive way to make a big difference. If you can't afford to replace something important like cabinets, paint or restore them to match your new design, or check out other ways to update your home without major renovations. And if changing other elements like countertops or flooring isn't an option, then consider getting rid of the old appliances and replacing them with shiny stainless steel or modern white ones. There are many ways to decorate on a budget and create a luxury kitchen for a fraction of the price, doing things like using stylish ceramic tiles instead of marble.
Other creative options for upgrading your kitchen include displaying personal decorative items such as cookbooks and photographs, or opening up the space by knocking down a wall or two. Another cheap way to make a noticeable difference is to switch hardware on drawers and cabinets, such as replacing old tarnished pulls and knocks with modern brass fixtures. Kitchen walls take up a lot of real estate in a room and are a place where cheap changes can make a big difference. Browse our five favorite wall decorating ideas from chalkboard walls to open shelves for inspiration you can apply to your own space.
Island kitchen
Including an island in your kitchen renovation is a huge benefit for resale value. According to a recent survey, 70% of buyers want an island in their kitchen, and 50% consider it a must-have. There are many benefits associated with having a kitchen island, from additional seating and cooking space to additional storage space. Since a kitchen island is a smart element in any kitchen design, we've rounded up 60 kitchen ideas to review, from integrating appliances to making use of overhead space.
A good rule of thumb is to allow at least 36-48 inches between the island's perimeter and surrounding cabinets, so there is plenty of room for people to move around. If you're not sure what you want, check out our 30 favorite modern kitchen staples.
Mounting methods
There are several ways to fix the panels to the wall.
For self-tapping screws
One of the simplest options for installing a kitchen apron made of MDF. The main thing is that the surface of the wall is smooth.
The procedure is as follows:
- Mark the surface on which the protection will be installed.
- Move the drawers aside.
- Level the wall (if required).
- Secure the sheathing made of timber or aluminum profile.
- Mark holes for fixing the panels.
- Drill holes.
- Attach the apron and tighten the screws.
The advantages of this technique are:
- simplicity;
- low cost of components;
- the admissibility of subsequent replacement of the screen or part of the apron without prior preparation.
It is very easy to attach the apron to the self-tapping screws.
The disadvantage is the impossibility of hidden installation - the heads of the screws will be visible on the surface.
Using skirting boards
To use this method, you do not need to remove the headset.
Work algorithm:
- Place the top and bottom drawers in place close to the wall.
- Measure the distance between them.
- Mark and cut the MDF panel 5-7 mm less than the height of the wall between the cabinets.
- Using glue or liquid nails, glue the baseboard to the apron.
- Fix the structure to the table top and the lower parts of the hanging cabinets.
- If the wall is uneven, then you can attach the apron to the baseboard using small self-tapping screws from the inside of the covering.
Fastening with dowels and screws
A more labor-intensive method of installing a kitchen protective screen to the wall.
Fastening with dowels is more labor-intensive.
To do this you need:
- Mark and drill the MDF board for wall mounting.
- Place it on the surface.
- Make marks through the finished holes.
- Drill the wall and install dowels.
- Secure the apron.
Decorative threaded inserts should be placed under the screws, onto which decorative caps should then be placed. It is best to purchase special Kleiners for installing wooden and glass panels. They will maintain the attractive appearance of the screen by hiding the drilled holes.
Aluminum profile
Thus, it is possible to attach an MDF apron to the wall only when the thickness of the plate is 4-8 mm.
The operating procedure is as follows:
- Glue the bottom profile to the tabletop using glue or liquid nails.
- Place a sealant in it.
- Insert the apron into the groove.
- Place the second part of the profile on its upper part.
- Attach the profile to the bottom of the hanging cabinets.
An aluminum profile can also be used to secure the apron.
This method involves fixing the guides to the wall. In this case, you need to mark the holes and secure them with dowels and screws. You can lay an LED strip or an electrical cable inside aluminum profiles.
The disadvantage of this method is the high cost of components.
For liquid nails
If the surface behind the set is flat, tiled or made of plasterboard, then the simplest option for attaching MDF panels would be to fix them with liquid nails. Using a mounting gun, they need to be applied to the back of the apron after 15-20 cm, left for 10-15 minutes and pressed firmly against the wall. The resulting gaps should be closed with kitchen plinth.
On glue
In this case, the procedure is similar to the previous method. You just need to choose glue for MDF. It should be applied in large dots over the entire surface area. Remove any remaining glue with a rag, and if it has dried, carefully scrape it off with a knife.
You need to choose a good glue for MDF.
Colors of decorative plaster
There is a wide palette of decorative coating colors. Shades can be mixed or sprayed on top of each other, and also combined with decorative painting.
Most common colors:
- White.
- Grey.
- Beige.
- Brown.
- Green.
- Silver.
- Gold.
The photo shows a kitchen with a gray concrete finish.
Colors can be combined and applied randomly with strokes.
Varieties
Construction stores offer many types of decorative plaster. It is quite difficult to understand them if you are not a professional. Therefore, we have prepared a detailed guide on all types of decorative plaster with a detailed description of them and features of use in the kitchen.
It is important to choose the right type for your kitchen.
The generally accepted classification uses several criteria for assessing the type of decorative plaster. Let's look at each of them step by step.
By structure
First of all, there are differences in the structure of the coating. There are three types of decorative plaster.
The most popular is textured . It forms a rough surface, so it can be used on unplastered walls: the coating will be interesting and unique.
An unusual texture can add charm to your kitchen.
Structural plaster is somewhat similar to it . The peculiarities of the coating are such that the wall acquires a relief. Most often it is used for kitchens in loft or high-tech style: the relief wall looks quite rough and simply does not look good in more classic styles. The most popular type of such decorative plaster is bark beetle, which imitates wood chewed by bugs.
Pay attention to the complex structure of deep tones.
Smooth, almost glossy, Venetian plaster will cost you quite a lot. In addition, such a coating requires perfectly smooth walls. However, the result is impeccable - popular liquid wallpaper belongs to this type of plaster.
Venetian plaster can even imitate marble.
Based on materials
Depending on the elements included in the composition, decorative plasters are also divided into different types. Let's take a closer look at the features of each material.
as a binder for acrylic plaster . Thanks to it, the plaster is applied easily and elastically, providing a smooth and even coating. Acrylic types of decorative plaster are distinguished by a wide range of colors.
A wide palette allows you to choose the right shade for any interior.
In addition, they are easy to use - they are sold in the form of a ready-made mixture, which can simply be applied with a spatula.
The disadvantages of acrylic plasters include low vapor permeability, which makes them undesirable for use directly above the slab. In addition, under the influence of direct sunlight, the coating may crack.
The most inexpensive and at the same time environmentally friendly decorative plaster is mineral . It is diluted with water before applying to the wall, so it is important to choose the correct concentration and follow the instructions. If everything is done correctly, you will receive a reliable and safe heat-resistant coating.
The peculiarity of mineral plaster is its granular texture.
A distinctive feature of this plaster is that over time it becomes even stronger than at the beginning. In addition, it does not fade in the sun. However, you need to wash it carefully - the use of hard sponges and abrasive detergents is unacceptable.
Synthetic resins used for silicone plasters provide ease of application. This coating repels dust and moisture while allowing air to pass through.
Despite its complex texture, silicone plaster is easy to apply to walls.
Features a very wide color palette.
For silicate decorative plaster, liquid glass - quartz sand - is used. The coating is resistant to mold and mildew, moisture resistant and very durable. The service life can reach 50 years - the maximum among plasters. However, it costs a lot - the price is higher than other types.
By appearance
One of the priority points of choice is the appearance of the plaster. The combination of different materials allows you to achieve a wide variety of effects. This allows you to choose the appropriate type of decorative plaster finishing for any interior design style.
The decorative plaster already mentioned above, when applied correctly, looks like polished stone or marble. Therefore, it is often used for luxurious interiors in baroque, classic, and rococo styles.
This “stone” looks very noble, but will cost less than natural stone.
Textured plaster " travertine " also looks like stone, but in relief. In some ways it resembles wind-worn shell rock - a porous surface with chaotic irregularities. Most often it is done in light, pastel colors.
Travertine looks very interesting due to its texture.
Loft lovers will appreciate concrete-effect plaster - the surface completely imitates untreated concrete. Colors can vary, allowing you to choose the perfect shade for any interior.
Plaster can imitate various types of concrete.
A complex but very effective technique is the use of decorative plaster under the skin. It must be applied by a professional, but the result exceeds all expectations. This coating is not suitable for every style, so we recommend consulting with a designer.
Some types of plaster even imitate expensive crocodile skin.
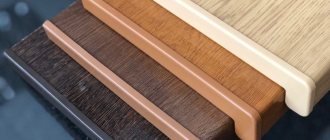
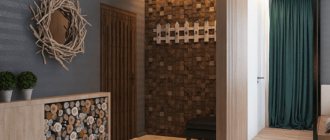
Some types of textured plaster allow you to imitate wood patterns - textured wood on the walls looks very cool. In addition, such a coating of decorative plaster will cost you much less than real wood cladding.
It's hard to believe that this is plaster and not solid wood.
Decorative plaster with mother-of-pearl provides a soft silky effect - perfect for styles like Provence, boho-chic or neoclassical interiors.
Mother of pearl looks very soft and delicate.
Plaster with the effect of brickwork will save your budget - the coating is much cheaper than natural brick. An excellent choice for Provence, Scandinavian style or loft.
Decorative plaster replaces brickwork.
Decorative plaster for the kitchen of the “ bark beetle ” type is another fashionable technique that allows you to create an unusual and textured surface.
Bark beetle is one of the most popular types of decorative plaster.
The stylish and rough “ orange peel ” effect suits any style of kitchen interior, the main thing is to choose the right shade.
Many people appreciate orange peel for its delicate texture.
A more complex technique is the sea wave effect . It can vary in size and intensity of curls. It is quite difficult to lay plaster in this way on your own, so you will have to turn to professionals.
An unusual sea wave is another popular technique.
Plaster of complex shape. This technique allows you to give the plaster the appearance of stucco - flowers, stars, geometric shapes. Well suited for complex interiors where design details play an important role.
You can create real stucco masterpieces from decorative plaster.
Peculiarities of work - expert advice
To ensure that working with decorative solutions does not seem very complicated, you need to take into account some nuances:
- It is necessary to prepare the walls as best as possible for puttying. A smooth finish will not work on very textured walls. And some textured putties will also not fit as they should.
- Plastering is more expensive than wallpapering or painting. Therefore, take this into account when planning your renovation. Always be prepared that you may need a new portion.
- Textured designs and deep reliefs require more material compared to smooth surfaces. This also needs to be taken into account when planning repairs. For example, acrylic type is required for 1 sq.m. on average from 2.5 kg. up to 3kg. But each manufacturer has different recommendations, you need to rely on the instructions.
- To save on putty, you can choose a primer mixture with deep penetration. But it is necessary to look for compatible ones so that the work does not crumble or become deformed. This primer will additionally protect against mold and fungi, because it contains a fungicide and an antiseptic.
- For distribution, you can use any movements (long, short, crosswise, longitudinally, smoothly, roughly). You can even roll it out with a tool in different directions or with gloved hands. To get the same effect, 1 person must distribute everything in the room.
- The solution will harden within 2 weeks. And until it dries completely, you need to be extremely careful so as not to spoil the plastering.
- Due to the rapid hardening, quick work is required, so it is better to do everything together. For example, the first will apply, and the second will distribute and create relief.
- To maintain a pleasant appearance for a long time, everything is treated with acrylic varnishes or protective wax. They increase service life, prevent cracking, make the surface more resistant to moisture, and make the coating shiny, emphasizing the relief.