Putty for concrete floors is a special building material that is supplied in the form of a dry or liquid mixture that requires preparation, intended for finishing surfaces in order to implement various tasks. Most often, concrete floors are covered with putties to give them the necessary characteristics of rigidity and strength, extend their service life, level them, and prepare them for finishing.
A concrete floor experiences high mechanical loads and must be as reliable, wear-resistant, and able to withstand aggressive influences. Due to the peculiarities of the porous structure of a concrete monolith, untreated concrete can become dusty and deteriorate over time, subject to the spread of a network of cracks and the appearance of other deformations (chips, potholes, etc.).
Even if you plan to finish the concrete with a floor covering, pre-treatment of the surface will extend the service life of the finishing layer and eliminate a lot of problems. One way or another, concrete reinforced with putty demonstrates increased characteristics of durability, comfort, and strength. In addition, putties are used to level concrete in the presence of small differences.
About Rotband plaster
Dry mixture Rotband is a type of gypsum plaster mixture intended for leveling the surfaces of walls and ceilings.
According to the instructions and if you have experience working with gypsum mixtures, Rotband quality allows you to skip the puttying process and immediately paint or wallpaper the plastered surfaces.
The mirror-smooth surface of Rotband is achieved by rubbing and smoothing the surface. However, such a smoothed surface is not needed for laying tiles; it is enough to bring the walls of the bathroom or toilet into the correct geometry according to the levels.
The problem of laying tiles on Rotband gypsum plaster
Conventional gypsum plasters have one drawback: they are afraid of water and strong humidity. That is why gypsum plasters are not used outdoors, but only indoors.
It’s worth stopping and clarifying here. Usually, bags of gypsum plaster do not say “for dry rooms.” More often .
By definition, gypsum plaster is not a finishing material; it is used to prepare surfaces for finishing. In damp rooms and wet areas of the apartment, special finishing materials are used, which should protect the walls from moisture and water. Therefore, a priori, correctly laid tiles will protect Rotband from moisture.
In addition, the bathroom has so-called wet areas. These are places of direct contact of walls with water - shower, sink, possibly toilet, the junction of the floor and walls. According to the rules for decorating and renovating a bathroom, these wet areas must be covered with waterproofing compounds.
We are not talking about bitumen or roll waterproofing. In apartments and stone houses, coating or coating compounds are used for waterproofing. The first ones resemble liquid rubber of pink, blue, and gray colors. They are universal and can be applied to any surface, both plaster and cement. The second ones are very similar to a cement mixture and are sold as a dry mixture. They are applied only to cement bases. For example, Sika waterproofing.
So, returning to Rotband, waterproofing will protect the gypsum plaster from moisture and water.
In addition, a normal tiler will use only moisture-resistant tile adhesive in the bathroom, which will also protect the gypsum plaster from moisture.
It is important to note that there are reinforced tile adhesives on sale that say that they are intended for laying tiles on gypsum bases. For example, glue K 80 is recommended for gypsum panels, gypsum plaster and other anhydrite substrates.
To protect the plaster from moisture, I would add the use of high-quality grout for the joints between the tiles. For complete peace of mind, additionally use a protective coating for grouted joints between tiles.
You need to prime gypsum plaster twice, each time waiting for the primer layer to dry completely.
Do you think that double priming and using a special adhesive for gypsum plasters will not protect the gypsum plaster from temporary destruction? Perhaps, especially since it is not always possible to find this special glue K 80 Litocol Litoflex. In this case, take UNIS Plus tile adhesive. It is suitable for gypsum bases.
For complete protection against possible problems in the future, the surface of dry gypsum plaster can be covered with a layer of tile adhesive, 1-3 mm thick. The glue is diluted to a more liquid state and applied to the double-primed surface with a spatula (like putty) or a rule (like a covering).
Acrylic mixtures
Acrylic putty
One of the most convenient forms - it hardens quickly and creates a smooth surface. The multi-component system is not subject to shrinkage and is not afraid of water.
In addition to water, the composition of polymer putty for concrete floors includes sand, marble chips, cement, and synthetic additives. This putty is plastic, has good waterproofing properties and adhesion to the surface being treated, is waterproof, and elastic, which makes it an excellent material for preparing surfaces for self-leveling and heated floors. But its use is advisable on surfaces with a small number of deep cracks and gouges.
Price for polymer putty
acrylic putty
Laying tiles on Rotband gypsum plaster
The use of a layer of tile adhesive will not cancel the waterproofing of wet areas. The complete, correct cycle of preparing gypsum plaster for laying tiles looks like this:
- Prime the layer of gypsum plaster, not rubbed, generously with a deep penetration primer for wet rooms twice. The interval between priming cycles is 5-6 hours.
- Coating the surface of wet areas (preferably the entire bathroom) with coating polymer waterproofing such as Knauf Flachendicht or weber.tec 822.
- Tightening (applying a thin layer of glue) the surface of the walls with tile adhesive intended for wet rooms;
- After gluing the tiles, it is mandatory to seal the seams with good quality grout solutions.
Rotband and load
However, besides moisture, there is a more serious problem, and ignorance of it can ruin the laying of tiles on gypsum plaster. These are the load restrictions on a plastered wall.
In theory and in practice, a violation of the plastering technology with gypsum solutions can collapse your laid tiles along with the layer of plaster.
To prevent this from happening, remember and follow these rules.
— To level the walls with gypsum mixtures, the walls in the bathroom must be cleaned of old paint, whitewash and any other finishing material. Cleaning is carried out down to the basic rough foundation of the walls.
— When working with Rotband and other gypsum mixtures, do not take risks; clean the walls conscientiously. Using a primer such as Betonokontakt applied to old durable paint or plaster may not help and the Rotband will eventually fall off along with the tile due to moisture.
By the way, after Roband has completely dried, tap the plastered wall. If instead of a ringing sound you hear a thumping sound, then Rotband has not stuck to the wall and everything needs to be redone.
— To remove paint from walls, the recommended methods are annealing the paint with a torch (dangerous), heating it with a hair dryer (does not always work), or painstakingly stripping off the paint and layer of putty under the paint with a knife and spatula, or scraper. Some people beat off the paint with a punch, but this is a living hell for the neighbors. You can use the method of peeling off the paint using an angle grinder with a diamond bowl.
— The last layer of primer is applied to the wall on the day the plastering or tiling begins. This way it is guaranteed not to get dusty.
Advice. Never leave beacons in the plaster layer. Knock them out of the plaster layer the next day and cover the grooves with Rotbanod after priming.
Now the most important thing! According to the manufacturer's instructions, the layer of Rotband gypsum plaster , for area plastering, for laying tiles should be from 10 mm (1 cm) . By the way, cement moisture-resistant plaster mixtures are also applied from 10 mm.
Instructions for using Rotband
— The time for complete drying of a 10 mm layer of Rotband in summer in dry weather is 2 days. When plastering large areas (the entire bathtub), it is better to lay the tiles after a week or 10 days.
— The layer of tile adhesive when laying tiles on Rotband should not exceed 5 mm. Therefore, using particularly heavy tiles on gypsum plaster will be difficult and is not recommended.
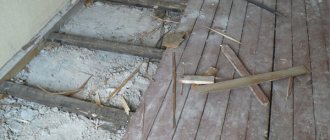
Inexpensive methods to help remove gaps between boards
Often, before carrying out repairs, owners discover unwanted defects in the form of gaps between the boards. This usually happens at the most inopportune moment, when funds in the budget are severely limited and there is nothing to allocate for major repairs. In this section we offer several low-cost and very effective options for eliminating defects.
Large gaps between boards are best sealed with products with good viscosity Source phonoteka.org
Installation of rack wedges
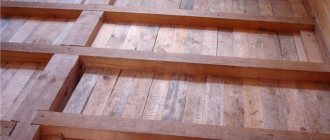
You can always turn slats yourself from leftover timber or fresher boards that you have on the farm. They need to be planed so as to obtain a wedge-shaped shape, and the width of the slats should be 0.5 mm larger than the size of the gap between the boards.
Before placing the wooden piece, the gap is thoroughly cleaned, and dust and debris are removed using a vacuum cleaner. Then apply wood glue to the wedge of the slats (PVA will also work). It is also injected into the gap in a small amount. Next, use a rubber mallet to hammer the batten in so that it fits as tightly as possible between the boards. You can use a hammer to hammer in, but you need to put a rubber or thin block under it so as not to make even more holes in the floor.
Is it possible to level the floor under the tiles using a rotband?
Hello. I'm laying tiles in the kitchen. The gender difference is 1.5 cm. Is it possible to level the floor under the tiles using a rotband? And then on glue - ceresit cm 11. Otherwise, it’s a pity for glue, but there is a rotband. The tiles are porcelain stoneware 45x45cm. The floor is concrete, but I coated it with ceresite cm11, it was stripped off. Thank you.
Wall tiles are laid on a rotband. But on the floor... The manufacturer does not say this. Firstly, I have not personally checked how the rotband works for compression. Secondly, gypsum plasters do not like dampness and moisture. That is, you need to carefully seal the seams between the tiles, you will have to use epoxy grout. Thirdly, I will not advise using a rotband, because professionals do not do this at their own discretion. If they do, it is under the responsibility of the customer himself. In the bathroom, I would definitely dissuade the customer.
Alexey3 wrote: It’s a pity for the glue, but there is a rotband.
so the rotbant needs to be re-fed?
Behind Baikal he wrote: Secondly, gypsum plasters do not like dampness and moisture.
Exactly. “Secondly” is enough. Somehow I didn’t think about this. Thank you.
I bought a self-leveling floor and a cement screed for the floor - AXTON. Maybe coat it with glue “to tear off” in front of them? It will not be worse? Thank you.
Alexey3 wrote: Hello. I'm laying tiles in the kitchen. The gender difference is 1.5 cm. Is it possible to level the floor under the tiles using a rotband? And then on glue - ceresit cm 11. Otherwise, it’s a pity for glue, but there is a rotband. The tiles are porcelain stoneware 45x45cm. The floor is concrete, but I coated it with ceresite cm11, it was stripped off. Thank you.
You will obviously ruin Rotband and eventually you will have to redo everything. Rotband is not designed for such floor work. In your case, it is better to level the floor with a self-leveling mixture of Knauf Tribon and then you can lay the tiles on a thin layer of glue. This option is optimal, and Rotband will also come in handy; repairs never end, they can only be paused. Therefore, you should not spoil it in this way.
Source
Video description
How to seal cracks in a wooden floor
The composition is left for a while and the cracks are prepared in the standard way (small debris and dust are removed). Afterwards, apply the mixture with glue onto a rubber spatula and evenly fill the spaces between the boards. It must be well leveled so that there are no tubercles. The filled cracks are left for two to three days. This time will be enough for quality hardening.
PVA glue and sawdust for preparing a mixture for sealing cracks in a wooden floor Source vodakanazer.ru
On a note! While the adhesive mass is setting in the cracks, it is better not to use the floor, since when walking on it, the boards will inevitably move, which will cause premature ejection of the filling material.
Paint combined with sawdust
In this case, they try to use exactly the paint that will subsequently be used to paint the entire surface of the floor. To prepare the mixture when sealing cracks, use one part paint and one part wood varnish. Four parts of fine sawdust are added to them.
All components are thoroughly mixed together, and then the cracks are sealed with this mixture. One pass will be enough to fill small crevices, but larger defects will have to be filled several times in a row.
Cement with broken glass
This mixture is an excellent protector against rodents that will not be able to penetrate from the underground into the home. To prepare a mixture for eliminating cracks, you will need to do the following:
- Take an unnecessary piece of glass, put it in an old pillowcase (which will no longer be useful. You can additionally cover it with several more layers of thin fabric.
- Then, using a hammer, thoroughly crush the glass into crumbs, then pour the prepared material into a separate, preferably metal container.
- Prepare a cement mortar in water in a bucket and bring it to a uniform consistency. Next add the broken glass and mix thoroughly.
- For a small number of holes between the boards, two tablespoons of cement and half a liter of water, plus 100 grams of broken glass, will be enough.
If it is not possible to use glass chips, then you can replace it with finely chopped wire. An alternative to regular wire will be small fragments of a kitchen scraper.
Preparation of cement mortar with the addition of broken glass to seal cracks in the floor Source egocolor.ru
Is it acceptable to use gypsum plaster for the floor?
The basis of a durable floor is a screed - an intermediate layer between the floor slab and the finishing coating of tiles, laminate, parquet, linoleum or other material. It is performed with the aim of leveling the surface, giving it rigidity or a certain slope, improving thermal insulation and sound insulation. The choice and service life of the finishing coating depends on the quality of the screed.
Today, some craftsmen practice leveling the floor with gypsum plaster. But if you want to independently prepare the surface for laying flooring, you need to weigh the pros and cons of using this material. Is screeding a floor with plaster always a profitable and rational solution, or is it better to give preference to other materials?
Types of screeds
There are two ways to level the floor surface:
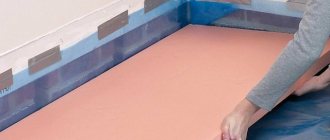
- Wet screeds - cement-sand mortars, self-leveling floors or levelers and gypsum plasters. To create a layer up to 35 mm thick, it is necessary to install beacons.
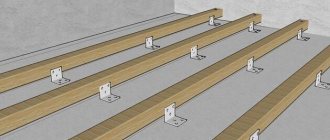
- Dry or prefabricated - using chipboard, plasterboard or thick plywood. They are laid on a dry layer of fine expanded clay or wooden logs.
The choice of screed type depends on the floor material, the number of storeys in the building, the condition of the floor, the purpose and location of the premises.
Gypsum plaster for floors: features and disadvantages
Based on the main binding component, dry mixtures are divided into cement and gypsum or anhydrite. Cement mortars are universal; they can be used in any premises and for outdoor work. Self-leveling floors are easy to use, easy to apply and have an affordable price. Leveling with gypsum plaster is only suitable for dry rooms.
Gypsum-based mixtures are environmentally friendly, more plastic and harden faster than cement ones, but have the following disadvantages:
- absorb moisture - cannot be used in damp areas;
- their strength is much less than that of cement-based compositions;
- over a large area can cause significant shrinkage;
- when exposed to heavy loads, they crack and crumble;
- generate dust during operation.
How to make the right choice?
Can you be 100% sure that your upstairs neighbors won’t flood you, a pipe won’t burst in your house or apartment, a radiator won’t leak, or a child won’t turn over a bucket of water on the floor while cleaning? Surely all the answers will be negative! This means that leveling the floor with gypsum plaster is not an acceptable option for you.
To create a strong and durable screed 2 - 3 centimeters thick, we recommend using a traditional cement-sand mortar. And to eliminate small level differences and unevenness, self-leveling self-leveling floors are perfect. Gypsum plaster for the floor is not the best solution, but it is great for finishing walls and ceilings! Its use makes it possible to mask all unevenness and create perfectly smooth and even surfaces.
Gypsum plaster for ceilings and walls absorbs excess moisture, and releases it when the temperature rises, thereby maintaining a favorable microclimate in the premises. Don't forget about the advantages of this material when you make repairs!
Added: 01/21/2019 16:39:00
Criteria for choosing putty
How to choose putty
It is very important to choose the right building mixture, taking into account the properties of the surface being treated and the purpose of the room. It is important to pay attention to the following properties of the putty mixture:
- adhesion indicator - there are special solutions for smooth surfaces;
- type of base (concrete, aerated concrete);
- moisture resistance, since the putty layer must reliably protect the concrete base from moisture;
- vapor permeability (the ability of a material to remove excess moisture).
| Type of putty | Purpose | pros | Minuses |
| Cement | For rooms with high humidity and outdoor use | Moisture-resistant, cost-effective | Significant shrinkage, possibility of cracks appearing over time |
| Plaster | For rooms with low humidity | Forms a smooth surface, does not shrink, hardens in 2-3 hours, maximum layer 4 mm | Not moisture resistant, the solution thickens in 1.5-2 hours |
| Polymer | For residential premises and rooms with normal humidity | Lightweight and easy to use, hardens quickly. The coating is smooth and glossy. Ideal for finishing coats | Expensive |
Important! Pastes and mixtures for concrete bases are not suitable for aerated concrete and vice versa. Because they contain various component additives suitable for a specific structure. When choosing a mixture, you need to remember that how evenly and smoothly the finishing materials (parquet, laminate, linoleum or ceramic tile) will lie will depend on its quality.
Step 1. Preparing the work surface
The room in which the work will be carried out must be prepared in advance. It is advisable to remove the old floor covering, widen deep cracks and crevices using a drill and clean with a construction vacuum cleaner.
Cracks should be widened and cleaned
Then seal with cement mortar (cement: sand: water: bitumen = 1: 3: 1: 0.5) and wait until the surface is completely dry. Instead of bitumen, you can use PVA glue.
It is very important to remove all stains from the floor:
- fat;
- dirt;
- rust;
- fungus;
- mold.
Usually they are easily washed off with warm soapy water, but if necessary, you can use specialized products.
Step 2. Prime the surface
Base primer
Before priming, the floor should be cleared of debris or swept again. The primer must be selected based on the characteristics of the room, its humidity and purpose.
To apply the composition you will need the following materials:
- roller or brush;
- special pallet.
The primer is applied in two layers, each of which is thoroughly dried. A high-quality composition will seal pores and small cracks, making the next step easier.
Important! If the base is smooth, then it is preferable to use a primer with a quartz filler - it will ensure stronger adhesion of the putty to the concrete due to the rough surface obtained after priming.
primer concrete
Step 3. Preparing the solution
Mixing the mixture for floor repair
The putty can be purchased ready-made, or you can mix the composition yourself. To do this, you will need a drill with an attachment or a construction mixer, a suitable container and dry mixtures. It is very important to follow the dilution proportions indicated on the packaging.
There is no fundamental difference between the coating obtained from thick and liquid plaster, but there is a difference in applying the composition to the working surface.
Experts advise adding 10-15% more water than the manufacturer recommends. The optimal ratio of dry mixture and water is 1:5, the minimum is 1:3.
Sometimes you can add sifted chalk, crushed sawdust, and PVA glue to the building mixture yourself.
The sawdust must first be soaked for 12-14 hours, and the entire mixture must be stirred twice with a mixer. To putty bathrooms, drying oil is added to the composition - this will make the final coating even more resistant to temperature changes.
Keep in mind that the solution thickens after 3-4 hours and becomes unusable, losing up to 20-25% of its properties, so you should not make a lot of construction mixture at once.
Step 4. Applying material to the surface
Repairing a large crack
The puttying process is quite long and painstaking. The tools you will need are the following:
- spatulas of various lengths;
- Master OK.
For convenience, you can purchase a rubber spatula or a tool with comfortable handles, be sure to take care of personal protective equipment and gloves. The putty is applied in 2-3 layers, each no more than 4-5 mm thick. You should not try to eliminate all unevenness with putty - this process is carried out during the execution of the floor screed.
Repairing defects
- Place small portions of the mixture on the floor or pour out part of the mixture, then quickly spread everything over the surface with a spatula. Try not to make the first layer too thick - there is a risk that the coating may crack.
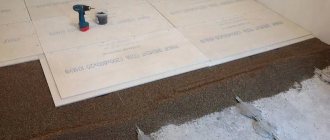
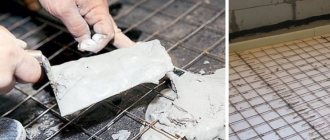
- If the treatment area is large, you can use a reinforcing mesh with small cells - this will at least double the strength of the coating. It should be lightly pressed into the first layer of putty immediately after its application, without waiting for it to dry.
- After the first layer has hardened (after about 12-16 hours), re-apply the freshly prepared mixture.
The putty will dry completely after 24 hours. If there were deep cracks, the process may take 2-3 days. It is important to dry without drafts or sudden temperature changes.
Step 5. Elimination of irregularities
It is more convenient to use a manual machine for sanding.
After final drying, large irregularities and protruding lumps of unmixed material should be treated with coarse sandpaper P120-150.
With sufficient skills, puttying can be done independently, without resorting to the services of specialists. Concrete floors can be leveled quite easily, and if all recommendations are followed, the coating will be of high quality and without defects.
Where is Rotband used?
According to the technical documentation of the KNAUF company, namely, it is the manufacturer of Rotband in Russia, this plaster mixture can be used:
- Without a protective layer, only for interior work, in rooms with normal humidity;
- When protecting the plaster layer with tiles or other water-repellent material, in bathrooms and kitchens.
Simply put, if you decide to level and paint the wall, then you can use Rotband only in dry areas of the apartment. If you decide to level the wall and cover it with ceramic tiles or plastic, you can use Rotband everywhere.
Thanks to the polymers included in this mixture, it can be applied to the following surfaces of the walls and ceiling of the apartment:
- Concrete;
- Brick;
- Pre-plastered with cement mortar;
- DSP boards;
- Expanded polystyrene (!).
According to Rotband practice, plaster is applied to any durable surface coated with a primer such as concrete contact, including:
- On plasterboard for local leveling of differences in plasterboard surfaces;
- On ceramic tiles;
- On OSB, chipboard boards.
Rotband is NOT used for leveling floors. Can be used to seal cracks and holes in the floor for subsequent installation of screed or self-leveling floor.
What other alignment methods are there?
In some cases, solutions of PVA and sawdust are used to level the surface. This method is advisable to use only to eliminate minor defects of the base surface. Such compositions are applied as follows:
- Initially, the area located between the guides should be filled with the mixture.
- Then you should wait for the mixture to dry completely.
- Next, another layer of adhesive is applied.
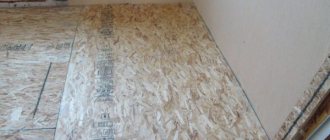
- Plywood sheets of small thickness are laid on top and secured with self-tapping screws.
- After this, you need to lay linoleum or laminate.
Scheme for applying self-leveling floor
Is it possible to level the floor with self-leveling flooring? Leveling compounds can be used to level the base surface. However, remember that this method is very labor-intensive and expensive. Before pouring self-leveling floors, a number of preparatory measures should be taken. Initially, the base surface is cleaned, all windows are closed and cracks are eliminated. Be sure to remove dust with a vacuum cleaner. Otherwise, the mixture may not set well. Also, during the preparation process, a primer is applied to the floor using a sprayer. This procedure is necessary in order to ensure better adhesion.
Leveling compounds are applied using specialized equipment. Most often they resort to using needle rollers. If the room area is small, then filling is done in one step. When finishing large rooms, the composition is applied in strips.
Is it possible to level the floor with plaster? This can be done provided that you select high-quality materials. To level floors, it is recommended to use gypsum plaster and a penetrating primer mixture.
Many people have a completely logical question: is it possible to level the floor with a rotating band? To level the base surface, you can use both gypsum plaster and rotband. The main thing is to prepare the mixture correctly.
It is recommended to use gypsum plaster to level floors.
Important! It is recommended to fill plaster mixtures with cold water, since gypsum sets quickly when exposed to high temperatures.
If you decide to use gypsum plasters or rotband, then remember that to accurately apply the mixture you must use beacons. It is recommended to apply leveling mixtures in several layers. To level floors with large differences in height, you need to apply plaster in 3-4 layers.
Where to start leveling?
Preparing the walls
Leveling walls with a rotband invariably begins with their preparation. To do this, it is necessary to remove all previous finishing from the walls. Rip off the wallpaper, wash away the paint, chip off the old plaster, and also remove all the old nails and screws. It is better to cut off the protruding mounds, otherwise you will have to use a large amount of plaster and this will significantly complicate the work. Then you need to sweep away all the dust from the wall. This kind of work is quite labor-intensive and not always safe, so I advise you to be extremely careful and attentive. This is especially true when using tools such as a hammer, chisel, or spatula. It is also better to use a respirator and a hat.
Leveling floors under laminate
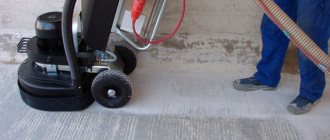
How can I level a concrete floor under a laminate? In this case, it is best to resort to grinding the base surface. This method is the most inexpensive and simplest. Processing with a grinding machine can only be done if the difference in height is no more than 5 millimeters. After sanding, the surface is cleaned with a vacuum cleaner and primed.
How can you level a laminate floor if the differences in height are large? It is best to resort to using a cement-sand screed. It is poured onto the previous screed or directly onto the ceiling. When using this leveling method, it is necessary to clean the base surface and lay a waterproofing layer. A reinforcing mesh can be installed on top. Also, when using a cement-sand screed, beacons are placed, which are fixed using alabaster mortars.
Is it possible to level the floor with underlayment? It is believed that a substrate can be used if the difference in height is no more than 7-8 millimeters. This leveling method is also used in cases where the laminate is laid on top of linoleum.
Important! It is customary to lay the substrate perpendicular to the laminated panels. This way you can best compensate for unevenness of the base surface and achieve high sound insulation rates in the room.
As a substrate you can use:
Scheme of laying the substrate under the laminate
- Foamed polyethylene. This material is often used because it is inexpensive and has high thermal insulation properties.
- Polystyrene. This substrate consists of two layers. The first is polystyrene itself, and the second is aluminum foil. The substrate must be laid so that the foil is on top.
- Cork materials. They are available in rolls. When using cork substrates, you must resort to additional application of moisture-resistant materials. For example, you can use rubber, bitumen mastic or ordinary polyethylene.
Is it possible to level the floor with tile adhesive? In construction practice, adhesive compositions are widely used, as they are inexpensive and easy to apply. In addition, tile adhesive can be used to repair cracks on the base surface. Remember that you can use adhesives only if the differences are insignificant. The material must be applied on top of the concrete screed.
Using tile adhesive you can eliminate cracks on the base surface
What is putty used for?
The concrete floor itself has high strength, but if there are minor defects (chips, cracks and crevices) and poorly puttied slab joints, it can be subject to destruction, which will entail repairs and significant financial costs, especially when it comes to public buildings.
Cracks in concrete
Additional strengthening of the concrete base will also be required in cases where cheap materials were used in construction. Treated floors have a number of advantages:
- high wear resistance;
- resistance to erosion;
- resistance to abrasion and mechanical damage, exposure to chemicals and moisture (including leaks);
- longer operating period.
Putty mixtures thoroughly and reliably level the floor, ensuring easier further installation of building and decorative materials.
Putty mixtures
Two main advantages of Rotband
The first advantage is a thick layer at a time. Rotband plaster can be applied to the surface in a thick layer of up to 50 mm without the spraying stage. That is, if you need to level the wall by 4-5 cm, place beacons on the wall and plaster it with Rotband mixture in one pass.
The second advantage is that no puttying is required. With high-quality mixing and repeated tightening, you will usually get a smooth wall, which, after covering and simple grinding, does not need to be puttied.
Note: The gypsum mixture can be applied in several layers, waiting for the previous layer to dry completely. This allows you to level walls (ceilings) with unevenness of more than 50 mm.
Video description
Securely level old floorboards
Construction foam
This material is most often used to seal joints between the wall and wooden boards on the floor. This option is also suitable for sealing large cracks and damage in the floor. Before using such a product, the surfaces of the gaps are moistened with water so that the liquid foam adheres better to the wood.
It is recommended to apply polyurethane foam in small quantities, as it tends to expand and subsequently the boards may begin to deform, which will negatively affect the plane of the floor.
Acrylic sealant
Sold in special tubes equipped with a syringe. Ideal for filling gaps between laminate and parquet joints, and eliminating spaces between dry boards.
After applying the composition, the boards will stop moving, the creaking will disappear, and it will be comfortable to move on the floor. The acrylic sealant on top can be painted with enamel or special paint for wooden floors.
Acrylic sealant for sealing cracks in wooden floors Source materik-m.ru
Leveling the surface at the same time as installing the tiles
In this case, laying the finishing floor covering is carried out together with leveling the base.
- Surface preparation.
- The level marks the lowest and highest points on the concrete floor. In a small room (toilet, bathroom), the building level and rule are used.
- The tile material is laid out so that the entire tile lies near the free wall and entrance.
- The laying must begin from the maximum mark, and the direction is set by a stretched cord.
- Water is added to the solution and mixed.
- To ensure uniform coverage, the adhesive composition is applied in a thick layer to the facing element using a comb.
- The first tile is placed taking into account level control and fixation with a special clamp (SVP).
- The actions are repeated.
You can walk on such a surface after 2 days.
Leveling a concrete floor using a screed
Which plaster to choose for finishing a bathroom under tiles
How to level the walls and ceiling yourself using putty
Do I need to prime the walls before laying tiles?
Properties
Putty is selected in accordance with the functions it must perform. So, for example, for floors in industrial premises it may be important to ensure maximum wear resistance and strength, for certain residential premises - to minimize exposure to moisture and temperature changes.
But most compositions demonstrate approximately the same properties, increasing the basic technical characteristics of concrete, since we are talking about a surface that is constantly under load.
What kind of putty should be used for a concrete floor:
- Resistance to mechanical damage is more important the higher the expected loads.
- Ensuring good adhesion with other materials.
- Resistance to water and moisture.
- Long service life.
- Wear resistance.
- Safety and environmental friendliness for people.
Putties are selected according to the type of finishing coating, the purpose of the room, the functions of the floor and other factors. The modern market offers a fairly large selection of various compositions, most of which meet basic requirements, while for specific ones it is important to select specific substances.
Leveling mixtures - self-leveling floors ↑
In the case of a small difference in floor levels of no more than 3 cm, floor leveling mixtures are used, which are divided into two types. Some are able to spread over the surface of the base on their own, which is why they are called self-leveling mixtures. Another type of mixture requires human intervention, who manually spreads it on the floor using a spatula.
Self-leveling mixtures intended for finishing floors are otherwise called self-leveling floors, floor levelers, self-leveling mixtures, etc. The main purpose of these mixtures is to prepare floors made of various building materials (concrete, wood, gypsum) for finishing with floor coverings such as :
- linoleum;
- carpet;
- PVC materials;
- cork;
- ceramic tile.
They produce dry self-leveling mixtures on a cement base containing special modifying additives that increase the plasticity and fluidity of the mixed mortar. Some compositions contain fibrous reinforcing additives that inhibit the development of microcracks. After drying, self-leveling floors form a fairly dense and durable layer. However, they are not intended for use without a floor covering, since an unprotected surface can become dusty and absorb moisture, oil, etc.
Thin-layer self-leveling mixtures are available for sale, which are intended for finishing. You can also buy special mixtures suitable for rough leveling of bases that have significant unevenness. These mixtures are applied in a layer, the thickness of which can reach 30-40 mm. At the same time, polypropylene foam tape is laid around the perimeter of the room, which relieves the stress created by the self-leveling floor. Since these mixtures have reduced fluidity, it is not possible to obtain a perfectly flat surface. Therefore, a thin layer finish is usually applied on top.
DIY putty mixtures
Wood can also be treated with putty created by yourself. How to make it and which components are best to choose can be found on any construction portal. However, not every recipe is successful, and the quality of the finished putty will have to be checked during practical experiments.
To make putty for wood, you can safely use the following components in the specified quantities:
- Drying oil or any of its analogues (about 600 g);
- Glue of plant or animal origin (150 g);
- Turpentine (120 grams);
- Drying agent in liquid form (about 25 grams).
You will also need chalk (dry and especially carefully sifted) and soap. Animal glue is slowly heated and soap is added. All steel components of the future putty are gradually introduced. The chalk additive should be added to the composition last. The mixture is thoroughly mixed, waiting until the homemade putty acquires the required thickness.
An important rule: the mixture for screeding a wooden floor should not be cold. With its help, the floor covering is leveled either immediately after production, or by preheating in a water bath.
Laying tiles on Rotband gypsum plaster
The use of a layer of tile adhesive will not cancel the waterproofing of wet areas. The complete, correct cycle of preparing gypsum plaster for laying tiles looks like this:
- Prime the layer of gypsum plaster, not rubbed, generously with a deep penetration primer for wet rooms twice. The interval between priming cycles is 5-6 hours.
- Coating the surface of wet areas (preferably the entire bathroom) with coating polymer waterproofing such as Knauf Flachendicht or weber.tec 822.
- Tightening (applying a thin layer of glue) the surface of the walls with tile adhesive intended for wet rooms;
- After gluing the tiles, it is mandatory to seal the seams with good quality grout solutions.
The history of the creation of this plaster
Rotband is translated from German as “red ribbon”.
Before its production, the brands “Green Ribbon”, “Golden Ribbon”, “Blue Ribbon” were announced on the market. This is where the concept of “cigar bands” came from, which went on sale back in 1854. This made it possible to accurately identify the manufacturer and rely on his reputation. The first products of the brand were manufactured in West Germany in 1962 . The company itself was originally located in the German town of Perl. The first mine for the extraction of gypsum stone was commissioned back in 1938. In 1972, for the first time in the German provinces, plasterboard sheets began to be produced. After World War II, it was decided to move the head enterprise to the American zone of occupation.
How much does it cost to level walls with Rotband?
Scheme for plastering a wall.
Before carrying out repair work, you will need to calculate the cost of leveling the walls with Rotband. The average cost of a 30 kg package in Russia is 380 rubles. This package is enough to plaster 3.5 m² of base. As an example, we will consider a room with an area of 16 m². The ceiling height is 2.5 m, length – 6 m, width – 2.7 m. The area of all walls in the room will be 43.5 m². Therefore, to plaster a room with a layer of 1 cm, taking into account the average packaging consumption per 3.5 m², you will need 12 packages of this building mixture. It is worth noting that the manufacturer packages the material not only in large packages, and therefore it will be possible to purchase 5 or 10 kg if such a need arises. The cost for a room of 16 m² will be approximately 4,560 rubles. In this case, the price includes only plaster, excluding tools, primer and additional materials.
It is worth noting that recently counterfeits of a similar plaster mixture have often been found on sale. The manufacturer has put a lot of effort into identifying and eliminating them. Each original package contains a holographic sticker. When choosing, be sure to pay attention to the production date, which indicates not only the day/month/year, but also the hours/minutes/seconds of production. New packages appear approximately every 5 seconds.
Scheme of plastering a wall using beacons.
Therefore, if there are several packages on sale with the same date, this means that the mixture is counterfeit.
To plaster walls with Rotband, you will need to prepare the following elements:
- brush for applying primer;
- building level or plumb line;
- metal profiles;
- rule;
- wide spatula;
- mixer;
- metal rail;
- hard sponge or metal grater.
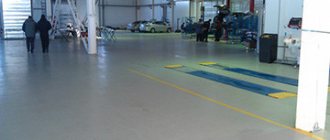
Leveling for different floor coverings
Depending on the type of floor covering, the technology for leveling the floor may differ. First of all, this can be explained by the characteristics of finishing materials, as well as their operational properties. Leveling the floor surface is most often used for coverings such as parquet, tiles and linoleum. Below are the main types of coatings.
Floor leveling for different floor coverings
Table. Types of floor coverings.
Source