- Metal grid
August 7, 2019
3172
When laying floors during renovation or during the construction of a new building, leveling of the floors is always carried out at the final stage. As a result, the top layer becomes more neat and even. To give the surface strength, you need a floor screed mesh of various geometric sizes; it is used for high-quality reinforcement.
Reinforcing mesh for floor screed has many applications. But its main industry is construction.
- It can be used when arranging ordinary floors in non-residential industrial buildings
- When installing a specialized heated floor in a modern apartment or country house.
Installing a reliable screed mesh can significantly increase the service life and make the floor almost eternal.
You should choose and purchase the screed mesh correctly. It must be of proper quality. If the material is chosen incorrectly, the floor will quickly begin to deteriorate, and you will have to repeat the floor leveling procedure. This is a waste of time and money.
In this article we will look at the main features of choosing a mesh, as well as the correct laying technology.
What is a floor screed in simple words
The topmost layer of the base is called the screed. This layer consists of a high-quality concrete mixture and additional material for reinforcement (strengthening). After screeding, the surface will be quite flat, which will allow all kinds of coatings to be laid on it (tiles of various sizes and shapes, laminate or linoleum).
The main components of the screed are usually sand, cement and water. These elements are mixed in certain proportions to prepare a mixture of a consistency suitable for installation. In addition, various additives and additional components can be added to the composition, which speed up the drying process and add strength.
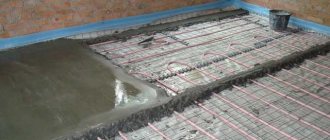
The number of components can be adjusted at your discretion. But it is worth remembering that sand is the main thing, it is what gives strength. If you add little of it to the mixture, the screed will begin to crack and collapse over time. To increase the strength characteristics of the floor, first a mesh for floor screed is first evenly laid out on the base, and then it is filled with concrete mixture until completely immersed.
The video shows in detail how to make a cement-sand screed, how to place beacons and pull the mortar over them. The next day, the screed from the solution must be rubbed
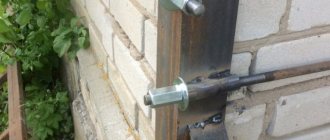
Metal mesh in facing works.
METAL MESH FOR COVERING A RETAINING WALL WITH STONE.
Laying tiles or stones on a mesh is not recommended by any manufacturer of mixtures. Therefore, most will consider this idea nonsense.
But if there are several people (unfamiliar) with similar thoughts, then this means that this is not entirely schizophrenia. One of these is in the video below:
What useful thoughts were expressed?
- It’s better not to do plaster at all, but to immediately fill the mesh.
- Plaster with a composition of 1:3, 1:4 - weak for cladding.
It can be added that constant wetting of the base on the fence accelerates the process of destruction. And for such areas, metal mesh is one of the solutions:
Partially, the difficulties with fastening the stone outdoors are voiced at the beginning of the video (hereinafter - advertising):
But it is not entirely clear why rejection occurs on the gazebo, where the temperature of the wall and the stone is the same. In addition to temperature fluctuations, other unfavorable processes occur in the wall of a heated house:
- accumulation of moisture in winter, from the movement of moist air from heat to cold;
- freezing of the facing layer due to errors in heat calculations.
Reinforcing the screed is a simple way to make the floor last forever
The main purpose of reinforcement is to increase the strength of the structure, as well as improve the load-bearing capacity. Thanks to this, deep cracks will not appear on the floor surface, and bending loads will also be reduced. An increase in the strength characteristics of the screed is achieved by introducing reinforcing materials into the structure that have high strength indicators.
To screed the floor covering, two types of reinforcement are used:
- Mesh is used as the main material for strengthening. The essence of this method is that the material for strengthening is laid on a pre-prepared base and filled with cement mortar;
- Micro-reinforcement using various industrial additives. Fiber, steel filings and wire are used here.
The procedure for reinforcing the screed is not always mandatory, but on most construction sites, building codes require the laying of a reinforcing layer. With this procedure, the floor will be more monolithic, and the likelihood of cracking will be significantly reduced.
There are small cracks on any concrete surface. If you do not see them, then wet the surface a little - the cracks will become clearly visible. Such defects are not critical. The most important thing is that the entire concrete structure is single and monolithic, and not assembled from separate fragments. It is the reinforcement that ensures the integrity and solidity of the entire structure.
The mesh for pouring the floor with concrete is laid over the entire area, and after filling with mortar it turns the entire top layer into a durable slab. Under the influence of external forces, small cracks will still appear, but the mesh will not allow individual fragments to move freely. If you install quality reinforcement materials, your floor will last forever.
Mesh for tiles
I would like to share my own experience in preparing walls for ceramic tile cladding. I am sure that everyone, when carrying out renovations at home, wants to do everything efficiently and for a long time, I was no exception. From time to time I had to knock down tiles in the bathroom or in the kitchen and, of course, glue new ones. But, unfortunately, the new tiles did not always stay on the wall for long, and it happened that after a year some began to fall off.
After asking the tiler builders, I learned that there are several reasons for this. Firstly, the foundation is not strong, the surface of which crumbles. Secondly, a poorly cleaned base, for example from paint, resin, etc. Thirdly, insufficient adhesion, i.e. the ability of the surface and material to absorb moisture and thereby stick.
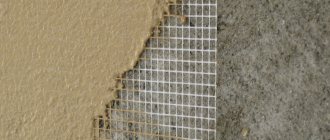
On the picture. The mesh is attached to the wall with a regular dowel and a screw with a washer.
The solution to all of the above problems is to install a metal mesh on the surface that is supposed to be covered. A properly secured mesh will take part of the load on itself if the base is not strong or poorly cleaned. Due to the fact that the glue envelops the mesh and at the same time adheres well to the tile, it can be assumed that the tile will no longer fall off spontaneously.
What types of materials are used to strengthen floors?
There are the following types of reinforcing elements that are used in the construction industry:
- Metal grid. It is mounted most often and gives the structure high levels of strength and reliability;
- Plastic and fiberglass reinforcement. These elements have fairly low strength indicators, and these materials also have poor fire resistance;
- Fiber – steel microfibers.
During the construction of industrial and residential buildings, in most cases, steel mesh is installed as a reinforcing material for the floor. It allows you to correctly form the load over the entire surface and avoid deformations under sufficiently large loads and bending forces. If you use steel mesh for reinforcement, you are guaranteed decades of reliable operation.
Features of floor mesh production
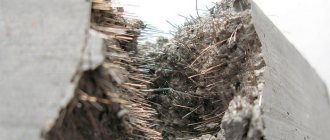
Floor mesh is produced at specialized enterprises from prepared VR-1 wire. This is a cold-drawn wire made of high-quality low-carbon steel. Depending on the geometric dimensions of the cells and the intended purpose, the wire diameter can vary from 2.5 to 6 millimeters. The wire is cut into individual rods and welded into a special mesh using spot welding.
The rods have special notches along their entire length, which are applied every 3 millimeters. They are necessary to provide stronger adhesion to the concrete mixture.
The cells have equal sides (square shape) with clearly fixed dimensions:
- Mesh with geometric cell dimensions of 50×50 millimeters. This is the minimum cell size for the production of these products. The minimum cell size requires the use of a large volume of steel rods. Accordingly, the strength characteristics will be significantly higher. It is used for laying conventional floors in industrial buildings, as well as in garages for heavy trucks;
- Grid with geometric dimensions 100×100 millimeters. The main area of application is the arrangement of floors in shopping centers and warehouses;
- Grid with geometric dimensions 150×150 millimeters. Here the size of one square cell is 150 millimeters. It is used for laying floors in residential premises and industrial workshops where there is no heavy load;
- Grid with geometric dimensions 200×200 millimeters. This is the largest cell size produced. Used to install a leveling layer in rooms where there is no heavy load.
Products with thinner wire and small cell sizes are supplied from the manufacturer's factory in rolls. Products made from large thick wire are quite problematic to roll into rolls, so they are supplied in cards. Twisted rolls are much more convenient to transport.
Photo
Combination of diagonal and parallel laying
Layout pattern
Running
Parquet installation
Modular installation
Technology for correct installation of reinforcing elements. Expert advice!
Before you begin installation, you must thoroughly inspect the purchased products for any possible defects, if you did not do this when purchasing. Correct installation technology is performed in a few simple steps:
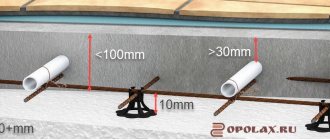
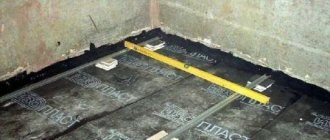
- First you need to prepare the base on which the screed will be laid. All visible defects are eliminated and treated with a special primer solution. Then the entire surface of the prepared base is covered with a special waterproofing material. The walls around the entire perimeter of the installation must also be covered with damper tape. This will completely eliminate the possibility of deformation as a result of thermal expansion. The walls are pasted to a height of approximately 10-12 centimeters.
- Next, the grid is laid out. It should be arranged in strictly parallel layers, with an overlap of no more than 10 centimeters allowed. The mesh should not lie close to the wall. The required gap is 3-4 centimeters.
- It is also necessary to raise it 2 centimeters above the surface. This is done with the aim of uniformly distributing the mesh in the poured concrete mixture. To do this, additional stands are made from bricks or pipe scraps.
- Check the evenness of the laid out mesh. A level is used for this. In places where unevenness is identified, it is necessary to make additional linings from scrap materials.
- Next, a special concrete solution is prepared and placed on top of the previously prepared layer. The reinforcement elements must be completely in the solution, none of the edges should be visible on the surface. Afterwards the surface is leveled.
I hope this article will help you understand which floor screed mesh you need!
Final stage
While working, you need to periodically wipe the already completed area of masonry with a rag. This is necessary to wipe off any remaining adhesive before it hardens. And after laying the entire flooring, you cannot walk on it for at least two days.
Grouting floor tiles
After the glue has hardened, you can begin grouting the joints. For this, a special moisture-resistant putty is used. This work can be done using a rubber spatula. But first you need to clean the seams from construction debris and dust.
After all the seams have been rubbed, you need to clean the entire floor of debris with a rag. Then the grout is given a day to dry and you can begin wet cleaning.
This completes the tile laying work. You can learn some tricks and installation techniques by watching videos and photos.
Suggestion from the editor
It is hardly worth using granite or marble samples that are characterized by increased weight as tiles. We recommend using very well-proven clinker tiles on plaster, the detailed laying technologies of which have been worked out on any surface.
Multilayer scheme - from brick to tile
The layout of the tiles, when there is plaster underneath, looks like this:
- 1 – penetrating primer, corresponding to the nature of the rough surface;
- 2 – glue for fixing insulation boards;
- 3 – insulation board, we recommend using mineral wool basalt boards, although the list of quite worthy options is very large, including even foam chips;
- 4 – dowels for fixing the insulation; note, you should not rely only on glue, more reliable fixation is also necessary;
- 5 – mesh-reinforced plaster;
- 6 – primer to increase the adhesive properties of materials;
- 7 – adhesive composition;
- 8 – clinker tiles.
Mosaic care
Glass, ceramic and porcelain tile mosaics do not require special care tips. They are resistant to most types of cleaning agents, strong and durable. However, if you choose the wrong glue and grout, mold may begin to form. Then you will have to wipe the wet mosaic dry each time and thoroughly ventilate the room. To avoid this, don’t be lazy to choose anti-fungal grout!
Working with natural stone modules
As for mosaics made of natural stone, they require special care. Of the different types of stone mosaics, granite positions are the most durable. But the most popular stone is, of course, marble. To clean it, you can only use special cleaning products designed for wiping natural stones. You should try to remove most of the dirt from the stone as early as possible so that the pigment does not have time to be absorbed into the mosaic and remain there forever.
Surface marking
Preliminary markings in the room will allow you to lay tiles with your own hands without making gross mistakes.
Use a textured cord or laser level for this purpose. The most common way is to use a cord.
The entire floor surface is divided into squares using a cord and a marker. The next step is to determine the height of the future masonry. Optimally carried out markings will allow you to identify all errors in the work and reduce the time spent on work.
Note!
Italian tiles for floors and walls: photos of beautiful tile designs in the bathroom and kitchen. Choosing tile color, style and size
Marble tiles for the bathroom: TOP-200 photos of original design, ideas for mixing and matching
Do-it-yourself tile shower step by step: instructions, algorithm of actions, dimensions, layout diagrams, photo of a shower with and without a tray
Grout
We rub the seams
A day after installation, the joints are grouted (jointed). Based on the composition, grout mixtures are divided into cement and epoxy.
Applying water-repellent impregnation to seams
The most popular, inexpensive and easy to use are cement-based mixtures, but they quickly become dirty, are not moisture-resistant and are not so durable. Therefore, when working with them in damp rooms, it is advisable to treat the seams with a water-repellent agent (Ceresit CT 10, Litolast and others).
The opposite of them is epoxy grout - it can withstand even aggressive environments, acids, does not lose color over time and does not become dirty, and is not afraid of moisture. But it is much more difficult to work with it, the seams are formed by the mixture that has not yet hardened, and to remove plaque you need to buy a special product. Expansion or flexible seams (for example, between a wall and a bathtub) are sealed with silicone grout-sealant.
Stone mosaic
This material has many types: marble mosaic on a grid, pebble mosaic on a grid, pebble mosaic, granite mosaic, travertine. You can also find other pebbles on the grid! Stone mosaic is a durable material that can be safely laid on the floor. Natural pebbles on a grid create a feeling of unity with nature. Even small pebbles look aesthetically pleasing and expensive. However, the color palette and overall variety are much inferior to other types of mosaics. This kind of mosaic is expensive and quite difficult to maintain.