When carrying out repair work in the house yourself, it is not advisable to skip the process of puttying the walls. A layer of plaster most often leaves the surface uneven and rough. Ideally smooth walls are a prerequisite for many further finishing works, in particular for applying paints and varnishes. Painting and reinforcing mesh for putty help achieve the desired result.
Purpose of reinforcing mesh
All imperfections of the plaster layer are eliminated by applying putty. Gypsum putty, unlike automotive putty, does not have sufficient strength and is susceptible to cracking after some time. When the bases on which polymer putty is applied are not indestructible (walls of a recently built brick building; joints and corner bends of plasterboard, gypsum fiber sheets and cement-bonded particle boards; joints of reinforced concrete slabs in panel houses; wooden floors, etc.) , then there is also a possibility of cracks appearing.
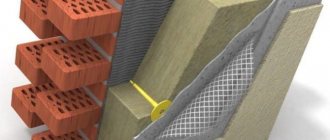
In order to prevent the occurrence and expansion of the territory “damaged” by cracks, a reinforcing grid for putty is used (another name is a painting net). A mesh is made from fiberglass, previously impregnated with polyacrylic dispersion. When the repair is completed, it is naturally not visible: it is fixed in the leveling layer. The use of reinforcing mesh counteracts vibration and prevents deformation of finishing layers under mechanical loads.
The flexible lattice will also prevent the putty layer from falling off if the technology for preparing the mixture and the process of its application were violated.
Working with polyester mass
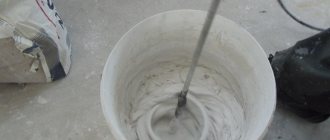
Separately, I would like to talk about the quality of the putty, because further finishing of the walls depends on this indicator. Polyester mass, which is sold in finished form, has proven itself well. It contains polymers that extend the service life of the coating, but the price of such material is much higher than that of conventional putty.
Polyester mass is used by professionals for:
- finishing;
- as a leveling layer and covering cracks;
- achieving smoothness and evenness of the walls.
The use of a polyester mixture sometimes allows you to avoid grouting and sanding the surface of the walls. It adheres ductilely and easily to walls, and is also easy to sand.
Among the polymer finishes, the following are popular:
- universal;
- finishing;
- fiberglass based;
- aluminum;
- pneumatic spray, etc.
As a coating for rough finishing, from No. 40 to No. 80 are suitable, for finishing – from No. 100 to No. 180. Large numbers are used very rarely when it is necessary to prepare the surface for glossy paint. For more information on how to putty with mesh, watch this video:
Classification of reinforcement materials
Main types of material
There are several types of painting nets on the modern construction market. They all differ both in the size of the cells themselves and in appearance. Let's look at each subspecies in more detail.
Wide fiberglass mesh
For the purpose of puttying, a fiberglass grid with a cell size of 2x2 mm is often used. Fiberglass mesh is not susceptible to alkalis, does not rust, has a long service life, is lightweight, and also increases the resistance of the putty layer to mechanical loads. A painting mesh for construction putty will absorb potential deformation transformations due to temperature fluctuations or increased humidity levels in the room.
Intended use of wide painting nets (common width: 1 m):
- the process of reinforcing the putty layer during the finishing of walls and ceilings;
- preventing the appearance of cracks on surfaces (during subsequent painting or wallpapering);
- adding impact resistance to walls (an important property in public places);
- reinforcement of the waterproofing layer.
Serpyanka mesh
There is a popular type of material on the market – serpyanka. The product is the same fiberglass lattice under the putty layer, the cells are square, the only difference is in width: the serpyanka is narrow and often involves the application of an adhesive mass. Width in rolls – 4.5-25 cm, length – up to 20,000 cm. The most common purposes of serpyanka:
- Reinforcement of the joining edges of plasterboard, gypsum-fiber sheets, cement-bonded particle boards, particle boards and wood-fiber boards, and other materials of a similar type;
- Reinforcement of putty on external and internal corners;
- Masking cracks on indoor surfaces;
- Strengthening slopes on doors and windows;
- Territorial leveling of ceilings and plaster layer on the walls of the building.
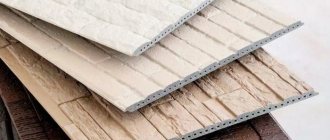
Fiberglass web
Spider mesh (an alternative name is painting fiberglass) is a translucent non-woven mesh that achieves its final appearance as a result of pressing the finest glass fibers arranged in a chaotic manner. The web is more elegant, which opens up the possibility of using fiberglass for reinforcement in areas where a wide reinforcing mesh for putty, which is comparatively thicker, is not ideal for use.
For example, when plastering a ceiling with vapor-permeable gypsum material, it is desirable to compensate for the low absorption of the mixture into reinforced concrete slabs. The cobweb is glued to the slab, thus increasing the adhesion of the plaster with its roughness. The convenience of the material is also due to its considerable width in the roll, which simplifies the finishing of large areas.
In the video: how to use a painting net correctly.
In what cases is it used?
If all the planes in your house are relatively flat and the repairs are supposed to be purely cosmetic, light leveling with a mixture not exceeding one centimeter in thickness can be done without strengthening. However, if your home is new and may shrink, or in cases where the mortar will be applied thicker, it is better to use strengthening bases.
If the applied composition will be applied to a thickness of more than three centimeters, the use of reinforcing materials becomes a mandatory part of the work. Without reinforcement, in this case the plaster will no longer hold on and will fall off.
However, to obtain a better result when leveling surfaces even with a small leveling thickness, a polymer painting mesh for the ceiling is often used. It is somewhat thinner than the metal used when working with thick layers of mortars, but it significantly strengthens the surface and prevents the formation of cracks in the coating.
How to use
The reinforcing capabilities of painting grids are maximized when they are placed inside the processing layer intended for leveling. The probability of crack formation decreases in proportion to the approach of the mesh to the outer layer of the surface. Technological process for reinforcing the putty layer:
- Prime the plastered wall.
- After the primer has hardened, apply the putty base.
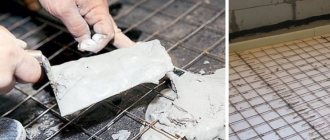
- While the putty is wet, place a fiberglass mesh on the wall and press it into the solution with a tool (trowel).
- Cover the network with an additional layer of putty, leveling it with a wide spatula.
When the reinforced layer has hardened, it is time to process it with a sanding mesh or sandpaper. In order to achieve an ideal aesthetic effect, a finishing compound is applied to the second layer of putty, which, after hardening, is sanded with fine-grain emery cloth. A completely flat plastered wall is coated with a finishing primer, after which it has hardened, painting can begin.
The technology for using mesh with an adhesive layer on drywall is somewhat different:
- The joining boundaries are expanded, cleaned and primed.
- Serpyanka is glued to the frozen joint.
- Putty strokes are applied with force so that the mass squeezes through the mesh and fills the space between the sheets of drywall.
- Without interruption, apply the second layer of putty, gradually leveling it with a spatula.
After sanding the surface and making sure that the primer has completely polymerized, you can begin painting and wallpapering.
The web is also initially glued to the primed surface: the glue is spread with a roller, the strips of fiberglass are leveled and pressed with the same adhesive roller. The putty mixture is applied after the glue has completely hardened. The following steps are identical to previous finishing technologies: sanding and priming.
Note! The next mesh for puttying fiberglass walls should overlap the previous one by at least 5 cm.
In order to reinforce the putty layer at the outer corners of the openings, you can use a specially designed corner with attached fiberglass. The corner forms an auxiliary barrier against careless chipping as a result of severe mechanical damage by a person carelessly leaning on these areas. Internal corners are often reinforced with a standard grille or fiberglass.
Fastening technology
The technologies for carrying out work with each option have an identical algorithm: preparing the base, fixing the canvas, covering the surface with a solution. However, each case has its own nuances.
Preparatory stage
Before leveling the base, preparatory work must be carried out. The surface must be clean, “healthy” (free from mold, mildew and rust), and durable. The putty is applied in a thin layer, so it is also important to fill large differences, pores, cracks, and gaps in the seams with plaster mortar in advance. Only a couple of types of paints stick to oil stains, which forces you to use a degreaser. Finally, the walls and ceilings are impregnated with adhesive primer. For wet rooms, options with antiseptic additives and water repellents are considered.
Grinding
The concept of “reinforced network” is defined, but among building materials there is also a grating for grouting the putty layer. The product is based on woven glass fiber in a large checkered pattern. An abrasive is attached to the mesh itself with glue (a common type is silicon carbide), which is why the type of mesh is called abrasive.
Advantages of the product over sandpaper:
- Efficiency. After the puttying is completed, it makes sense to sand the surface - an abrasive mesh will cover a larger area three times faster than sandpaper.
- Easy cleaning process. The emery quickly becomes clogged, and attempts to clean it are futile. Just hit the mesh a few times and the clog will fall out on its own.
As you can see, painting and fiberglass meshes for reinforcing the putty layer are useful building materials for finishing. Thanks to such products, you can securely fix the putty on the surface and get smooth walls.
Installation of painting mesh on walls and ceilings (2 videos)
What you might need (21 photos)
How to properly plaster ceilings: choosing a mixture
The procedure for preparing and applying the solution depends on which plaster for the ceiling is chosen. Each package is supplied with instructions indicating the exact proportions for diluting the mixture.
Cement based
Suitable for plastering concrete ceilings. The advantages of such compositions are strength and long service life. In addition to performing the main function of leveling the plane, cement plaster is a universal material that is used for interior and exterior work.
Buyers are wary of the myth that cement-based mixtures crack after drying. In fact, this is a misconception. Cracks on the surface appear as a result of violations of the technology of work and preparation of plaster:
- if the proportions of the components are not met. Cement is a material that is sensitive to sudden changes in temperature and humidity. As the cement dries, it shrinks. To prevent this from happening, fine sand is added to modern compositions. Fillers make the plaster dense, so as the mixture hardens, the stress on the plaster layer becomes less;
- forced drying will negatively affect the plastered surface. Do not use a hair dryer, fan or other equipment to speed up drying. This will cause the outside layer of plaster to become crusty, but the inside will remain damp.
Surface preparation
Perhaps this step cannot be avoided. The plaster should be applied to cleaned walls, without visible defects or cracks. The preparatory work is as follows:
- Cleaning the surface of old coating. This could be wallpaper, paint, old plaster or other finishing coating. For convenience, use a spatula and a metal brush. They can easily help you get rid of everything unnecessary.
- Conduct a wall inspection. All gaps, defects and cracks must be crumbled (enlarged) and sealed with plaster.
- Using a plumb line and a building level, measure for any unevenness. It is better to cover large differences and depressions and level them with a rule. Wait for the plaster to dry.
- The final step in preparing the wall is the application of a primer layer, which will improve the adhesion and properties of the applied material.
Note! The deep penetration primer can be applied with a brush or roller. All areas must be thoroughly processed
Then let the wall dry for 10–12 hours.
Conclusion
Now you know what types of mesh there are, and you can independently choose the right option for the work. The video in this article will reveal the topic in even more detail, and if something is not clear to you, then ask questions in the comments.
Did you like the article? Subscribe to our Yandex.Zen channel
June 22, 2021
Tools and materials, Plastering and wall putty
If you want to express gratitude, add a clarification or objection, or ask the author something, add a comment or say thank you!
Description
Abrasive meshes are an alternative to sandpaper. This is a fiberglass sanding cloth coated on both sides with abrasive electrostatic chips. The building material for grouting putty is characterized by the presence of grain. Therefore, it is selected for a specific type of work.
Essentially, this is a lattice cloth on which abrasive particles of different sizes are applied. The cells themselves are almost identical in size, only the grains differ. Perforated mesh material is sold in specialized construction stores or on the construction market.
During this type of grinding, neither dust nor putty will clog the holes. Depending on the variety, meshes can be used to perform wet putty. They are easy to use and practical. Allows you to get by with a minimum amount of dust.
The surface finished with it looks smoother and smoother than when using sandpaper. The material for cleaning walls gives the surface of the treated base not only smoothness, but also uniformity. The abrasive smoothes out irregularities, pits, depressions, and cracks.
Externally, the mesh is a small rectangular canvas. Also on sale there are modifications in the form of a circle, which are used for automated surface treatment. The material marking indicates the grain size, country of manufacture, wear resistance, moisture resistance, and purpose.
The mesh skin does not become limp from water. To clean it, just remove the cloth from the grater and shake it. Compared to regular sandpaper, dust will not scatter throughout the entire area of the room. The waterproof mesh has a rigid and durable structure that does not lose its functional qualities.
The most important principles of reinforced concrete ceiling reinforcement
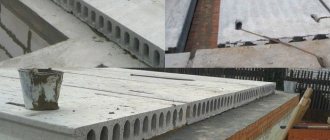
When constructing private houses, we often encounter monolithic ceilings. The width and thickness of the floor strictly depend on the specifics of the reinforcement used. One-sided top reinforcement is used on floors with a span of no more than 3.5 meters. In other cases, a ceiling with transverse reinforcement is better suited.
A ceiling with transverse reinforcement has much greater rigidity, and therefore greater load-bearing capacity. Additional transverse reinforcement allows you to increase the transversely reinforced ceiling up to 5 meters. Thanks to this, this is a slightly more popular solution for the construction of private houses.
Reinforcement of a monolithic floor is carried out entirely on the construction site. The thickness of the floor, its deflection, and other parameters must be carefully calculated by the designer. When reviewing the documentation, we will also find out how much wire for a monolithic ceiling, as well as the maximum deflection allowed by the designer.
Source
Is it necessary in all cases to putty before painting with a painting mesh?
Is it necessary in all cases to putty before painting with a painting mesh?
Masters online: 585 Orders per week: 1,629 Offers per day: 1,083
Of course, not in all cases; the mesh, of course, reinforces the putty layer, but does not protect it from large cracks. If you are putting putty under wallpaper, a mesh is not necessary at all. And for painting I recommend fiberglass and sheetrock or painting non-woven canvas, with the latter, however, you need a good wallpaper gluing specialist. In general, in my opinion, the grid is recommended by those who want to increase the cost of the estimate.
Hello Sergey. It is safer to cover the surface with fiberglass, although sometimes it also tears. It makes no sense to use mesh or fiberglass on drywall. surface, except at joints. In other cases, always.
In all cases, if you want a mesh
There is no need to install a mesh on drywall in the area where there are no seams. There, the forming layer is the paper layer. In general, you can’t spoil porridge with oil :-)
Forget about the putty mesh. There's no such thing. To prevent cracks in the paint, you need to glue a fabric into the thickness of the putty - a web, non-woven fabric or something like that.
Source