Applying plaster to the walls is only the initial stage of finishing the wall surface. In order to give it maximum evenness for subsequent painting or wallpapering, after applying plaster mixtures, proceed to priming and puttying. And only then can you move on to the final work of decorating wall surfaces with wallpaper for painting.
What to do after plastering the walls? If the surfaces have completely dried after the plaster has been applied to it, you can proceed to priming the walls. To do this you will need to purchase a special tool. It is offered in a wide range by modern manufacturers of building materials.
Primer after plastering does not require special skills from a person. It is enough to purchase a convenient tool and be patient if a person performs this work for the first time in his life.
But if the priming stage has been completed, you can safely move on to puttying the wall surfaces.
The putty mixture used at this stage of finishing the room fits perfectly on a flat wall. However, not many can boast of the ideal geometry of their city apartment. That is why uneven surfaces must first be covered with plaster and primed. And you can do this with your own hands and without the involvement of professional builders.
Preparation of plastered walls
First of all, it is worth adding that before moving on to the subsequent wall , the layer of plaster must be allowed to dry thoroughly. Basically, this takes about a month, and at the same time the room must have a systematic home temperature and air flow. It is most advisable if the plaster is made in the warm season, then you can simply leave the doors and windows open. In another case, temperature changes lead to destruction of the surface or the appearance of cracks. Proper drying must be given special attention, since the plaster cannot be allowed to freeze, and at the same time, drying too quickly can have a bad effect on the entire coating.
When making repairs in a house or apartment, it is extremely rare to do without a layer of plaster on the surface of the walls.
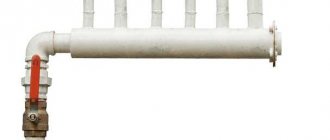
Beacons for plaster
Another fundamental point that is often not taken into account in the case of repairs. But the thing is that all lighthouses are made of steel, and over time, rust begins to spread on their surface, which can lead to a crack, or even destruction of the plaster layer. Professionals always recommend removing beacons and sealing the grooves formed in their place with putty.
Main! Even zinc beacons do not guarantee that rust will not start. Of course, an additional layer of zinc will significantly increase the service life, but over time, corrosion will eat away the protective layer.
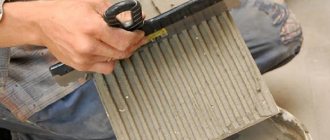
The beacons should be removed extremely carefully, and even before the plaster becomes completely dry. Of course, it will not be possible to avoid chipping, but the more carefully the removal is performed, the less effort will need to be spent on removing the formed grooves.
Professionals always recommend removing the beacons and sealing the grooves formed in their place with putty
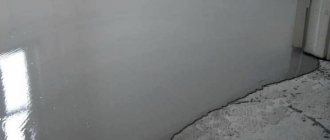
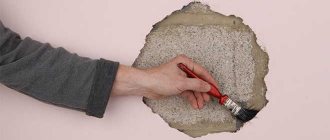
The next step is, if possible, to level the walls, in other words, to grout with coarse sandpaper or a mesh made of metal. You can check the evenness of the coating by simply looking at the surface of the wall along it, towards the window. Likewise, it will be possible to examine all significant irregularities and remove them. You can also check the evenness of the plaster layer by applying a rule or any other flat object with a large plane to the wall. As soon as the surface has been grouted and all blemishes have been removed, the wall must be treated with a primer layer, which will serve as additional adhesion to the next layer and will prevent fungus and mold from occurring. Drying of the soil layer can last from a couple of hours to a day, depending on the temperature in the room and drafts, and only after complete drying do you proceed to the second stage.
When can I paint, glue and putty?
The primer layer applies well to the putty and dries quickly, but still, experts recommend waiting until it dries completely, otherwise the wallpaper will wrinkle or bubbles will appear. On cement-sand plaster, the impregnating mixture sets in 2-3 hours, and on cement-lime plaster you need to wait 4-6 hours, but putty can be started before it dries completely. It's also worth remembering:
- Primed putty walls should be painted after complete polymerization.
- Painting with old paint is done after the mixture has polymerized; in this case, the old paint will not peel off.
- Painting on plaster without putty requires covering with a primer composition in at least two layers, and each layer is applied to the completely dry previous one; it will take at least a quarter of a day to be completely ready for painting.
Final preparation of walls for finishing
Depending on the skills and experience of the person who will do the finishing, the type of putty mixture is selected.
They can be:
- In the form of dry mixtures that are diluted independently. This option is more suitable for specialists or when finishing a large area.
- In the form of a ready-made mixture in buckets. Such material is more expensive than dry mixture, but it does not require additional preparation. The mixture can be applied immediately, and straight from the jar.
Preparation of putty mixture
Dry mixtures must be properly mixed with water. The proportions are shown on the packaging. First, water is poured into the bucket, then the mixture is poured in, wait until the water absorbs the mixture, soaking the entire mixture, this happens quickly in literally half a minute.
After using a construction mixer, mix the composition for 2 minutes until a homogeneous mass is obtained. The solution is infused for a minute, and the composition is stirred again.
Adding more water or mixture is not acceptable.
Using a construction mixer, mix the composition for 2 minutes until a homogeneous mass is obtained.
Puttying as the final stage of work
This stage is necessary if, when leveling the base, a set of measures was not provided that would allow obtaining a smooth surface (smoothing, glossing, etc.). Such coatings are not entirely ideal, not only due to the lack of finishing work, but also due to the granularity of the solution used.
For example, for cement plasters the maximum fraction size is usually 1.5 mm, for gypsum plasters it is up to 0.2 mm. The lower this indicator, the more uniform the texture is. The large fraction is manifested by the presence of barely noticeable tubercles and depressions in the grain size. This may not be very critical for further wallpapering, but it is very important for painting the wall. You also need to remember that a smaller fraction size helps to increase the adhesion of subsequent layers of finishing. Simply put, wallpaper sticks better to such a coating.
Putty is a fine-grained composition designed to fill microvoids in the plaster coating. It can be applied in 1 or several layers depending on the desired result. Between each application the wall must be primed.
Rule #5. Remember that plaster belongs to the category of thick-layer coatings, and putty belongs to the category of thin-layer coatings. And if in the first case there are restrictions on the minimum and maximum thickness of application, then in the second case restrictions are imposed only on the maximum layer thickness.
Putty is usually sold in the form of dry mixtures, differing both in composition and price, as well as in characteristics. Which one to choose is up to you. Below we have presented a small table that shows only a small fraction of the available range of putties for preparing walls for painting or wallpapering.
Putty options for leveling a plastered wall
| Manufacturer | Name of putty | View | Max layer thickness, mm | Approximate price* |
| Unis | Blik | plaster | 8 | 340 rub. for 25 kg |
| Cron | polymer | 3 | 350 rub. for 25 kg | |
| LR | 5 | 480 rub. for 25 kg | ||
| Slide | plaster | 3 | 350 rub. for 25 kg | |
| Knauf | Fugen | 3 | 390 rub. for 25 kg | |
| Uniflot | 5 | 1600 rub. for 25 kg | ||
| Stroybrig | Genfir PG35 MW | plaster | 5 | 240 rub. for 20 kg |
| Founds | Versilk | 10 | 280 rub. for 20 kg | |
| Graysilk | cement | 4 | 320 rub. for 20 kg | |
| Elisilk | plaster | 2 | 350 rub. for 20 kg | |
| Belsilk | cement | 4 | 370 rub. for 20 kg | |
| Gladsilk | polymer | 3 | 380 rub. for 20 kg | |
| Lersilk | 1,5 | 400 rub. for 20 kg | ||
| Weber.Vetonit | VH | cement | 4 | 470 rub. for 20 kg |
(*) – the price is indicated for comparison.
The putty is applied using two spatulas: wide and narrow - after the primer layer has dried. The number of layers depends on the initial state of the base, and the quality of work is checked using lighting devices. The coverage must be perfect.
The video below talks about the basics of puttying work on a plastered surface. Recommendations and techniques are provided that will make it possible to simplify the process of final leveling of the base for subsequent painting work.
After the last layer of putty has dried, they begin sanding the coating. For these purposes, sandpaper with a grit of 240 or 320 is used. The surface is cleaned of accumulated dust and additionally primed. All that remains is to paint the wall or stick wallpaper on it.
Finally
Even a beginner in finishing can achieve excellent results. The only question is how long it will take. If you are not confident in your abilities and are not ready to stretch out the repair work for several weeks, then you should consider offering the services of specialists.
Types of primer compositions
The building materials market offers a solid selection of primers from different manufacturers. Primer mixtures differ in composition, purpose and drying time; they can be universal or special, for interior or exterior work.
Based on their properties and purpose, primers can be divided into the following types:
- Concrete contact - the mixture includes quartz sand, cement, and other fillers; an acrylic binder is the basis of the composition. Designed to increase the adhesion of smooth, weakly absorbent surfaces (concrete, tiles, old paint) with plasters, putties, and ceramic tile adhesives.
- Penetrating universal – prepares surfaces before tiling and painting. Strengthens loose, crumbling substrates and reduces their absorption capacity.
- Colorless - used for treating wooden surfaces in order to preserve the natural structure of the wood. Forms a waterproof film that protects the wood from rotting.
- Contact – enhances the ability of a hard surface to “adhere” to various solutions (paints, adhesives).
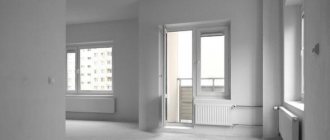
Plastering walls in a new building
The basis of almost any renovation in a new building is work related to preparing the surface of the partitions for applying finishing layers - ceramic tiles, paint, wallpaper. For this reason, plastering walls in a new building is an important stage: the longevity of the operational properties of the room and the overall result of wall finishing depend on the high-quality implementation of this work.
By the way, our craftsmen have the highest qualifications of professional plasterers. You can place a request for individual plastering work or entire repairs in the apartment on this page or by calling 8(495)662-48-33.
What is wall plaster?
Plastering the surface of walls and partitions in a new apartment is a process of applying special solutions and their subsequent leveling. This is the most important element of wall decoration. As a result, the surfaces of vertical structures become smooth and suitable for a fine finish. In this case, both planar (sinks, potholes, bumps) and angular irregularities are eliminated. In the latter case, deviations of walls and partitions from the vertical and horizontal are minimized or eliminated. In this regard, it is customary to talk about aligning angles at 90 degrees. Creating a room geometry that is close to ideal becomes especially important when using ceramic tiles as cladding or when installing built-in furniture, such as a kitchen. The lack of correct “geometry” of the room manifests itself when joining corner furniture elements (for example, when installing kitchen cabinets in an L-shaped line). Taking into account the purpose of the room after renovation, its equipment and the type of finishing, you can make an appropriate decision when looking for an answer to the question of whether it is necessary to plaster the walls in a new panel building. It should be remembered that ideal evenness of walls and partitions is not always required. In some cases, this leads to unreasonable wastefulness in the use of materials, as well as an increase in the duration of repairs due to the additional time required for thicker finishing layers to dry.
Removing beacons
Quite often, beacons are installed before applying plaster. They allow you to work smoothly over the entire plane. But after the processing is completed, they will need to be removed painlessly. Since they are often made using metal tools, which means they are susceptible to corrosion. Corrosion, in turn, can cause the wall finish to crack or fall off.
We recommend removing the beacons immediately after treatment before the solution dries. This will greatly simplify the task. The remaining holes can be easily dealt with using putty.
Galvanized beacons are sometimes used, but they are also subject to corrosion. We recommend that removal be carried out as carefully as possible to reduce damage to the wall. After the structures are removed, surface treatment can continue.
Drying conditions for plaster
The first thing to do after plastering the walls is to let the surfaces dry naturally. Part of the solution water will be used to create artificial stone (cement, gypsum or lime), depending on the type of plaster used. Another part is required as a medium in which reactions, for example, polymerization, proceed well. Excess moisture gradually begins to evaporate from the surface of the layer, and this cannot be prevented.
According to standards, the surface before wallpapering or painting should have a moisture content of no more than 8%. The drying time of the plaster coating will depend on:
- Types of solution.
- Weather conditions.
- Consistency of the solution.
- Base material.
- From the thickness of the plaster layer.
Typically, walls are leveled using mortars with a cement base, followed by gypsum and lime compounds in popularity. From the construction experience, it was possible to identify the pattern of the drying process. So, regardless of the composition (the exception will be gypsum), it will take 24 hours for 0.1 cm of outdoor plaster coating to dry; a 0.2 cm layer in a room dries out in 24 hours. Stretch film is used to retain moisture in the CPS plaster. Cement-type coatings need at least a month to gain strength.
Less time is allocated for drying, because the main share of free water begins to evaporate earlier. A week is allowed in the room to dry the mortar with cement components, as well as cement and lime, but during this time only the surface layer will dry. During this period of time, the room is not ventilated, since a higher degree of humidity creates ideal conditions for hardening of cement coatings.
Try to take your time and let the solution gain strength. Solutions made from lime or gypsum and lime take less time to dry. For normal strength development, such compositions need from 10 to 15 days, and the room needs to be checked 3 times an hour (especially in the first few days).
According to KNAUF recommendations, a layer of gypsum plaster of 1.5-2 cm will dry for a week at a temperature of +20 degrees and a humidity of 60%, a layer of 5 cm will dry completely in two weeks. For puttying work, 10 days are enough. These are the deadlines for drying plaster inside buildings, where conditions can be controlled and created, but outside this is unrealistic. For this reason, choose the time for plastering facades in accordance with the normal weather conditions of the climate in your region.
For work, it is better to use dry periods when precipitation is irregular and the temperature does not fall below -8 degrees and does not rise above +30 degrees. Ideally, the temperature should be +18…+20 degrees.
Popular types of universal soils
Useful video
I know that wallpaper needs to be glued with the doors and windows closed so that there is no draft. Is plastering of walls also carried out in a completely enclosed room?
Yes, you can putty. Breathing in the vapors of primer and putty is not very pleasant, that is, harmful. When the windows are open, the humidity in the room increases, which allows the putty to remain in working concentration longer. At the end of the work, you need to close the window. Remember that the walls should dry gradually.
Yes, you can putty.
You can’t glue wallpaper, it will just come off, and putty is only afraid of the following:
Puttying under wallpaper
For the purpose of further wallpapering, the putty is initially carried out with a wide spatula, covering with each subsequent layer up to ¼ of the previous one. The resulting “sausages” are not ground. Holding the spatula at an angle of 21-30 o, maintain constant pressure, which will help distribute the material in an even layer from 2 to 4 mm. The smaller the angle of inclination, the more it leads to the formation of a thick layer, the more it leads to the formation of a thin layer. However, the dependence is typical for variations in the specified degree interval; when going beyond its limits, bumps and breaks form on the surface.
The next step is drying the layer, removing beads with a jointer and abrasive and checking the smoothness using a building code and a torch. The resulting defects are eliminated: protrusions - with abrasive, recesses - with additional lubrication. It is possible that an inexperienced master can approach the wall up to 5 times until the surface becomes perfect.
At the end of the manipulations and long hardening, they go over the wall with a jointer with a mesh size range of 80-120 (with an increase in the number, the abrasive grain decreases). Initially, the entire surface is worked with circular movements, after which, loosening the grip, movements are criss-cross in order to remove the contours of circular manipulations.
Then the wall is again checked according to the building rules with the lantern. If there are no lingering reflections from the rule, the surface is ready, after a day the walls are primed and you can start gluing.
Sequence of applying layers
It was previously explained whether it is possible to plaster over putty, but you need to know in what order the putty mixture is applied after priming and preparation. Use starting putty to eliminate unevenness. When there are large cracks, a reinforcing mesh is installed on them.
The dried layer should be sanded down. The surface is cleaned of dust, the treated areas are primed again, and the final puttying proceeds. Sanding and priming are carried out again.
The dried layer should be sanded down.
The nuances of puttying corners and slopes
Separately, it is necessary to describe the principle of working with corners and slopes. For easier processing, you can make a thicker layer, which is then leveled by sanding. The stage is difficult even for professionals.
The second option to simplify the work would be to apply the solution using a sealant gun, previously cleaned of the old composition. Or you can use a confectionery syringe, which is inserted into the gun, thickening is made using rubber linings and gluing with electrical tape. It works like this:
- Putty solution is drawn into the selected tool.
- Squeeze the putty out of the syringe into the crack in the corner; it is advisable to fill the entire void from top to bottom at one time.
- Afterwards, the layer is leveled with an angled spatula, based on the base, just as plaster is applied to beacons.
- When the layer dries, the protruding parts are sanded.
On slopes they work using an angle trowel, a convenient method. Sanding is also carried out. Evenness is checked by the rule.
On slopes they work using an angle trowel, a convenient method.
Drying plaster and walls with a dehumidifier - a real example
For use in small rooms (apartments, offices, basements) with an area of 24 m2 to 50 m2, household dehumidifiers are suitable:
MYCOND Roomer 20
.For larger premises (buildings, warehouses, shopping centers, business centers) from 150 m2 and above, these models are suitable:
conclusions
Already outdated methods of conducting construction and finishing work are being replaced by new energy-efficient technologies. Is it possible to dry plaster with a heat gun? Yes you can.
But it is necessary and should use an economical and automatic mobile dehumidifier. This option is several times more economical to use, does not require huge amounts of electricity, and dries the walls much faster and with better quality.
The many other advantages of modern drying equipment and its application in various industries, including construction, are described in the articles of our Blog.
Want to speak directly to dehumidification experts? Call (044) 225-00-15 or order a call back on the website, and we will solve any problem related to air humidity in your room.
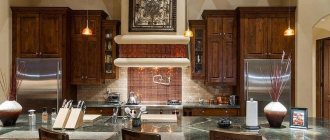
Ceramic tile
With the help of tiles it is very easy to visually expand or reduce space.
Walls in the interior in combination with floor and wall ceramic tiles
The use of small, cold-colored tiles narrows the space. Spaciousness is provided by large tiles in warm colors.
Tip: choose the color of the grout for the joints two shades lighter than the tile itself.
Putty
Puttying walls after plastering is a serious area of work, so it is better to separate it into a separate section. Before you start making a topcoat, you need to choose the type of material that is ideal for your conditions. There are three types of mixture in total.
Cement
This material is used for work after plastering and has the following advantages:
- resistance to temperature changes,
- moisture resistance,
- ease of use,
- affordable price.
All these advantages have led to the fact that this mixture is often used after applying plaster to make the final layer. The main reason that the material has not received an overwhelming advantage in the market is a number of disadvantages, including:
- the possibility of cracks due to shrinkage;
- long drying period;
- low adhesion.
Cement putty is used when work needs to be done in rooms with high humidity. Moreover, it perfectly tolerates harmful environments. It is also often used when, after the construction of a house, it is necessary to finish the facade.
Plaster
Gypsum putty is also used quite often when work needs to be done after plastering walls. It has the following advantages:
- no shrinkage,
- low probability of crack formation,
- high plasticity,
- ease of application,
- high adhesion,
This material is easy to apply. Moreover, it is easy to level it after completing the main work on plastering the walls. But, of course, there were some downsides:
- Plaster is afraid of moisture. Therefore, you should not do any manipulations with it in a room with high humidity.
- Plaster hardens quickly. On the one hand, this is a plus, but on the other hand, you shouldn’t make too large volumes of the solution, otherwise you won’t have time to use it all up.
- To get a high-quality finish you will have to do at least two layers.
If you decide to putty with gypsum, you must take into account that you need to wash such walls extremely carefully, otherwise you will have to make new putty, and possibly plaster.
Polymer
In recent years, more and more companies have decided to make putty based on polymers. This decision is easily explained by a number of advantages that this material gives to builders after treating the walls with plaster and primer, namely:
- Using the mixture, you can make a coating in rooms with water.
- It is possible for craftsmen to make only one layer of putty.
- It should also be noted that it has high adhesion.
- The substance dries quickly, is inert to temperature fluctuations and does not absorb odors.
Polymer putty, which is used to create the final layer of wall finishing after plastering, has a long service life. Moreover, it has high ductility, it does not crack or dry out.
Despite all the apparent advantages, before you start putting putty on the walls using gypsum, you need to learn about the negative aspects of this substance. Fortunately, there are only two of them. This is high cost and difficult to apply.
Most often, polymer mixtures are used when it is necessary to putty walls indoors. Some varieties are even used for external work. Such widespread use is explained by the high quality of the substance.
Packaging
To start making walls, you need not only to choose the type of putty, but also the packaging form. The fact is that there are dry mixtures on sale. After purchasing, you just need to dilute them with water.
You can also buy the substance in buckets. In this case, you won't have to do anything else. The putty can be immediately applied to walls that already have plaster. The first option is best suited for professional builders, and the second for beginners.
Application
For everything to go as expected, all operations must be done in the exact sequence. First apply a starting coat to the walls. This is best done with a thick spatula. Movements come from the corners. You can work in any direction convenient for you.
When the mixture has dried, it’s time to check the evenness of the coating. You will also need to sand the surface again. For this purpose, skin with a fine fraction is best suited. After this comes the finishing layer. Now you can safely glue wallpaper or paint the walls.
Leveling the surface
After plastering the walls, you can consider that you have gone halfway before finishing. But before further actions, it is necessary to give the plaster time to dry thoroughly. The drying time is usually indicated on the mixtures; we recommend from 15 to 28 days. The drying time depends on the humidity in the apartment and temperature. The best option is to ventilate the room, but at the same time make sure that the temperature remains at the same level of 20–21 degrees. After plastering the walls, we’ll find out what to do next by reading the article to the end.
Primer
The work after plastering consists of leveling. But the surface is first treated with an antiseptic and coated with a primer. You can purchase a two-in-one composition, but the price is higher. To treat a plastered surface, you can purchase a ready-made starting mixture, which is suitable for all types of coatings and will give greater adhesion. The primer is applied in 1–2 layers, pay attention to what the manufacturer advises.
Photos are enlarged, click!
Puttying
After the primer layer has dried, which will take 8–10 hours, you can begin leveling. To level the walls, putty is selected. Based on their composition, putty mixtures are divided into types:
- It is based on cement - it resists moisture well, but the degree of shrinkage is high.
- Gypsum-based putties are the most inexpensive putties, shrinkage is minimal, working with it is simple, but they are afraid of water and easily absorb it.
- Based on resins or polymers - the most expensive of putty mixtures, shrinkage is minimal, waterproof.
In an apartment, putty is selected depending on the room. An inexpensive gypsum option is suitable for the living room and bedrooms; for the kitchen, toilet and bathroom it is better to use expensive polymer-based ones.
You cannot use gypsum plaster on the street side, for example, on a balcony or loggia. It is afraid not only of moisture, but also of temperature changes and quickly crumbles. On sale you can find ready-made wet putties and dry mixtures in bags. The first option is mixed at the factory and is considered better, but the composition must be used immediately after opening; the wet mixture does not last long when opened. Dry ones are inferior in quality, since when mixing at home it is difficult to maintain exact proportions, but it is more convenient to store the powder.