Unfortunately, apartments in multi-storey buildings have a very low level of sound insulation. This is especially true for buildings built from reinforced concrete panels. Not only do the interior wall panels themselves have a very small thickness, but their structural structure does not contribute to the absorption of sound, and some of their components even conduct it, for example, fittings. Therefore, soundproofing the floor in an apartment has become an urgent necessity for many.
Soundproofing the floor in the apartment
Not so long ago, it was very difficult, and sometimes almost impossible, to purchase materials for sound insulation, and apartment owners came up with different ways to protect their homes from booming music or emotional conversations of neighbors. Old carpets, leftover styrofoam packaging, and even egg trays were used.
Today, construction stores have a huge selection of various soundproofing materials, and craftsmen offer numerous ways to construct a soundproofing system. To choose the option that is most suitable for a particular room, you need to consider the characteristics of some of them and how they fit on the concrete floor.
How to soundproof a floor: basic materials
Noises can be impact or airborne. Airborne sounds - the sounds of voices, a working TV, music - are transmitted through air vibrations. Impact noises are direct mechanical impacts on floor slabs - when heavy objects fall, walk, jump, or drag furniture.
To protect against airborne noise, soft materials with a high sound absorption coefficient are used. To protect against impact noise, dense materials with a high degree of sound insulation are used.
Types of materials for sound insulation: 1 - polyethylene foam; 2 — “Tuplex” 3 — coniferous slabs; 4 - plug
Foamed polyethylene
A 2 mm thick non-crosslinked polyethylene foam soundproofing underlay reduces noise by 6 times. The structure resembles a sponge. It is laid on interfloor and inter-attic floors, used as: a base for a floating floor, a substrate for laminate flooring, parquet boards and other types of finishing coatings. Elastic, can be mounted on any base in any conditions. Additionally levels the surface, but cannot be used as a leveling layer. Available in rolls 1 m wide and up to 50 m long.
Advantages of foamed polyethylene:
- Maintains technical characteristics in the temperature range from -60 to +85°C.
- It does not ignite and does not absorb moisture, so it can be used in different rooms.
- Provides vapor barrier.
- Does not rot, is not susceptible to mold fungi, and is chemically resistant.
- Low weight does not make the structure heavier and makes transportation easier and cheaper.
- In terms of thermal conductivity, a 2 mm layer of foamed polyethylene replaces 1 cm of mineral wool.
- Resistant to external mechanical loads.
- It is combined with almost all types of building and finishing materials.
- Eco-friendly.
- Durable - service life up to 100 years.
- Easy to install.
- Affordable.
Disadvantages of the material:
- may ignite without additional additives;
- Doesn't hold its shape well enough - it sags over time.
Extruded polystyrene foam
XPS expanded polystyrene foam is produced in the form of standard mats and “accordion” - the first type is optimal for typical rooms, the second - for rooms with complex geometry. Thickness – 2, 3 and 5 mm.
Advantages of the material:
- biologically and chemically stable;
- does not allow moisture to pass through;
- additionally provides thermal insulation of the floor;
- high deformation strength – up to 24 T/m2;
- convenient for transportation.
Flaws:
- flammable and toxic when burned;
- zero vapor permeability - not suitable for wooden bases;
- sags over time, especially the thicker ones.
“Tuplex” and Eco-line
Combined professional substrates “Tuplex” (Finland) and Eco-line (Russia) are two layers of polyethylene film: the upper one is dense, the lower one has ventilation shafts. Between them is a layer of polystyrene foam granules of the same size. Designed for concrete foundations. Available in rolls of 1*10 meters. When cutting, the granules do not crumble.
Advantages of materials:
- create the effect of a double-glazed window - provide maximum sound insulation of 30 dB;
- economical - they provide vapor barrier and micro-ventilation - they collect moisture in the space between the films and remove it around the perimeter of the room;
- do not deform - elastic and durable;
- eliminate minor irregularities and differences in the base;
- simple and easy to use;
- do not lose physical and chemical properties during operation, micropores do not become clogged;
- environmentally friendly;
- not susceptible to mold fungi;
- fireproof;
- service life – up to 30 years.
The disadvantage is that they are relatively expensive.
Coniferous slabs
Soft boards based on coniferous wood fibers. The binding composition is lignin or synthetic resins. Must “breathe” - not mounted on waterproofing. Thickness – 3, 4, 5 and 7 mm. Standard size 850*590 mm. Sound insulation index 21‒26 dB.
Advantages:
- environmentally friendly and hypoallergenic;
- give additional strength;
- easy to cut with a knife, easy to install.
Flaws:
- not resistant to moisture;
- relatively expensive.
Cork
Cork can be either an independent soundproofing material or a substrate. A layer of cork 2 cm thick is superior in terms of sound insulation to a layer of monolithic concrete 10 cm thick. In terms of sound absorption, cork is 2.5 times superior to wood. Laying a cork on the self-leveling floor reduces noise from below by 2 times. According to the technology, the cork is laid and glued onto polyethylene foam, with plywood and a finishing coating on top. Available in rolls 1 m wide and 10 m long. Thickness – 2, 3, 4, 5, 6 and 10 mm.
Advantages of cork:
- moisture resistant;
- resistant to fungi and mold;
- environmentally friendly;
- antistatic;
- Available in a wide range of shades.
Disadvantages of cork:
- subject to mechanical stress;
- burns out;
- flammable;
- difficult to dismantle;
- relatively high price.
To properly soundproof the floor and achieve maximum effect, soundproofing and sound-absorbing materials are combined.
Cork soundproofing underlays
Cork sound insulation
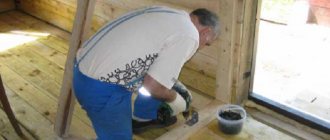
Cork covering can be made on an existing carpet or linoleum. But this can only be done if you have already leveled the surface. It is possible that only the baseboards will have to be dismantled. If you plan to install it on a concrete screed, the surface needs to be leveled and dried.
Next, a thin substrate is laid on the surface. Maintain a length between stripes of approximately 2 centimeters. Cork is a material that is not resistant to moisture, so you will need waterproofing. It must necessarily extend onto the walls to a height of approximately ten centimeters.
Point the side panels towards the light. Laying must be done from right to left. In this case, the ridge is directed towards the wall, and the groove - into the room.
So it is necessary to mount a whole row near the wall. Initially, make the calculation so that the finishing panel has a length of at least 20 centimeters.
Make sure that the joints do not touch each other during work. After soundproofing the floor has been completed, it is not recommended to place heavy objects on the floor. Cork underlayment is often placed under laminate flooring.
Options for soundproofing an apartment, taking into account the type of base
Soundproofing methods vary depending on the substrate. Soundproofing a concrete floor begins with laying soundproofing material. A layer of waterproofing is placed on top of it, after which the screed is poured. After it dries, the topcoat is laid and the baseboards are installed.
Soundproofing of a wooden floor is done using beams. Soundproofing material is laid on them, and logs are placed on top of it. Chipboard or boards are laid on top of the structure. A finishing coating is applied to them.
Video - an original solution to the problem of sound insulation
The presented video shows a very interesting way of performing floor soundproofing using modern material with pronounced anti-vibration properties “Shumoplast”. If it is possible to purchase, it is quite possible to do this work yourself.
When choosing sound insulation for a floor, you need to consider how much sound travels through the floors. The choice of material and its thickness will depend on this. In addition, you need to take into account the height of the ceilings in the apartment - if they are low, then you should choose a thin sound insulator.
What else you need to remember is that if you want to make a room as noiseless as possible, you need to install a sound insulator not only on the floors, but also on the walls, and even on the ceiling.
How to ensure sound insulation of a floor depending on the flooring material?
Laminate conducts all noise well, so it requires mandatory soundproofing before installation. Isoplat is used as a noise-insulating substrate. It is glued onto a pre-leveled rough screed. The direction of the flooring is at an angle of 45° to the laminate slabs.
To increase sound insulation before laying linoleum, use Vibrostek. Its canvases are laid close to each other and the seams are secured with tape. Linoleum is laid on top. In rooms with moderate load, such as a bedroom, linoleum can also be laid on Isoplat.
The tiles are placed directly on the screed, under which basalt or fiberglass 2-3 cm thick is laid. Together with the concrete screed, they provide sound insulation of up to 39 dB.
Wood conducts sound very well. To soundproof a wooden floor, “floating” technology is used. Additionally, a thin substrate, for example, Texound, can be laid under the topcoat.
When laying parquet:
- Foamed polyethylene is laid on the floor slab;
- a layer of soundproofing membrane is laid on it;
- plywood is attached on top;
- parquet is laid on it.
Expanded clay
Expanded clay is used both as the main component for dry screed and for soundproofing floors under wet or semi-dry screed. The difference lies in the size of expanded clay granules:
- If you use expanded clay for a dry screed, then its granules should be of different sizes, so you will ensure the highest strength of the finished leveling layer.
- To soundproof a wet screed, it is recommended to choose expanded clay of the same size. In this case, more voids will form between the “pebbles”, this will reduce the density of the substrate, but it will have higher sound insulation properties.
Important! When purchasing expanded clay, ask the seller for a certificate for it. There is a certain standard (GOST 9757-90) that regulates the production of this material.
Basic options for floor soundproofing and work sequence
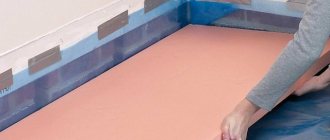
"Floating floor"
The floor is called “floating” because it is not fixed to the walls and floors, but rests on a soundproofing substrate under its own weight. To ensure high-quality sound insulation, soundproofing material is used as a separator over the entire surface of the screed. In such a substrate noise is dampened. Depending on the thickness of the noise-insulating material – from 4 to 20 mm – the “floating” floor reduces the impact noise level by 20-40 dB.
"Floating floor"
Sequence of work:
- If necessary, remove the old covering down to the floor slabs. If depressions and holes are found, seal them with a self-leveling mixture or cement-sand screed. The height of the layer is no more than 2 cm. The difference in height should not exceed 1 cm.
- Prime the surface.
- To prevent acoustic bridges, install temporary formwork made of plywood, thin boards or plasterboard along walls and partitions. Its height should be greater than the floating floor.
- Lay sound-absorbing material on the prepared base without cracks or gaps. To reduce waste, start laying from the corner. Glue the joints.
- Set up a self-supporting screed - cement-sand, expanded clay or dry: It is recommended to lay an oilcloth under the cement-sand screed, the edges of which are folded up and secured with tape to the formwork. Install beacons 1-1.5 cm high on it, and a reinforcing mesh on them. Lay guides made of metal profiles according to the level. Lay out the cement-sand mixture in a layer of at least 6 cm and level it. After drying, sand the surface.
- Instead of a concrete screed, you can use fine-grained expanded clay, this saves both time and money. Lay a sound-insulating material on the base of the floor - preferably hard, to avoid subsidence during operation, for example, membranes made of bituminous polymers or cork. Fill in expanded clay, compact and level it. Install chipboard or gypsum fiber boards on it with a gap of 1-2 cm. Check with a level. Glue the folds and secure them with self-tapping screws.
- To construct a dry screed, sheet materials are used - plywood, OSB boards, plasterboard or gypsum fiber sheets. They are laid in 2 layers. To avoid the appearance of acoustic bridges, the joints are shifted. The layers are glued together. If necessary, the surface is puttied and rubbed with waterproofing mastic.
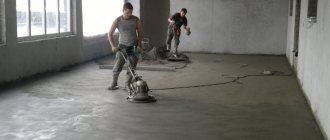
Cement strainer
Sound insulation using screeds is effective and reliable, while being heavy. Due to the large load on the supporting structures, this method is not always suitable. The drying time for this screed is 1 month.
For soundproofing apartments, cement grades 150 and 200 are used. The ratio of cement and sand in the mixture is:
- for grade 150 – cement 400 1 part, sand – 3 parts;
- for grade 200 - cement 300 and sand - in equal parts.
Sequence of work:
- Install the beacons according to the level.
- Pour the solution in one layer, moving from the far corner of the room to the exit. Working width – up to 2 meters. Align with the rule. Use the freshly prepared solution within 1-1.5 hours. It is advisable to complete the screed installation work within 1 day. Screeding can be done on different days only where there are differences in floor height. In these cases, a 1-2 cm seam is left between the sections of the screed.
- To prevent the screed from drying out quickly and cracking, cover it with plastic wrap for 3-7 days.
- After 3 days, remove the beacons, prime their recesses and fill them with cement-sand mortar.
- In order for the screed to ripen better, cover it with sand or sawdust for 7-10 days and spill it with water.
- Then remove the sand or sawdust and leave the screed to dry for ~4 weeks.
Dry screed
Dry screed does not require drying. Sequence of work for its arrangement:
- Dry backfill, for example, fine-grained expanded clay, is laid out on the floor along the beacons and leveled using the rule.
- To evenly distribute the load, plasterboard or chipboard is laid on top with gaps of 1-2 cm.
- They are leveled and fixed with self-tapping screws.
Dry screed
ZIPS-Paul
When there is no time to make a classic “floating floor”, you can use quickly prefabricated ZIPS floor systems. The technology allows you to install soundproofing of the floor covering in 1 day without wet work. The premises can be used the next day.
The system consists of Vector and Module sandwich panels with a thickness of 4.5 and 7.5 cm, respectively. The kit also includes acoustic triplex Sandline with a thickness of 1.7 cm and a compensating layer of plywood with a thickness of 1.8 cm. The total thickness of the system is 5-11 cm, excluding the thickness of the final coating. Impact noise reduction index – 32-38 dB.
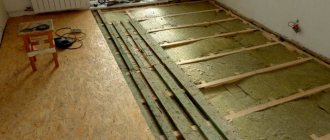
Wooden logs
A frame floor dampens vibration noise less well, but it isolates audio noise better and is more reliable. Procedure:
- Install rubber gaskets and logs with a cross section of 5*10 cm on the floor slabs. The distance between the logs is 30-40 cm.
- Place soundproofing material between the joists so that there is no empty space left.
- Lay boards or chipboard on top. Leave a 1 cm gap between the walls and the flooring.
- Apply the finishing coat.
The fastest and most cost-effective way to soundproof the floor in an apartment with your own hands is without a screed. To do this, a layer of noise-insulating material is laid on the floor slabs or self-leveling floor, and a finishing coating is placed on top. In this case, the effectiveness of sound insulation is reduced by 30-40%. An even simpler solution to the problem, but also even less effective, is to lay carpet on the floor.
Whatever floor soundproofing option you choose, it will not completely solve the problem of extraneous noise. To achieve a high-quality result, you need an integrated approach: you will also need to soundproof the walls and ceiling.
Mineral wool
This soundproofing material, the structure of which consists of randomly placed synthetic fibers, is available in two types:
- Glass wool. This product is made from waste from the glass industry. Glass wool has high sound insulation properties.
- Stone wool. This material is obtained by melting rocks, volcanic rocks and basalt. Stone wool has better thermal insulation characteristics, but in terms of sound insulation it is inferior to glass wool.
Although this material is light in weight and low in cost, it is worth noting that it increases the height of the screed. For apartment buildings, mineral wool is used very rarely, but for wooden houses such a sound insulator is more suitable.
Important! Any contact with glass wool causes this material to crumble. Fine dust from glass waste is very hazardous to human health, so be sure to protect your respiratory tract and skin.
Noises may vary
- mechanical (from steps, moving furniture, falling objects, etc.);
- caused by air vibrations (loud music, barking dogs or screams).
Of course, it will not be possible to completely reduce all noise to zero, but it is quite possible to reduce noise discomfort to a minimum. To do this, you will need good sound insulation in the apartment.
Equally important is proper thermal insulation of the room. It has been proven that heat loss in an ordinary multi-storey building can reach up to 40%. This is due to the fact that the materials traditionally used for construction are not able to retain heat. Thermal insulation in the house is designed to maintain a microclimate that is comfortable for humans. Firstly, it reduces heat loss from the inside, and secondly, it limits the flow of heat in the summer, which is necessary for the normal functioning of cooling electrical appliances.
It is noteworthy that for heat and sound insulation the same materials can often be used, which are conventionally divided into:
Such modern materials can be used for roofing, walls, floors or have a highly specialized purpose.
Briefly about the main thing
Regardless of what the floors in the house are made of and what design is chosen for the floor, it can be made much less noisy by using special materials and technologies for sound insulation. The optimal option is different in each case. If the height of the ceilings allows, you can lay thick slabs of mineral wool or expanded polystyrene under the screed or between the joists. In wet rooms, the screed is mounted on rolled materials, which simultaneously perform the function of waterproofing. If you don’t have the time or desire to carry out major renovations in an already inhabited house, you can get by with a laminate underlay or other floor covering.
Ratings 0
Installation of a floating floor with a monolithic concrete screed
| Fig.2. Floating floor design with monolithic concrete screed. |
1 - overlap; 2 - elastic sound insulation for a floating floor; 3 - mesh for screed reinforcement; 4 — monolithic screed; 5 - backing for laminate; 6 — final floor covering (laminate); 7 - plinth.
When choosing sound insulation, we are guided by the recommendations of this article and the manufacturer of the material.
Sound insulation is laid on the leveled floor. A moisture-proofing film is placed on the sound insulation layer to prevent moisture from leaking out of the freshly laid screed monolith. Polyethylene film with a thickness of at least 0.15 mm is used as moisture insulation. with overlapping film joints of at least 200 mm. The ends of the film are placed on the walls. Don't forget to lay edge tape around the perimeter of the walls.
To construct a monolithic screed, ready-made mixtures of different compositions are used, widely available on the construction market. Reinforcement is made with a ready-made wire mesh with a diameter of 4-5 mm. with cell size 100x100 mm or 150x150 mm. The protective layer of concrete at the bottom of the mesh must be at least 20 mm. The thickness of the screed layer is usually at least 50 mm.
Read: “How to properly make a floor screed with your own hands”
You should also take into account the recommendations of the soundproofing manufacturer, an example is given in this article above.