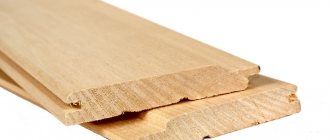
Throughout the history of mankind, there was a tree next to it, which man used to build housing and for its decoration. It has a unique texture, the pattern of which does not tire the eye. When the boards are placed horizontally, their lines make the room visually wider, and when placed vertically, they make the room taller. However, natural wood cladding may not always be an affordable option for a family's budget. As in other similar cases, imitation became a way out of the difficulty. Decorative plaster imitating wood indoors and also on the facade of a house can imitate wooden cladding of a large area or individual decorative panels. This is done in different ways.
Types and applications
Using decorative plaster, you can achieve various effects related to texture:
- tree bark,
- surfaces eaten away by woodworms,
- boards laid closely
- wooden panels,
- cross cut.
Textured wood-look plaster requires compositions that do not contain fibers or large inclusions. These are mostly smooth mixtures. Decorative plaster is made from mixtures with fine filler, looking like tree bark. The exception was structural bark beetle plaster with granules from 2 mm.
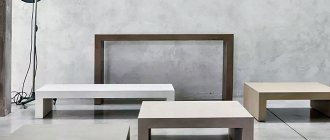
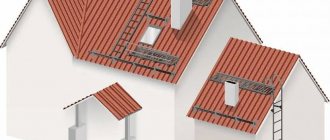
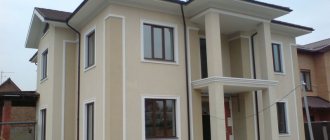
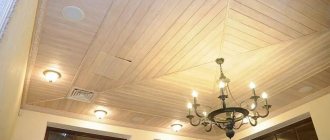
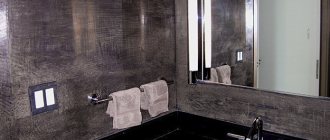
Wood-like plaster finishing is used in interiors in the form of wooden panels in the hallway, corridor or in other rooms. Such coverings look great on loggias and balconies, in the decoration of facades or small architectural forms (gazebos, walls, etc.), fences and even paths. Surfaces that imitate bark or wood cuts look advantageous in various interior styles.
Before working on the wall, practice on sheets of plasterboard, fiberboard or plywood.
The imitation wood made by professionals is very close in texture to natural wood. In fact, decorative wood-look plaster can be successfully done with your own hands and by those who are still new to the plaster business. It's all about the desire to learn, practice and the desire to achieve high quality.
Necessary tools (trowel, brushes, trowel, rubber rollers)
Plastering the surface is carried out in three stages:
- Leveling the wall.
- Applying a decorative layer.
- Creating a drawing.
Each process requires its own set of tools.
Surface preparation:
- containers for preparing cement mortar;
- hammer drill with mixer attachment;
- bucket for pouring mortar;
- rule for leveling the rough layer;
- a small spatula to remove residual mortar;
- trowel for finishing leveling.
Applying plaster:
- container for preparing decorative composition;
- construction mixer and hammer drill with attachment;
- wide spatula;
- smoothing iron;
- plastering and grouting trowel.
Creating patterns:
- plastic grater to create a “bark beetle” effect;
- rubber rollers with a pattern;
- ready-made stamps for imprinting a design.
Attention
The list of tools can be modified in accordance with the technology for laying a particular type of plaster.
What's so good about this finish?
The main advantages of this type of finishing (compared to natural wood) are lower cost and greater durability. Decorative plaster for wood:
- doesn't rot
- withstands temperature fluctuations,
- resistant to precipitation,
- does not burn,
- can be renewed by coloring,
- hides minor flaws,
- "breathes"
- environmentally friendly
Bath and banquet complex Dream
Address: Lipetsk st. Dovatora, 61a t: 39-64-63
Our complex includes: a sauna for up to 20 people and a Russian wood-burning bath for up to 6 people + 2 banquet halls for 25 and 60 seats
The cost of renting a sauna is from Monday to Friday until 17:00 - 600 RUB/hour, at other times - 800 RUB/hour. For companies of more than 7 people, an additional payment of 100 rubles per hour per guest.
The cost of renting a Russian bath is 100 rubles/hour per person, minimum 400 rubles/hour.
For sauna guests we offer:
- Luxurious steam room, temperature can be adjusted according to the client’s wishes
- Banquet hall for up to 20 people, equipped kitchen, at the request of guests we will set and serve the table, you can order foamy drinks
- TV with karaoke, Wi-Fi, billiards, massage chair, relaxation rooms, warm pool, heated floors, broom (oak) - 200 rubles, barbecue area.
Materials used and preparation for application
Compositions on various bases can be used as textured wood-look plaster: acrylic, mineral, silicone. These are mainly smooth mixtures or with fine-grained filler, for example, decorative plaster Marmorino tree bark. To obtain the bark beetle effect, structural compositions are used. Often, decorative plaster imitating wood is done by home owners with their own hands, and from materials made independently. For example, they can imitate wood even using ordinary putty.
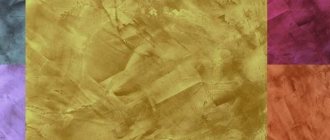
The work does not require colored mixtures, since the coatings, after completing the formation of the texture, are painted and protected with wax or varnish. As a result, decorative plaster is obtained to resemble valuable or aged wood, as needed in a particular interior.
Achieving an antique plaster effect has become increasingly popular lately.
This type of finishing can hide minor flaws and flaws in the base surface. However, in all other respects it requires the same preparation of the base as other types of coatings. Only in this case can a long, multi-year service life be achieved.
Prepared base:
- cleared of remnants of the previous finish,
- if necessary, leveled and repaired,
- removes stains and traces of grease,
- primed,
- dried thoroughly.
If the surface of the base does not hold the coating well (for example, paint or foam), be sure to install a reinforcing mesh.
How to make decorative plaster “like wood” with your own hands?
Simple technology for applying decorative plasters
allows you to make a wet facade with your own hands. To ensure a long service life of the decorative protective coating, carry out work at an air temperature of +5 to +30 ºС and a relative humidity of no more than 80%.
Before applying decorative plaster to the wall, carefully treat the base with an adhesive primer. It improves adhesion and reduces the absorbency of the base plaster layer. The primer is applied to the base with a wide brush. You can begin applying decorative plaster to the primed base layer no earlier than 3 hours after its treatment.
- Mix the plaster mixture with the required amount of water according to the instructions on the package. Mix the mixture thoroughly until the required consistency is obtained.
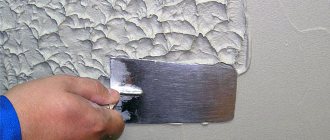
- Apply a thin layer of plaster to the base and form a comb structure using a 10-12 mm toothed trowel.
- Level the plaster with a smooth trowel so that the thickness of the plaster layer is approximately 4 mm.
Technology and application methods + video
Bark of tree
As an example of how decorative plaster with the effect of wood bark is made, let’s take a finish made from the least expensive materials.
- The working solution is prepared from gypsum plaster. The purchased dry mixture is diluted in water.
- The solution is applied to the prepared base using a trowel in an even layer of 2-3 mm.
- The initial relief is immediately applied with a roller moistened with water.
- When (after 20-30 minutes) the surface of the plaster dries a little and does not sag when pressed lightly, it is moistened with a spray bottle and the protrusions begin to be smoothed. This is done with a spatula so that after it passes between the smooth areas, ruts remain - deepening cracks in the bark. After each long smoothing movement of the spatula, wipe it with a damp cloth so that the lumps of solution remaining on it do not spoil the surface.
- The surfaces are allowed to dry completely (usually a day). After drying, small flaws that can be scratched are removed with a spatula.
Wax is usually used for the protective layer of decorative plasters. In this case, it can be replaced with non-woven glue mixed with water-soluble acrylic varnish. The glue is diluted, brought to readiness, and mixed with varnish in a ratio of 1:0.5. Then the selected color is added and after stirring, the “budget wax” can be used. It is applied with a trowel. With this application, all the depressions are filled and the surface is smoothed. Excess is removed with a damp sponge, and the surface is smoothed again with a trowel. This type of finish can be varied in various ways, for example, you can apply a little paint of a different tone with a sponge.
Technology for modeling wood texture on plaster
Before modeling the texture of wood on plaster, you need to wait half an hour until the surface of the mixture dries. You need to prepare your tools in advance, maybe a spatula, to display the pattern of natural wood on the relief.
After the plaster has dried, you need to apply the solution to the matrix in the ratio specified in the requirements for the mixture, and distribute the lubricant evenly over the surface of the wall. Carefully roll over the layer with a rubber roller to imprint the wood pattern. From time to time the matrix needs to be changed sides, this is done in order to create a realistic look of the wood pattern, thus the pattern does not repeat itself, but changes the structure.
After the façade plaster has dried, sharp edges are removed using paper. You need to thoroughly clean the surface from any imperfections and dust; this action is done before impregnating the colored solution, which will add volume to the pattern on the wall. The colored solution is applied only after three days, after all the plaster has dried. The mixture must be applied with a brush; painting occurs in a double layer with a break of a day between applications.
Coloring
Of course, creating texture is the most labor-intensive task in wood finishing. However, painting the plaster is the final stage of finishing. Therefore it must also be of high quality.
Before painting, a primer is applied to the surface with a brush along the wood lines, colored in the desired tone. The dye used is water-soluble.
The best way to convey the richness and depth of the natural color of wood is with translucent compounds, applying layer after layer of compounds of different shades. To obtain a budget coloring composition, you need to mix sequentially (with stirring after adding each next component) the following components:
- a little primer
- color scheme of the desired tone,
- white water-based paint,
- some dry wallpaper glue.
The mixture is applied with a brush, following along the fibers. Excess mixture is removed with a rubber spatula. After this base layer has dried, you can apply a composition with a different shade. The paint for subsequent layers is made without wallpaper glue and primer - only water-based emulsion with dye.
There are many options for coloring and coloring compositions. Here, as they say, dare and create. Just try it first on “experienced plots”.