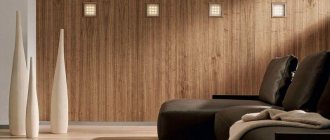
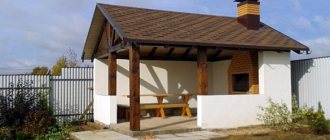
Currently, lining is one of the most popular finishing materials. It is used for finishing the facades of various buildings and structures. In some cases, the lining does not look very attractive. To give it a zest, so-called aging is used.
Lining can be used to cover walls, facades, ceilings, and loggias.
Aged lining looks much more interesting than ordinary coating. Many people do not know how to age lining. In fact, you can age the lining using several methods. All of them are actively used in practice. Of course, you can age the lining with your own hands, but not all methods can be used for this case. It is worth considering them in more detail.
Revealing wood texture using dyes
Revealing wood texture using dyes
The patterned shimmer of maple and birch wood, as well as other types of trees, will appear deeper and shine with beautiful shades if you choose this particular finishing method. Here's what you need to know to be successful in identifying wood grain.
Those of you who have been successfully using ready-made stains for many years will most likely be surprised: “Why do you need to use dyes? Who needs them? Just don't rush to conclusions. Compared to pigment stains, which are most often found on sale, dyes produce purer colors that better highlight the natural shine of wood. The difference will be more noticeable if you use dyes to tint dense wood that does not tolerate regular stain, or patterned wood, such as wavy maple. Stain will usually make the wood grain look a bit cloudy, while stain will add impressive depth and richness. These differences are clearly visible in the figure below.
Curly Maple Toning
Stains and dyes have different effects on the appearance of wood, as they color it in different ways. Pigment stain only partially penetrates the wood; the coloring effect is created by tiny pigment particles settling in the smallest cracks and pores. If the wood has a smooth and hard surface (for example, maple), then the pigment particles simply have nowhere to stay.
Gel stains, which have a thick consistency, form a film on the surface, but also do not penetrate deeply into the wood. They prevent stains but hide the grain pattern. In contrast, dyes, being completely dissolved, penetrate deep into the wood along with the solvent and change the color of wood cells (due to these properties, dyes are sometimes mistakenly called mordants). In this case, the surface becomes as if transparent. Some pigment stains add dye, but this combination still does not solve the problems inherent in dense wood.
Wood dyes: choosing options
Dyes are sold in liquid or powder form, and any dye can be dissolved in one or more solvents: water, denatured alcohol, or oil (toluene or turpentine). When starting to work with dyes for the first time, buy a water-soluble concentrate or powder, which is easy to use, has good penetrating properties and good resistance to fading.
Regardless of the tinting method, end grains always pose a problem because they absorb more dye or pigment, becoming darker than the surfaces formed by the longitudinal grains. For a more even color, try one of the two methods below. Before tinting, sand the end grain with a finer abrasive than the rest of the area, or prime it with a 50:50 mixture of shellac and denatured alcohol and, once dry, lightly sand with 220-grit sandpaper.
How to properly age lining
Currently, lining is one of the most popular finishing materials.
It is used for finishing the facades of various buildings and structures. In some cases, the lining does not look very attractive. To give it a zest, so-called aging is used. Lining can be used to cover walls, facades, ceilings, and loggias.
Aged lining looks much more interesting than ordinary coating. Many people do not know how to age lining.
In fact, you can age the lining using several methods. All of them are actively used in practice. Of course, you can age the lining with your own hands, but not all methods can be used for this case. It is worth considering them in more detail.
Applying dyes to wood
In most cases, we prefer to work this way with water-soluble dyes. When the project or its parts are ready for finishing, we sand the wood as usual and wipe it with a wet cloth to raise the so-called lint. Let it dry for 24 hours and then lightly sand with 320 grit sandpaper. By removing the lint, we prevent it from lifting after applying the coloring solution. Then we dilute the dye as shown in the photo.
Boil water, let it cool for a minute and add dye powder to obtain a concentration of 30 g/l. Let the solution cool to room temperature
Mix the solution thoroughly and strain it through a paper filter or nylon stocking to get rid of undissolved powder particles
Using glass or plastic dishes, prepare such an amount of solution so that it is enough for the entire job and you do not have to re-achieve the desired color by mixing a second portion. We check the result on scraps of the same wood from which the project parts are made. Using a regular sponge, apply an aqueous solution of dye to the wood, spreading it in any direction, trying to quickly cover the entire surface evenly to avoid the appearance of spots and streaks when covering already dried areas.
Omissions and drips should also be avoided. We process all sides of the finished product at once. To make it more convenient to work with relatively small objects, if possible, we divide a large project into several component parts or tint all the parts before assembly. After applying the solution to the entire surface, you should immediately wipe off the excess with a soft cloth.
Working with alcohol dyes
If you decide to use alcohol-soluble dyes, keep the following in mind:
- Dissolve them only in denatured ethyl alcohol. Do not use isopropyl alcohol. Do not heat this flammable solution.
- Apply the alcohol-based coloring solution by spraying to avoid streaking due to rapid evaporation of the alcohol. Use a compressor-assisted sprayer rather than an electric sprayer. To tint small items, you can use a hand sprayer with a rubber bulb.
- To tint pine wood, which is most prone to stains, it is recommended to mix an alcohol-based coloring solution with shellac and apply the toner to the surface by spraying. Dissolved shellac is not absorbed into the wood, but forms a thin film on its surface.
Correcting the result of wood tinting
If the color looks darker than planned, it is better to lighten it immediately. In some cases, when the result is too far from your expectations, it is possible to return to the starting point. Rinse off most of the dye with water, then remove the rest with regular household chlorine bleach. If you want to darken the wood, apply the same or a stronger color solution again.
Removing excess composition ensures uniform coloring. If you applied the solution with a sponge, wring it out and run it over the surface again.
You can use a wet cloth to lighten the surface even if the dye has already dried, but you will achieve the desired result faster if the wood is still damp
Once you have mastered the techniques of working with dyes and learned how to choose the right color, start experimenting with the color palette. Once the surface is dry, add a different color dye to create a mixture of two colors. For example, add red dye to make the base tone warmer, or blue dye to create a cool tone. If the color looks the way you wanted, dry the surface thoroughly. Dry wood will fade, but a clear varnish will return it to the brightness of color and beauty of the design, as they were when the dye was applied.
Any coating can be applied over the dye, but be careful if you decide to use a water-based solution. When applying water-based varnish with a brush over water-soluble dye, the latter may re-dissolve and mix with the varnish, making it cloudy. Aerosol application will help avoid this problem.
Source: remstd.ru
Artificial aging of wood
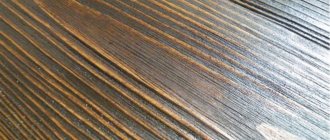
Aging of wood is a long and painstaking process consisting of mechanical processing of wood and work with paints and varnishes. Leon42 associates this method of finishing wood with naturalness, antiquity, and folk culture.
According to leon42 , buying furniture and brushing it with a metal brush does not make it old, but simply scratches it or, at best, creates a textured surface.
Furniture bought in a store - made of slats and “skinny” - is not suitable for texturing; it looks rather sad and defective.
Safety precautions
The work of brushing, although not particularly difficult, requires a lot of effort and time. For high-quality decorative processing, you will need to purchase expensive paints, stains and other products. Vapors from chemical solutions, the smell of paint and varnishes are especially harmful to our health - we should buy respirators, however, even during mechanical processing there are many points from which we must protect ourselves:
- Wear gloves, use a respirator and safety glasses;
- If work is carried out using electric machines, follow all safety requirements that protect against electric shock and damage from rotating mechanisms.
Tinted oil
We use black tinted teak oil. You need to apply it with a piece of cloth. Next, wait about a minute and wipe it off with a clean rag. Already at this stage we get a contrasting wood pattern. But we won't stop. Apply dark green wax to the surface. The result is a deep green tint. This method of finishing wood looks good in the interior. For example, I have a wall in my living room decorated in a similar way. Different shades appear in different lighting.
You can achieve the desired effect by alternating tinted oil and colored wax.
“Abrasion” of the surface of the door leaf
An antique door is created in several stages:
- It is necessary to paint the surface of the door leaf (the dye is applied evenly).
- Paraffin should be applied to individual areas of the product.
- Then you need to cover the door with another coat of paint (this time use light paint).
- Using a spatula, carefully remove the paraffin.
- Afterwards you need to sand the surface of the door leaf and cover the surface with stain.
Before installing such antique doors, you need to wait until they are completely dry.
Wax + paint
This method is very similar to the third option, but we will choose a light olive color - and we will not treat the fibers with wax before applying it. After the paint has dried, we’ll go over the workpiece with sandpaper, freeing the protruding fibers from the color. As a result, they will have less contrast. Next, we treat the surfaces with oil the color of larch wood. It has a reddish tint, which in combination with paint will give an interesting effect.
Feel free to overlay different colors and shades
Patination
To age interior doors made of solid maple or beech with your own hands, use the patination method. The first step is to select a paint that best matches the basic tone of the product. You need to paint the surface with this product (apply one layer). It is very important to do this work carefully: there should be no drips. Then the product is allowed to dry.
Next, wooden doors should be painted with a second coat of light-colored paint, for example, milky white. However, it is not recommended to use too bright paint, as it will reduce the “antique” effect. Then the product is left and waited until it dries.
Then take fine-grained sandpaper and sand the surface with it. As a result, the lower base will begin to appear through the top layer: it will seem as if this piece of furniture had to be painted more than once in the past, and it is already many years old.
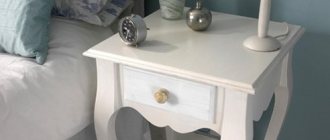
We imitate the structure of wood with acrylic
This master class will be of interest to anyone who has furniture that is of good quality, functional, but completely inappropriate for the interior of the room.
It is not always possible to remove the old varnish and re-coat the surface with a new one. Especially when it comes to repainting it in a lighter color. And yet, it happens that furniture does not have its own wood structure, that is, plastic, chipboard, metal.
We use a similar method when we paint refrigerators, imitating the structure and color of kitchen facades.
For work we will need the following materials:
- Dresser.
- Alkyd primer.
- Sandpaper.
- Acrylic paint for furniture.
- Water-based acrylic varnish.
- Brushes of different thicknesses and densities.
- Rollers.
Let's get to work!
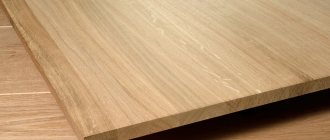
We had to repaint the chest of drawers to match the new furniture in the room. Furniture color “Bleached oak.” The photo below shows the armrest of the sofa.
The challenge was not only for the color to match, but also for the structure to be similar.
We begin work by removing all the handles, sanding the surface and carefully priming it.
After the primer has dried, we begin to cover it with acrylic paint.
We use paint of several shades, similar in tone and color, not completely mixed with each other. We immediately begin to apply the paint lengthwise with a roller, so that the edges of the roller form stripes-furrows.
Next, you need to use a brush with different bristles to enhance this effect.
Repeat scratching with a brush until the paint is completely dry.
We also use a brush to paint in different shades, achieving the effect of wood.
This is what we ended up with.
Next we started decorating: we lightly patinated the shelves. But if you wish, you can decorate it however you like.
The last stage is to cover everything with several layers of colorless acrylic varnish.
We violate the integrity of the layer: craquelure
There are special paints available to consumers with the effects of cracked or peeling paintwork on the surface.
Craquelure with contrasting colors
Using standard compositions, it is possible to create, on any type of structure made from a completely different material, the effect of a layer of paint that has been damaged by time.
The technology of artificially producing small and deep cracks through the use of craquelure varnish allows you to create an aging effect on the surface of any quality material. The main thing is to strictly follow the instructions for using the composition:
- the first layer of paint and varnish of any color is applied to a wood or any other surface as a base;
- the completely dried layer is covered with a finishing layer, that is, craquelure is applied.
The active components that craquelure varnish contains cover the base layer of paint and, after drying, cause the surface to crack. The aging effect of the coating looks like cracked old paint.
Craquelure in contrasting colors
Artistic decorative cracks will appear within just a few minutes. And now the antique doors are completely ready for use, oddly enough.
Vintage look of craquelure coating
There are other ways of aging wood that are similar to the craquelure effect. At the same time, there is no need to purchase craquelure varnish, which reduces the cost factor, because it is not so cheap. All methods can be reproduced with your own hands at home using practically available tools:
- PVA glue.
A fairly thick layer of PVA adhesive is applied to the surface of the door slab. Without allowing the glue to dry, we apply a second layer, but of acrylic paint. We do not leave the product to dry on its own, take a hair dryer (preferably a hair dryer), and carefully gradually dry the surface. As a result, the layer will behave under the influence of temperature, and the paint will crack, like craquelure.
- Silver and varnish.
Decorating Craquelure with silver on a contrasting base and a layer of varnish
The cleaned sash is covered with a layer of varnish, which is left to dry for just half an hour. After which the canvas is dried with a construction hairdryer. Under the sharp influence of elevated temperature, the varnish cracks. The resulting cracks are rubbed with silver. After all, the canvas must be left until completely dry, and varnished again to consolidate the effect.
- 9% vinegar.
Any fresh paint coating will crack when exposed to 9% vinegar. Of course, the sash should be laid strictly horizontally, and generously watered with table vinegar.
- Egg white or gelatin.
Decorative blackening of wood and craquelure on one canvas
These two products can also work on a fresh coat of paint in the Craquelure style. To do this, you will need soaked and brewed gelatin or egg white. The compositions are applied to the canvas with a wide brush. The layer of applied product must dry naturally. In order to consolidate the aging effect, the surface is coated with varnish.
Which color to choose as a base for a cracked surface is a purely personal matter and depends on the design of the home.
DIY methods for aging wood
Despite the variety of glossy facades, interior elements made of antique wood remain in demand. Purchasing such furniture will cost a pretty penny. If you don’t want to spend too much money, you shouldn’t give up the idea of having an aged chest of drawers or a table. You can try to age the furniture yourself. Let's try to figure out what technology is used to process antique wood with our own hands. After all, natural conditions age a tree for many years. And to get results quickly, you will have to age the wood artificially.
Construction portal No. 1
Life in concrete dungeons leaves its mark on character and mood, and that is why many city residents began to use a classic or vintage style when decorating their homes.
Such an interior involves the use of a large amount of wood, which in a sense brings a person closer to nature and makes the apartment lighter. Modern designers have learned to harmoniously combine wood and technology when creating an interior, but in some cases problems arise. We are talking about moments when it is not just wood that is used, but artificially aged wood , which is used in the design of a classic interior. To do this, the material is brushed or fired.
Nature forms a unique pattern on wood that is difficult to replicate with your own hands, but there are still options when even amateurs can age wood when making furniture or decorative elements.
Why do they age wood?
You won't find antique furniture in every home. It should be used where appropriate. The design of the room must be thought out in the appropriate style so that antique products look decent.
Typically, the procedure for aging wood is performed for a specific purpose, namely:
- Satisfy the taste of the inhabitants of the home.
- Save money on antique items. It is much cheaper to buy inexpensive furniture and age it artificially.
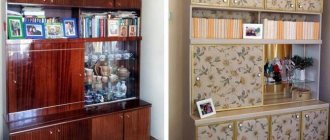
Using certain methods of aging wood, you can get exclusive things. Both the entire product and its individual parts are processed. Particular attention should be paid to such items as chests of drawers, sideboards, bookshelves, mirror frames. They are aged most often, since it is difficult to imagine a vintage-style interior without these items.
Aging methods
The process of processing antique wood with your own hands is done in several ways. The main ones are:
- Chemical treatment – used for hardwood.
- Firing or heat treatment is a universal option.
- Mechanical processing or brushing - this method can be used to process products made of oak or pine needles.
Furniture for aging is selected to be massive, with a rough texture, so that in appearance it resembles hand-made objects of past centuries. Before processing, it is better to disassemble the furniture into individual parts. This will make it possible to treat even hard-to-reach places.
To make it easier to achieve the effect of aging wood, it is better to purchase material that has already been damaged by the bug, with minor chips, cracks and knots.
If you are doing the process of aging wood yourself for the first time, then it is better to practice a little on separate unnecessary bars. The quality of the result depends on how well the solution, stain or varnish is applied. It is recommended to carry out work outdoors so as not to harm your own health.
How to make new boards or furniture look like old products? Now you know that several techniques are used for these purposes. Let's take a closer look at each of them.
Mechanical restoration
Wood can be aged mechanically in products made from species such as pine, spruce, and larch. It is these types of wood that have a pronounced texture, the presence of layers of fibers with varying degrees of hardness.
The main task during machining is the formation of various types of chips, potholes, and cracks artificially. This can be achieved by the following actions:
1. Wooden surfaces are processed using an ax or a special grinding machine. They are randomly marked with potholes of varying depths and widths. The block is hewn, but one should not strive for special accuracy and symmetry.
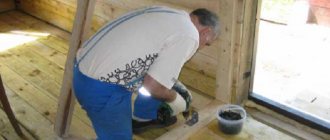
2. After this, we proceed to sanding the surface using a brush with metal bristles. It will be easier to do this with a grinder and an appropriate attachment. During processing, grinding is carried out along the grain until the caused potholes and chips take on the appearance of naturally formed defects in the wood.
3. Then we move on to the second degree of grinding. At this stage we use a brush with soft bristles and sandpaper. During this treatment, soft fibers are removed, leaving coarser ones. Thus, we get an uneven tree structure. Using the same method, you can additionally highlight knots and cracks.
4. At the next stage we work on the color of the wood. It is necessary to bring the light new wood as close as possible to the shade of the board that has darkened with age. Here you can use stain or dark acrylic-based paint.
5. When the applied product is completely dry, sand the surface with fine-grain sandpaper. At the same time, we try to perform all actions carefully. The paint should be removed from the hills and ridges, but it remains in the potholes.
6. At the final stage, cover the treated surface with colorless or light yellow varnish and dry completely.
On video: a method of mechanical aging of a wooden board.
As for the question of how to age wood on small items, such as small pieces of furniture or wooden dishes, here the process is a little simplified. The surface to be treated is thoroughly cleaned from wood dust with a brush until the desired effect is achieved. Subsequent painting and opening with varnish occurs identical to the previously described process.
Brushing should only be done by hand using a wire brush until small dents and ridges are reached.
Heat treatment
Wood can be aged by heat treatment. A special feature of this aging method is the complete absence of mechanical processes. The disadvantage is a certain danger to human health during work. Therefore, they should be performed in the fresh air, while protecting the skin, eyes and respiratory organs.
Heat treatment or firing is carried out by exposing the wood to direct fire. You should use either a torch or a blowtorch. It is necessary to burn to a depth of about 3 mm.
If heat treatment is carried out superficially, the aging effect will not be as pronounced as with stronger firing.
After finishing the heat treatment, perform the following steps:
- Using a metal brush or grinder with a bristle attachment, begin to scrape off the layer of soot to the desired degree of antiquity. There is no need to paint the surface. The soot will highlight the entire structure.
- Sanding is done with sandpaper.
- A finishing layer of transparent varnish is applied to aged wood.
Chemical method
You can age wood by chemical treatment using such means as alkaline compounds or ammonia. You can use household chemicals that contain alkaline components.
The essence of the process is that when the product gets on wood, it burns its soft tissues. The structure of wood is distinguished by the presence of hard and soft tissues. When processing antique wood, soft tissues are removed in various ways.
In this case, the surface layer of wood is burned with alkali, which simultaneously colors it gray.
The next step is the process of washing off alkaline residues. To do this, you can use vinegar or citric acid. A solution of citric acid is prepared in the following proportion: 1 teaspoon of acid per glass of water. If vinegar is used, it should be a 9% solution. Acetic acid should not be used. Next, the treated surfaces are well dried, sanded and varnished.
Aging wood using all the methods listed above is quite simple if you put in the effort and effort. You can give the desired effect to any surface. Can be aged like small household items, furniture or even wooden floors.
Chemical brushing
We know about brushing as one of the artificial methods of aging wood from one of our previous publications.
Chemically structured wood
At the same time, the mechanical method of brushing was previously considered. Now it’s time to get acquainted with chemical brushing, since today our time is devoted to chemical methods using exclusively paint and varnish compositions for aging solid wood.
The mechanical brushing method involves the use of physical force, or the purchase of a specialized machine. Our goal is to ultimately obtain a structured surface of aged solid wood. Solid pine is perfect for such purposes. So the chemical brushing method requires:
Acids for chemical brushing
- caustic alkali;
- acid;
- ammonia;
- protective mask for working with acids;
- special gloves, glasses and clothing;
- a work area remote from living quarters, with a good exhaust system.
The chemical brushing process itself is simple:
- the wood of the canvas can be cleaned and sanded;
- the horizontally laid sash is generously treated with caustic compounds;
- soft layers of wood soften under the influence of caustic acids, and therefore lend themselves well to processing with a coarse brush.
As you can see, the process is quite simple, but it also requires some physical effort, such as using a wire brush. But the very identification of a clear tree structure is much faster and more efficient.
Brushed wood using chemical compounds
The final finishing of the structure is done in the form of paint and varnish coatings, which will emphasize the texture and protect the array from the negative effects of the environment.