Natural wood lining is again gaining popularity; it can be seen not only in country houses and on balconies, but also in the interior of kitchens, bedrooms and living rooms of city apartments. And this is not surprising, because its advantages over other finishing materials are obvious and undeniable. It is durable, helps retain heat, and maintain an optimal level of humidity in the room. And everything has been said a long time ago about the aesthetic properties of the lining and the incomparable woody smell. However, wood requires special care, which includes processing and coating with various compounds. In addition, painting the lining solves the problem of a boring color or an undesirable association for someone with a sauna or a summer house and allows you to change the style of the interior without giving up this excellent natural material.
How and why is the lining painted?
The lining may need painting, varnishing or other compositions for several reasons, which determine the choice of a specific product:
- A tree needs protection, which can be different. For example, for lining on a balcony, you need to think about enhanced protection against UV rays, which cause photoaging (greying of wood). Some compositions make the lining more fire and moisture resistant and protect against pests.
Pine is often used as a material for interior decoration. If left untreated, the wood may darken over time.
- You need to preserve the color of the wood and make the design more expressive.
- It is necessary to change the color of the lining, but at the same time maintain the structure of the wood.
- The interior of the room does not involve the use of natural wood color.
The following products can be used to paint or otherwise process the lining:
- Protective compounds. Can be intended for different purposes. To treat lining on a balcony, especially one located on the sunny side, it is better to use a composition for external work. For the ceiling and walls indoors, a product for interior work is suitable.
Important! When choosing a protective product, carefully study the information on the packaging. Some compounds paint the wood pink and green, which can only be painted over with a very dark tint or opaque paint.
- Stains (compositions for tinting). They give the lining a certain shade, preserving the wood texture. By applying different numbers of layers, you can adjust the intensity of the coloring.
- Lucky. For lining, aqualacs are best suited - water-based compositions that allow you to maintain the vapor permeability of the material and protect the surface from absorbing contaminants. Varnishes can be glossy, matte, semi-matte, contain bactericidal additives and UV filters, and you can add color to them to change the shade of wood.
- Paints. They can have a wide variety of compositions and are designed to completely paint over wood by creating a dense film on the surface.
- Wax compounds. They can be solid, liquid, water-based, provide excellent protection, and retain the distinct structure of the tree.
Important! In order for the wax to spread evenly, the surface of the lining must first be primed.
- Special oils. They can be transparent and pigmented, protect the wood from dirt and abrasion, and emphasize the structure of the wood. They do not create a film on the surface, like varnishes, but penetrate into the top layer of wood. Creates a matte finish or silky shine effect.
Depending on the purpose of application, these products can be used either independently or in combination with each other. For example, impregnation and paint can be used to protect and achieve a uniform painted surface.
How to paint lining inside a house: ideas
Painting techniques and methods are great, but how? Just. There are many interesting options. The designers' latest finds are a clapboard wall in a room with smooth walls. It looks creative and interesting. And most often such a wall is made using the brushing technique.
An interesting effect is achieved by combining fittings of different thicknesses - in the photo, thin ones are inserted between wide boards. Moreover, they are painted in different shades of the same color. The combination turns out interesting and fresh.
Lining is not necessarily just a flat board with small grooves on one side, which is also called eurolining. There are different profiles, including those with waves and troughs. From them you can assemble interesting walls, the relief of which is emphasized by painting.
You can assemble interesting reliefs from linings of different profiles. To make it look more interesting, highlight the reliefs or whiten them
As usual, in the interior, a lot depends on the light. Several non-standardly designed lamps - long translucent strips behind which lamps are hidden, installed in the middle of the ceiling - and the interior is completely transformed. This design can be used to decorate rooms for young people, creative rooms, etc.
You can play not only with light, but also with color: in the lighting zone, paint the lining in a lighter color, thus emphasizing this zone.
If you have good drawing skills, you can paint the lining. Just don’t forget to then cover the entire painting with colorless oil or varnish to preserve it longer. This technique can be used when
Rigidly defined clapboard panels look great in the living room and hallway. In the same vein, you can decorate the wall in the dining area in the kitchen. Only its quality and coloring must be perfect.
The honey shade of the lining is repeated on the ceiling
Treatment for a rustic-style interior can be deliberately imperfect. These are rooms with a masculine character.
The rustic style will appeal to men. In this case, painting the lining using the brushing technique is the norm. Moreover, the colors are chosen dark
As if in contrast - light walls. The lining is whitewashed and the beams are painted dark. Despite the traditional materials used for centuries, the look of such a room is modern and stylish.
An excellent combination is light walls with the effect of bleached oak and dark massive beams. It's practically a win-win option.
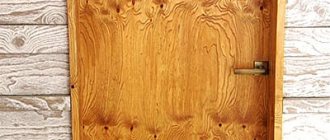
Lining is also used in the decoration of bathrooms. Impregnation here needs to be given maximum attention, but if it is done at the proper level, impregnation is protected from moisture, then there should be no problems. And the interior, you see, is very interesting - warm wood tones combined with bright marble are a great move.
Lining is also used for. You just need to fill it horizontally - this way you can expand the small space. And light colors look better in such a small area, maybe with a dark edging.
Ceiling - lining, painted with light stain
All photos from the article
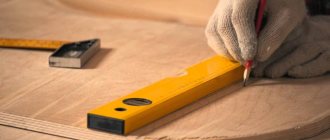
At first glance, it may seem that there is nothing special about painting wood; buy paint, brushes and off you go. But in reality, such work involves many subtleties, without which there is no need to count on quality. Moreover, if the question is how to paint wood to look like bleached oak, cherry or exotic varieties, then there is no way to do it without following technology. These subtleties will be discussed further.
In general, all wood painting jobs are similar. It is not so important here whether the doors, furniture or floors are finished; the algorithm for performing the work, if it differs at all, will be insignificant.
One of the most important points is the competent selection of paints and varnishes. This is followed by careful preparation of the base. And only at the end do you paint the wood yourself. Next, about everything in order.
Choosing paint
If we are talking about painting directly, you will need paint for the lining of one of the following types:
- Oil paint. Penetrates deeply, protects from external influences, and is suitable for painting lining on the balcony. Disadvantages: takes a long time to dry, fades over time.
- Alkyd enamel. A universal paint that creates a dense, most often glossy coating that is resistant to external influences and durable. The disadvantage is the limited selection of shades.
- Acrylic water-based paint. Used more often than others, it creates a matte, translucent coating. When applied in a thin layer, it allows you to preserve the structure of the wood.
Subtleties of choosing a composition
- Before answering the question of how to properly paint wood, any specialist will first ask what the final result you want to get at the finish. The type of coating composition largely depends on this. Without going into professional difficulties, let's say that there are glossy and matte surfaces.
Advice: if you are not in the mood for complex multi-stage technology, then it is better to immediately abandon glossy surfaces. You can make a high-quality glossy finish with your own hands at home, but instructions will require time and serious labor.
- Radical color change coatings are typically used on older, severely damaged wood. Or in the case when the style direction in the interior requires it.
- If you want to preserve the natural beauty of the solid wood, then the wood is painted with transparent and translucent varnishes or enamels. Here, in addition to applying the finishing layer, wood treatment is necessarily used before painting with various types of primers and impregnations. It is at this stage that the solid wood is tinted to resemble bleached oak or other elite types of wood.
- Pay attention to the packaging of the composition; there will definitely be recommendations for use. So there are paints and varnishes for furniture, parquet, as well as for exterior and interior work. If you cover a stool or table with urethane-alkyd (yacht) varnish, they will not become stronger, but removing such varnish will be problematic, plus its price is serious.
- The most popular materials for processing furniture, doors, window sills and other similar products are now acrylic paints and varnishes. The basis here is acrylic resins, harmless to humans, dissolved in a water-dispersed emulsion. Most brands have an antiseptic effect; the line includes compositions with fire retardants (fire protection).
- If we are talking about parquet or products that will be in a humid environment, for example, entrance doors, as well as bath and bathroom furniture, then you should pay attention to polyurethane or alkyd varnishes and paints. They have good resistance to moisture, in addition, polyurethane parquet varnish has enviable wear resistance.
- Nitro enamels adhere well to the surface and dry within an hour, but you shouldn’t count on serious durability here. Plus, these compounds are made with toxic solvents that have a strong, unpleasant odor. Therefore, it is recommended to carry out all work in well-ventilated, preferably non-residential premises, or better yet, on the street.
- Painting wood with oil-based compounds was popular in the past. Nowadays you can still find oil-based ones in residential areas. As for paints specifically, they dry for quite a long time and last no more than 3 – 5 years. Therefore, they are most often used to paint utility and utility rooms.
Important: if you have already decided on the coloring composition, then it is better to immediately buy a suitable primer for it. Moreover, the primer or impregnation should be taken from the same manufacturer as the paint itself, so there is less chance of rejection.
Products made from bleached wood look original and noble; they will organically fit into a harsh rustic interior, or decorate an elegant room in. However, such furniture is rarely found on sale, and its quality often does not correspond to the high price.
Meanwhile, there is a simple and easy way to whiten pine with your own hands, which anyone can use. Unlike the traditional method, you won't have to wait several years for wind and fresh air to transform ordinary boards into a sophisticated material.
All you need is regular pine boards and paint, as well as a little effort and patience. In the master class offered below, we will show how you can decorate it with bleached pine, using the example of decorating a hanging cabinet designed for storing small items.
Choosing the color of the lining
We found out how to paint the lining; it’s time to decide on the shade of paint. Many of the shortcomings of the room can be advantageously turned in the other direction if you “play with color” a little. Need to expand your space? Choose paint in white or light beige shades. But remember that they are susceptible to rapid contamination. A dark tone, on the contrary, will visually reduce the size of the room.
You cannot make the ceiling, walls and floor contrasting in color. It is best to leave natural wood in the bedroom, and choose paint in subdued tones to decorate the office.
Secrets of decorative wood staining: techniques and tricks
City dwellers want to preserve the natural color of wood as much as possible. For those for whom wood in the house is a boring everyday thing, paint the interior lining in some unusual color. Modern paintwork materials allow you to achieve different effects. For example, textured or brushed lining, but in two colors. This technique is often used.
Brushed lining in two colors is an excellent choice for decorating walls
The trick is to apply two layers of different colors. The first layer is a dark color, the second is a light or brighter color. After playing with colors and the order of their application, you can create your own version. Watch the video - how to get lining brushed in two colors.
Painting in two colors may not be the same. You can make the recesses a darker color, and only slightly tint the face (front part) or do everything exactly the opposite. The result is a striped wall made of clapboard - the effect of a slatted wall.
We paint the lining according to all the rules
Painting lining involves a certain sequence of actions that must be followed.
- Cleaning from dirt and dust.
- Surface grinding.
- Application of antiseptic and primer.
- Coating the lining with paint or other selected composition.
Ideally, the lining should be painted before installing it on the wall, painting each board separately; it is extremely difficult to properly apply paint on a ceiling or walls already covered with lining. Painting the finished surface is allowed only when the paint is renewed.
Let's start tinting
There are several ways to tint. Paint by hand, spray or dip. The most common method that can be successfully used at home is painting with a brush. So, the old wooden bedside table is ready for its color transformation. And this is what she has to do:
- Cleaning and sanding
. Before painting, it is important to level the surface and make the wood structure as smooth as possible. An ordinary sandpaper will help with this. - Applying stain
. Using a roller or brush, spread the paint evenly over the wood along the grain. And to remove excess, simply rub the stain with a dry cloth or swab. - Paint drying
. This stage is extremely important. It is better to be patient and wait until the layer dries thoroughly. Only in this case can you evaluate the final result of the work and the resulting shade. If it is not saturated enough, you can apply the stain again. - Varnish coating
. This completion of tinting prolongs the wear resistance of the colored wood product.
DIY wood tinting
– the process is quite labor-intensive. However, if you love creativity and are not afraid to try new things, then this type of work will certainly bring maximum pleasure. And bright wooden interior items will delight you every day!
Preparing lining for painting
If the lining is painted for the first time, the front side of the individual planks is sanded until smooth using a sanding machine or sandpaper mounted on a block.
In the event that already painted lining on a wall or ceiling is to be varnished or painted, the sequence of actions will be as follows:
- Using a scraper or brush, remove dust and remnants of old paint, and use sandpaper to make circular movements to completely clean the surface. If the varnish or paint holds firmly, you should wash the lining with a soda solution (take 300 grams of powder per bucket of hot water). There are special chemicals available to remove mold.
- If the dirt cannot be washed off, you can use bleach or stain. To ensure that paint or antiseptic sticks to the surface better, we treat the ceiling, floor or walls with detergents that contain alkali.
- We sand the wood. In order not to miss a single section, mentally divide the wall, ceiling or floor into several squares and rub them sequentially. You can’t press hard and grind one piece for a long time.
- It is not necessary to treat with a primer antiseptic, but it will increase the durability of the lining.
- All irregularities are covered with a special putty.
It is better to take a spatula made of plastic; unlike metal analogues, it does not leave scratches on the surface.
- We apply a layer of drying oil, which will perform a protective function.
- Finally, a primer is applied. It will protect the lining from temperature changes (if we are talking about an unheated balcony) and will fix the already applied putty, in addition, it allows you to achieve a more uniform distribution of paint.
We paint according to all the rules
After finishing the surface preparation, it's time to figure out how to paint the lining.
- Depending on the area, you can use either a brush or a roller.
- Painting lining with paint or a pigmented product involves applying the composition in small portions. You can only wet the brush generously when using transparent impregnations and primers.
It is important to mix the paint thoroughly both before and during painting so that the color applies evenly.
- Movements should be made along the boards, applying the composition with strokes, and then rubbing and shading until a uniform coating is obtained.
- It is better to apply several thin layers than one thick one.
- When working with opaque paint or varnish, after the first layer has dried, you need to sand the surface again.
- Do not start painting a second time when the first coat has not yet dried.
Dyeing process
Painting wood with your own hands is not a difficult task, but in order to achieve a high-quality result at the finish, the instructions must be strictly followed. As already mentioned, the general algorithm for such work is similar. Therefore, as an example, we will talk about how to paint a wooden table.
White bedside table.
Preparing the base
Painting furniture, like any other product, is best done disassembled, of course, if possible. All trims, handles, locks, metal or plastic parts, and stained glass must be removed or covered with masking tape and foil.
Working with a construction hairdryer.
Next you need to remove the old coating. We immediately reject the use of chemical reagents; wood is a hygroscopic material and, having absorbed the chemistry of solvents, such furniture will become harmful to health. If you have a hair dryer, then heating the surface with it and using a metal spatula can quickly and easily remove the old paint. You can take a blowtorch, but it will leave scorch marks.
Those who do not have a hairdryer can use sandpaper, although it is time-consuming and difficult. It is much faster and more convenient to take a relatively inexpensive attachment for a drill or grinder, made in the form of a metal brush.
The principle is shown in the photo. In this way, the old coating can be removed quickly enough, but there will be a lot of dust. And be careful with the veneer, it is easy to wear out.
When the old coating is removed, the surface needs to be leveled. Experienced craftsmen recommend using a grinder or regular sandpaper with a number of 180 or more, stretched over a block.
Advice: all work of this kind involves the need to periodically remove dust. So, for this it is better to use a vacuum cleaner, dry rags or brush. After sanding, the pores of the array open and with a damp swab, you will simply clog them with fine dust.
Do-it-yourself sanding.
Painting while preserving the structure
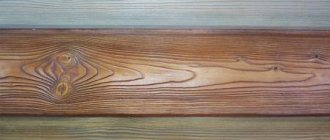
How to paint the lining to change the color but maintain a pronounced wood grain? You can use the brushing technique, which in this case involves processing the lining in several stages:
- First, pigmented oil, wax or glaze is applied to the surface.
- Then the selected varnish or paint for the lining is taken in a small amount, applied along the entire length of the board and gently shaded.
- After 10 minutes, use a soft, lint-free cloth to remove most of the oil.
The result of such manipulations will be a bright and expressive wood pattern, emphasized by the pigment remaining in the grooves and recesses. This method is great when using lining in different interiors: country, Provence and many others.
#1: Painting with a rag
Many types of wood that are sold in hardware stores are already sanded and have a smooth surface (for example, boards or sheets of plywood
), but there are also untreated boards.
This whitewashing method is suitable for both smooth and unsanded wood.
. It creates a neat and refreshing look, great for modern, farmhouse or Scandinavian style.
White paint makes the wood more refined, while leaving the opportunity to see the structure of the boards and their natural pattern.
How to do:
- First, dilute the white paint
with a special solvent. - After this, dip a rag into the resulting paint mixture and wipe it over the wooden surface, making an even layer.
Apply 1-2 more coats of paint if you want the color to look deeper white. Let the paint dry after each new coat.
Of course, you can use a brush, but it leaves strokes, while a rag makes the surface perfectly smooth.
Bleached oak effect
The lining painted white looks very stylish and modern. If white wood is used in a Scandinavian or rustic interior, it is advisable to create not a dense, impenetrable coating when painting, but to preserve the structure of the wood, achieving the effect of bleached oak. This can be done using different means:
- Tints (stains) with the appropriate name - “bleached oak”, “frost”, etc. To create the desired effect, the product is applied in several layers, each of which must be very thin.
- Oils with wax of the required color. Can be applied in two layers to obtain a virtually opaque finish, or in one layer, which is subsequently wiped down with a cloth to obtain a distinct wood grain pattern.
Now you know how to paint the lining and how to process it correctly. On the one hand, this process is quite labor-intensive, on the other hand, it is exciting and enjoyable.
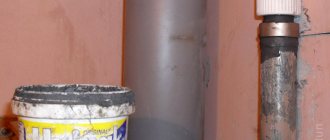
Good evening! Tell me how to competently solve the situation? The loggia was covered with clapboard 2 years ago, primed and treated with colorless stain in 2 layers. Now the color is like this (I attach a photo). How to make the color of bleached oak, is it possible? Thank you very much for the answer!
Dennis Denny
After you have stripped everything back down to bare wood, take white paint and dilute it 3-4 times until it shows through when applied. For reliability, the top can be secured with colorless acrylic varnish.
- Likes: 1
- Save
Dennis Denny
But even then, you will end up with something like a milky tint. If you want it just like in the photo, you need to experiment with light gray paint.
- Like
- Save
Furniture
Luxurious and noble color bleached oak furniture looks miniature. It has many advantages, among them:
- Looks great in darkened rooms.
- Suitable for small spaces.
- Makes the room brighter and more spacious.
- Fits into almost any interior style.
- No dust is visible on it.
When giving preference to light-colored furniture, pay attention to the design elements; they should not be in the same color palette, otherwise the room will not be cozy and comfortable. Don't forget the temperature of the combinations. If the shade of the wallpaper is in cold colors, then the furniture should be cold in color.
Furniture in bleached oak color is suitable for various interior items.
- Cabinets . This piece of furniture in bleached oak shade is a classic option for the interior. It’s easy to choose other furniture, colors for decoration, and decorative elements to match it. The wardrobe will decorate even the most modest room.
- Tables. Computer tables and dining tables are produced in this shade. They will fit perfectly into the interior, complement it, and add special charm and sophistication.
- Dressers. This piece of furniture, made in bleached oak color, goes with almost any style. The chest of drawers will decorate the living room and hallway, bedroom, country house or cottage. Its colors will create a coziness, a homely environment in which it is pleasant to be and relax.
- Beds. A neutral and calm shade of furniture will harmonize perfectly with the darker colors of the room. The palette of bleached oak shades for the bed has a beneficial effect on sleep and relaxation. Choose textiles in rich colors to emphasize the nobility of the furniture, its luxury and unusualness. Give preference to gray tones, beige, light green, as well as lilac, coffee and blue.
If you want to create a cozy atmosphere in your home, modern and laconic, choose furniture in the shade of bleached oak. It will be an excellent basis for any design ideas. Light colors give creative inspiration and the opportunity to realize fantasies. The shade is easy to combine with different wallpapers, floors, decorative elements, and accessories. The main thing is to choose and arrange everything correctly.
Related discussions
Black ceiling - to do or not?
I really need advice on choosing furniture colors!
Need advice from designers who love working with wood
sapienti
Here a very similar option is described, albeit in English and with local materials, but Google will translate, and I think analogues can be found here too:
And here’s another technology (similar to what Dennis described):
- Like
- Save
Tatyana Tatyana
What kind of stain was it, water based? If yes, you can try Tikkuril paint, they have wood paint for exterior use, I won’t tell you the name, you need to consult with the sellers. The paint leaves the wood texture visible without covering it up. The covering one is called Vinha, there are very beautiful shades. Can I use it?
- Like
- Save
Details: stain colors for wood (photo examples)
Wood painted white looks very simple, stylish, and cozy at the same time. This type of painting while preserving the wood texture has become one of the most popular interior and exterior styles!
In this article we will look at 3 simple methods of painting wood with worn or aged effects.
, as well as beautiful and inspiring examples of floors, walls, doors and furniture painted with them.
Traditionally, whitewashing was used as a cheap and easy way to protect wood (lime has antibacterial properties) and give it a neat appearance. Now, when we recreate a whitewash, it is usually done using any water-based or acrylic-based white paint for interior or exterior work.
(this is exactly what we will do in the methods described here).
Water-based or acrylic paints without odor!! and can be used indoors
Preparatory work
Painting doors to look like bleached oak is not difficult. Before you begin such operations, you should stock up on several tools and materials:
- primer. Experts recommend selecting only special compounds that are suitable for the door material;
- varnish and white enamel. Buy only high-quality products that will be easy to apply and have the desired tone;
- sandpaper and brushes. Here it is better to use products that will not shed lint. Paper is needed to brush the surface of the door.
Please note that the structure of oak can be imitated on almost any surface. Here it is only important to choose the right tones of paints and varnishes.
Photo combinations in the interior
We offer several photographs of the combination of bleached oak furniture in the interior.
The video contains a selection of photos of bleached oak in the interior of various rooms.
Application technology
Doors can be painted either manually or using a spray gun. This process can be described in the following sequential steps:
- Preparation. The door leaf is thoroughly washed beforehand. This is to remove any grease or oil stains. Do not leave large pieces of dirt on the surface. If the doors have been painted previously, then it is advisable to completely remove the old layer of paint. To speed up this process, you can heat it with a hairdryer.
- Primer. When the canvas dries, it is coated with special solutions. They help strengthen the wood structure. Experts recommend using deep penetration formulations.
- Treatment. Many experts recommend going over the top layer of doors with a wire brush. This will allow you to give the desired texture, making the surface more attractive and natural.
- Application of the solution. The first coat of paint should be thin. It is important to let it dry. To create a more attractive effect, you can use a mixture of varnish and enamel. When the composition has dried, apply the paint with a brush. It is important to move only in one direction in order to create parallel strokes. After they dry, they are treated with sandpaper, giving the desired texture. Then the whole thing is covered with a layer of protective varnish.
Painting doors to look like bleached oak requires some experience. Therefore, before carrying out such operations, you should practice a little.
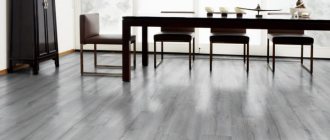
Laminate
The shade of bleached oak in flooring is in high demand among buyers. Color is especially relevant in the production of laminate and parquet boards.
Some people are afraid to install bleached oak laminate flooring because it is not practical to maintain. But this is a misconception. The floor covering is covered with a special protective layer, so traces of dust are invisible on it, and dirt is easily washed off. Laminate has excellent quality and aesthetic features. It is used for apartments, staircases, placed on verandas, as well as on open terraces.
A bleached oak floor with a ceiling of a similar color scheme will look great. Laminate flooring is also combined with furniture in contrasting tones of ash, mahogany and larch. If the interior uses mainly only white tones, dilute the atmosphere with stylish accessories in rich and bright colors.
Why you should focus on this material: main qualities
Oak has a high density (700 kg per m3), so it is less prone to cracking over time and warping when drying. When deciding to furnish a room with products made from this wood, it is worth considering its advantages:
- strength and durability (rated 3.9 Brinell units), the piece of furniture will last for several decades;
- cleanliness, the wooden surface repels dirt, dust is hardly noticeable against a light background;
- environmental friendliness, wood does not emit toxins, and no harmful substances are used during bleaching;
- breathability, coatings made from it allow air to pass through well, which prevents mold from appearing;
- thermoregulation, natural wood maintains a comfortable temperature in the room, so the room is warm in winter and not hot in summer.
In addition, the material does not rot, increasing the life of furniture, flooring or panels. And after impregnation with a special composition during manufacturing, it has antiseptic properties: pathogenic bacteria do not multiply on the surface.
Color palette
To get the whitening effect on a natural oak board, it is specially treated. First, soft fibers are removed from the surface of the board using brushes. The resulting recesses are filled with a light compound to whiten and emphasize the natural grain of the wood, and the board is coated with a transparent protective varnish on top. Of course, the modern market offers not only natural solid wood of this shade; eco-veneer, laminate boards, and MDF and laminated chipboards coated in bleached oak color are now widespread. But the palette even within this shade can be quite wide. These can be warmer - yellowish or bright beige shades, and cooler, silvery colors with the effect of aged wood.
Advantages of oil-based stains and wax and acrylic stains
Oil-based stain comes in a wide range of colors and shades. It costs more than water sprays, but it also has more useful properties. This preparation can be used not only to change the color of the product, but also to emphasize its texture.
Treating wood with oil-based stain is easy and convenient; it is applied in a thin layer and does not lift the fibers of the product. Also, this tinting does not fade under the influence of sunlight, makes the wood resistant to temperature changes and protects it from moisture. Oil stains can be removed using white spirit solvent; it can also lighten painted wood a little. It differs from compositions with similar properties in that it does not require varnish to secure it. The disadvantages of staining with oil include: long drying of the tint and its toxicity.
Oil-based stain can be applied using a regular brush.
It is very important to find a stain from a responsible and conscientious manufacturer. Judging by the reviews, the most popular companies are Vartan, Latek, Novbytkhim and Herlak.
Acrylic and wax stains are very easy to apply; they apply in a uniform layer and do not leave stains or streaks. However, due to the rapid drying of such stains, you need to work with them very quickly.
Wax stain is used to protect wood from moisture. It can be used to treat parquet. This stain is not resistant to mechanical damage, so to extend its service life, it is better to use varnish.
Acrylic, also known as rustic, stain perfectly emphasizes the texture of wood. With its help you can get a variety of shades, which is why this drug is so popular. Wood painted with such stain will still need to be opened with several layers of varnish.
How to make your own stain
It is not necessary to buy ready-made stain. By mixing dyes such as coffee, a few drops of iodine or black bark shavings, and some chemical elements, it can be made at home. Homemade stain is not only effective, it is also natural.
A few tips on how to make your own stain:
- Boil a glass of larch bark in a glass of water. The resulting product can be used to coat birch products; it will give them a beautiful reddish tint.
- Grind the dried walnut shells into powder and boil for ten minutes. The resulting decoction must be mixed with soda. Apply the solution to light-colored wood and it will turn brown. If you want to change the color of the product, you can treat it with vinegar or potassium bichromate. In the first case, the shade will be gray, and in the second, red.
- Brewed tea or coffee can give the wood different shades. The intensity of the colors depends on the strength of the brew.
- Using a solution of potassium permanganate you will paint the product cherry color.
- A red tint can be achieved by soaking rusty nails in vinegar for several days. Black stain is obtained by adding a decoction of oak or walnut leaves to a vinegar solution.
To properly make stain with your own hands, you need to first watch the instructional video
They make their own stains quite often. They turn out to be environmentally friendly and harmless. Unfortunately, they all tend to fade, so to preserve the color of the product, you need to apply a layer of varnish over the stain.
How can Romatti radically change the interior of your apartment?
If you need to transform your living space to make it cozy and comfortable, cooperate with us. Our specialists will be able to develop any project drawings according to the footage of the room, lighting, and layout features. We will bring your wildest ideas to life and provide a free consultation with a designer. You can count on:
- a range of services, from the surveyor’s visit to showing the finished design project to the client;
- the ability to edit projects, when you can redo the original version of the sketch;
- selection of a repair team that will perform all finishing work;
- assistance in purchasing materials and their delivery;
- creation of documentation and strict adherence to repair deadlines.
In our portfolio section you will find photos of examples of finished work. You can calculate the cost of repairs per m2 yourself; the website has an online calculator and an open price list. To order repairs, call the number provided.
Doors
Doors are a very important part of the overall living space: the choice of color and door design should be taken very seriously. A light door does not overload the space and creates a nice neutral background. Also, the texture of bleached oak will be wonderfully combined with glass. Additional lighting can be provided through the glazing in the door, which is very important for dark rooms. You can achieve an interesting effect by choosing different shades and degrees of glass transparency. In general, the atmosphere of a home with light interiors and an entrance door will be lighter and airier. They are great for narrow hallways and cramped spaces.