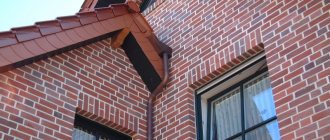
Today you can experience all the benefits of a Turkish bath without leaving your home. To do this, it is enough to build a small hammam in the apartment. Thanks to its compact size, the Turkish bath will fit even in a small bathroom. The main thing is to know the main stages of hammam construction and purchase high-quality building materials.
A little history
Hamams are the name given to public steam baths that originated in Turkey, from there spreading to other countries of the East, and then throughout the world.
The name comes from Arabic - “hot”. Just as the Romans at one time built luxurious baths on the site of ancient temples, so the Turks, after the conquest of Byzantium, began to build their own structures, dismantling the majestic ancient Roman buildings piece by piece.
Initially, the main function of Turkish baths was a ritual of purification before visiting the mosque. Later, like in European public baths, they began to practice the treatment of diseases.
According to Islam, every believer must observe the seven commandments of purity. Until recently, it was impossible to imagine the life of a righteous Muslim without baths.
What is a hammam and where did this phenomenon come into our lives?
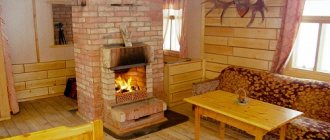
The origin of this bath is not Turkish, but ancient Roman - from the Roman thermal baths. Steam from boiling water outside the room was supplied to holes in the walls, and the stove heated the underground floor on poles. But in Turkey, baths became truly widespread because the Prophet Mohammed declared that the cleanliness of a Muslim’s body is half of his faith, and declared regular visits to the hammam obligatory. The first Russian hammam was incredibly luxuriously built in Tsarskoe Selo according to the design of Ippolit Monighetti.
Sketch by architect Ippolit Monighetti “Turkish Bath”
In Europe, hammams originated in the 19th century and were considered a panacea even for asthma and cholera. They are traditionally spacious and luxurious; marble and mosaics are used for decoration. They have certain architectural principles, in particular - a domed vault, so that water does not collect in the corners and does not drip on vacationers.
Hammam dome in mosaic
What is unique about the oriental bathhouse?
Turkey, which is warm all year round, does not require a very hot bath, so the hammam is almost twice as cool as a traditional Russian or Finnish steam room (average temperature no more than 60°C). However, the humidity reaches one hundred percent, and the body warms up well on the hot stone shelves.
Hammam at home in a light design
Large home hammam
Steam is softer, but also healing. The bath gets rid of toxins and impurities, and foam peeling - one of the features of the hammam - ideally cleanses and rejuvenates the skin. The microclimate is such that people with problems of the heart, blood vessels, kidneys, liver, and stomach can easily visit the bathhouse. As a result, metabolism is normalized and nerves are calmed.
Hammam in a private house
Hammam in the interior of the house
The cooling process in the hammam is also not the same as others. Visitors are doused with cold water directly in the steam room. Public or commercial establishments entrust the watering procedure to specially trained people.
Hammam at home in blue design
Stone qurnas in the hamam
Advantages and disadvantages
One of the main advantages of a Turkish bath is the gentle effect of heat. The pores of the body open slowly and are gradually saturated with moisture. Blood circulation improves, the body’s self-purification processes are activated: the removal of waste and toxins begins. This effect is achieved by a special room arrangement. Despite the high level of air humidity, reaching 100%, the hot steam here is surprisingly easy to transfer.
Arrangement of a Turkish bath and finishing with natural materials is possible in a modern style
There are several disadvantages:
- high energy intensity: on average, the hammam warms up within 3–4 hours;
- the complexity of the work on arranging the premises.
- high price of finishing materials and necessary equipment;
- significant weight load on the foundation and floors.
Plastic fake
What is now found everywhere in small saunas, inexpensive hotels, fitness clubs and spas under the guise of hammam has very little to do with it. Expecting luxury, you may well find yourself in a plastic cabin, with single seats tightly arranged in a circle. Thick steam, temperature and white color - that’s all that it has in common with the famous eastern steam rooms.
Turkish soap massage suffered no less from mass distribution. Instead of the fabulous pleasure of working out each muscle with your fingers gently sliding in rich foam, unprofessional massage therapists can vaguely smear liquid soap over your mortal body and perform an ordinary massage.
In order not to end on such a sad note, we note that with due diligence, even in the outback you can find the right Turkish baths and saunas with a hammam. They will have sparkling marble, a dome with windows, bright oriental decorative elements in relaxation rooms, a tea ceremony, and an excellent soap massage specialist.
Optimal temperature indicators
The human body temperature in any environment is no more than 400. This is achieved by the fact that when the ambient temperature rises, a person sweats and releases excess heat with moisture into the surrounding air. This is the basis for the effect of any bath; they differ in the ratio of temperature and air humidity.
The best state of health at a certain combination of humidity and temperature is graphically expressed by homeothermal curves: below the first curve is the optimal combination of temperature up to 900 and humidity up to 80%. It is the combination of temperature of about 40% and almost one hundred percent humidity that gives hammams.
Homeothermal curves - theoretical dependences of relative humidity on temperature
Description and structure of a Turkish bath, drawings
The highlight of the hammam is the installation of equipment that heats the air in a separate sector. It is important that all equipment in the Turkish bath is kept out of sight, and the steam produced by the steam generator enters the room through special channels. The area where the equipment is hidden can be tiny - occupying only 1 m². The main thing is that it is about 15 meters away from the steam room.
In a modern hammam, a boiler with hot water is replaced by a steam generator and a heating system
It is impossible to imagine a Turkish bath without a kurna. This is the name given to large stone bowls filled with hot and cold water.
The bowl is filling with water
In the hammam, they must create a heating system, the elements of which are mounted in the walls, floors and floors. To organize heating in a Turkish bath, you can go in two ways:
- lay pipes with water and install a boiler that maintains the required temperature of the coolant;
- install electric heating cables, the control panel of which is placed in the technical compartment.
The uniqueness of the Turkish bath lies in the arrangement of a heated massage table. It usually rises 0.8 m above the floor level and has a round shape. In hamams with a large area, the massage table is usually located in the center. In terms of dimensions, it should be such that several people can fit on it.
The device is intended for one person
Comparison of hamam with bath and sauna
There can be nothing in common between a Turkish and a Russian bath. The material for finishing the hammam is stone or tile, and the building material for the walls of a traditional bath is ordinary wood. The heat in a Turkish bath produces hot steam and heating of all surfaces, while in a Russian bath there is a stove with a heater.
The Finnish bath is also significantly different from the Turkish one, since in it the air is heated to 70 degrees, and the humidity level reaches 100%. Such conditions put a lot of stress on the body.
You can completely relax in the Turkish bath
In the sauna, as in the Russian bathhouse, people steam with brooms, which is never done in a hammam with an air temperature of 40 degrees. Therefore, it can be called a luxurious holiday destination where people enjoy the amazing interior and water treatments. Thanks to the light steam, the vessels of the human circulatory system dilate slowly, which means that staying in the hammam will not negatively affect the health of people with heart or stomach problems.
Ceiling
Installation of a dome ceiling in a Turkish bath
The ceiling part is made in the form of an arch or dome, which allows condensation not to drip onto the heads of visitors, but to flow down the walls onto the floor.
For the manufacture of the dome, extruded polystyrene foam panels are used, with double-sided reinforcement with fiberglass mesh and polymer-cement waterproofing.
PSB-50 foam is also often used - a polystyrene foam board with maximum rigidity.
Both materials have a number of characteristic advantages:
- Easily give the ceiling the desired shape.
- They have excellent thermal insulation, retaining heat indoors.
- Resistant to rotting processes.
- They have good moisture resistance.
- They are water-permeable and vapor-permeable.
- They are easy to install.
Regardless of which canopy you want, foam or polystyrene foam, it is important to discuss delivery in advance with an employee of the supplier company. Most often, the assembled ceiling cannot be brought into the room, so the transport company delivers it disassembled. It is better to clarify this point and order a larger machine so as not to disassemble the structure. Although delivery will be more expensive, installation time will take much less.
Otherwise, you will have to glue all the ceiling segments yourself using foam adhesive specially designed for polymer products. Decide for yourself right away whether you need decorative design in the form of a starry sky or not?
After the glue has dried, the dome-shaped structure is raised to the ceiling and secured with temporary fasteners. Further installation of the dome will begin after the installation of the wall panels is completed (see below). Foam adhesive for working with polymers is applied to the surface of their upper end, the dome is lowered and glued. If the dome-shaped sphere is mounted from expanded polystyrene or reinforced foam, it is necessary to cover it with three layers of waterproofing. If it is unreinforced PSB-50, the first step is to reinforce the façade with fiberglass mesh with a density of at least 145 grams per 1 m/sq. using adhesive for reinforcement. We wait for it to dry and apply three layers of waterproofing coating.
We will begin laying the mosaic after the waterproofing has completely dried. The ceiling should be as vapor-proofed and waterproofed as possible, since it, like the floor, is subject to a huge load in the form of steam and humidity. To do this, a colorless composition based on epoxy resin is used as a mosaic grout.
If your dome is made of polystyrene foam, you will need to additionally purchase 50 mm extruded polystyrene foam panels with double-sided reinforcement. They are needed to cover the corners and sides of the room, that is, where the sphere does not cover the ceiling. A hole is cut in their middle for the dome itself.
Structures in the shape of triangles, assembled from guides, are attached to the wall. The dome-shaped structure rises to the ceiling, then is fixed to the triangular elements using self-tapping screws with washers. In the end, it will turn out that the triangles will remain on top under the dome attached to them, and the panels will remain on the bottom.
The hole under the dome is leveled, reinforcement and waterproofing are carried out in the same way as described above.
Requirements
Before drawing up any project for a hammam or any sauna, you should familiarize yourself with the requirements that apply to this type of construction, no matter where it is done - in a private house or in a bathroom in an apartment. For example, it depends on the room how high the ceilings will be, whether a massage table will be possible, and how many benches can be placed.
You need to decide how many people can be there at the same time. A building of this type must have a dome-type ceiling to collect drops of condensation so that they flow down the walls. For this reason, the top point of the ceiling should be at a height of about 270 centimeters.
Another important requirement is the presence of at least one full bench on which you can lie. Its dimensions should be approximately 60 by 200 centimeters. It would be nice if you could also place a chebek there, a massage table with a free area for a massage therapist. But this is not a mandatory requirement.
If we talk about the requirements for materials, then you will need panel elements, which are usually made of polystyrene. Such materials can withstand high temperatures and fire, do not emit anything into the atmosphere and have a long service life. And finishing materials adhere perfectly to them. As for finishing, you can use marble, porcelain stoneware or onyx.
Speaking about lamps, it should be noted that they can be placed either on the wall or on the ceiling. It would be good if they were halogen or LED.
Now let's talk about some points in a little more detail.
Tips for choosing material
Construction supermarkets offer a large selection of materials for finishing such a structure. Requirements for facing materials:
- moisture resistance;
- high strength;
- heat resistance.
Marble is best suited for interior decoration of a hammam.
Marble is expensive, but it also has a long service life
Marble is smooth to the touch, retains heat for a long time, is durable and can emphasize the status of the owner of a private home. A significant disadvantage of this material is its high cost. Soapstone is comparable to marble in price, but surpasses it in heat capacity. It can help reduce sudden temperature changes.
An affordable replacement for marble is tiles and small mosaics. Smalt is a fine-grained mosaic made of glass of different colors: it can be used to create beautiful exclusive canvases with oriental ornaments. The color of the material shimmers under different lighting angles.
Smalt finishing decorates the room: it can be used to lay out multi-colored panels on the walls
Smalt is produced in the form of plates or tiles ranging in size from 2 cm² to 4 cm², it can be rough and smooth, colored and colorless. Places on flat or curved surface. The main advantages of this finish:
- zero water absorption;
- frost resistance;
- heat resistance;
- unique color design of patterns.
There is only one drawback: laying out the mosaic is time-consuming. But on sale you can find ready-made mosaic panels that make the work easier.
The most affordable of all materials is ceramic tile. In addition, it is easy to install.
Ceramic tiles are easier and faster to lay than small mosaics
If you have no experience in decorating hammams, then it is recommended to choose a simple finishing method. It is not necessary to lay out a mosaic; you can buy tiles of a similar type and lay out the desired patterns. Some manufacturers have developed and launched Eastern series ceramics.
Choosing a place
It is very important to choose the right location for such a room. Regardless of whether the hammam is being built from scratch or an existing room is being adjusted to fit it, certain standards must be observed:
- the floor, walls and ceiling are prepared for subsequent cladding with ceramic tiles or natural stone;
- the room must have sewerage and ventilation systems;
- ceilings cannot be lower than 250 centimeters;
- The hammam should consist of 4 rooms - a relaxation area, a technical room, a shower and a steam room.
If you want to make a hammam at home, then it would be right to move the technical room further away. And for a relaxation room you can take any room in the apartment. If the hammam is being built from scratch, it would be better to use cinder block or brick.
Hammam design in a private house
The classic material for finishing a Turkish bath is marble. Nevertheless, this decorative option is available to few due to its high cost. A budget method is to lay out the ornament with mosaic tiles made from small fragments. Thanks to this decision, the oriental style will be respected. Below in the photo you can see some design ideas for a Turkish steam room.
Thus, it is possible to set up a hammam in an apartment if the room meets all the requirements. In this case, the steam room will be safe for both residents and neighbors.
List of construction raw materials and supplies
To make a hammam in a separate building, you will need to purchase:
- finishing material;
- expanded polystyrene;
- tile adhesive;
- foam blocks grade M 25, density D 700 and with dimensions 100x300x600 mm (or other material for building walls);
- cement-sand mortar;
- adhesive mixture in bags (for laying the second and subsequent rows of material);
- thick beams for rafters;
- entrance door and interior glass doors;
- waterproofing sheet (polymer film);
- concrete;
- insulation;
- fastening elements (nails, screws, brackets, dowels, anchor bolts);
- plaster;
- putty;
- polyurethane glue (for the dome).
The formula N = Sp/Smat will help you find out the required amount of tiles or other finishing material, where N denotes the amount of construction raw materials, Sp is the surface area in m², and Smat is the area of one element of the material in m².
To create a hamam you need to find the following tools:
- building level;
- plumb line;
- rubber coated hammer;
- perforator;
- putty knife.
Calculation of material requirements, necessary tools
Calculation of the need for materials can be done by focusing on a specific hammam project, since it directly depends on the area and volume of the premises. To build a steam room with a plan size of 1.99x2.2 meters and a height of 2.5 meters inside a habitable residential building with film heated surfaces, the following materials will be needed:
- Brick for laying the base of the bench and deck chair;
- Moisture-resistant, non-corrosive material for the subfloor, arched ceiling, shelves of benches and deck chairs; cement-bonded or glass-magnesite sheets are best suited;
- Cement-sand mortar;
- Ceramic floor tiles;
- Ceramic or glass mosaic for cladding walls, sun loungers and ceilings;
- Tile adhesive;
- Wood to create a circle for the arched ceiling and the anatomical profile of the lounger;
- The door is fully equipped;
- Pipes for supplying steam from the steam generator;
- Pipes for supplying sewerage to the drain;
- Hydrophobizing solution for wall surfaces;
- Foil vapor barrier;
- Waterproofing material for the floor (2 layers);
- Fastening elements - self-tapping screws and dowels.
It is possible to make sunbeds on a frame made of rolled metal; in this case, bricks will not be needed, but the consumption of glass-magnesite sheet (SML) will increase and a 50x5 corner will be added.
All metal elements must have an anti-corrosion coating, pipes and electrical cables must be heat-resistant.
Hammam equipment:
- Steam generator;
- Infrared films for heating surfaces and monitoring and control system;
- Bowl - qurna;
- Plumbing - taps, drain;
- Ventilation system;
- Waterproof lamps and LED strip.
If desired, this list can be supplemented with an aroma generator, a color and music system and a “tropical shower” shower head.
Required Tools
The set of tools for performing the work also depends on the chosen design and materials. To set up a steam room with sun loungers made of glass-magnesite sheets on a metal frame and lining the room with mosaic tiles you will need:
- Level;
- Yardstick;
- Trowel;
- Smooth and serrated spatula;
- Drill;
- Screwdriver;
- Jigsaw;
- Milling machine;
- Container for solution and glue;
- Roller and brush;
- Scaffold.
Project
One of the most important elements when creating a hammam is drawing up a project. Even if you need to build a small hammam yourself, you should understand that this particular building is a rather complex structure from an engineering point of view.
At a minimum, for this reason, the drawings should be drawn up in as much detail as possible. That is, they should reflect not only the layout of the rooms, but even such aspects as the operation of the heating system and steam supply mechanism, plumbing and electrical wiring.
Most often, a sauna or bath is made together with the hammam.
Of course, you can develop the drawings of a mini-hammam yourself, but the problem is that the technology for creating a building of such complexity practically cannot be followed by a person who does not understand this and does not have a specialized education.
For this reason, it would be better to order an individual hammam project from a construction company. The specialists of such an institution will be able to fully take into account all the specific aspects of each specific case and find the best solution to a particular problem that may arise at various stages of construction. Yes, the cost of such a project will not be cheap, but it will help avoid a lot of problems, wasted time and money.
Scheme of heating and heat distribution in a Turkish hammam
The classic oriental bathhouse has one peculiarity: it is not heated on purpose. Even at the construction stage, special channels are made in the walls and floor for the circulation of hot mineral water, which is used to heat the room and fill the bathtub or bathhouse inside the bathhouse.
In a modern Turkish hammam for personal use, the floor, beds and bathing area inside the bathhouse must be heated using built-in hot water channels. In this case, the coolant selection must be carried out and regulated from a separate heating circuit.
A modern way to heat the walls and floor of a bathhouse
Important! The temperature inside the hammam usually does not exceed 50-55°C, so during construction it is necessary to look for optimal options for heating the floor and beds so that the temperature of the ceramic surface does not exceed 35-40°C.
Directly running hot water from the heating circuit of the house is allowed only at the stage of warming up the hammam room. Next, you have to reduce the temperature of the coolant and regulate it either manually or with a built-in automatic tap.
Determining the optimal size
The required area of the hammam is calculated depending on the number of people who will simultaneously take bath procedures.
- The minimum size is usually at least 2 square meters. m. and it is designed for visits by 1-2 people.
- For two people, 3 square meters is enough. m.
Practice shows that even in a hammam of such a small area it is possible to install a shower system or a small shower.
- An area of 4 square meters is suitable for three people. m.
If you plan to conduct a full massage in the best Turkish traditions, make one wide lounger, leaving free access for the massage therapist.
- For 4-5 people – 6 sq. m.
In such a hammam you can already make two wide loungers, while there will be enough space for a massage therapist.
8 sq. m
To install a kurna and shower system, it is better to plan a hammam with an area of at least 8 square meters. m.
The beneficial effects of hammam on the body
Any bath benefits the body, but not everyone can tolerate high temperatures. The Turkish hammam also has contraindications - for asthmatics, cancer patients, hypertensive patients and those who cannot tolerate high humidity, the path here is closed. However, fans of this type of steam room believe that the hammam is capable of:
- Cleanse the body of toxins;
- Recover;
- Clear the respiratory system;
- Reduce pain;
- Help with insomnia;
- Help with colds;
- Improve the condition of the skin;
- Positively influence metabolism, promoting weight loss;
- Positively influence digestion.
Guide: how to make a hammam with your own hands
A hammam can be built in a few months if you follow the following instructions:
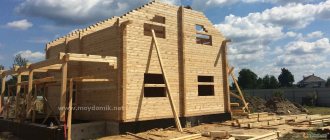
- level the area and dig a hole, and then, using pegs and boards, build formwork, put reinforcement in it and pour liquid concrete, that is, create a strip foundation;
A Turkish bath is built only on a strip foundation - lay a waterproofing coating on the created platform and place three rows of foam blocks edgewise, starting from the highest corner of the foundation (the seam between the blocks, where a special compound is applied, should be no more than 5 mm);
- Having completed the laying of three rows, lay a fine-mesh reinforcing mesh made of steel to make the walls stronger;
Foam blocks are used as material - assemble the roof frame and attach the rafter legs to it, forming a gable roof;
Since the ceiling will be domed, a gable roof is needed - in the wall of the technical room (as in the rest room), using anchor brackets and self-tapping screws, install a metal-plastic window block, achieving its evenness using bars placed under the bottom of the frame;
- first on the left and then on the right, secure the window in the opening using mounting plates and dowels, constantly checking the horizontal and vertical structure;
- Fill the gaps around the perimeter of the window with polyurethane foam, wait until it dries, and make slopes that protect the material from the influence of ultraviolet radiation;
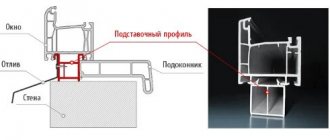
All gaps are filled with foam - install the ebb under the window, fixing it on the window sill strip, cut the window sill along the length of the opening, move it to the stand profile and level it;
- treat the area under the window sill with foam, on which you will need to place something heavy for one day in order to prevent its deformation due to the foam;
- install entrance and interior doors, prepare an opening that is 2 cm larger than the door frame, and insert spacer bars;
The interior door must be glass - drill holes in the door frame frame and insert anchor bolts into them;
- remove the spacer bars and close the gaps between the wall and the door frame with foam, and then install the door leaf and fittings;
- start making a dome from polystyrene foam, first calculating the circumference depending on the diameter of the domed ceiling and dividing the resulting figure into equal zones; The dome fragments must be identical to each other
- cut out unnecessary fragments, and glue all the rest with the edges so that a dome is formed;
- plaster first the front and then the back surface of the dome, using mesh, glue and a plywood spatula; Plaster will prepare the dome for cladding
- make a frame from metal profiles and install the prepared dome on it;
- when arranging the ceiling, build an exhaust ventilation duct from a sandwich pipe and install it with a slope;
- install a stainless steel valve on the edge of the air duct;
- install sewer pipes into the ground inside the perimeter of the building, leading outside the house into a specially dug deep hole;
- equip the sewer drain with a water seal, which will prevent the appearance of a foul odor in the steam room;
- make a rough screed and fill it with a mixture that levels the soil, forming a floor with a slope of 7 degrees so that water from it quickly flows into the sewer;
- apply bitumen mastic, wait for the leveling mixture to dry, and cover the floor with rolled waterproofing material, laying the sheets with an overlap of 1 cm and always in several layers;
- organize a “warm floor” or water heating system, and then complete a clean concrete screed; The evenness of the screed is constantly checked
- cover the walls and ceiling with a plaster waterproofing mixture and install a “warm floor” or water heating system on all surfaces;
- lay all communications, that is, electrical wiring, steam pipes and plumbing;
- place a kurna on the floor, and not far from it - a massage table made of brick, which is finished with ceramic tiles;
- cover the steam room with ceramic tiles or other material;
- attach lamps to the wall and install switches at the entrance (in the adjacent room).
Now it is necessary to make a shower in the hammam. In the room allocated for it they work as follows:
- plaster and level the ceiling and walls, wait for the spread mixture to harden and apply a waterproofing compound;
- organize sewerage and, if there is no shortage of free space, then install a toilet;
- create a subfloor for laying a waterproofing layer;
- lay a waterproofing sheet and lay out a brick pallet at a slope;
- conduct electricity and plumbing;
- treat the ceiling with putty and paint with dispersion emulsion;
- decorate all surfaces with tiles, always covering the brick tray.
The room is decorated in the same style as the steam room
After this, they move on to arranging the technical sector:
- level the floor and cover the walls and other surfaces with finishing material;
- plastering, puttying and painting the ceiling and walls;
- organize room lighting;
- install the boiler and connect it to water heating pipes;
- install a steam generator and control panel;
Installation of equipment is the last stage of hammam construction - turn on, adjust the functioning of the equipment for the hammam and be sure to test it.
Floors
To preserve the heat and integrity of the thermos, the floors of the hammam are insulated. The flooring is constructed in two ways:
Method number 1 (fast)
A drain with a ladder is equipped in the floor, on which a locking mechanism is located, preventing the spread of the smell of wastewater into the steam room. The surface is leveled with a solution. A pallet is placed on the drain, the rest of the space is lined with 5 cm thick panels reinforced on both sides.
Pallets are selected from extruded polystyrene foam with double-sided reinforced fiberglass mesh, coated with polymer-cement waterproofing. The thickness of the edge of the pallets is 5 cm, and in the drainage area - 3-4 cm, based on the overall size of the product. Descents to the drain are located on all sides, and the drain hole can be made either in the center or on any other side, as is convenient for you.
The pallet is placed in such a way that the descent to the ladder is not at the location of the sun loungers.
The panels and pallet are fixed to the floor with a special tile adhesive designed for use in rooms with high humidity, as well as with self-tapping screws and washers (6 units per 1 m/sq.) in a checkerboard pattern.
The panels are fixed to each other with adhesive foam for polymer materials.
Installation of the heated floor is carried out after the glue has completely hardened:
- Using a router or knife, cut out channels for pipes and cables (no need to do it under the bed).
- The width of the channels must be such that there is a distance of at least 5 mm from the pipe/cable to the polystyrene, preventing contact with the panel.
- Lay the pipe/cable in the middle of the channel.
- Fill with glue for reinforcement.
- Wait for complete drying and reinforce the channels with glass fabric façade mesh that is resistant to alkalis. The density must be at least 145 grams per 1 m/sq. Refill with glue.
- Wait until dry and apply waterproofing in three layers.
Method No. 2
First of all, the floors are insulated with panels reinforced on both sides, 3-5 cm thick. First, the panels are fixed to the floor with glue, then for reliability they are attached with 6 dowels with washers (6 pieces per sq./m).
A cement-sand mortar screed, preferably with fiberglass, is placed on top of the panels. The floors are laid at an angle towards the drain. In the place where the sun loungers will be located, the surface is leveled horizontally.
There is no need to lay heated floors under the sunbeds.
A three-layer waterproofing is placed on the screed.
The final coating of the floor surface is selected primarily based on safety - it should not be slippery, which can lead to injury. It is recommended to use ceramic tiles measuring 10x10 cm. Their size is smaller than a foot, and the seams between the tiles are a natural anti-slip coating, which at the same time visually smoothes out the slope towards the drain well.
To prevent water from flowing out, drainage is made under the door, or a slope towards the drain. The size of the inlet gap should be 3 cm, or you can equip a special air channel.
Minimum amount of free space
Since the steam generator must be located in a separate room, it becomes necessary to allocate space for it. For this, 1 square meter is enough, but the technical room also requires isolation from the steam room.
A comfortable steam room for 1-2 people can be arranged on an area of 3 square meters.
Experts also recommend thinking about a relaxation room, but this is more likely just a wish, and not a prerequisite.
Room layout
When installing a Turkish steam room, it is advisable to focus on a pre-made drawing. When drawing it up, it is necessary to take the layout of the bathroom as a basis. The drawing must include all the hidden nuances of the structure. If the owner of the premises does not have experience in drawing up drawings, then it is best to contact a specialized design organization for help.
Special shape and ceiling height
It is no coincidence that Turkish baths are made dome-shaped - due to the low temperature, condensation inevitably appears on the ceiling, which rolls down the walls without disturbing the people in the steam room. You can do it yourself, but you will have to work hard.
If the ceiling is standard, then moisture will continuously drip directly onto the heads of vacationers.
The issue of ceiling height also deserves attention. Unlike a Russian bath, in a Turkish bath it must be at least 2.5 meters.
Qurna
Qurna (sink) for a Turkish bath
Bowls are classified according to the presence or absence of a drain. If you think that a drain mechanism is necessary, then make sure that the water flows onto the floor and goes into the drain. The presence of a siphon on the pallet will relieve vacationers from unpleasant odors.
Depending on the material used, the products can be marble, foam plastic, etc. The former are very beautiful, but heavy. They stand on a stand or deck chair. For reliability, it is better to secure them.
Bowls made of polystyrene foam are lightweight, unbreakable, and come in various shapes. They are often decorated with mosaics and are necessarily reinforced.
Integration of qurna and massage bed
If you want to bring your improvised hammam as close as possible to the standards of a Turkish bath, then you definitely cannot do without a kurna and a massage bed. Kurna is a special container into which aromatic solutions for massage are placed.
Nearby there is a bench or sunbed reinforced with a foundation. It must support at least 2 people. It will also be used for massage. It’s great if you have a broom made of bamboo sticks - the result will be amazing. Typically the following dimensions are recommended:
- height - 0.8 meters;
- length - 2.1 meters;
- width - 1.2 meters.
You can simply relax on the bench or give a massage to your neighbor. It is ideal if it is decorated with stone or tiles, and the body does not slip on it. But it doesn’t matter if slipping is still present: you can cover it with a special rug.
If you want more convincing, you can decorate the lounger with sea pebbles. It will turn out very authentic and attractive!
Walls
Insulation of walls in a Turkish bath
The best option for a hammam is brick walls or foam blocks. Brick, like other materials, must be solid, since it will serve as an attachment point for the thermal cake structure. Voids in the walls will not provide the required fixation and proper fastening reliability.
Extruded polystyrene foam panels are attached to the walls. They even out all the unevenness and roughness. Among other advantages, panel laying is a waste-free production - the trimmings can be used for their intended purpose in other places. For interior decoration, 50 mm plates are used.
If the wall is brick or concrete or made of foam block, then:
– First of all, the surface is thoroughly primed;
– then the installation of expanded polystyrene panels with two-layer reinforcement begins. The fixing agent is tile adhesive designed for working with polymer materials. To ensure reliable fastening, use self-tapping screws with washers (7 pieces per 1 m/sq.m. in a checkerboard pattern);
– the panels are fastened together with foam adhesive for polystyrene surfaces.
Materials and equipment for the hammam may vary. For example, there are steam rooms with wooden products, or there is a need to install a partition made of wood. In this case:
- An additional frame is created from concrete or brick walls (or foam blocks) are laid out. In this case, the structure becomes significantly heavier, which means preliminary strengthening of the foundation is necessary. The masonry should not be adjacent to the wooden wall; between them it is necessary to leave space for an air cushion. Laying bricks or foam blocks is carried out in strict accordance with building codes.
- To fasten the panels, you will need to install guide profiles. It is done in the same way as for installing plasterboard sheets. The panels are installed with the reinforced side in the steam room and the non-reinforced side against the wall. They are fixed to each other with an adhesive composition for polymer materials. Traditionally, the fixation is strengthened with self-tapping screws and washers, only in this case 8 pieces are used for each m/sq. and also in a checkerboard pattern.
The steam room is completely covered with panels, including where the sun loungers are located. Otherwise, they will not be fixed properly, which means it will cover the bed.
The top of the panel touches the bottom edge of the dome, that is, the top part must be trimmed, exactly following the contour of the dome structure. If you have built an arch, envelope or skullcap, you will need to install a horizontal top end.
The heated floor rises along the wall to a height of 150 cm, except in the places where the seats are installed. To conduct thermal communications, special grooves are cut out in the panels, in which pipes and cables are laid (just not behind the sun loungers). The width of the channels must exceed the diameter of the laid lines by 10 mm. A pipe/cable is laid at the bottom of each, which is fixed so that the distance from them to the panels is 5 mm. This will eliminate the possibility of polystyrene foam melting from contact with a hot surface. The groove is filled with adhesive for reinforcement. After the glue has dried, the surface is reinforced with alkali-resistant facade fiberglass mesh with a density of 145 grams per square. Then reinforcing glue is applied again. At the final stage, we cover everything with waterproofing in three layers.
Don’t forget to waterproof the panel joints as well. In places where the floor and walls touch, as well as where the sun loungers are located, waterproofing tape is laid. Pasting begins from the corners, where strips 15-20 cm high are glued. Then we go along the entire perimeter of the floor covering. The tape is not self-adhesive, so it is necessary to use ceramic adhesive with a strong hold.
After this, you can begin decorating the walls with mosaics.
Correct use of a Turkish bath
Water procedures in the hammam are not at all tiring, since it is relatively cool. At the same time, the air humidity in the Turkish bath reaches 100%, which creates tropical conditions in the room that help a person relax with benefit for the body.
Optimal temperature
In the changing room of a Turkish bath, the temperature is usually close to 30°C, so it’s not hot, but it’s already quite warm. The main hall of the hammam is heated more intensely; there the air temperature can reach 70°C. But to make washing in this room comfortable, it is better to stay at the optimal temperature value - 35–40°C. In such conditions, you won’t have to endure the heat with difficulty and torment your body.
Ideal conditions have been created for relaxation
Features of use
You should visit the hammam by adhering to the following rules:
- first, lying on a marble lounger, warm up the body until drops of sweat appear;
- after preparing the body, begin the massage, lubricating the skin with oil and putting on woolen mittens on the hands, which clean off the keratinized epithelium well;
- then the body is washed using a special soap containing olive and peach oil;
- at the end of the procedure, take a cool shower, which will help the pores that have expanded from the heat to narrow again.
Stages of hammam construction
In terms of the number of layers required, the walls of a Turkish bath resemble a Napoleon cake.
After the room for the boor is ready, its further construction consists of the following stages:
- insulation (with a mandatory layer of reflective foil);
- waterproofing;
- installation of a heating system;
- screed and final waterproofing;
- decorative finishing.
Insulation
First of all, the room in which the hammam will be located should be insulated. This will allow you to save significant energy costs in the future. Today, there are various insulation technologies, some of which you can familiarize yourself with by reading the article “Warm House” on our website.
Waterproofing
In terms of humidity, a hammam can easily be compared to a bathroom, and the amount of moisture settling on the ceiling and walls will be several times higher. Therefore, naturally, you cannot do without high-quality waterproofing. The technology for installing it is practically no different from similar work in a regular bathroom, so you can use this article as instructions.
Heating system
Both water and electric systems can be used as a heating system for the hammam. You can read more about their installation here.
Water heating can be “powered” from a central hot water supply system (if, of course, it is present in the house) or from a separate electric boiler, which can be located in a technical room along with a steam generator.
Hamam water heating system
For electric heating, it is most logical to use mats of the “warm floor” system. For safety reasons, it is better to move the system control panel to a technical room or rest room.
Please note that electric mats or heating pipes must be laid not only on the floor, but also on the walls and under the central pedestal of the hammam.
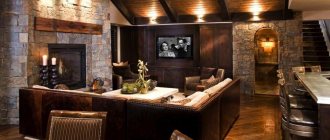
Decorative finishing
The classic hammam is finished with natural marble, and a solid stone slab is used for the bed. But since this option is quite expensive, ceramic tiles are often used in modern hammams. Such finishing will cost much less and will have virtually no effect on the quality of the steam room.
Mosaic with oriental pattern is an excellent option for decorating a hammam
Small mosaic tiles are suitable for finishing the hammam. It would probably be redundant to say that the pattern should be based on oriental motifs.
Lighting
Considering the fact that the humidity level in the hammam will be extremely high, it is necessary to use only special moisture-proof lamps for lighting.
The level of protection of lamps, as well as sockets and switches must be at least IP 65.
LED lamps are perfect for lighting the hammam.
In addition to high humidity, there are also significant temperature changes in the hammam, so all electrical wiring must be made of a special heat-resistant cable.
Lighting
Lighting devices operating in conditions of high humidity should be given special attention. Firstly, the maximum operating voltage should not exceed 24 V. Secondly, the degree of protection is at least IP64.
It’s worth noting right away that selecting lighting for a steam room is a painstaking task that requires certain knowledge and skills. The decoupling of electrical wires must be laid before the mosaic is laid.
You can choose ceiling or wall lighting fixtures. Some people just need the light coming from decorative elements, which include:
LED strips
LED waterproof strip for hammam.
Usually installed in sun loungers, on the ceiling, decorative wall cells. The light emanating from them is very beautiful, but the technical documentation for each LED strip indicates a maximum operating temperature of +40°C. This means that they will have to be changed frequently.
How to use the hammam?
Unlike the Russian bathhouse we are used to, the hammam is less hot. Thanks to this, water treatments here are more comfortable and do not tire you even after a long stay in the steam room. Since the humidity here is very high, it is easy to recreate tropical conditions in the hammam, which will make it possible to stay here with health benefits.
The air temperature in the locker room should be about 30 degrees. In the steam room this figure is much higher and can reach 70 degrees. To make your stay here comfortable and tireless, it is recommended to set the temperature at 37-40 degrees.
Illumination of a lounger in a hammam Source goodpools.ru
When visiting the hammam, you must adhere to the following recommendations:
- It is important to warm up your body first. In this case, you just need to lie down and wait until droplets of sweat appear on the skin.
- The appearance of sweat indicates that the body is ready for further procedures. Only then can you begin a massage session, during which a solution of soap and a mixture of oils is applied to the skin. Olive and peach oils are usually used. To better cleanse dead skin cells, massage is best done with special gloves made of natural wool.
- Using warm water in the kurna, wash off the soap and oil mixture from the skin.
- To close the pores, take a cool shower.
If you ignore these recommendations, you may harm your health.
What else is included in the design of a bathhouse with a hammam?
It is logical that the operation of the bath complex requires complex technical support. In our case, this is a boiler, a mini-electric boiler and a fairly powerful steam generator. They are collected in one technical room with a separate entrance from the street.
Our Russian bathhouse with hammam also has one more exit - from the living room. Passing through the wide sliding doors, we find ourselves on a large porch-veranda with a barbecue, a wooden table and the same benches. Here you can enjoy dining al fresco in good weather, surrounded by exotic green spaces. A great way to cool down after bathing and washing procedures! And if it suddenly rains and winds, just close the windows and doors.
Carrying out work - step-by-step instructions
We begin the work with the installation of a sewer drain - we bring the sewer pipe to the installation site of the drain. We bring cables into the room to connect the lighting system, surface heating, water supply and ventilation.
We impregnate the surfaces of walls and ceilings with a water-repellent solution.
Subfloor
We make the subfloor: we lay 14 mm thick LSU sheets over the joists in two layers. If there are no lags and no insulation of the floor, we level the base soil, fill it with sand or small crushed stone, and use a tamper. We make support posts measuring 250x250 mm, the height depends on the height of the base of the house, from solid brick with a 1x1 meter lattice. We lay the logs with the cranial bars attached, and make the first subfloor from a moisture-resistant material. We install a moisture-windproof membrane; lay insulation (according to calculations); cover the insulation with a foil vapor barrier, attaching it to the joists and insulation using a construction stapler.
A superdiffusion membrane, insulation and foil vapor barrier are laid sequentially on the subfloor
We install the subfloor of the hammam from LSU sheets in 2 layers, with the seams staggered, and remove the sewer pipe. We make a slope to the ladder from a cement-sand mortar with a thickness of 10 - 25 mm (5%).
Installation of equipment
We install a steam generator in the technical room, connect it to the water supply system, supply power from the electrical network, and lead the steam supply pipes to the steam room.
The steam generator is installed in an adjacent room or no further than 15 meters from the hammam
We install a surface heating power supply system, install a regulator and temperature sensor.
Benches and sunbed
We make a frame from 50x5 corners for benches, fasten the frame to the walls and floor with expansion dowels with thermally insulated heads to avoid cold bridges. To make an anatomically shaped lounger, we prepare a circle from LSU boards or sheets, make a frame from the corner using the circle, and install the structure in place. We connect the steam supply pipes to the outlet of the steam generator and the steam supply nozzles, which are located under the seats.
Diagram of steam supply in the hammam: turquoise arrows - steam, red - heating surfaces
We sew up the sunbeds, bench and massage table with sheets of glass magnesite on self-tapping screws, while simultaneously installing steam outlets under the seats of the benches.
A wet LSU sheet is attached to a pre-made frame
Please note: LSU sheets have different surfaces - one is smooth, with an acrylic finish, the second is rough. To increase adhesion with subsequent layers, we sew with the rough surface facing up.
Glass magnesite sheets have surfaces of different textures: one side is rough, the other is smooth
Ceiling
The arched vault, made in a circle, is mounted in place. To install it, support guides made from 50x5 corners or glass-magnesite sheets in several layers are first attached to the wall.
The wet glass-magnesite sheet can be easily bent to the desired shape according to a circle pattern
A wet sheet bends without much effort
Vapor barrier
We install a vapor barrier layer on all surfaces: walls, sunbeds, benches, ceiling. We fasten the vapor barrier sheets with special vapor barrier tape, with an overlap of 10 cm.
Vapor barrier sheets are mounted overlapping, the joints are glued with special heat-resistant vapor barrier tape
Heating system
Heating elements are fixed over the vapor barrier on all surfaces except the ceiling and connected to the electrical cable.
The cable heating system is installed on all surfaces of the room except the ceiling
We connect a temperature sensor and a thermostat to the heating system, and power the entire system from the power supply.
The thermostat can be mounted in an adjacent room
Waterproofing
Apply a layer of waterproofing plaster over all surfaces, then apply a layer of primer to increase adhesion.
Coating waterproofing 6–7 mm thick will protect structures from excess moisture
Finish lining
Sheets of mosaic tiles are attached to a layer of heat-resistant adhesive.
Mosaic tiles are sold with the front side glued onto special paper, which is removed after the tiles are placed on the glue.
Clean floor
Ceramic floor tiles are laid on a layer of heat-resistant adhesive.
After laying the tiles, the seams must be sealed with a fugue.
They install the equipment, kurna, lamps, and connect the crane.
You can buy a ready-made kurna, made from ornamental stone. Such bowls look especially decorative
The hammam is ready to receive visitors.
Algorithm for working on walls, ceilings and floors
- We install waterproofing over the entire area;
- we insulate with special materials that are not afraid of moisture;
- We put foil insulation on top for optimal heat retention in the room;
- we install basic communications;
- we make screed on the walls, ceiling and floor;
- carefully plaster the surface;
- we apply the final waterproofing using the membrane mentioned above;
- We do the finishing with ceramic tiles or natural stone;
- You can additionally decorate the walls with wood carved bath panels, but it is important to choose the right pattern in order to logically fit into the oriental theme.
Functions of hammam sun loungers
A stone-based lounger or a special table has the following functions:
- when heated, the stone can warm up joints or muscles well;
- on a sunbed you can take special foam treatments typical for a hammam;
- Stone loungers are also used as massage beds, which is especially important after preheated muscles.
To make it convenient for a massage therapist to work, the optimal height of the lounger is 80-90 centimeters .