Statistics show that while at home, we spend the most time in bed, in the kitchen and... on the toilet. This means that choosing a convenient and reliable “faience friend” is extremely important for our attitude and mental balance. After all, if harmony reigns around, then it comes into the inner world much easier. The plumbing trend of recent decades has been wall-hung toilets, which literally transformed not only the appearance of the bathroom, but also the constructive approach to the placement of sanitary equipment.
Wall-hung toilet and its features
The wall-hung toilet differs from the usual sanitary ware in the absence of a supporting part. The white bowl seems to float above the floor, attached to the wall at the back end. The tank, pipes and other not very aesthetic elements of the system are hidden behind a false wall, leaving only the bowl with a seat and a panel with a water drain button visible. A bathroom equipped with a wall-hung toilet immediately takes on an elegant, stylish look. But to understand how this impression is achieved, you need to look beyond the tile layer and understand the internal structure of the suspension system.
Wall hung toilet AM.PM Awe
Varieties of release forms
Many buyers are interested in: how to choose a toilet without splashing? This is known to be influenced by the shape of the plumbing fixtures. You need to pay special attention to it, because the features of the installation depend on it, since you may have to redo the entire sewer system due to the wrong choice.
Particularly popular are toilets with an oblique outlet, that is, water drains at an angle. In such models, the angle of the drains is about 45 degrees. They were popular during the Soviet era, but even now many builders use them when designing sewage systems inside buildings.
It is worth choosing toilets with an oblique outlet if:
- the socket in the bathroom is at a slight angle;
- the distance between the toilet and the doors simply does not allow it to be placed further than 15 centimeters from the wall;
- There is no desire to start renovating the entire toilet with a complete replacement of the sewer system and dismantling the ceilings because of the replacement of the toilet.
Products with direct release were first popular abroad, but over time they appeared in our country. In such models, the sewer pipe goes horizontally into the wall, which is rarely found in Russian toilets. But in modern new buildings, this type of release is most often installed.
If you decide to opt for just such an instance, you shouldn’t worry, because it can be connected to any sewer system using a corrugated pipe. Using a piece of ordinary corrugated plastic pipe and a specialized seal, you can deploy the product in the pipe and wall at the most convenient angle.
Design of a toilet hanging system
The shining bowl is just the tip of the iceberg, the base of which is hidden inside the wall. The wall hung toilet system includes:
- installation
- a durable steel frame that is attached to the wall or floor and takes on the weight of the plumbing fixtures and the seated person;
a rectangular drain tank- the flush button
is a rather complex device that transmits pressing force from the button to the tank; - a toilet
without a support leg, providing for hanging installation.
These are mandatory elements that you cannot do without if you install a wall-hung toilet in your home. Let's look at them in more detail.
Conclusion
A built-in toilet differs in design from a standard one, so its installation may involve some difficulties, but in general you can do it yourself if you have the necessary skills. Maintenance of this design differs from conventional options, so be prepared for this. The video in this article will give you the opportunity to find additional information on the above topic.
Did you like the article? Subscribe to our Yandex.Zen channel
Installation - what is it?
It is impossible to securely fix the toilet directly to the wall for a number of technical reasons. The designers found an elegant and simple solution to this problem, proposing the use of a special load-bearing frame. It is called an installation because all the functional elements of the water closet are installed on it. The frame is made of steel profile coated with anti-corrosion paint. He is not afraid of high humidity. The installation is designed to withstand significant weight loads: products from well-known European companies can withstand weights of up to 400-500 kg, and some even up to 800 kg.
There are two types of installations:
- block
- designed for wall mounting and used only when fixing the toilet to a load-bearing wall made of durable material - concrete or brick; - frame
- which is a vertical frame on two horizontal supports, which is attached to the floor and wall. The height of the frame is chosen based on the characteristics of the bathroom and installation requirements.
Wall-hung toilet KERAMIN Grand R without rims, with microlift seat
The frame installation does not depend on the wall material and can be installed anywhere, even in the center of the bathroom, if such a desire arises. But the block one allows you to gain some free space, since it has a more compact size.
As a rule, the installation is sold complete with a tank, since it is important that these products match each other in size and other design nuances.
Installation instructions for the mounted model
The main installation guide is always the instructions that come with both the toilet and the frame. Usually it looks like several diagrams or drawings indicating dimensions and order of actions.
If you are not ready to decipher the schematic instructions yourself, it is better to turn to experienced plumbers, since accuracy and qualifications are very important when installing the frame structure, pipes and bowl.
Stage #1 – preparatory work
Preparation includes the purchase of the necessary plumbing equipment and additional installation parts.
Flax is useful for sealing, and silicone with a gun is used for processing joints. Also, plumbers often use flax as a sealant, but you need to train it to wind it correctly
You also need to get the tool:
- hammer drill + drill 10 mm;
- grinder;
- a set of keys, including gas and adjustable;
- screwdriver;
- hammer;
- marking tool - tape measure, level, marker;
- soldering iron or press pliers - for welding polypropylene pipelines or crimping metal-plastic pipes.
You will learn which is better to choose: polypropylene or metal-plastic pipes from our recommended article.
When everything is prepared, turn off the water and assemble the installation. Before installing the frame, some mounting elements are installed on it - brackets, adapters, pipes. We attach a fitting to the tank hose.
Stage #2 – installation installation
Before installing the installation for hanging plumbing, we prepare the place - we install sewer and water pipes, securely fasten them to the wall with clamps. Throughout the entire installation process, we remember that the structure will be covered with plasterboard, so we carry out all work responsibly.
There is a sticker on the frame with markings indicating the maximum installation height. We try to respect this value; we calculate from the finished floor - not from concrete, but from ceramic tiles. If it has not yet been laid, we calculate the difference.
We monitor the location of the holes for attaching the bowl. As a result, it should be at a height of about 40 cm; if higher, it will be difficult to use the toilet; lower, it will be inconvenient.
We install the frame in place, adjust the height by adjusting the legs - loosen and then tighten the adjusting bolts.
We insert the adapter for the sewer pipe - a large black plastic corner that comes with the frame. Subsequently, you need to insert a pipe from the toilet into it
During the “trying on” we mark the attachment points, then remove the frame and drill holes in the floor with a 10 mm drill.
They are also on the wall (main), but there are different fastenings - for studs that hold the frame at a certain distance from the wall.
We hammer plastic plugs into the holes, install the installation in place, and tighten the bolts. If the ends of the studs protrude outward, saw off the excess with a grinder. Along the way, we use a level and level the position of the horizontal parts by adjusting the legs
We tighten the nuts, tighten them, and connect the tank tap. In place of the button installation we install a foam template, which is removed only after the partition is erected.
We specify the distance between the mounting studs for the toilet (there are 2 options), screw them into the required holes, and put on the protective elements.
Stage #3 – fixing the bowl
If the installation is installed correctly, installing the bowl will not take much time. Usually, between these two stages, a partition or box is installed to mask the installation.
We measure the distance from the pipe outlet to the toilet flares, which are located in the inner part of the bowl facing the wall. We put pipes on them and push them all the way.
Since the studs and connections were prepared at the installation stage, all that remains is to lubricate all elements of the toilet with a special lubricant and install it on the fasteners. Lastly, fix the seat
First we put on the washers, then just tighten the nuts.
Stage #4 – attaching the flush button
We remove the foam template and attach a plastic installation frame in its place. We use the screws that are included in the kit and a screwdriver or screwdriver. Then we screw in the threaded rods that will be controlled by the button, adjust their position and fix them.
The elements from the installation kit fit together perfectly, so you don’t need to put in much effort, just follow the steps specified in the instructions
The final touch is the installation of a decorative strip with a button. Apply it to the rods and press until it clicks. Let's check how the mechanism works.
After completion of the work, we complete finishing activities. Do not forget to equip a plumbing hatch for access to internal communications, otherwise at the first accident you will have to dismantle the partition.
Wall-hung toilet cistern
Even such a prosaic element of a water closet as a cistern has its own character in a suspended system. As a rule, it is made of durable solid plastic, but some manufacturers offer metal tanks with an anti-corrosion coating. It is shaped like a flat rectangle, the width of which corresponds to the width of the installation frame.
GEBERIT Delta concealed cistern 12cm
Modern tanks are divided in half by a partition, allowing only half the water to be used, thereby saving a valuable natural resource. A reliable drainage system with a float is installed inside, for which the manufacturer provides a guarantee for a period of 5-10 years. All its elements are coated from the inside with a special composition that prevents the settling of limescale, thereby significantly increasing their durability and performance. In addition, the tank must be equipped with a drainage hole in case the float fails. The water entering the tank will flow through the drainage hole into the toilet to prevent overflow and flooding.
Flush button
In a suspended system, the flush button, for obvious reasons, is mounted separately from the cistern, on a false wall that hides the installation. The consumer sees only a decorative panel with one or two keys. By design, the button can be:
- ordinary
, with a single key, when pressed, all the water in the tank is drained; - economical with a bipartite key
: by pressing one half, you drain all the water from the tank, when you press the other, only half of the water; - economical with the “start-stop” function
: the first press opens the drain, the second closes it, i.e. you regulate the amount of water drained yourself.
The key is connected to the drainage system using a pneumatic drive, a special lever or a cable.
GROHE Sail flush plate, chrome
What are wall-hung toilets made of?
Currently, manufacturers produce plumbing fixtures from various materials that satisfy the widest possible range of consumer needs.
Plumbing faience
For the manufacture of wall-hung toilets in the budget segment, high-quality sanitary faience is used - a porous ceramic material coated with a durable, durable glaze. Modern glazes have a dirt-repellent surface, so they are easy to clean using any disinfectant.
Plumbing porcelain
Plumbing porcelain is recognized as the most successful material for making a wall-hung toilet. This ceramic material has a highly durable and very smooth surface, making it look solid and elegant. Due to the absence of pores, dirt does not accumulate on the surface and plaque does not form. All contaminants can be removed with minimal effort using a wide range of detergents and disinfectants.
Strained glass
A glass toilet is an impressive, but very expensive plumbing fixture. As a rule, such products are produced in very small series or are made individually to order from a design studio. They look at least unusual, but they require constant and rather complex maintenance, because even dried drops of water on the surface of the glass give an untidy appearance to capricious plumbing fixtures.
Stainless steel
A stainless steel toilet looks unusual and brutal, which is why such models are used in interiors of “industrial” style trends: loft, high-tech, industrial, etc. The product is characterized by practicality and unsurpassed durability, and the efforts of technologists make it possible to make it low-noise. The stainless steel toilet is lightweight and easy to clean. With minimal engineering modification, modern high-tech accessories can be easily integrated into its internal cavities.
Polymer concrete, acrylic marble
Various types of artificial stone are used for the manufacture of designer toilets, that is, products produced in single copies or in small series. As a rule, they have an original design and look impressive in the interior, are quite durable and quite reliable, but they are very expensive for their owners.
Acrylic
The wall-hung acrylic toilet is lightweight, excellent in appearance and relatively affordable. The antibacterial coating prevents the appearance of unpleasant odors, the smooth surface is easy to clean and does not accumulate lime deposits. The only drawback of the material is its low durability: after 7-8 years, it usually has to be replaced.
Dimensions of wall-hung toilets
The size of the toilet bowl is especially important for owners of small apartments where the bathroom is not spacious. Depending on the length of the bowl, wall-hung toilets are divided into three groups:
- compact
- no more than 54 cm, ideal for small apartments; - medium
- from 55 to 60 cm, making up the bulk of the assortment; - large
- from 61 to 70 cm, convenient for people with disabilities or designed for spacious bathrooms.
When choosing a model, you should definitely take into account the dimensions of the bowl, correlating them with the dimensions of the bathroom and the design features of the rest of the plumbing.
Wall-hung toilet JACOB DELAFON Presquile with microlift seat
Toilet design
The design decision is an important factor that has a huge impact on the choice of plumbing fixtures. The traditional shape for a bowl is an oval or semi-oval. Among the products in the upper price segment, many models have an almost round shape. Due to the absence of corners, they are considered the most injury-proof. In addition, a round or oval bowl is easier to clean, since it does not have internal corners where dirt can accumulate.
However, consumers gravitate toward variety, so many plumbing manufacturers offer toilets in a variety of shapes: rectangular, teardrop-shaped, etc. It is not difficult to find a wall-hung model of an unusual shape if the embodiment of your design idea requires it. The color palette is also quite wide. Although most models are made in the traditional white color for plumbing fixtures, manufacturers offer products in other shades, from delicate pastel tones to radical black.
Review of manufacturers
Below is a table that contains the best manufacturers taking into account various criteria.
Rating of manufacturers based on several criteria
We hope this table will answer the question of which manufacturer is better. It should be taken into account that new models are entering the market, therefore, the objectivity and relevance of the sample may not be reliable.
Structure of the toilet bowl
There are three main types of toilet bowl, depending on its internal structure: plate-shaped, funnel-shaped and visor-shaped. A bowl in the form of a funnel is considered the most hygienic, but due to the high water level, a lot of splashes are formed in it during the discharge of needs, and not everyone likes this. Such toilets are popular in the USA, but in our country the most successful are visor models with a special shelf that protects against splashing.
Flush design
In traditionally designed toilets, the flush water comes from a hole in the back of the bowl, so the flow does not always reach the front wall, which has to be cleaned with a brush. Another disadvantage is the increased formation of splashes. This flushing system is called direct, or horizontal.
Modern models are usually equipped with a reverse, or circular, flush system. In the upper part of the bowl, close to the rim, there is a series of small holes located along the entire circumference and at an angle. The streams of water flowing through them twist in a spiral and wash the entire inner surface of the bowl. In addition to high-quality cleaning, back flushing is characterized by minimal splashing and low noise. In addition, such a system uses water more economically.
Additional accessories
There are a number of additional accessories and devices that will make using a wall-hung toilet even more convenient and safe for you and your family.
- Cover with microlift.
A device for smoothly lowering the lid significantly extends the life of the seat. At the same time, the lid is easy to remove for washing. - Built-in bidet.
The design consists of an additional container with a built-in water heater, a retractable tube with a fountain nozzle and an electronic control unit. When you press a key, the tube extends from under the seat, and the control unit supplies heated water to the nozzle. - Flush aeration.
Thanks to a special device, the water is saturated with air bubbles and washes the walls of the bowl more effectively. For a complete flush, much less water is required than usual. - Heated seat.
During the cold season, it is much more pleasant to sink into a warm seat, the temperature of which is equal to or slightly higher than body temperature. - Air towel.
After using the bidet, the heated fan turns on, delivering a stream of warm air that dries out the moisture.
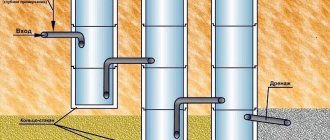
Stages of formwork installation
Take a board made of plywood or chipboard measuring 50/30 cm . Markings are made on it where in the future the places where the toilet will be attached to the wall will be located. Usually this is a point at a height of 35-40 cm. Between the points the width is 20 cm. Before fixing the formwork, you need to bring the toilet to the markings and check their accuracy.
Using a hammer drill or a drill, 2 holes according to the markings of the shield, 15 cm deep. They are cleaned of dust. A “chemical anchor” is poured into the holes (it is in the T.M. Moment and Ceresit catalogs under the index CF 850).
The required length of the pins is cut off (taking into account the distance of penetration into the wall of 15 cm + the distance from the wall to the toilet + the thickness of the toilet + the length of the free end where the nut will be screwed). The pin is inserted into the hole filled with a “chemical anchor” .
The front shield with a drain hole is protected at the hole with polyethylene. The location of the outlet of the toilet should coincide with the inlet of the coupling in the toilet. Two holes are also made in the shield, and through them the shield is secured to pins fixed in the wall. Two side shields are installed nearby. Their verticality is checked with a level. To give the formwork stability, nuts are screwed to the pins. On the inside of the front shield, a piece of foam plastic slightly larger than a matchbox is glued to the top. It will become a form for recessing in the concrete.
Caring for a wall-hung toilet
Methods for maintaining hygiene in a bathroom equipped with a wall-hung toilet are absolutely no different from caring for conventional plumbing fixtures. At least once a week, the bowl and lid, as well as the floor and walls in the bathroom, must be washed using a special disinfectant. For routine maintenance of cleanliness, use a round brush, which is usually located next to the device.
Wall-hung toilet JACOB DELAFON Struktura, used rim, used seats
Photo
Round toilet
Black toilet
Wall-hung toilet with installation
Attached toilet with built-in hidden cistern