So your dream has come true - you now have an air conditioner in your house, now you won’t be afraid of the heat in the summer and the dampness in the room in the off-season, when the heating has not yet been turned on, and there are prolonged rains outside. Immediately after installation, the air conditioner is connected to the electrical network - it must be carried out strictly according to the diagrams indicated on the internal covers of the modules. The operating instructions also contain recommendations for making connections and specify the basic requirements for the electrical network of the installation site.
Device Description
Cassette-type air conditioners are classified as split systems, which, due to their greater efficiency, quickly displaced window devices that had already become familiar “from the shelves” and confidently conquered the climate control equipment market. Split systems operate on the principle of dividing the air conditioning system into two blocks:
- Interior.
- External.
This technology allows, without cluttering the space of window openings and the usable area as a whole, to ensure compliance with a comfortable temperature regime.
Thanks to the evolution of technology, it has become common to place the noise source (compressor) outside. Users were able to enjoy a favorable indoor climate without compromising their concentration.
Choosing an outlet
A home outlet must meet certain requirements:
- the presence of a differentiated relay or reliable grounding is welcome;
- it must fully meet all the requirements and parameters drawn up by the manufacturers, according to the appendices in the instructions for using the split system;
- if the socket is supplied with electricity using aluminum wires, it must be replaced with copper analogues with a normal cross-section;
- it must be connected to the panel via a circuit breaker.
Modern standard European sockets are ideal for connecting high-power household appliances, but all work on connecting an air conditioner must be carried out by a specialist with the appropriate approval, otherwise the product warranty will be void. If you moved to a new place and decided to install a product that was already working, especially since you carried out the dismantling yourself, then follow the recommendations and do everything carefully.
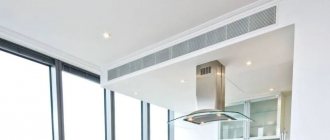
Advantages of a cassette air conditioner
Structurally, the “cassette box” is designed in such a way that cooled air is blown out in 4 directions. While a wall-mounted air conditioner cools relatively small rooms, a cassette air conditioner can cover a fairly large area.
In addition to a large coverage area, this practical technique has a number of other advantages:
- Aesthetics. The indoor units remain invisible because they are located behind the suspended ceiling. Hidden installation does not change the interior of the room, which allows the use of such climate control equipment in representative premises and offices.
- Almost complete absence of noise during operation. The fan built into the unit creates natural circulation of air masses, does not create turbulence, and effectively pumps air.
- Maximum room coverage. Since warm air accumulates in the area where the air conditioner is located, the room temperature will decrease gradually from top to bottom.
- Convenient air flow regulation . Using the rotating bars, you can direct the air jets at your discretion.
Cassette air conditioning systems for large premises are controlled not only by portable remote controls, but also by installing stationary panels connected to the building's electrical network.
The installation of a cassette air conditioner should be planned before renovations are carried out in the room. In this case, it is necessary to have a tension structure with an inter-ceiling space of 15-30 cm
Many cassette systems have additional features. They can heat the room, ionize and humidify the air. To be able to fully coordinate the operation of air conditioners, you can install a unified climate control system.
Which cable to choose
When choosing a wire, you need to focus on the type of network in your apartment. It can be two or three line. In modern apartments, sockets have grounding. Therefore, a three-core cable is used to connect air conditioners. The cross-section of its conductors is selected according to the power of the future split system. Electrical engineering reference books contain all the necessary data. It is also not difficult to determine the cross-sectional area of the wire using online calculators on the Internet.
For example, for the long-term operation mode of the air conditioner, select:
- for devices with power up to 3 kW, a cross-section of 2 sq. mm is sufficient;
- for power from 3 to 5 kW, choose a 2.5 sq. mm cable;
- a power of 7 kW will require a copper cable with a cross-section of 4 sq. mm.
It is worth understanding that the ratio of cross-section and permissible power is different for aluminum and copper cables, products with multi-core conductors and solid ones. Therefore, using reference books or online calculators is a must.
The cable is also selected based on its insulation characteristics. For example, a product intended for outdoor use will be prohibitively expensive. The optimal cable in terms of price-quality ratio is the VVG type. It is made in PVC insulation, the service life of the product is 30 years. A flat modification of this cable is also produced under the marking VVG-P, as well as a non-flammable version VVGng.
Operating principle of cassette air conditioner
The main idea of the designers is to ensure that the air mixture is removed to the outside and promptly replaced with a cooled analogue. A pair of physically separated refrigeration circuits accomplishes this task.
The evaporator (indoor unit) cools the incoming indoor air.
The condenser (external component) removes heat from the “undesirable” mixture according to the climate parameter. The exchange of thermal energy is provided by the refrigerant.
Operating principle of cassette air conditioner
The location of the evaporator is well chosen - cold air currents are dispersed throughout the room 360 degrees.
Connecting the air conditioning system
- the connection point is connected directly to the junction box. In this situation, they do without a socket and plug. But with this connection method, it should be taken into account that the electrical wiring used must withstand the load during the simultaneous operation of all household devices connected to it. The distribution panel is additionally equipped with a system that controls automatic shutdown in case of overload;
- If an air conditioning device is installed during general repair work, a closed structure is most often used during installation. A special channel is installed in the wall. It houses the cable. One end is connected to the distribution panel, and the other is secured to the outlet terminal. At the final stage, the channel is sealed. At the same time, the interior of the room does not deteriorate. The wiring is not influenced by external negative factors;
- Installation of the socket under the air conditioner can be done in an open way. This method is used if the repairs have already been completed and residents do not want to further damage the wall. One of the ends of the wiring is connected to the junction box. A socket is connected to the other end. The cable is located on the surface of the wall covering. It is placed in a decorative box.
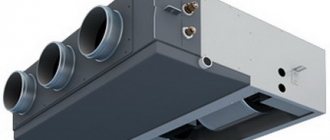
Cassette indoor air conditioners
Being, in fact, a variant of a split system, a cassette air conditioner has certain design specifics. It is designed for large areas.
The external cassette module is not much different from similar elements of other split systems. It includes a compressor and a condenser unit that removes heat from the conditioned space to the outside space. The main differences lie in the design of the internal module.
What is the difference?
The cassette air conditioner has an internal unit of predominantly square shape, designed for installation in the space above the suspended ceiling. That is why the depth of the module is 20-35 cm. This is enough to accommodate,
The dimensions of the external panel most often correspond to a standard suspended ceiling cell (50x50 cm). Outwardly, it looks like an ordinary suspended ceiling, in which there are cells with blinds, through which cooling is carried out.
Preventive Maintenance
Cleaning (prevention) of an air conditioner installed in a house or apartment includes the following work:
- periodic change of filters;
- cleaning elements from dust and dirt;
- diagnostics, refilling with freon;
- if problems are identified, repair or restoration.
In standard cases, maintenance is performed 1-2 times a year. Mechanical filters require monthly cleaning. You can do this yourself. First you need to remove the panel, then remove the filters and wash them thoroughly under water using dishwashing detergent. Then dry it well and put it in place, covering it with a panel.
What is good about this cooling method?
Let's talk about this using the example of wall-mounted air conditioners. The fact is that they are convenient for small spaces. And in large ones it is impractical to install a wall block. If placed on the wall, the device will not create enough air flow to reach the middle of the room, not to mention the ability to blow on the opposite wall.
Invisible and effective
You can, of course, hang the room with wall elements around the entire perimeter, but the cost and aesthetics of such a solution are unlikely to interest the user. This is where installing an air conditioner with a unit built into the ceiling structure will be useful.
Cassette air conditioners cope best with cooling large areas, and, being semi-industrial products, are most often suitable for air conditioning:
- Trading halls
- Large lobbies
- Catering establishments
- Shops and workshops
- Exhibition complexes and galleries
Having a working evaporator located around the perimeter of the outer panel of the housing, the cassette air conditioner is capable of blowing cooled air in four directions, covering a larger area than a classic wall-mounted unit.
Conclusions and useful video on the topic
Since installing an air conditioner and sockets for it takes a lot of time and effort, the issues of its power supply must be taken as seriously as possible. Before installation, you should take the advice of electricians and designers.
Some recommendations for installing sockets in an apartment are given in the video below:
If possible, you should design the location of an individual outlet and lay a separate power line to ensure uninterrupted operation of the climate control equipment. This can be done both at the stage of major renovation of the premises, and during the installation of an air conditioner in an already renovated room.
Tell us where and how you placed the electrical outlet for the air conditioner in your apartment/office/house. Share the nuances of the location known only to you. Please leave comments, ask questions, post photos in the block form below.
Installation of cassette air conditioner
Installation in new buildings and in other types of premises is identical. Although there are some nuances, in general the technology is similar.
When choosing a cassette-type split system, you need to remember that its size matters. A deep casing may not fit into the narrow gap between the ceiling and the suspended sheet
The whole process can be divided into several stages:
- installation of blocks - external and internal;
- laying air ducts and power lines;
- installation of a control panel if the air conditioner is installed at a large facility;
- testing, adjustment.
The installation of the air conditioner must be carried out taking into account the climatic conditions of the region. If the air contains aggressive substances, they can negatively affect the operation of the device, so an additional air filter will be required.
High-frequency equipment installed nearby can have a negative impact on the cassette air conditioner. It can act as a barrier to the inductive current that must function in the air conditioner motor
A guarantee of successful operation of the air conditioner is compliance with all rules for installing the external unit and indoor module:
- The wiring must be thick enough to withstand high loads.
- It is not recommended to install any air conditioners in industrial premises where the air contains vapors of acids and other toxic and flammable substances in high concentrations.
- Cassette air conditioners must not be installed in places where they may come into contact with technical oils.
- The height of the room should not be less than 2.6 m.
- The ceiling must be strong and as horizontal as possible.
- The unit must be completely grounded, both the circuit and the metal base.
- There should be no obstacles left in the air conditioner installation area after the work is completed.
- The gaps between the air conditioner body and the extreme points of the holes must be equal.
The order in which the air conditioner units are installed does not matter, but until it is at the installation site, it is not recommended to unpack it. The cassette player works most effectively when the indoor module is installed in the center of the ceiling.
Installation of the indoor unit
In most cases, the air conditioner comes with a cardboard sample of identical dimensions. But even if it is missing, you need to do it yourself. It will be useful as a template for marking.
The location of the air conditioner depends on the power. Standard size 600x600 mm or 1200x60 mm. The outer panel has a beautiful design
Before you begin attaching the internal cassette units of air conditioners to the ceiling, you must first draw an outline on the floor and then transfer it to the ceiling. Next, a small cut is made in the ceiling profile. If the suspended structure vibrates, a piece of foam plastic is glued to the ceiling.
Next, mark the mounting locations for the module, drill holes in the marked locations to a depth of about 50 mm with a diameter of 12 mm and insert pins into them. A nut, a washer and another nut are screwed onto each stud. After this, the internal module is lifted up, the studs are inserted into the grooves intended for them, and the nuts are tightened.
The block for internal installation is installed so that it fits flush with the surface of the ceiling panel. This will happen if the distance between the main and suspended ceilings is identical to the immersion depth of the “cassette player” body.
The horizontality of the plane is controlled by a level. If you skip this procedure, the drainage fluid inside the module will leak out and drip onto your head. When the condition of flatness of the plane is met, tighten the nuts well. The distance between the modules of the unit is measured in order to subsequently lay the freon line.
At the next stage, the highway is cut. This operation requires great precision, down to the millimeter. An error with the size will complicate things. Insufficient length means additional financial investment. Larger quantities can be hidden in the intershelf space.
Since the indoor unit of the air conditioner is located in a suspended ceiling structure, this saves space on the wall, and most importantly, does not spoil the interior
A disc pipe cutter is most suitable for cutting the main line. You cannot cut with a hacksaw or grinder. These tools can leave metal shavings, which can subsequently negatively affect the performance of the air conditioner.
The cut is carefully cleaned with a file or sandpaper, and the shavings are shaken out. The hole formed as a result of cutting the pipe is closed with tape or tape, and the pipe itself is insulated.
Studs with hooks are attached to the ceiling to secure the freon pipeline. If you need to change the geometry of the pipe, use a pipe bender, but before doing this, cut the insulation and move it back a little. Having completed the procedure, the ceiling surface is sealed back.
If it is necessary to expand the pipeline, a special flaring machine is used, which increases the internal cross-section of the pipe to match its external one. Adjust the size gradually - making about three passes, each time increasing the size of the collet. Otherwise, the pipe may burst.
The hoses are brought to the holes of the internal module, the fixing nuts are unscrewed and put on the tubes. The ends are cleaned with a file, and shavings are collected with a vacuum cleaner. Using a flaring tool, expand the diameter of the pipe so that it covers the nozzle of the indoor unit. The tube is clamped and secured with a nut using keys. One of them holds the nozzle, and the second tightens the nut.
If the nuts are unevenly or insufficiently tightened, there is a possibility of moisture leaking into the room. If the air conditioner does not fit tightly to the ceiling, the gap can be eliminated by tightening the nuts on the studs
The junction area is insulated and tightened with clamps. Next, remove the air intake grille and put it aside for a while. Then take out the 4 corner plugs and find the motor with which the blinds move. This position must necessarily be combined with the connection point of the freon line.
Fix the overlay in the area of the brackets on the block, carefully move the latter so that it fits exactly into the hole. Using a level, level the cladding and return the air intake grille to its place, securing it on the sides with plugs.
The use of units is limited by the installation height of the cassette air conditioner, because they cannot be installed in an apartment with a ceiling height of 2.5 m. Based on this requirement, it is recommended to use cassette players in rooms with a height of at least 3 m.
Installation of a street block
Installation of a street block is possible subject to certain points:
- rigidity of the surface intended for installation;
- no obstacles in the way of air flow;
- the presence of metal plates to protect the unit from strong gusty winds;
- the closest possible distance between blocks;
- taking into account the difference between the geometric center of the block and its center of mass.
When moving the block, it must not be tilted more than 45⁰. It is strictly forbidden to place the module on its side.
The street block is mounted on a supporting surface made of brick or concrete. At the same time, the fastening rules and current standards are observed, and the weight of the unit is also taken into account.
In the case when the option of “floor” fixation of the external block is chosen, it needs its own concrete foundation, otherwise the structure will not be able to resist gusts of wind. Fastening is carried out using a bracket for the air conditioner.
After this, a pipeline is installed into the room to remove the refrigerant from the condenser. The main thing is to ensure a minimum of cold losses on the section of the main line from the external to the internal unit.
The installation location should be chosen so that there is no snow or leaves on the module. When the air conditioner operates for heating, the condensate discharged from the outdoor unit should not cause any inconvenience.
Nuances of installing a pipeline and drainage system
To increase the service life of the air conditioner, it is necessary to take into account several nuances:
- The length of the line intended for refrigerant circulation must not be exceeded.
- More than 15 bends in the pipeline should not be allowed. Bends of more than 90⁰ and a radius of more than 9-10 cm are unacceptable.
- After installing the sockets, mandatory vacuum cleaning of the circuit from excess air, dust, and moisture is required. To do this, a valve is connected to the pump along the external circuit. During the procedure, all tubes should be visually checked for integrity.
- To fully ensure the integrity of the system, the joints can be covered with a soap solution after filling the tubes with freon.
If necessary, the system is topped up with refrigerant. Refilling is required when the pipeline in one direction is longer than 8 m.
An ideal option for draining condensate, when it does not drip on the heads of passers-by, but goes into the sewer. This can only be done at the stage of construction or major renovation of the building.
Work on installing a drainage system begins with connecting a plastic pipe to the drainage pump of the indoor unit. It is put on the pipe and secured with a clamp. Next, the pipe is pulled to the drainage point. Typically, the outer diameter of the pipe is 37-39 mm, the inner diameter is 32 mm.
The laying is done at a slight angle - literally a few centimeters for every square meter. In general, the slope is a maximum of 30⁰, ─ the rise is no more than 20 cm. The waste should leave the air conditioner by gravity and under no circumstances be returned to the collection tank.
The other end of the drainage pipe should not be immersed in liquid. To check the functionality of the drainage system, pour water into a special hole and turn on the air conditioner in cooling mode. In this situation, the pump and drain will show their work.
Connecting the air conditioner to the mains
A special feature of the cassette air conditioner connection diagram is that it can only be connected to an individual machine. If there is no voltage stabilizer in the general wiring, it is advisable to add this element to the circuit.
The wires from the evaporator of the cassette type air conditioner are connected to the corresponding contacts of the outdoor module. Manufacturers, as a rule, place a diagram on the inside of the lid, which greatly simplifies the process
Both indoor and outdoor units must be grounded. Subsequently, the grounding will be combined into a single circuit. If an extension cord is needed, it requires a cable of the same type and cross-section.
Please note that the wires must not intersect with refrigeration pipelines or shut-off valves. There must be fuses in the power circuit.
After installation is complete, you need to press the control panel and start the unit in test mode. You should listen to how the engines in the blocks work. If there are extraneous sounds, rattling or vibration, the unit must be turned off and the cause of the problem must be looked for.
Mounting requirements
Fastenings for mounting the outdoor unit of an air conditioner located at a high altitude are unlikely to be subject to maintenance or at least careful inspection during operation. Therefore, increased requirements are initially placed on them:
- minimum dead weight and reliability of all connections;
- compliance of the bracket with the mass of the intended load, while a double safety margin is desirable;
- the diameter and position of the holes must be suitable for the appropriate fasteners for the air conditioner being installed;
- the ability to maintain its strength properties over a wide range of temperatures and in conditions of high humidity.
Correct mounting of the outdoor unit
Attention! For a well-made bracket, the holes are drilled before painting. Otherwise, they will become the source of spreading corrosion.
Production materials and coating
The most durable brackets are made of stainless steel. But the increased cost has become a significant obstacle to their widespread use. Therefore, the most popular products are made of galvanized steel, additionally treated with other anti-corrosion coatings. Among them are:
- paint and varnish enamels;
- polymer compositions;
- powder dyes.
The latter option is also characterized by increased strength to mechanical stress, which can protect against accidental damage to the protective layer during careless installation.
Installation of the internal part
Installation of simple cassette air conditioners begins with the installation of the indoor unit. The best place for an air conditioner is in the center of the room. The device will be most effective and useful and will be able to create the correct air flow.
Before installing the unit, a cardboard sample is created that matches the size of the device (if such a sample is not included with the device).
The sample is applied to a place on the wall or ceiling to determine the scope of work. If there is such a need, the ceiling profile (aluminum) is trimmed, but only after it has been thoroughly strengthened. To reduce vibration of the indoor unit, the ceiling is additionally equipped with foam inserts before installation. For the studs on which the air conditioner will be held, holes are made using a drill.
Nuts are put on each stud, after which the internal block is attached to the grooves. With the help of nuts the body is well secured.
Installation of additional pipes
Using a level, the position of the block is checked (otherwise liquid will collect in the future). After this, the distance for the future freon line is measured. The pipes that come with the device are carefully trimmed to fit the measurements taken. It is important to clean out any metal shavings that may remain in the scraps. Special tools are used to process the edges of pipes.
To install pipes, insulation is carried out using adhesive tape or adhesive tape. Then the pipe is insulated and hung on prepared hooks. Pipes are secured using ties to prevent them from loosening during the passage of air. Bent pipes require additional fastening - do not bend the pipe manually, this can damage or break it. If the pipe length is not enough, you can increase it by increasing the diameter. The final fitting of the pipes is welding of individual parts.
Connecting the internal part of the system
Fixed pipes should be connected to the block. To do this, the following steps are carried out:
- pipes are connected to the nozzles of the inside of the device;
- the nut is put on the pipe;
- a cone is attached to the pipe;
- the cone is securely fixed;
- Insulation is attached between the block and the pipe.
After the final fixation of the connecting parts, a strip is installed that covers the pipes. Using a level, the cladding is installed - the internal block is completely covered and adjusted to the decor.
If the decorative elements do not fit tightly, tighten the fastening nuts. All parts must be firmly fixed to prevent damage to the device and damage to the ceiling.
Types of brackets
Brackets for stable mounting of air conditioners have horizontal elements on which the installed unit is placed and secured against spontaneous displacement, and vertical parts that are pressed tightly against the wall. For ease of fastening, holes are provided.
In most cases, the brackets take the form of L-shaped parts, used in pairs. The differences usually relate to the shape of the profiles used in the manufacture and the presence of additional elements intended to strengthen the structure.
Important! The production of brackets used outdoors uses stainless or ordinary structural steel with anti-corrosion treatment.
Corner brackets
This simplest type of fastening is made by perpendicular welding of corners with a shelf thickness of at least 2 mm.
It can withstand moderate loads, but over time, vibration negatively affects the strength of the seam. In addition, accidental damage to the anti-corrosion coating can lead to a rapid decrease in the strength of the product and a change in its configuration.
Structures made of U-shaped profiles connected by bolts
Such brackets are more reliable due to the presence of additional stiffening ribs and a bolted connection that is resistant to vibration. Fasteners made of galvanized steel do not corrode for a long time and can be replaced with new ones if damage is suspected.
Brackets for outdoor unit
Brackets made of U-shaped profile with additional reinforcement
This design is similar to the previous one, but has slightly elongated vertical elements, to which an additional jib is attached at a certain angle. It gives the entire system absolute rigidity and allows it to be loaded with a fairly heavy load.
Brackets made of U-shaped profile, fastened with a horizontal strip
Such devices, in addition to all the positive qualities of the previously described models, also have resistance to horizontal displacement and ease of mounting to the wall. They can be installed under the most expensive and critical equipment.
For information! The presence of elongated holes on the horizontal shelves of the brackets makes them suitable for installation under any brand of air conditioners.
Features of installing a cassette air conditioner
If we consider the external module of a cassette split system, there are no features that distinguish the installation from the classic standard.
The internal cassette module is a completely different matter. In this case, the installation-related features are determined by the design of the block.
Main features of cassette module installation:
- the surface for installing the cassette is strictly horizontal;
- the gap between the open and false ceiling is at least 350 mm;
- the ceiling structure must withstand 4 times the weight of the cassette;
- The installation position corresponds to the required distances from obstacles.
When installing the system, you should take into account the location of doorways, heating elements, and various heat sources.
Also, the installation position should be coordinated according to the power supply points, the possibilities of supplying loop pipelines and the condensate drainage channel.
The layout of the cassette on the ceiling, which should be followed when installing a cassette air conditioner. Departure from the established parameters threatens to significantly reduce the quality of the device’s operation.
The cassette must be mounted in such a way as to exclude the presence of objects that impede the uniform distribution of air.
As a rule, it is necessary to install the cassette module as close as possible to the central point of the room. Installation is performed with the distribution panel and other components included in the panel assembly removed.
The cassette module is installed using the hanging method. Therefore, suspended metal rods have to be installed on the main ceiling.
Holes for four anchor rods are drilled on the surface of the main ceiling. The size (standard) between the rods is pre-marked in width and length.
Cassette suspension diagram: 1 – internal air conditioner module; 2 – false ceiling level; 3 – metal support rods with anchors for fastening in a concrete ceiling; 4 – concrete ceiling
The cassette module is suspended from the installed rods, leveled horizontally and secured. Accordingly, it is necessary to divert the drainage line according to all the rules - at a slope, without sharp bends. And also connect the refrigeration circuit pipes.
Only after this work has been completed, the surrounding part of the false ceiling is assembled and the parts of the distribution panel of the split system cassette are installed.
Gating stage
Marking the grooves for the air conditioner is done in several ways. It depends on the drainage system:
- If all the pipes - freon and drainage - run side by side, the recess is made at an angle of 3 degrees so that condensate does not stagnate.
- If the drainage is located separately, the slope of the groove is needed only for the drainage hose. The freon line is laid without a slope. Can be done on the ceiling or walls.
- If it is not possible to drain the drainage liquid by gravity, it is necessary to install a pump with which water will be removed from the system.
When marking the recess, you cannot make sharp turns, since it will be impossible to bend the pipes for such a turn. Sharp corners must be avoided, otherwise the copper tube will crease and freon will not circulate freely.
The recess is made 60 mm wide and 40 mm high. For a drainage tube 20mm deep and wide. The work is carried out with a wall chaser. An ordinary grinder and chisel are not suitable, as they can destroy the wall. In a panel house, this can disrupt the load-bearing performance of the walls.
The original models have eyeliner on the left side. In Chinese air conditioners, sometimes there are pipe inlets on the right.
The best cassette air conditioners
When thinking about purchasing a cassette air conditioner, many people are confused about which model is more worthy. In fact, everything is simple here - you need to rely on reviews from real owners, because they are the ones who point out all the advantages and disadvantages of the devices. The description of the models in our rating includes the main features of the products, as well as their positive and negative aspects.
Dahatsu DH-CS18A
The cassette type air conditioner has a square shape. It looks stylish and perfectly complements the interior of the room, even though people rarely pay attention to such things.
The best cassette air conditioner in our rating is equipped with a panel with a circular flow (a full circle of 360 degrees). A comfortable sleep mode is provided here - the device does not interfere with users’ rest at night. The manufacturer also added automatic defrosting of frost and warm start to the functionality - these functions allow the equipment to work longer.
Pros:
- well-known reliable brand;
- automatic diagnostics;
- processing a sufficient area of the room;
- rapid cooling;
- ease of installation.
Flaws:
- the only negative is the unfinished automatic restart function.
Autorestart is needed for the air conditioner to restore operation in the event of a power outage.
Hisense AUC-18HR4SAA
A cassette air conditioner for an apartment is a full-fledged split system. The model is convenient to use both in small and large rooms.
The device operates in several modes. It efficiently heats and cools the air, and can also dehumidify or ventilate it. There is only one indoor unit, but it is quite enough for good results in the operation of the equipment. You can buy a cassette air conditioner for 53 thousand rubles. average.
Advantages:
- ease of use;
- supply ventilation mode;
- self-diagnosis;
- optimal dimensions for small living spaces;
- great timer.
The disadvantage is that the device is not sold in all stores.
Ballu BLC_C-12HN1
The Ballu compact cassette air conditioner is energy efficient, although it does not seem so at first glance. It is made in a light tone and has a square shape and stylish design, due to which it looks quite modern.
Positive reviews most often come about the capabilities of the BLC_C-12HN1. The unit operates reliably, provides fresh air and operates in intensive mode if necessary.
Air mixing involves the air conditioner using some of the fresh air from the street and introducing it into the room.
Advantages:
- optimal power for residential premises;
- high-quality drainage pump;
- excellent timer;
- accelerated operating mode;
- Japanese quality compressor.
Flaws:
- not detected.
Kentatsu KSZT35HFAN1 / KSUT35HFAN1
Truly, an amazing cassette-type air conditioner does not stand out much in appearance, but it has functionality, thanks to which it is ready to outdo more expensive models. This is precisely why it is loved by consumers who value real possibilities, and not a “wrapper”. The Kentatsu device operates at very high power. It processes the air over a large area of the room and does it with the highest quality, which buyers can verify on the first day after purchase. You can buy a cassette-type air conditioner for 43 thousand rubles.
Pros:
- durability;
- informative display on the control panel;
- Japanese quality;
- easy installation;
- quiet night mode.
Flaws:
- Some consumers say the disadvantage is that the design is not the most presentable.
Ballu BLC_C-18HN1
A cassette air conditioner with high performance pleases consumers with its appearance. It fits perfectly into the interior of any room, be it an apartment or a shopping center.
The device uses electricity economically - for this, the manufacturer has provided class A energy efficiency. It copes well with all its functions at a minimum temperature of -15 degrees. An additional feature is the addition of fresh air. A cassette air conditioner for a home costs about 77 thousand rubles.
Advantages:
- ease of installation;
- cooling operation down to -15 degrees;
- presence of an automatic work program;
- optimal route length;
- high-quality external blocks.
Flaws:
- A timer set for more than 15 hours does not always work at the end.
Haier AB12CS1ERA/1U12BS2ERA
The Haier cassette air conditioner has a rectangular body, minimalist design and interesting features. Many products from this manufacturer have such characteristics - it is for these reasons that the brand is remembered by the consumer masses. Positive reviews about the air conditioner are explained by its excellent characteristics. The unit operates at medium power and efficiently processes the air in a large part of the room. In addition to standard cooling and heating, it can also ventilate or dehumidify air. These functions will certainly be useful to owners, depending on the situation.
Advantages:
- clear controls;
- self-diagnosis;
- automatic restart;
- optimal temperature limits for unit operation;
- selection of operating mode by the system itself.
Flaws:
- not detected.
Ballu BLC_C-24HN1
The performance of the Ballu cassette air conditioner is as good as its appearance. The manufacturer really took care of the design and made it presentable. This approach will definitely be appreciated by all customers.
The model has high performance. It saves energy and rarely causes inconvenience to users. You can control the air conditioner using the remote control - it is, accordingly, supplied in the kit. The price of such a product is pleasantly surprising - 51 thousand rubles. average.
Pros:
- favorable price;
- air mixing at any time of the year;
- full-size external units;
- durable body;
- auto mode.
The downside is that the warranty is only for one year.
The manufacturer gives only a 12-month warranty for the air conditioner, but, based on customer reviews, it works without breakdowns for at least 5 years
LG UT30W/UU30W
The LG cassette air conditioner deserves no less attention. All its capabilities fully comply with the characteristics declared by the manufacturer, which is rare in modern times. There is no provision for controlling the unit via Wi-Fi, but the most necessary functionality suits people quite well.
The device dehumidifies the air, cools and heats it when necessary. It is capable of adapting to negative room temperatures in a short period of time and performing the assigned task without any problems. As for the area of the processing room, it reaches 88 sq.m., which is considered a very high figure. The air conditioner is sold at a price of about 121 thousand rubles.
Advantages:
- quiet operation;
- reliable reversible compressor (for heating);
- convenient timer;
- self-diagnosis;
- good power in any operating mode.
What to consider
Before installing a device in a residential area, it is necessary to clearly calculate its total power and compare it with the same values for existing household installations. For this purpose, excess heat in the apartment is calculated. If the room is equipped with heat-generating devices or its windows have a southern exposure, the air conditioner power should be increased by 20-30 percent. In the opposite situation, incorrect operation of the device will lead to its rapid breakdown.
Drainage
Please note that the drainage hose must be located below the freon line.
Connect the air conditioner drain hoses.
For extensions, many use a regular metal-plastic pipe d-16mm. The factory drain tube is flared and metal-plastic is inserted into it, sealing the connection at the top with electrical tape.
However, over time, a fungus may form inside the metal-plastic material, which will not allow the water to drain away quickly enough.
Therefore, other installers use only corrugated pipes as drainage.
In addition, it is the corrugated drainage that allows you to connect directly to the bath without additional connections.
General recommendations
The electrical circuit of an air conditioner for household services differs from the connection of a three-phase device, which is used in large offices for various purposes, business centers, and supermarkets.
It must be remembered that electrical installation is carried out in accordance with the Installation Rules and relevant regulations.
Before connecting the units to the electrical network, you should carefully prepare.
To do this you should:
- carefully read the diagrams and specifications for components and materials of the device;
- inspect the existing electrical supply system, including the location and cross-section of incoming cables;
- test the intended route with a detector for the absence of internal electrical wiring and metal elements of building structures;
- analyze the composition of the walls on the surface or inside of which electrical work will be performed.
Connecting the air conditioning system is impossible if there is old aluminum wiring in the house and there is no grounding.
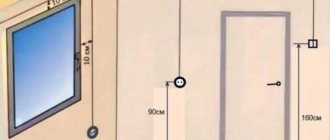
Direct cable laying must be carried out taking into account the following requirements:
- the distribution box, switch, socket for a household air conditioner are located in an accessible place;
- the socket is installed at a distance of at least 50 cm from the floor and grounded metal elements (batteries, water and heat supply pipes);
- The wire is laid only horizontally and vertically;
- when laying horizontally they recede:
- from the cornice 5-10 cm,
- from the ceiling - 15 cm,
— from the baseboard – 15-20 cm;
- there must be at least 10 cm between the vertically stretched wire and corners, as well as window and door openings;
- laying parallel to gas pipes is carried out at a distance of 1 m from them;
- The electrical wire is protected from heating pipes with insulation.
In addition, the following rules must be observed for connecting devices to the electrical network:
- It is strictly forbidden to connect wires by twisting. Extension is carried out using terminal blocks or bolts;
- It is not allowed to connect a wire made of aluminum and copper due to their different electrical conductivity (for a copper cable this figure is one and a half times higher).
External wiring
If the method of laying on the wall surface is chosen, then the cables are fixed every 50-60 cm with plastic clamps, which in turn are secured to the wall with screws. When using boxes in which the wire is laid, they are secured with glue or screws.
Internal wiring
Cables hidden in the wall are laid in plastic corrugated pipes, having previously made a recess (groove) of the required length. Typically, the corrugated pipe is secured inside the wall with clamps. If the depth of the groove is 2 cm or more, then it is allowed to carry out work without a corrugated pipe.
Wires must not be laid in bunches and at a distance from each other of less than 3 mm.
Flaring of copper tubes
We move on to the stage of preparing the tubes.
Error No. 5 You can cut them only with a special pipe cutter, no hacksaws or grinders!
When making a cut, it is necessary to hold the end of the copper pipe strictly downward in order to prevent any chips from getting inside.
The ends are processed with a rimmer.
Use the rimmer carefully to avoid scratching the skirt. The quality of rolling is one of the most important aspects in installing an air conditioner.
Flaring is carried out using a special tool with an eccentric. Don't forget to put the connecting nut on the tube before this step!
The width of the flare should be such that the connection eventually fits freely and unhindered into the nut.
The height of installation of the tube in the rolling clamp is strictly regulated.
The simplest and most proven old-fashioned way to determine the quality of rolling, at least at the initial stage, is to see your reflection in the “skirt”.
Flaring of the pipes of the outdoor unit will have to be done outdoors on weight. Otherwise, the line simply will not fit through the hole.
Error No. 7 Please note - if the installation does not take place on a hot, warm day, then when bringing copper pipes home from the street, close their ends and be sure to wait time for the copper to reach room temperature.
If you bring them in cold and open, then due to the dew point effect, condensation will form inside the tube, which, on a poorly evacuated air conditioner, can lead to dire consequences.