Air conditioners and split systems are modern devices that maintain optimal climatic conditions in residential areas. Unfortunately, not every owner can purchase a normal climate system due to its high cost. In such cases, a homemade air conditioner using improvised means, which you can actually make at home in a few hours, will help save the situation. Home cooling structures can be made from plastic containers, a radiator, a freezer - the choice of materials rests with the user. To learn how to make an air conditioner with your own hands, you need to familiarize yourself with the principles of its operation.
How the home climate system works
Before making an air conditioner with your own hands, it’s a good idea to learn how the most common household cooler works. The device consists of two heat exchangers, a compressor, two fans and a throttling device. The heat exchanger is located on the inside of the living space; it takes heat from the passing air masses, after which they return cool to the house.
The refrigerant of the device transfers the removed warm air through the tubes towards the second radiator, which, in turn, transfers it outside. The effectiveness of household climate control systems is determined by the processes of vaporization and condensation, which are accompanied by heat exchange. Household split systems take heat for the refrigerant from the apartment air masses. At this time, the compressor creates pressure in the closed system and transports air through the throttle to another heat exchanger. Here the refrigerant undergoes condensation due to the influence of external air masses and releases thermal energy to them.
How to make air conditioning in a car
To make a car version of the air conditioner you will need:
- a plastic container (a container from a cooler bag is best);
- interior radiator from the stove;
- small submersible pump (aquarium or machine washer);
- a pair of fans;
- connecting tubes.
In a car, the device can only work from the cigarette lighter, so if you do not have a car charger for your phone, you will need to purchase one.
To make an air conditioner for your car with your own hands, follow these instructions:
- Place a pump at the bottom of the container.
- Route the wires from the pump outside.
- Make a couple of holes in the lid of the container for fans.
- Secure the fans.
- Install the stove radiator on the inside of the cover using silicone.
- Combine the wires from the fans, pump, and charger.
- Connect the pump to the radiator using connecting pipes.
- Place ice inside the container.
- The device is ready for use.
The operating principle of condensation equipment is based on a change in the aggregate state of the working fluid, depending on pressure and temperature in a closed cycle. At the same time, the condenser transforms the freon gas into liquid, and the evaporator-suspension into gas. As a rule, to transfer heat, the air conditioner expends the electricity required to operate the compressor shaft. At the same time, the engine, creating pressure differences, forces the working fluid to forcibly circulate in the system. And the thermal energy released due to air cooling is removed outside the room.
If the device operates in cooling mode, the refrigerant gradually evaporates in the heat exchanger of the indoor unit. At the same time, freon condenses in the outdoor module.
As a rule, the exchange of thermal energy and air occurs using copper heat exchangers. To speed up this process, ventilation devices are often used. In addition, by passing air flow between the heat exchanger and the refrigerant, these mechanisms prevent overheating of the condensing device.
To maintain the required pressure in the system, the air conditioner is equipped with a special throttle.
When the unit operates in cooling mode, the above process occurs in its internal module. However, if the device is turned on for heating, the air conditioner performs the functions of a heater. At the same time, the above processes take place in the external unit of the device.
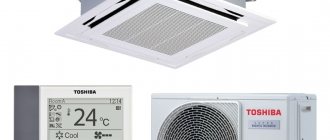
Does it make sense to purchase a factory split system?
Air conditioners have become a part of people's lives, especially those living in the southern part of the country. This device has become one of the most indispensable. But in addition to the positive properties, factory coolers also have a large number of disadvantages.
The advantages of ready-made climate systems include:
- Creating comfortable indoor climate conditions at any temperature acceptable to you;
- Filtration of incoming air:
- The presence of humidifiers and ionizers in many modern devices that maintain the microclimate in a living space;
These three advantages are enough to buy a split system in the middle of a hot summer.
But it is necessary to take into account some disadvantages:
- Modern split systems require proper care and regular cleaning. If you do not clean the device in a timely manner, fungi and pathogenic microorganisms multiply on its parts, which, together with the released air masses, enter the living room and provoke the development of allergic reactions;
- Despite the quality guarantee, many modern split systems require regular maintenance. Technicians will be able to notice a malfunction in the operation of the device in time and prevent its further breakdown;
- The factory cooler consumes a sufficient amount of energy, so in the summer you will have to pay more for electricity;
- Older models of air conditioners that are not equipped with built-in humidifiers, when used frequently, lead to a decrease in the percentage of air humidity in the room. This can negatively affect the condition of the skin, organs of vision, and nasopharyngeal mucosa;
- Due to frequent operation of the factory cooler at the lowest temperatures, the likelihood of developing colds increases.
Reference! Also, if you do not clean the air conditioner in a timely manner from dust, when you turn it on, the house may be filled with an unpleasant odor, which will be difficult to get rid of.
Having assessed the pros and cons of factory split systems, you can decide whether it is worth purchasing such devices or whether you can try to do without them.
Pros and cons of self-made climate systems
Homemade air conditioner from improvised means also has its advantages and disadvantages. It is suitable for those citizens who live in regions with a temperate climate and cool summers. In the south such cooling systems will be of little use.
The advantages of home split systems include:
- Easy installation. Some types of homemade climate systems can be built by people who have nothing to do with technology. Moreover, to install such devices you need parts that can be found in almost every home;
- Positive result;
- Low cost.
These advantages are offset by disadvantages:
- The need to regularly recheck the design and change the ice (if used). This method is not suitable for those who want to cool the room at night;
- Possibility of short circuit when ice melts;
- The duration of room cooling is only a few hours.
With frequent use of a homemade air conditioner, you can notice that the level of moisture in a living room increases significantly during its operation, because of this a person feels much worse than in the heat. This is due to the fact that the air masses entering the room constantly pass through the ice.
To summarize, we can say that homemade split systems from improvised means are working devices that can help a person out during periods of extreme heat. It is advisable to use such devices several times a week in cases of urgent need, but not every day.
Regular use is fraught with an increase in humidity in the room, as well as the development of problems with wiring, since many home-made designs operate on the basis of ice and a fan turned on. When ice melts and splashes on it, the risk of a short circuit increases.
The simplest design
An air conditioner is a device that helps maintain an optimal temperature in a room suitable for people to live in. Modern cooling systems can be divided into two types: compressor and evaporative. The latter are considered easier to perform independently. Back in the last century, many citizens came up with climate control systems for their homes that functioned by evaporating moisture under the influence of heat. To do this, the owners hung a thick piece of fabric on the window, and one end of it was lowered into a basin of water. Warm air entered the room from the street, which dried the fabric and contributed to the appearance of moist and cooled air.
Some owners still use homemade evaporative air conditioners today. Only in addition to the main materials, they also use a fan, which speeds up the blowing process.
To build a home climate system you will need to prepare:
- Medium-sized fan (you can buy the cheapest one on the market);
- A bowl of cold water;
- Durable cloth or towel;
- Wire (it is needed to strengthen the frame).
DIY air conditioning at home - step-by-step instructions:
- The first step is to insert a fan into the window. It must match the dimensions of the window, so you should take measurements before purchasing;
- Secure the structure with a wire frame;
- Attach the prepared fabric to the wire, lower its lower part into a basin of cold water.
Now you need to turn on the fan and wait for cool air to appear in the room.
Reference! This method of cooling a room is considered the simplest and quietest. The disadvantage is the need to periodically add water to the basin. This is not always convenient, especially at night, when residents want to spend the night in cool rooms.
Cheapest option 2
Photo of the finished machine from a milk flask (can)
Finding a milk can is not a problem now. There are quite a few of them left over from Soviet times, and you can easily find a suitable option on Avito or Yulia.
A flask makes a really good distillation cube of decent size, which is suitable for distilling a large volume of mash. It is not so difficult to process it into a moonshine still, because the principle remains the same as with a saucepan.
A possible option for implementing a moonshine still from a flask.
How to convert a can into a moonshine still
I suggest reading the instructions in text format again, and then watching the video.
Hole in the cover for the fitting.
- Using a 20 mm feather drill, we make a hole in the can lid.
- We insert a brass fitting into it, which is tightly clamped from the inside with a nut and gasket.
- If you plan to monitor the temperature, you can make another hole for a bimetallic thermometer.
- We put a stainless steel gas hose on the fitting, which we connect to the steam tank.
- We make a dry steamer with our own hands from a jar; for detailed instructions, read the link provided or continue watching in a separate video.
- From the steamer we move the hose to the refrigerator, which can be made flow-through or regular. The first option is more effective and complex, but for the second you just need a large container of water (bucket).
- Let's tighten all the nuts and start making moonshine!
Making a distiller from a can on video
One of the most detailed videos from Youtube, the OverCraft channel, has collected almost 250 thousand views. The author shows all his actions on video and makes pop-up tips that describe the diameters and names of the necessary equipment.
The video is short, but it is enough to understand the general principles of processing a can into a moonshine still.
Making a steamer with your own hands
As a bonus, we are posting a video from Antonich and Alexey Podolyak, where the author makes a steamer from an ordinary can. Using this principle, you can even make a bubbler (filtration occurs through water), if it seems to you a more useful and effective device for purifying alcohol vapor.
We believe that any classic distiller should have 1 steamer or 1 bubbler. Combining them or making several at once does not make practical sense. Just wash unnecessary equipment and increase alcohol losses.
Plastic containers + water
You can use a fan to cool the air in the room together with plastic containers.
This homemade air conditioner is constructed from the following available materials:
- Plastic containers of various shapes;
- Floor fan;
- Cold water.
Water will need to be poured into sealable plastic containers. It is first recommended to put them in the freezer overnight. Here you can use one trick - to prevent the ice from melting quickly, you need to add a few tablespoons of salt to the water. How to make a homemade air conditioner using improvised materials:
- Install the fan next to the table or cabinet;
- Place plastic containers filled with ice water in front of it. The distance between them should be no more than 3-4 cm;
- Connect the fan to the power supply.
Normalization of the indoor climate occurs due to the fact that melting ice takes heat from the air, making it cool, and the fan distributes the air throughout the room. To keep the temperature from rising, you need to change the water vessels every 3-4 hours.
If users are unable to place plastic containers on the table, they can be hung from the back of the fan. Such a home climate system can be manufactured quickly, does not take up much space in the room, and operates without unnecessary noise. The disadvantage of the design is the need to regularly change vessels with water.
Air cooler from a five-liter bottle
This plastic container air conditioner has a more complex design. It will take a little more time to build.
In the process, the user will need the following materials:
- Two five-liter plastic bottles;
- Sharp knife or scissors;
- Electric fan (can be taken from an old computer);
- Power supply with a voltage of no more than 5 V;
- 3-4 plastic bottles.
How to build a home split system:
- Initially, you will need to cut off the neck of two plastic bottles. In this case, on one bottle the distance for cutting from the top should be less than on the other. The result should be a plastic cap placed on the second cut bottle;
- The second neck must be used to make a bell; it will need to be inserted into the upper part of the plastic cap, which is placed on the cut bottle;
- On the side of the bottle you need to cut a round hole on which the fan will be attached;
- Install the fan from the computer into the resulting hole so that during its operation the air flow is directed inside the plastic vessel;
- Remove the top cap from the cut-off vessel and fill it with 2-3 bottles of water. For a greater cooling effect, they must first be kept in the freezer for 3-4 hours;
- Cover the air conditioner with a plastic cap.
To cool the room, you need to turn on the fan. Within a few minutes, the owners may notice that the constructed device produces streams of cold air. The water will need to be changed periodically. Users should be aware that re-freezing liquids in the same bottles may cause the walls to stretch and become weak. Therefore, every 2-3 times you will need to replace not only the water, but also the vessels themselves in which it is located.
Reference! To make the air conditioner more productive, wrap it in a thick cloth or place it in a foam container. Some users use polyurethane foam in this case. Instead of water bottles, you can use metal parts.
Video description
This video shows how to make a stand-alone air conditioner:
Place these homemade cooling elements in the freezer and wait until their temperature drops. When the blue wet filler is completely frozen, you can put these bags in a box, laying them between the turns of the previously laid hose. To cool the water passing through the hose even more efficiently, you can replace the plastic sleeve with a foil one.
If you install the second fan in the same way as the first, but on the opposite end of the box, and close the lid tightly, you can begin testing a homemade air cooler. The main thing is not to forget to connect the wires to the power element (battery) and the shutdown button.
Using cardboard box
The basis of this cooling system is a regular fan and ice. In this case, everything used during the installation process can be easily returned to its original position without any damage.
In the process of manufacturing a home split system, you will need the following parts:
- Box made of thick cardboard. Its dimensions should easily accommodate a large pan;
- Aluminum pan;
- Table fan;
- Scotch;
- Needle and thick thread;
- Sharp knife;
- Ruler;
- Simple pencil;
- Pieces of ice.
When all the devices are ready, you can start making a home climate system:
- At the first stage, a structure is built from the prepared box that will correspond to the size of the pan. To do this, cut the box with a knife, cut out its bottom and lid (they should be equal to the diameter of the pan);
- The box can be reassembled; to do this, it is assembled in the cut places and treated with glue in several layers;
- From the remaining part of the cardboard you need to cut out a square box lid;
- A circle should be marked in its center; its diameter should be 3 cm larger than the span of the impeller of the table fan;
- The cut circle needs to be set aside; the rest of the sheet will need to be covered with the prepared structure;
- The entire box must be carefully sealed with tape or glue so that the structure does not collapse during operation;
- You will also have to seal small holes if there were any on the side walls of the box (for example, for fingers);
- On one side of the box, cut a rectangular hole 10 cm long and 4 cm wide. It is from this rectangle that cool air will flow into the room;
- Now you will need to cut two identical strips from the remaining cardboard, their length should be 3 mm less than the cutout on the box, and their width should be 5-6 mm larger;
- Connect two rectangles together using a large needle and stiff, dense threads (all corners of the cardboards should be connected with threads, but so that they can be separated by 4 cm from each other);
- Insert the connected cardboards into the cut-out side opening of the structure. Each of them should fit snugly into the top or bottom of the cut hole;
- Using the same large needle and thick threads, sew the cardboards located opposite each other to the structure itself. In this case, there is no need to tighten the threads; they are secured with knots;
- Lay a thick piece of cloth on the floor and place a pan on it;
- Remove the front mesh from the fan and place it on the pan;
- Place large pieces of ice on the grid. You can freeze it in medium-sized plastic cups. To operate a home air conditioner you will need 5-6 pieces;
- Cover the ice structure with the prepared box;
- Insert a fan into the cut-out space located on the lid of the structure so that its impellers point toward the floor (at the pan with the mesh and ice);
- Turn on the fan and start any cooling mode on it.
This design can cool a living space for up to 2-3 hours. After this, the ice will melt and the pan will fill with water. Owners will need to ensure timely replacement of water. Otherwise, the fan may fall into the structure and get into the water. This will cause a short circuit.
Copper tube + hose
In this case, the climate system for the home is made on the basis of a table fan.
For installation work you will need the following parts:
- Hose for garden watering (rubber, plastic);
- Copper pipe with a diameter of 7-9 mm and a length of up to 10 m;
- Fan equipped with front grille4
- Plastic clamps;
- Submersible pump for aquariums;
- A bucket, if you have a thermal box at home, it is better to use it;
- Cold accumulator. These are flat-type containers filled with quick-freezing liquid. Thermal boxes contain fillers in the form of silicone, gel or a water-salt mixture. To create a home air conditioner, it is better to focus on a silicone thermobox.
If all the parts are ready, then you can start creating the air conditioner:
- Remove the upper mesh from the fan using a screwdriver;
- Bend the copper tube in a circle so that there is a gap between the bend sections for air supply (2-3 cm), secure it to the fan mesh using flexible clamps;
- The ends of the copper tube can be left in place, but it is advisable to remove the ends of the clamps to give the cooling structure a more aesthetic appearance;
- Attach the grille with the tube back to the fan, with the ends of the copper pipes directed towards the container with water;
- Place plastic or rubber hoses onto the ends of the copper tubes on the fan grille and secure them with clamps or wire;
- The hoses must reach the container with cool water. One of them is connected to the aquarium pump;
- The second hose is placed in a bucket or three-box filled with cold liquid, and a cold accumulator is also placed here. To ensure that the lid tightly covers the container, you can drill holes in it for the hose and wires (this way they will not lie on the top of the container and interfere with the lid);
- Plug in the aquarium pump and fan into a power outlet.
When the air conditioner is activated, water will begin to move through the rubber or plastic hose towards the fan, then move to the copper pipes and give off the cold that the fan gives. After that, it will go back into the thermal box. If you use a silicone cold accumulator and a thermal box during the installation process, you can cool the air in the room for up to 1 week without additional installation work or equipment replacement.
How to make air conditioning in a car
To make a car version of the air conditioner you will need:
- a plastic container (a container from a cooler bag is best);
- interior radiator from the stove;
- small submersible pump (aquarium or machine washer);
- a pair of fans;
- connecting tubes.
In a car, the device can only work from the cigarette lighter, so if you do not have a car charger for your phone, you will need to purchase one.
To make an air conditioner for your car with your own hands, follow these instructions:
- Place a pump at the bottom of the container.
- Route the wires from the pump outside.
- Make a couple of holes in the lid of the container for fans.
- Secure the fans.
- Install the stove radiator on the inside of the cover using silicone.
- Combine the wires from the fans, pump, and charger.
- Connect the pump to the radiator using connecting pipes.
- Place ice inside the container.
- The device is ready for use.
Not every family can afford to purchase an expensive air conditioner that will cool the house during the hot season. Therefore, the craftsmen came up with several simple ways to create a simplified version of the device from objects that came to hand. A homemade air conditioner is designed for use in an apartment, house, and even in a car.
To save money, you can make your own air conditioner
Ice and cooler
To make a home split system you will need the following items and tools:
- The reservoir is made of plastic; as an alternative, you can use a tin container;
- Self-tapping screws;
- Drill;
- An unused CD that can fit in a tin can;
- Cooler (small fan);
- USB cable;
- Ice.
If everything is ready, you can begin installing the cooling structure:
- Drill holes in the prepared container; they should be in the lower part along the entire perimeter (at the same level). The holes are needed to suck in air;
- Drill the CD with a drill according to the same pattern;
- Drill a cooler to the jar lid using self-tapping screws;
- Place the disk in a jar;
- Place large pieces of ice on top of it;
- Cover with a lid with the cooler attached to it. It must hold tightly, otherwise it will not be possible to fully cool the room;
- Connect one end of the USB cable to the cooler, the other to the corresponding connector on the system unit. You can also connect the cable to your laptop.
Reference! Such a product can work for up to 2-3 hours. When the ice melts and turns into water, you will need to pour it out and reload the jar with ice. This will help avoid short circuits.
Unique device made from bottles
This home air conditioner does not require electricity. For it to work, you only need a draft living in the living room. To understand how this system works, you need to do a little experiment:
- Open your mouth wide and blow on your hand - your skin will feel the hot air;
- Do the same, but with your lips curled into a tube - you will feel cool air on your skin.
This suggests that if the air flows through a small space, then when it expands sharply, it will become cool. For this experiment you will need to prepare a sheet of durable cardboard or plywood (preferably). Its dimensions must correspond to the dimensions of the window opening on which this home split system will be located.
The process will also require plastic bottles. From all of them, during installation, only the upper part of the neck along with the stopper is required. All bottles will have to be cut according to the same principle. The corks need to be removed, but you shouldn’t throw them away; they may be needed in the future to secure bottles.
There should be a lot of bottles (15-25 pieces) to cover the entire surface of the plywood sheet. At the same time, they should not touch each other; the acceptable distance between the bottles is 3-4 cm. You can mark the sheet with a simple pencil.
To drill small holes on plywood, you need a crown with a diameter of 18 mm. Armed with a drill, you can begin the process of creating holes. You need to insert the necks of the bottles into the resulting circles.
The finished air conditioner is installed in the window opening with funnels facing outwards. After 10-15 minutes, the room temperature will decrease by 5-7 degrees. You can regulate the flow of cool air using the lids. They can be put on the upper or lower rows of necks, and there will be little air blowing through the room.
Installation of the outdoor unit
If the air conditioner is installed in a private house, then it is not difficult to place the outdoor unit. But its installation on the building of an apartment building raises many questions.
The air conditioner is mounted in such a way that it can be reached from the balcony. After all, the unit will have to be serviced periodically.
Installation of the outdoor unit
It is best to mount the block on the north or east side of the window (balcony). It is advisable to install the system at the bottom of your outdoor area. Then, if necessary, it will be easier to reach the system by opening the window.
Using a tool such as a level, the mounting locations for the brackets are marked. Holes are drilled in the wall to install anchor bolts.
To conduct interblock communication, a through hole is drilled. A sufficient diameter is 8 cm. If the wall is brick, it is advisable to make a hole between the bricks at the place where they are laid. Then the hole will come out neater and less effort will be spent.
Next, the system is connected, as well as the resulting gap is sealed. Before proceeding to the next stage of installation of the structure, you should make sure that the outdoor unit is secured sufficiently reliably.
Radiator + fan
Almost any technology can be given a second life. This rule also applies to car radiators. They are often used to build a home air conditioner for home and garden.
For installation work you will need:
- An old radiator that still works;
- Fan;
- A plastic tray that is the same length as the radiator;
- Adapters for connecting the structure;
- Clamp and fasteners;
- Case from the system unit (or TV).
How to make a home climate system:
- Check the radiator for serviceability, if there are leaks, repair them by welding;
- Install the radiator into the TV or computer case and secure it with corners and self-tapping screws;
- Install a tray under the radiator;
- Attach a fan, or rather its impeller, disconnected from the panel with control buttons, to the rear side of the heat exchanger;
- Connect water supply hoses to the car radiator pipes.
The air conditioner is ready. To start it, you need to connect the fan to the power supply, and the hoses connected to the radiator to the cold water supply system in the house. You can also connect the hoses to a pump that lifts water from the well.
Unusual use of a freezer
A summer air conditioner can be made from an old freezer. It, like a conventional climate system, is installed to the window opening. In this case, the freezing chamber is mounted so that most of it is outside. You will need to make a working fan from an old computer in the door of the freezer and fix it on it, and seal the remaining cracks in the freezer using sealant.
In the food freezing chamber you will need to place a container with medium-sized pieces of ice (it can be frozen in plastic cups). The camera door must be closed and connected to the coolers from the computer using a USB cable to the computer. This type of cooling design can continuously cool a room for up to 5 hours. After this, you will need to remove the melted water and refill the freezer with water.
Cooling using Peltier elements
The use of these parts to assemble a homemade air conditioner is a controversial issue. It's all about the energy consumption of Peltier elements (otherwise known as thermoelectric converters), which is incomparable with the amount of cold produced. Outwardly, they look like plates with 2 wires; when electricity is connected, one surface of the element generates heat, and the other - cold.
What do home craftsmen and car enthusiasts who strive for comfort do:
- Buy from 4 to 8 Peltier elements and mount them with the “hot” side on a ribbed aluminum radiator.
- This radiator is installed in such a way that it is cooled by street air.
- A cooler from the computer is attached to the “cold” side of the converters so that it supplies room air to the plate.
Air cooling circuit using a Peltier converter
Peltier elements actually cool the air flow, but at the same time they simply consume electricity. After all, half of the energy is wasted because it is converted into heat and dissipated in the atmosphere. That is, for every Watt of electricity expended you will receive no more than 0.5 W of cold, while with a split system this ratio is completely different – 1:3. You can see how this works in practice in the next video: