It is often necessary to install (change) an apartment meter in the staircase entrance. This is due to the fact that the meters, and with them the machines, are technically and morally outdated and require replacement.
In addition, energy supervision services in plain text require replacement. They cannot directly force a replacement, but when the owner re-registers (sale of an apartment, house) significant problems may arise with the old meter.
People are changing meters, and doing the right thing. And it’s not just about my professional interest and problems when selling an apartment. It is really dangerous to live with such “electrical equipment”. Even I, despite the saying “a shoemaker without boots,” put my electrical panel in order. Now I’m calm, I installed a new meter and machines.
You can call an electrician to your home, or you can install the meter on the landing yourself, using the step-by-step recommendations given in this article. If anything is unclear or you have any comments, please write comments!
So, this article outlines step by step the process of replacing or installing an apartment electric meter on the landing of a five-story panel building. From this article, anyone with hands will know exactly how to install an electric meter themselves. How to replace wiring in a panel apartment is detailed in the article Replacing electrical wiring in a panel apartment.
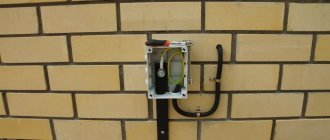
1. This is what we had at the start of work (the apartment in which I am changing the meter is on the right, number 65):
Apartment electrical panel with an old meter
This is not the worst option - the contacts (walnut) are in good condition, there are only two counters, although the switchboard is designed for 4 (two apartments on the site). By the way, the meter is not that old - even younger than me, but a replacement is overdue due to the upcoming sale of the apartment. You can ignore the machine downstairs - this is the power supply for cable television.
The worst thing in this picture is the rusty phase bus on the lower poles of the machines, which is completely open and located a few millimeters from the body (from zero and ground, or rather from the metal mounting strip), which in this place is not even painted. This is what happens when the screwdriver comes off in such cases:
Short circuit when replacing machines after the meter
Short circuit when installing the meter. Damaged screwdriver
But let’s forgive the Soviet designers their sin and move on.
Update 12/31/2014. Here's another picture. Two apartments, 4 meters?
2 apartments - 4 counters. A jamb in the movie?
By the way, a few seconds later, when Ipollit pushes Zhenya Lukashin away, an electrical panel and a movie camera are also visible. A jamb in the film. But that didn’t make it any less New Year’s. Happy New Year 2015! (I’m writing these lines, and the smell of Olivier is coming from the kitchen!)
Where does the installation of a new meter begin? That's right, as it is written in the article about connecting a home meter to SamElectric, starting with finding out how we will register (re-register) a new meter. I have the simplest option - I have my own person who, for a certain amount, will officially settle all the problems. The owner doesn't have to go anywhere. Otherwise, the owner needs to go to the energy supervision office in advance and find out the process of replacement and registration; different regions have their own characteristics of meter design, which are also constantly changing.
2. Further. Let's start from the beginning - turn off the machines and turn off the phase so that we can work calmly. We tell the owners that the refrigerator will not thaw in half an hour.
Disconnecting the introductory phase from the counter
We isolate the phase (the wire in white electrical tape at the bottom left), we will return to it at the end of the meter installation. We check with an indicator screwdriver that the connection is correct - you never know...
Let me remind you that the meter is easy to connect. From left to right - phase input, phase output, zero input, zero output. The connection diagram for the meter is usually given in the instructions and on the cover that covers its terminals.
How to connect the wire BEFORE the meter and what safety measures should be taken in this case, I wrote in the article Laying the wire from the gander to the meter.
3. We dismantle the electrical equipment - old Soviet machine guns (not to be confused with the Battleship machine gun for 15 kopecks) and with the AK-47)), and the electric meter. Making room for upcoming accomplishments:
We remove the counter and machines
4. After dismantling, we see that there are well-placed holes for mounting the DIN rail, which we will use. In fact, I noticed this detail when I came to preliminarily agree on the work, noting to myself that there was no need to take a drill.
install a din rail
Two self-tapping screws would have been enough. But it's more reliable.
5. We install circuit breakers.
Installation of circuit breakers
The attentive reader will, of course, note that since there are four wires, it is better to install 4 machines, and that with such wiring, the machine on the right at 25 Amps is too much. But “that’s ce la vie,” I’ll answer and continue the story.
6. I didn’t buy a bus for the machines, so we make the following comb for distributing the phase:
Comb for phase distribution
For such purposes, it is better to use a wire as in the picture - rigid, single-core, wire cross-section - 4 mm . The wire will provide one hundred percent both mechanical and electrical strength. But 2.5 mm can be disappointing in some cases. By the way, bus + wire is an additional contact, and in my version of contacts there is a minimum number of contacts. Accordingly, maximum reliability.
7. We connect the supply bus and the zero bus.
We supply the phase to the machines
The wires are immediately measured to the required length so that it is enough to reach the meter contacts.
8. We install (Mechanically mount) the meter.
Installation of residential electricity meter Energomera CE 101
The electric meter - Energomera CE101 - has the same seats as the old Soviet meters. It was with this in mind that he was bought. Otherwise, it would be necessary to make another DIN rail. Therefore, it is attached to the same 3 screws.
9. Connecting an electric meter.
Now attention. We connect the zeros first. How to properly connect the meter contacts has already been described. We make sure that there is no excruciating pain in the next 50 years.
Connecting wires to the meter
The phase conductor has black electrical tape wrapped around it, a throwback from the past. In the past, electricians designated a phase in this way. But you should always check. We leave the electrical tape, just as we leave the wires that go to the neighbors and the connections in the nuts. In such electrical panels, the slogan “do no harm!” is important. Where there is open access, you can tighten up contacts for prevention.
10. We put on the lid. That's it, the meter is installed and connected. In a couple of days, a specially trained person from the electrical networks will seal it, and that’s it!
Meter installation completed
We get our thousand rubles for our work.
Sometimes people said that it was expensive for an hour of work. In other words, an 8-hour working day costs 8,000 rubles. To this you can object that if the temperature of the finger is 36.6, this does not mean that you can fry eggs on your palm.
But seriously speaking, the work is retail, individual. And the payment is appropriate, negotiable.
Who charges how much and in what region for such work? Write in the comments. In general, did the article touch you? Feedback is important to me.
What types of electricity meters are there?
Depending on the input voltage, meters are divided into single-phase and three-phase. In individual houses, in most cases only single-phase devices are used.
Depending on the type of operation, devices can be electromechanical or electronic. At the same time, the first option is already being actively replaced by modern electronic devices. In this case, the monitoring device works better and counts accurately. Among other things, indicators can be taken remotely.
Important! Installation of an electricity meter in an old place, replacement of an old one or a new one, must be carried out in accordance with established rules and regulations.
There is a wide selection of electricity meters on the modern market, which are divided into the following types:
- Control devices that are installed to account for the consumption of direct and alternating current;
- Single-tariff and multi-tariff;
- Having the following type of mechanism: electronic, mechanical and dimensional;
- For direct and transformer connection.
Set of tools for installing the meter. Source tools.ru
Universal diagram for connecting wires to a single-phase electric meter
The diagram looks like this:
In the diagram you can see a single-phase electric meter located in the center, on the left there is an input power cable (phase and zero), on the right there are wires going out to the load, roughly speaking, the electricity recorded by the meter already flows through them, which through the protective automatics goes to your sockets , lamps, etc.
The procedure for connecting wires to the terminals of a single-phase meter is as follows:
Terminal “1” – Phase wire of the input cable (usually white, brown or black wire)
Terminal “2” – Phase wire going to the load of an apartment or house (usually white, brown or black wire)
Terminal “3” – Neutral wire of the input cable (usually blue or blue-blue wire)
Terminal “4” – Neutral wire going to the load of an apartment or house (usually a blue or blue-blue wire)
A connection made according to this scheme is already sufficient for the correct operation of a single-phase meter in the home electrical network. A protective ground connection to the electric meter is not required. Additional terminals that may be on your model of a single-phase electric meter are auxiliary and serve to access service functions, maintenance, automation of energy metering, etc.
Basic installation rules
Correct connection of the electric meter depends on whether the technician knows the basic installation rules. After all, single-phase devices are installed according to the same scheme:
- The electric meter is a link in the power circuit and it is through it that the current with the voltage necessary to use the equipment at a certain load will pass. The connection diagram for a single-phase meter in practice will be as follows: a switch is mounted at the input, after that a control device is installed, and only then the wires go to the junction box and to the points intended for connecting electrical equipment.
- Devices for monitoring electricity consumption have special places for connecting wires, called terminals. Before connecting the electric meter, you need to pay attention to the location of the terminals. They are counted from right to left. The farthest one on the right is intended for connecting the incoming phase, the second serves as the output of the phase wire. The input zero is connected to the third and the zero output is connected to the fourth, respectively.
Anyone who knows how to do it correctly can connect the device.
Source vestikarelii.ru In order to avoid confusion when connecting a single-phase electric meter, the instructions contain a detailed diagram and indicate which terminal should be connected to which wire.
Pulling contacts
Surely, if a person installed electrical wiring in an apartment on his own, he already knows that the connection contacts must be tight enough to prevent heating and failure of the wires. But it won’t hurt to remind you of this. Moreover, this rule applies primarily to the electric meter and power cabinet circuit breakers.
The contact terminals of the electricity meter have two mounting screws. First, the wire is fixed in the socket with the upper screw, then the lower one is pulled through. It is important to remember that after the power cabinet has been operating under load for one to two weeks, it is necessary to re-check the tightness of the fixing screws of the electric meter and machines. Particular attention should be paid to the zero bus and its contacts, since if the tightening is insufficient, it is the “zero” that begins to “burn.”
How to do installation
The electricity meter for each apartment in high-rise buildings is connected either in a common corridor or in the apartment individually. For private homes, the device can be installed directly on the street. How exactly the connection will take place depends on whether new wiring is being connected or whether a failed meter has to be replaced.
Important! Before you start working on the electrical panel, you need to install switches at the entrance to it, with which you can turn off the power. It must also be sealed.
To dismantle, you must perform the following steps:
- First of all, you need to take care of safety and completely turn off the input power;
- seals are removed from the meter;
- remove the cover covering the terminals;
- wires are disconnected.
Important! When disconnecting the meter from the network, you must first check the voltage again to protect yourself from electric shock, and only then disconnect the wires. The check can be done using a tester, a multimeter or a screwdriver with an indicator.
This is what the already installed device looks like.
Source zgbox.ru See also: Catalog of companies that specialize in electrical work.
Once all these steps have been completed, you can safely remove the device from the wall. Installation work is done exactly the opposite. The meter is attached to the place where the old one stood, and the wires are connected to the terminals. The terminal block is closed with a lid, seals must be placed and the voltage is turned on. In order to check whether the work was carried out correctly, you need to plug in electrical appliances. If the kilowatt-hour countdown has begun, then everything has been done without violations and in accordance with the standards.
Installing the meter in a new location will require more time and labor. It is recommended to mount it near the entrance doors. The shield must also be installed. When choosing it, you need to take into account that there will also be a circuit breaker and a device that will operate in case of danger.
The sequence of work will be as follows:
- As soon as the place where the meter will be fixed is designated, you need to use a drill to make several holes in the wall, and dowels are inserted into them. After this, the shield is screwed to the wall. This is done using screws.
- The counter itself is placed on the shield. There are special DIN rails for this. With their help, you can also attach a circuit breaker, as well as an RCD, to the panel.
Before starting work, a detailed plan is drawn up. Source museblog.ru
- The next step is to connect the wires to the terminals. First of all, connect the output wiring. And these are the second and fourth terminals. After this, you need to connect them to the circuit breaker, which will supply voltage to the consumption points.
- And only after connecting the internal wiring, the input is connected. At the end of the work, the terminals are closed with a lid and sealed.
Most often, users for such work call special services, which, in fact, are obliged to do dismantling and installation. But there are also cases when you can wait a very long time for installers and the consumer does this simple work on his own. In this case, you can find yourself in an unpleasant situation, which can be avoided if certain conditions are met.
Before you connect a single-phase electric meter yourself, you need to contact the electricity supply organization and ask for permission to remove the seals and carry out the work. Upon completion of installation, you again need to notify representatives of the organization that the installation has been completed and the meter needs to be sealed. In this case, you will avoid a fine.
Modern devices are small and compact. Source forcounters.com
Those who are interested in how to connect a Mercury 201 meter need to remember that the device is electronic and is mounted in the same way as other single-phase meters.
Cable cross-section for sockets
When choosing a cable cross-section for household sockets in an apartment, first of all we turn to the PUE (electrical installation rules) Table 7.1.1., which indicates the minimum cross-section for group network lines of 1.5 mm2.
But a copper cable with this cross-section can withstand a current of only 18A, which corresponds to an approximate power of 4.1 kW. Considering that we rarely lay separate cables from the distribution board to each outlet, and often several outlets are connected on the same line, then such a cross-section will clearly not be enough.
The optimal cable cross-section for socket groups in an apartment is 2.5 mm2, such a cable can withstand a current of 27 A, respectively, a load with a total power of about 6 kW. There is no point in using cores of a larger cross-section, for example, 4mm.kv, because... they will not physically fit into the terminals of the socket mechanisms, and in addition, such cables are harder to lay and economically, it will be more expensive.
It is worth noting that all manufactured household electrical appliances that are plugged into an outlet are rarely more powerful than 3.5 kW. Therefore, using a cable with a cross section of 2.5 mm2 in the electrical wiring of socket groups. you can be sure that they will withstand any household electrical appliance, even during long-term use.
How to connect a three-phase meter
Owners of individual houses need to know not only how to connect a single-phase electricity meter, but also a three-phase one. Since in most cases at home they use equipment and devices that require a voltage not of 220V, but of 380V. These can be carpentry or lathes and others, depending on what the person does. In this case, you will naturally need a device that can count kilowatt-hours and at the same time withstand greater voltage.
To install such a meter, a person must have access to work with devices reaching a voltage of 1000V. Of course, you can install the device yourself, but then you definitely need to call representatives of the power supply organization so that they check the quality of work, put seals and start the current.
Some tips and safety measures
To summarize all of the above, it makes sense to summarize the basic safety measures when installing power cabinets and connecting electric meters:
- All work is carried out with the voltage removed;
- The wiring should start from the apartment or room, and the power input should be connected last;
If you clearly understand how to connect a single-phase or three-phase electric meter, no special difficulties will arise during its installation, and therefore it is quite possible to connect the electric meter yourself. And if all of the above measures are observed, the electrical wiring will continue to bring light into the apartment for a long time, and its maintenance will not cause any problems.
Commissioning or reconstruction of electrical wiring in a house or apartment is rarely complete without installing or replacing an electric meter. According to the standards, work can only be performed by specially trained people who have permission to work in networks with voltages up to 1000 V. But you can install all the elements and connect the meter to the load (electrical appliances) without connecting the power supply yourself. Afterwards, you need to call a representative of the energy supply organization to test, seal and start up the system.
One of the housing options for the meter
Basic rules for connecting a three-phase meter
The meter must be protected from the external environment. To do this, it is placed in a special large metal box. Today the box is made of non-flammable plastic. A prerequisite is tightness and the presence of a window opposite the display so that you can easily control electricity consumption and take readings.
Detailed plan for installing a three-phase meter. Source electroazbuka.ru
The device is fixed at a height of one to one and a half meters. For connection, only copper wiring is used, the cross-section of which must fully correspond to the incoming load.
Small wiring that serves as an adapter from the meter to the switch is chosen with solid, undamaged insulation, straight and without additional branches.
Important! State inspection of the meter must be performed depending on the type of meter. Single-phase is checked every second year, three-phase every other year.
The three-phase meter is installed outdoors. It can be attached to a pole or on the wall of the house. The switches that supply energy to the points of consumption must be placed in another box and located indoors.
Where can I see the rules for connecting a meter?
How to correctly connect the meter phases is written in detail in the device passport or on the back of the meter itself.
The passport is attached to the meter upon purchase. In it you will find all the necessary information, including rules for transportation, installation and operation. The passport will be needed during installation; it will indicate acceptance of the work and the passage of periodic inspections.
Very often, the meter connection plan is shown on the device box, so it is very easy to find out by examining the case.
How to properly connect a three-phase meter
Three-phase meters differ from single-phase ones in that a larger number of contact wires are connected to them. Each phase and zero has its own input and output, which are placed in pairs. The connection occurs as follows: the first phase has an input numbered 1, the output numbered 2, the second phase 3 and 4 respectively, the third phase 5 and 6, zero 7 and 8.
This is what an installed three-phase meter looks like. Source izhevsk.ru
The connection is carried out in the same way as for a single-phase device, and you should not be confused by a large number of wires. The insulating layer is removed from each wire. The stripped ends are aligned, inserted into the contact recesses and secured with bolts.
After all the wires are connected, a device is installed that automatically protects the estate from short circuits and fires. Both two-core and four-wire cables can be routed from a three-phase meter, so in a private home you can get by with just one control device.
Cable cross-section for electric stove
An electric stove or hob in an apartment is most often the most energy-intensive consumer; accordingly, the cross-section of the cable for connecting it differs from others and, most often, is:
For single-phase connection – 3 x 6 mm.sq.
For three-phase connection – 5 x 2.5 mm.sq.
If there is a three-phase input into the apartment, you should not connect the electric stove to only one phase with a three-core cable, even if you take the cross-section with a margin, because Perhaps there will be a “phase imbalance” - an unevenly distributed load on different phases. Be sure to read our article about choosing a cable cross-section for a hob or electric stove; it describes in sufficient detail the rules for choosing a cable, its cross-section and everything connected with it.
Tips for using the meter
When installing a meter on the street, you need to remember that in this case it may incorrectly indicate the amount of energy consumed. It depends on some factors, namely:
- at low temperature;
- at high humidity;
- when exposed to direct sunlight.
To prevent such errors, you need to choose the right place for installation, place the device in a protective box and be sure to insulate it in the winter.
Meter installed on the street. Source nord-camping.ru
If connected incorrectly, the meter may become self-propelled. To check this, you need to completely turn off all electrical appliances, turn off the lights and machines. Unplug all electrical equipment from outlets. After this, follow the device display. If the counter continues to count and the numbers slowly replace each other, this means that the device is self-propelled. In this case, you must immediately contact the energy supply organization.
To ensure free access for representatives of the energy supply company, it is best to install the control device on the landing. In addition, the company that services your home will be responsible for the safety of the device.
If the question arises which meter is better to choose - single-phase or three-phase, you need to take into account exactly where it will be installed. If this is an apartment, then all the devices that are used easily operate on single-phase power. Accordingly, a single-phase device is installed.
Maintenance of electric meters. Source grani21.ru
In individual households, three-phase power is often used. But, since a single-phase cable can be run from a three-phase meter, it will be more economical to connect a three-phase device.
Video description
The video shows how to correctly assemble a water metering unit:
From this it turns out that before installing a water meter in a private house, you need to completely assemble the entire unit.
Second situation
Here the problem is solved - how to change the water meter. Previously, water meters were installed inside houses. Today, as mentioned above, they are taken outside the buildings. At the same time, they are trying to get rid of old models.
If a transfer is made, it will completely correspond to the installation. That is, the question of how to replace a water meter will not be appropriate here. Because this is, in fact, a complete installation process with the formation of a well. And although a valve or gate valve is already installed at the connection point, the remaining actions are carried out strictly according to the principle described above with the installation of a check valve, shut-off valves and a strainer.
It's another matter when the meter is in a well. It has failed and requires replacement. By law, replacing a water meter yourself must be done with notification of the water supply organization. The thing is that the device has a seal from this organization. You can't clean it yourself. This must be done by a representative of the water utility. If you show independence, then everything will turn out to have not very good consequences. You may be charged with unauthorized use of water. Like, you removed the meter and installed a straight pipe instead. And then they changed it back to the device. That is, you spent a certain amount of cubes illegally. You will be issued a fine, and if you do not pay it, you will be summoned to court, where a decision will be made based on the letter of the law.
Therefore, first of all, you need to write an application to the water utility. A representative will come and remove the filling in front of you. Now you can change. Many people are interested in whether it is possible to change the water meter themselves, or whether this should be done by representatives of the water utility. There are no restrictions here: if you want to change it yourself, if you want to use the services of specialists or third-party organizations.
You cannot remove the filling yourself Source nestudia.ru
Electricity meter device
Recently, induction electricity meters have been replaced by electronic ones. In these meters, the counting mechanism is driven not by voltage and current coils, but by specialized electronics. In addition, the means of counting and displaying readings can be a microcontroller and a digital display, respectively. All this made it possible to reduce the overall dimensions of the devices, as well as reduce their cost.
Almost any electronic meter includes one or more specialized computing chips that perform basic conversion and measurement functions. The input of such a microcircuit receives information about voltage and current from the corresponding sensors in analog form. Inside the microcircuit, this information is digitized and converted in a certain way. As a result, pulse signals are generated at the output of the microcircuit, the frequency of which is proportional to the current power consumption of the load connected to the meter. The pulses are sent to the counting mechanism, which is an electromagnet coordinated with gears on wheels with numbers. In the case of more expensive meters with a digital display, an additional microcontroller is used. It connects to the above-mentioned microcircuit and to a digital display via a specific interface, accumulates the result of measuring electricity in non-volatile memory, and also provides additional functionality of the device.
How to speed up the payback of such a device?
The payback of a two-tariff meter is a separate topic. You need to pay a tidy sum for installing or reflashing the device. These devices are not installed free of charge and are more expensive than standard single-tariff flow meters.
We talked about the cost of installing and replacing electric meters in this material.
A two-tariff meter of any brand is more expensive than a single-tariff meter due to the features of the software and more complex functionality
Externally, a two-tariff electric meter is no different from a standard meter. The difference between them lies only in the readings, which display information for night and daytime differently.
Due to the fact that the dimensions of the meters are the same, a new device can be installed in place of the old one.
Any person who understands electricity and fire safety can install a new two-tariff meter, but only an employee of the company providing the service can seal the device
Before installation, you need to evaluate the feasibility of using the device and, perhaps, settle on a single-tariff device.
If an electric meter is already installed, you can think about the optimal consumption of electricity:
- turn on the washing machine and dishwasher only after 23:00;
- set a timer on the multicooker so that it starts cooking before the household wakes up, i.e. until 7 am;
- start the water heating mode in the boiler (if there is one) only at night, and during the day activate the temperature maintenance function in it (maintaining the water temperature requires much less electricity than heating it).
In this case, you will be able to save about 200 rubles per month. Those. The installation of an electric meter will take 2 years.
If you don’t try to use electrical appliances after 23:00, then there will be no tangible benefit, because even the meter itself will take about 5 years (if not more).
What is a two-tariff meter, how it works
The essence of a two-tariff meter is simple. Unlike a standard meter, it controls consumption in two zones - daytime (from 7.00 to 23.00) and night (from 23.00 to 7.00), which allows you to split the payment for electricity.
In the first case, the standard tariff applies, and at night it is significantly lower. If you plan to use powerful consumers at night, using a two-tariff meter is the way to save money.
The relevance of the transition to such devices is easy to explain. It is important for power plants and substations that the load on equipment is uniform throughout the day. In practice, it is higher in the morning, afternoon and evening hours than at night. As a result, equipment operates at its limit and breaks down faster.
The widespread use of two-tariff meters allows for load balancing, that is, transferring part of the load from peak hours to night time. As a result, fuel consumption is reduced and the service life of equipment at power plants increases.
Conclusions and useful video on the topic
A look at the profitability of a two-tariff electric meter is reflected in the following video:
A two-tariff meter is not suitable for everyone. Before installing it, you need to carefully calculate all your expenses on electricity in order to understand whether it is needed or not.
There is no universal answer to the question of the advisability of installing a two-tariff metering device. Without accurate calculations of energy consumption in a specific apartment or private house, it is difficult to say in advance whether it will be profitable or not.
Do you use a two-tariff electric meter? Share your experience with other users - tell us whether using it was beneficial for you. If you are just looking at this type of counter and want to clarify a number of nuances, ask your questions in the comments block located below under this publication.
Wave load
If we consider electricity consumption at the “lower level”, the graph looks like a sinusoid. For example, in a building with a large number of apartments, people rest at night, and a small part of electrical appliances (refrigerator, PC, night light and other devices) are in operation.
Between 7 and 10 a.m. the situation changes and the load curve rises sharply. People get out of bed and start getting their children ready for school, getting ready for work and solving other problems. As a result, many electrical appliances turn on, from the TV to the electric kettle and boiler.
Then the residents go to work, and the load situation returns to normal - the curve goes down again and remains there until the evening, when people return from work and start doing household chores - swimming, watching TV, heating food in the microwave, cooking in the oven, and so on Further. As a result, the current consumption increases again and reaches peak values.
The maximum load occurs until 10-11 pm, after which people gradually go to sleep, and the cycle repeats. It's time for another overnight low. To avoid the fluctuations discussed above, two-tariff meters are being introduced. Their feature is load control in only two zones, namely at night and during the day.
Reducing tariffs at night and increasing them during the day encourages people to switch to new metering devices. As a result, both sides win.
The consumer saves electricity and receives payments with smaller amounts, and the electricity supplier relieves substations and power plants, thereby extending the life of expensive equipment. The risk of network failures due to peak loads is also reduced.
A person who has installed a two-tariff meter can turn on the machine, boiler and boiler at night, when the electricity tariff is lower, and turn them off in the morning.
Calculation of the benefits of a two-tariff flow meter
Benefit is a flexible concept. It must be determined by everyone for themselves, depending on the characteristics of the operation of certain household appliances. For ease of calculations, you can use standard indicators of electricity consumption for home devices.
The most powerful household appliances include:
- refrigerator (consumes approximately 30 kW per month depending on the model);
- washing machine (30-35 kW);
- personal computer (36-40 kW, but the figures can be 2 times higher if we are talking about a powerful PC);
- electric kettle (approximately 25 kW per month, although during 1 hour of operation this device consumes an extremely large amount of energy);
- hair dryer (5-15 kW);
- dishwasher (20-22 kW per month when used about 3 hours per week);
- microwave (10-13 kW);
- TV (5-12 kW);
- vacuum cleaner (5-10 kW);
- iron (around 7-8 kW).
Now, based on the consumption of each device, you need to check how much you will have to pay for light with a single-tariff and two-tariff meter.
All calculations are carried out taking into account electricity tariffs in Moscow and the Moscow region. In the Moscow region, for a single-tariff meter, the cost of 1 kW is 5.47 rubles.
For two-tariff electricity meters, prices are slightly different. When using a differentiated tariff at night (from 23 to 7 o'clock) a fee of 2.13 rubles per kilowatt will be charged, and during the day - 6.29 rubles per kW. In other regions, the cost per kilowatt may differ, but the proportion itself will remain the same.
The cost of a kilowatt depends on the geographical features of the region: for example, Chukotka and Kamchatka have the highest electricity tariffs in Russia
When calculating the financial benefits of a two-tariff electric meter, you need to take into account the time at which the specified household appliances usually operate. This will make it possible to carry out correct calculations.
The operating time of each household electrical appliance looks something like this:
- The refrigerator operates 24 hours a day.
- The washing machine can be started after 23:00, but at night you can wash it a maximum of 2 times (and usually once), because the washing cycle is 1-2 hours, depending on the program used.
- The computer is used both day and night, depending on the schedule of life and the nature of work.
- The electric kettle is turned on in the morning (including before 7:00), and in the evening, when they come home from work (before 23:00), and after 23:00. But mostly the kettle is boiled between 18:00 and midnight.
- Hair is often dried with a hairdryer after 7 am, when electricity is calculated at the daily rate.
- The dishwasher with the dirty dishes accumulated during the day can be turned on after 23:00.
- Food is heated in the microwave mainly from 7 to 23 hours.
- TV is watched in the evening on weekdays, so it often works during the night tariff.
- Due to the noticeable noise (if you do not take into account some modern models), the vacuum cleaner is practically not turned on early in the morning (before 7:00) or late in the evening (after 23:00).
- You can iron things with an iron even during the night tariff (after 23:00).
Now you can do some small calculations. For examples, we take information about the average electricity consumption of household appliances per month.
For a single-tariff electric meter, the calculations will be simple. First, the total consumption of all devices is calculated based on averaged data. It is equal to 173 kW. Without any devices (for example, a dishwasher, vacuum cleaner or electric kettle), this value may be lower. On a single-tariff meter, for 173 kilowatts according to Moscow tariffs you need to pay 993 rubles.
We also recommend that you familiarize yourself with the best methods for transferring data to your account.
Before installing any electrical appliance in an apartment, you must first evaluate its energy efficiency, and then buy it
Before calculating the benefits of installing a two-tariff meter, you should analyze the actual electricity consumption in the apartment and determine the devices that are constantly working.
The calculations are a little more complicated, so it would be more appropriate to calculate the cost of consumed electricity separately for each device, and then add up the information obtained:
- The refrigerator works both at night and during the day, so you need to calculate one half of its operating time according to the daytime rate, and the other half - according to the night rate. The example looks like this: 15*2.13+15*6.29=126 (rub.).
- A washing machine can be used in a similar way, but here it is better to use a ratio of 1 to 3, i.e. according to the night tariff, you should calculate only a third of the total consumption: 10 * 2.13 + 20 * 6.29 = 147.1 (rub.).
- Calculation for a computer : 18*2.13+18*6.29=153.69 (rub.).
- For an electric kettle, approximate calculation: 13*6.29+12*2.13=107.33 (rub.).
- The hairdryer is rarely turned on before 7 am and after 11 pm, so it is better to take into account only the daily rate: 5 * 6.29 = 31.45 (rub.).
- The dishwasher can be turned on at any time, but let’s assume that it is set on a timer after 11 pm: 20 * 2.13 = 42.6 (rub).
- Calculation for a microwave : 10*6.29=62.9 (rub.).
- For TV : 3*2.13+2*6.29=18.97 (rub.).
- For a vacuum cleaner : 5*6.29=31.45 (rub.).
- For iron : 7*6.29=44.03 (rub.).
If you add up all these values, you get 765.5 rubles. This is almost 230 rubles less than the amount that you will have to pay for the consumption of household appliances when using a single-tariff meter. But this is subject to loading the dishwasher late in the evening and periodically washing at night.
If there is no dishwasher (and not every family has one), then the difference in readings will be less: 722 rubles for a two-tariff meter versus 880 rubles for a single-tariff meter. Those. the overpayment in the second case will be about 160 rubles.
Savings and convenience rarely go hand in hand, so when installing a two-tariff meter you need to be prepared for the fact that you will have to turn on the dishwasher or washing machine at an inappropriate time
Then you need to calculate how much electricity all the light bulbs in the house consume. They are found in chandeliers, floor lamps, sconces and other lighting fixtures.
The number of kilowatts depends on the type of lamp:
- LED light bulbs consume 10 watts per hour;
- fluorescent - 36 watts per hour;
- incandescent lamps - 96 watts per hour.
The lights are turned on at night. In winter, it starts to get dark at 16:00, but a lot depends on the region. On average, each light bulb in the house works about 4 hours a day (some less, some more). Those. per month, one LED lamp consumes 1.2 kW, a fluorescent lamp consumes 4.3 kW, and a regular lamp consumes 11.5 kW.
LED light bulbs are expensive and are not sold in all stores, but they can significantly save on monthly electricity bills
The number of light bulbs in apartments depends on the personal preferences of its owners and the total area of the room. For example, in a two-room apartment there can be either 5 or 25. But for calculations, you can take an approximate value of 15 lamps: 3 in the kitchen and both rooms, two in the hallway and bathroom, and one in the pantry and toilet.
If all the light bulbs in the apartment are LED, 18 kW will accumulate in a month, if they are fluorescent - 64 kW, and if they are regular - 172.5 kW.
The more lamps, floor lamps and sconces in an apartment, the brighter and more comfortable it is, and therefore you should not skimp on lighting fixtures
If a regular single-tariff meter is installed in the apartment, then you will need to pay 98.5 rubles per month for LED bulbs, 350 rubles for fluorescent bulbs and 943.5 rubles for regular bulbs.
If you use a two-tariff meter, your electricity bill will be reduced. However, the lights often turn on before 11 p.m., so the bulbs will still work during the daytime tariff. The ratio can be taken as 1 to 3.
The cost of a month of electricity consumption is equal to:
- for LED light bulbs: 6*2.13+12*6.29=88.26 (RUB);
- for fluorescent: 22*2.13+42*6.29=311.04 (rub.);
- for incandescent lamps: 57.5*2.13+115*6.29=845.83 (rub.).
The benefit depends on the type of light bulbs installed. For LEDs it will be about 10 rubles, but for incandescent lamps – already 100 rubles. But does it make sense to buy a two-tariff flow meter if you can replace the light bulbs in the house with more economical ones?
Current tariffs (using the example of Moscow and the Moscow region)
The amount of payment for electricity for two-tariff meters depends on three factors - the type of slabs in a multi-storey building, the time of day, month of the year, and the region. Let's look at the main options.
Multi-storey buildings with apartments with gas stoves
- In the period from January 1 to June 30, the night and day zone tariffs for Moscow are 1.79 and 6.19 rubles, and for New Moscow - 2.24 and 6.03 rubles, respectively.
- During the period from July 1 to the end of 2021, the following tariffs apply at night and daytime: 1.92 and 6.19 for Moscow and 2.41 and 6.19 for New Moscow.
Multi-storey buildings with electric stoves
- From January 1 to June 30, the night and day zone tariffs for Moscow are 1.26 and 4.65 rubles, and for New Moscow - 1.58 and 4.41 rubles, respectively.
- From July 1 until the end of 2021, the following tariffs apply at night and during the day: 1.35 and 4.95 rubles for Moscow and 1.7 and 4.74 rubles for New Moscow.
Apartments and houses located in rural areas
- From January 1 to June 30, the night and day zone tariffs are 1.58 and 4.22 rubles, respectively.
- From July 1 until the end of 2021, the following tariffs apply at night and during the day: 1.7 and 4.34 rubles.
Two-tariff electricity meter table
Full version of tariffs for 2021.
See all changes in tariffs for the next years on the website https://mosenergosbyt.info/tarify/.
Advantages and disadvantages of two-tariff meters
When connecting a two-tariff meter, it is important to consider the pros and cons of such a transition. Let's take a closer look at them.
Advantages:
- For the consumer - a reduction in electricity costs by an average of 30-40%. This is due to the lower cost of electricity at night.
- For energy supply organizations - uniform distribution of load within 24 hours, which reduces overload during peak hours and helps to increase the service life of equipment.
- For the environment - reducing the volume of harmful emissions due to the uniform operation of the power plant.
- For enterprises, it saves energy at night, which helps reduce costs and production costs.
Flaws:
- Electrical appliances are left on at night, resulting in increased noise levels.
- Two-tariff meters are expensive and, according to users, often fail.