Installing household appliances is always a pleasant task. Especially when it comes to facilitating women's work. Everything here needs to be done reliably, safely and conveniently. However, installation instructions provided by manufacturers usually provide only the most necessary recommendations, and even then they are somehow “sparse.” To “immediately” connect a dishwasher with your own hands, they are often not enough. The whole point is that they are generalized. But each home craftsman has his own – individual case. I would like to simply insure myself, but for this I need more detailed information.
The connection diagram for a dishwasher is the same as for a washing machine - a high-quality connection to electricity, water supply, and sewerage is required. Therefore, if the conditions are not created in advance, the most reasonable solution would be to combine the installation of a dishwasher with at least cosmetic repairs or replacement of furniture. Then everything will happen “by itself” - imperceptibly and as it should.
But we will look at the opposite case, when the kitchen set as a whole is “satisfactory for now”, and it’s still too early to do repairs - everything is in decent condition. Don’t put the long-awaited equipment in the “far corner” until better times.
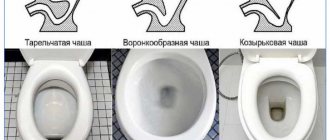
Dishwasher parameters
Let's look at the general characteristics of the models offered by manufacturers. This is necessary in order to correctly place and correctly connect household appliances. The size, capacity and functionality of dishwashers allow them to be classified as:
- Full-size – 60 cm wide, for 12-14 sets.
- Narrow – 45 cm, for 8-10 sets.
- Compact - tabletop, for 5-6 sets.
With the desktop version, everything is clear, but full-sized and narrow dishwashers can be free-standing or built-in household appliances. Moreover, it is clear that the free-standing machine is made in a full-fledged case. That is, it is an independent household appliance with its own design elements. Even if you traditionally place it under the countertop, it will be problematic to hang an element of the facade of the kitchen unit on it yourself, and there is no need.
Partially built-in models have an easily visible, accessible control panel. But the main part of the dishwasher at the front is disguised by a furniture façade. Fully built-in models do not reveal their presence at all; they are completely hidden by a decorative facade. Their control panel is usually on the top end of the door.
Important : therefore, the conclusion is obvious - all types of dishwashers must be treated with equal care.
Even for desktop models, it is advisable to choose a “stationary” installation option. Because their simplified connection: faucet, sink, socket is still “triple” and inconvenient. It negates the benefits of mobile use.
Autonomous dishwasher: myth or reality
What does a dishwasher that does not require a water connection look like and operate? Are you already looking forward to a colorful review of a huge range of models? Such cars exist, and they are truly autonomous. But whether they are dishwasher-safe remains to be seen. Experts call them not machines, but “devices.”
Meet Circo and NoStrom EcoWash Dinner Set. Both devices do not require electricity or plumbing.
To start washing, water is manually poured into the hopper and detergent is added. Next you need to turn the handle - like on a meat grinder. This is manual labor with only one difference from conventional washing - the hands remain dry.
You can note the advantages of these “machines”:
- saving resources;
- partial absence of manual labor.
- the range of manual dishwashers is small, the price is too high, the demand is low;
- The washing hopper can barely hold one set of dishes;
- Filling and draining of water occurs manually;
- The washing quality is not ideal.
Using the miracle of technology is unprofitable and irrational - you will spend more time and effort on searching and purchasing than you will receive benefits from the device. We propose to solve the problem with connecting the machine in the absence of water. We will help you choose the right model and give instructions for connecting.
Where to park the car
Of course, the easiest option is to place it closer to the existing plumbing fixtures - the kitchen sink. It has already been supplied and drained with water, so the main criterion is the length of the hoses. But despite the fact that the sink is most often located closer to the corner of the kitchen - such are design traditions, it is still possible to install the dishwasher at a decent distance from it. This can be done, but only along any of the adjacent walls. Therefore, when you are earnestly asked, you should not immediately refuse. You just need to correctly assess the possibilities. Perhaps the costs will be small, but the convenience will be tangible.
At the same time, it is obvious that it is not difficult to connect an electrical outlet to any place. The plumbing will also not cause any special problems - the water is under pressure, which means it will also “flow” anywhere. It is the connection of the dishwasher to the sewer that remains the decisive factor when choosing a location for it. After all, it is necessary to withstand slopes, and the dimensions of the pipe itself are comparatively larger.
Grounding electrical wiring
PMM is one of the most dangerous equipment from the point of view of electrical safety. And since the kitchen has the most equipment, the tension increases accordingly. Therefore, it is necessary to have a grounding connection when installing the PMM.
If there is a grounding, there is a possibility that the phase voltage of the electrical network will appear on the device body in the event of a break in the neutral wire. This kind of situation can act as a catalyst for electric shock to a person. Now you know how to properly prepare the electrical wiring for installing the machine.
Preparation
As always, preparation comes first. It’s good when everything fits exactly right. But often the kitchen set is completely unprepared for installing a dishwasher. The problem can be solved simply and radically - you still have to sacrifice something: shelves or drawers. Having prepared the place, let’s evaluate what is missing for a high-quality installation:
- You may need to install an additional partition.
- A door trim or replacement of part of the facade will be required.
- Sometimes the base plate of the headset requires modification.
In general, it often happens that you can’t do without a furniture maker - we invite you, we order. Moreover, the vast majority of them already had repeated experience of similar work. Therefore, it is better to entrust the façade part of the headset to professionals.
Review of the rating of the best models
In order to popularize dishwasher models, ratings of the best dishwashers from well-known manufacturers are regularly conducted online. Here are the TOP 6 best dishwashers without a water connection.
DISHWASHER WITHOUT WATER CONNECTION! MIDEA MINI. DISHWASHER REVIEW.
Weissgauff TDW 4017 D
This is one of the best models, designed for washing up to 6 sets of dishes. The compact dishwasher is electronically controlled. Condensation drying and child locking add to the appeal of one of the best dishwashers of 2021.
The machine uses 7 basic programs - these are express, intensive, economy, delicate, bio, soaking and rinsing modes. During one wash cycle, the machine consumes 6.5 liters.
Exiteq EXDW-T502
The electronically controlled machine can hold 6 place settings at a time. The hinged lid has an ergonomic display on which, using sensors, you can set 6 washing programs and 6 temperature modes.
The maximum noise level is 49 dB, power is 1.38 kW. Convenient baskets with guides for plates, separate compartments for cutlery and special holders for glasses are installed inside the chamber.
Midea MCFD42900 OR MINI
This is one of the most successful mini models from the Chinese manufacturer. The unit is designed to serve a married couple or one person. Before starting work, 6.5 liters of water are poured through the technological hole in the lid of the device.
The basket can accommodate 2 sets of dishes. Despite its miniature size, the dishwasher has a standard set of functionality.
Candy CDCP 8/E
The dishwasher can wash 8 sets of dishes at the same time. The ergonomic display shows the remaining time until the end of the wash and the water temperature. Water consumption – 8 liters, electricity consumption – 0.7 kW, noise level – 50 dB. The device has 6 basic washing programs and 6 temperature modes.
Krona VENETA 55 TD WH
The small-sized machine easily fits in the smallest kitchen. The unit easily copes with 6 sets of dishes in one washing cycle.
The stylish design of the machine body will decorate the interior of any room. Using 6 basic programs with a water consumption of 6.5 liters of water allows you to do without running water.
Mechanical dishwasher Circo
An amazing dishwasher design that works without running water or electricity was developed in Israel. “Circo manual dishwasher” is the name of a dishwasher model that works by rotating the lever by a person’s hand.
Inside the transparent body, water is sprayed onto plates that are in a vertical position. One load uses 3 liters of water. The machine has absolute mobility and is inexpensive.
DISHWASHER WASHES WITHOUT WATER
Connection to sewerage
And you can make changes inside yourself. For example, in most cases, the side of the countertop adjacent to the kitchen apron has a significant overhang - about 5 cm. This is enough to bring the pipe to almost any place. All you need to do is drill a hole for the outlet using a crown.
However, everything is not always so convenient, because there may be no space between the wall and the back wall of the headset. In this case, the sewage system for the dishwasher is laid inside it. The preparation is as follows:
- Interfering drawers must be removed from the set and the doors must be dismantled for convenience.
- Focusing on the socket of the sewer pipe, where the outlet for draining the sink is inserted, we use a cord or strip along the outer ends of the walls of the set to make pencil markings for the pipe. Be sure to take into account the slope.
- Then we transfer it to the back wall of the headset - we get the exact position of the pipe.
- After this, you can drill holes for it using a crown.
Getting ahead of events, let's say that you may have to trim the back side of the shelves or shorten the drawers. Their back parts are not visible, so you can really do everything yourself. The main thing is not to forget to waterproof the cuts, for example, with sanitary silicone. The main problem may be retractable fittings. Here, each case is individual: in some cases it is enough to simply trim the length, in some cases it will be possible to cut out a part and splice the headset directly on the wall, but it may also be necessary to replace it with a shorter one.
Why such difficulties, because you can simply install the hoses, without even getting into the sewer pipes, but make a simple connection - right into the sink siphon. Yes, it will also work with extended hoses. However, maintaining the slope with a flexible hose is problematic - there will be sagging. And these are potential places for blockages. If you simply run it across the floor, you will get a very voluminous water seal. By driving water through it, the drain pump will work with increased load.
Since we're talking about the water seal. The instructions for connecting and operating each dishwasher contain recommendations on the position of the drain hose. In addition, to be on the safe side and guarantee “separation” of the machine from the sewerage system, a water seal can be made directly in the pipe. To do this, you need 2 45° bends and the shortest tube:
- Let's put it all together. Branch – tube – branch.
- Install in an inclined position. To ease the flow, but get a full-fledged water seal.
Please note that it will not be possible to connect with a single pipe inside the headset - the walls of the sections will interfere. Therefore, before purchasing materials, you need to estimate the length of the component pipes in advance.
Important : for sewer installation, it is generally advisable to make “smooth” turns and connections. For this, it is good to use 45° bends and tees. This will ensure a faster, precisely targeted outflow of water. Therefore, sewer pipes do not become clogged longer. Use 90° bends and tees as a last resort - for installation in very cramped conditions or for the purpose of “tough” savings.
Installation of new pipes
For major installation you will need a varied range of materials:
- polypropylene pipe PPR PN20 with a diameter of 20mm
- water socket
- union nut connectors
- 90 degree connection fitting PPR-90
- HP/HP elbow with ¾" external thread
- FUM sealing tape
When installing pipes, the socket method is used. To do this, you will need a special apparatus for soldering polypropylene pipes.
The total length of the pipe and the number of fittings are selected individually. This depends on how far the dishwasher is from the cold water collector.
To begin with, mark the route where the pipes will be laid from the distribution manifold to the installation site of the PMM.
Then, use a wall chaser to cut to the required depth.
Next, connect the PPR connectors with a union nut to one of the manifold outputs.
Cut a piece of pipe so that it will last until the first turn or corner. At the same time, do not forget to leave a margin of 15mm for connections on each side.
Connect the pipe and fittings using the soldering method, controlling the position of the elbow.
After connecting all the pipes along the marked area, install a water socket at the very end. Be sure to fix it on the wall.
Next, screw an elbow with an external thread with a diameter of ¾ inches into the water socket
Mount the water supply hose onto the angle.
The AquaControl or AquaStop system with which it may be equipped should protect against leaks in the event of a breakdown and automatically stop the water supply.
Turn on the water and check the entire system. If everything is fine, you can finally seal the groove.
Connection to water supply
The length of the water supply hose is also limited - no more than 1.5 m. It can be attached with a water hose in a metal braid. This is not difficult, you just need an angle tee and the hose itself. But in order to reduce the risk of flooding and get a more reliable and therefore durable result, we will do it differently - we will run a water supply pipe parallel to the sewer pipe. The easiest way to do it yourself is to connect the water to the dishwasher with a metal-plastic pipe - this requires a minimum of tools. The procedure is the same for any connection:
- The cold water hose of the kitchen faucet is unscrewed.
- The corner valve is screwed on. More precisely, a tee with a ball valve for connecting domestic water consumers.
- The mixer is reconnected, and a fitting for a metal-plastic pipe is screwed onto the threaded connection that is locked with a tap.
For ease of inspection and maintenance, connections to the inlet and drain hoses of the dishwasher should be made in one, relatively easily accessible place, but not hidden behind built-in appliances. To be able to inspect them at any time, without dismantling the machine.
Important : threaded connections with rubber rings do not require additional sealing; they are tightened with force “by hand”; if in doubt, you can tighten them by ¼ turn. If the gasket is positioned correctly, this is usually more than enough. The remaining threaded connections require rewinding:
- The older generation can recommend flax - don’t give in, it’s more justified for other purposes.
- Tape-FUM is a more suitable option, but using it requires skill - experience in use. Rewinding with a foam tool is done “one-time”: rewind, twist and that’s it. If you make a mistake or leak, unwind it, remove the tape pressed through the thread and rewind it with a new piece.
- The most convenient thread to use is Tangit Unilock. It allows you to adjust the position of the tap to a more convenient one. Instructions for use on each package. Having tried it once, few people return to flax or FUM tape. This happens only for specific use or total savings.
To accurately select the position of the tap, it is recommended to screw it on “dry”, count the number of revolutions without tape, unwind it and reassemble it with winding.
Possible implementation of connection to hot water
Most dishwashers require a cold water supply. Let's figure out how to connect a dishwasher to hot water - after all, some models have such functionality. The installation and operating instructions for such machines indicate:
- It is allowed to connect to hot water, its temperature should be within 40° - 60°C. You can connect to alternative, for example, energy-saving systems.
- The functionality of the Aquastop protective device allows a maximum supply water temperature of 75°.
Therefore, connecting such machines to hot water supply is quite possible. But restrictions are imposed by completely different realities. The hot water system in comfortable apartments is unstable - the water temperature can easily be higher than the established norm. This is fraught with breakdown of control equipment and gradual destruction of internal elements.
The conclusion arises that connecting a dishwasher to a hot water supply is most appropriate in private homes, where it is implemented by a gas boiler. Because:
- Heating water with gas is actually cheaper than electric heating.
- It is possible to set and control the maximum water temperature.
However, some models, in particular the Bosch brand, have a heat exchanger for drying dishes. This is a completely different principle that has nothing to do with the common drying with a stream of hot air. Its meaning is that at the beginning of the drying process, the space between the walls of the machine is filled with cold water. Due to sudden cooling, moisture condenses on the inner wall, evaporating from the surface of the hot cookware. This achieves energy savings and implements a gentle drying mode that is harmless to dishes. That is, it is obvious that cold water is fundamentally necessary for the machine to operate.
First launch of PMM
Before starting, you will have to activate the test wash, since there is a possibility that the parts and elements inside the machine are lubricated, this will allow you to wash it inside, thereby getting rid of dirt and dust. You can see how the machine works, whether it hums, how quickly the water fills, how much detergent is needed, whether it is necessary to add salt or rinse aid. If you are connected to hot water directly, look at the quality of the water, whether there are streaks or stains on the dishes.
Be sure to turn the sprayer over before turning it on to see if it rotates normally. After this, pull out the filter and see if it is intact. Fill in the gel, add salt, and on the control panel you will have to indicate the type of product you are using. We launch the PMM and observe the work. If you hear any strange sounds or see a leak, all this can be corrected. Don't forget that you will need to let the machine dry and cool. Once you understand how to use the equipment, you can start washing dishes if all defects are absent or eliminated.
Electrical connection
Next, we’ll look at how to connect a dishwasher to electricity if there is no specially designed outlet. Safe operation of household appliances with high energy consumption provides the first class of protection against electric shock, where the grounding of metal non-current-carrying parts is ensured by connecting the plug of the electrical appliance to a socket with a grounding contact.
Therefore, from the outlet you will need to run a separate three-core double-insulated wire with a cross-section of 2-2.5 kV, and not into the distribution box, but directly to the distribution panel, equipped with a residual current device and a grounding bus. The connection is made through a machine that matches the power of the household appliance, so that you can turn it off without pulling the plug out of the socket.
It is recommended to place the socket itself not at the bottom - behind the dishwasher, but on the apron of the kitchen unit, so that, if necessary, you can quickly disconnect the machine from the network. The wire can be mounted in an electrical installation box, or in everyday life - an electric baseboard. But not temporarily “differently, diagonally, etc.”, but taking into account the permanent position according to the rules of electrical installation and the length reserve in each room, sufficient for laying in the groove. To be able to gradually hide it during the first cosmetic repair.
This solves the problem of freedom of placement. Obviously, it is limited only by connecting the dishwasher drain. Insurmountable obstacles can be a passage, a door, a Khrushchev-era refrigerator. At the same time, everything applies to washing machines; to connect them, you can combine everything except the electrical supply - following the rules for grounding electrical appliances, the connection must be made with two different wires.
We prepare tools and materials
Regardless of which PMM model you choose - compact, built-in or free-standing, to connect the machine, you will have to prepare the tools in advance according to the list. What does it take to build a machine?
- electric drill;
- screwdriver;
- knife;
- construction level;
- 2 adjustable wrenches;
- screwdriver for checking wiring (indicator).
When installing PMM, craftsmen recommend installing a leakage protection system. This is protection against accidents and force majeure in the event of some problem with drainage, sewerage, etc.
As for materials, they must be purchased in advance. There are standard situations when ¾-inch metal-plastic pipes with grounding already present were installed throughout the building. In this case you need:
- ¾" tee;
- ¾" stopcock;
- water supply tape;
- grounded socket;
- wire of optimal cross-section and length.
Additionally, you can buy a filter for cleaning. Depending on the situation, it may be that extended hoses are required, because... In the kit, manufacturers most often add very short ones that do not reach the connection point.
Completing the installation
When the communications are connected, we attach a steam protection on the underside of the tabletop: a metal or plastic plate or glue a film - depending on what is included in the kit. In the desktop version, for example, nothing is provided, so we make it ourselves from scrap materials. Next, we connect the dishwasher to the water supply, sewerage, and electricity. Then we “push” the equipment into place.
Horizontal alignment is required. This stage should be taken seriously; the quality of the wash and the duration of operation depend on the quality of the installation. For this purpose, threaded legs are provided. For built-in models, the front ones are freely accessible, the back is usually one - with an adjusting screw, also accessible from the front. It is implemented on almost all models, from prestigious Bosch to less popular brands. For aesthetic reasons, it is necessary to eliminate the gap at the top - the machine is raised to the tabletop and only after that the set is leveled in all positions and planes.
In principle, that’s all – you can do a test run and evaluate the quality of the connection. The final stage for built-in models is hanging the front door from the set. There is a template for this:
- We put it “in place” on the dishwasher door.
- We transfer it to the back side of the facade door and make markings.
- We mark the holes for the screws with an awl or drill.
- We degrease the areas for the double-sided self-adhesive facade fasteners and attach the seal.
- We combine - we put the facade on the dishwasher door.
- Carefully open it and secure it with 1 self-tapping screw.
- We close it, evaluate the position of the façade, and adjust it if necessary.
- We open it and fasten the façade diagonally with a second self-tapping screw.
- Again, we make sure that the position is correct and tighten the remaining screws - we secure them completely.
After this, we adjust the built-in dishwasher - we clarify the position in the plane of the remaining facades of the set. If the design provides for it, we fasten it with self-tapping screws to the headset and install the base - in most cases it requires trimming it from above.
At this point, the installation of the dishwasher is completely completed. Obviously, you can do everything yourself with a minimal set of tools. Additional difficulties can only be caused by the aesthetics of the kitchen set itself.
Recommendations for use
Dishwasher owners are interested in their long-term operation. To do this, you need to follow the recommendations of specialists and manufacturers of this equipment.
- Be sure to fill the box with detergents. The gel works well with porcelain and silver, the tablets heat and soften the water, preventing lime deposits from forming.
- As for the dosage of detergents, you need to follow the instructions for using the machine.
- Before placing the dishes, you need to remove large food residues.
- You need to check the filter regularly and clean it of lime.
- At the end of washing, the internal surface of the unit must be thoroughly wiped using special antibacterial dishwasher care products.
- In winter, you should not leave a washing machine with water in the country house. Ice can be a destructive force that can damage your camera. If there is no water discharge device, then it is removed with a sponge.