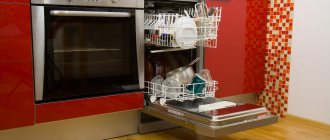
For those who bought a kitchen set earlier, a dishwasher might seem unnecessary, so space was provided only for an oven, gas stove and microwave. But now, when washing household appliances are becoming more and more popular, the question of their placement becomes acute.
To figure out how to integrate a dishwasher into a ready-made kitchen, it is worth delving into the existing options, already tested by users, and studying the variety of device housings, which will help you choose the right one, suitable for installation in specific conditions.
Problems with using a non-built-in dishwasher
First of all, you should pay attention to the problems associated with the operation of a free-standing built-in dishwasher. The thing is that there will be no difficulties with connecting and starting, since such a unit is designed exactly the same as a device that is produced separately. But experts do not recommend using a dishwasher regularly in this way. And that's why.
- Firstly, it's simply not aesthetically pleasing. It would seem like a small thing. But all the unsightly insides that should be hidden behind the facade (for example, soundproofing material) will be on the outside, which will immediately give your kitchen an unflattering appearance.
- It will be almost impossible to open the door of such a dishwasher without a front, especially if it is equipped with a tight spring. After all, a built-in dishwasher is designed to have a front and a door with a handle, and without them you will have to spend a lot of time getting used to it.
- Extra noise. Any dishwasher makes quite loud noises, but built-in dishwashers are much less equipped with sound insulation in the expectation that some of the sound will be absorbed by the set. Therefore, if you operate the machine separately, be prepared for noise during operation.
- The centrifugal force of a dishwasher is not as powerful as that of a washing machine, but it will still shake your unit quite well. This is not such a serious problem, but you need to be prepared for it.
It is best, of course, to be patient and wait for the kitchen furniture that will have a built-in dishwasher. Then there will be no worries or hassle, everything will work as usual. But if you really want to test the unit, take into account the above difficulties in order to properly use the device without embedding it.
Types of materials and decor of furniture facades for a dishwasher
Various materials are used to produce dishwasher fronts.
Basically it is MDF. Since it is he who is able to withstand temperature changes and high humidity that occur during operation of the equipment. In addition, they are safe and do not contain substances harmful to human health.
Natural wood is rarely used in the production of furniture for a built-in dishwasher, since it is a very expensive material that requires a high-quality top covering.
Temporary connection for dishwasher
Now let's figure out how to install a built-in dishwasher separately from the furniture set.
- First you need to connect the drain hose to the sewer. To do this, you can connect it to a part of the sink drain, which in turn connects to the sewer pipe. In this case, it is important to create a bend near the “joining” point so that waste waste does not linger in the hose. As a last resort, you can simply leave the drain hose in the sink.
- Make sure that the length of the drain hose is no more than 1.5. In extreme cases, you can leave 2m.
- Now you need to deal with the inlet hose. In order to install it, you must first install a special hose tee. Remove the faucet hose from the water supply and replace it with a brass or bronze adapter. Now install the mixer on one branch, the filter on the second, and the dishwasher hose on the third.
Attention! The last step is connecting to the network. At first, you can use an adapter, but when the unit is already built-in, it must be connected to a moisture-resistant outlet connected to a line protected by a circuit breaker.
Now you know how to operate your dishwasher without having to build it in until the kitchen furniture arrives. Try out new equipment and get out of the habit of washing dishes by hand.
Methods for attaching furniture fronts to a dishwasher
It is important not only to choose a front for a dishwasher, but also to install it correctly.
Depending on the installation method of the equipment itself, facades can be mounted by:
- full installation - in this case, the facade completely hides the body of the equipment;
- partial embedding - the door covers only the main part of the machine, and the control panel remains visible.
And according to the method of fastening, there are two methods of installing doors:
Curtain facades guarantee uniform load distribution between the doors of furniture and appliances. The only disadvantage of this solution is the complex arrangement of fastenings and the presence of a gap between the doors.
In the pantograph system, the facade is attached directly to the car door. The main advantage of this method is the absence of gaps between the doors - dirt and moisture cannot accumulate there. In addition, the pantograph does not require a complex synchronization structure, which is used in mounted products.
Problems with using a non-built-in dishwasher
First of all, you should pay attention to the problems associated with the operation of a free-standing built-in dishwasher. The thing is that there will be no difficulties with connecting and starting, since such a unit is designed exactly the same as a device that is produced separately. But experts do not recommend using a dishwasher regularly in this way. And that's why.
- Firstly, it's simply not aesthetically pleasing. It would seem like a small thing. But all the unsightly insides that should be hidden behind the facade (for example, soundproofing material) will be on the outside, which will immediately give your kitchen an unflattering appearance.
- It will be almost impossible to open the door of such a dishwasher without a front, especially if it is equipped with a tight spring. After all, a built-in dishwasher is designed to have a front and a door with a handle, and without them you will have to spend a lot of time getting used to it.
- Extra noise. Any dishwasher makes quite loud noises, but built-in dishwashers are much less equipped with sound insulation in the expectation that some of the sound will be absorbed by the set. Therefore, if you operate the machine separately, be prepared for noise during operation.
- The centrifugal force of a dishwasher is not as powerful as that of a washing machine, but it will still shake your unit quite well. This is not such a serious problem, but you need to be prepared for it.
It is best, of course, to be patient and wait for the kitchen furniture that will have a built-in dishwasher. Then there will be no worries or hassle, everything will work as usual. But if you really want to test the unit, take into account the above difficulties in order to properly use the device without embedding it.
Stages of installing the facade on a built-in dishwasher
If the installation of equipment is a very complex process that is best entrusted to a specialist, then the installation of the facade can be carried out independently.
Before installing the front panel, the machine itself must be securely fixed by attaching it to the side walls and table top.
To fasten the panel, use the following tools and components:
- facade;
- table top;
- screwdriver;
- set of accessories;
- measuring tape.
The process itself consists of two stages:
- installation of the facade at the required height. For this purpose special screws are used. Next, you need to determine the distance from the attachment point to the edge of the dishwasher facade. To do this, use a tape measure to measure two indicators: the distance from the top mount to the countertop and the size of the gap between the countertop and the front of the other cabinet. Then subtract the second from the first parameter. According to the data received, you need to make notes. To do this, you can use a pencil or colored tape;
- installation of fasteners and accessories. First the handle is attached. To do this, a hole is drilled on the front side of the panel for the handle screw. If you drill from the back, a chip may form on the furniture, especially if the coating is enamel or acrylic. Next, according to the notes made, shallow holes for fastenings are drilled - about 3/4 of the panel thickness. You don't have to drill, but then the fastenings won't be as reliable.
At the end of installation, be sure to check how the door opens - it should not rest against the base.
Often, built-in models have special ready-made templates that make it easy and quick to attach the front to the dishwasher door. If you doubt your abilities, try first practicing on an unnecessary piece of MDF or chipboard.
Temporary connection for dishwasher
Now let's figure out how to install a built-in dishwasher separately from the furniture set.
- First you need to connect the drain hose to the sewer. To do this, you can connect it to a part of the sink drain, which in turn connects to the sewer pipe. In this case, it is important to create a bend near the “joining” point so that waste waste does not linger in the hose. As a last resort, you can simply leave the drain hose in the sink.
- Make sure that the length of the drain hose is no more than 1.5. In extreme cases, you can leave 2m.
- Now you need to deal with the inlet hose. In order to install it, you must first install a special hose tee. Remove the faucet hose from the water supply and replace it with a brass or bronze adapter. Now install the mixer on one branch, the filter on the second, and the dishwasher hose on the third.
Attention! The last step is connecting to the network. At first, you can use an adapter, but when the unit is already built-in, it must be connected to a moisture-resistant outlet connected to a line protected by a circuit breaker.
Now you know how to operate your dishwasher without having to build it in until the kitchen furniture arrives. Try out new equipment and get out of the habit of washing dishes by hand.
Complex installation of a new kitchen unit with a set of equipment is an ideal, but not always possible solution. It happens that a dishwasher is bought later, and there is no special cabinet for its installation. What needs to be done to ensure that the long-awaited purchase fits successfully into the furniture module?
You will learn everything about how to integrate a dishwasher into a finished kitchen from our article. We will talk about which equipment layout options have been tested in practice. Do-it-yourselfers will find a detailed step-by-step guide here.
Photos of dishwashers with furniture fronts
In any case, a facade masking a dishwasher will help create the desired interior without the difficulty of selecting equipment of a certain design. In addition, it will protect equipment from aggressive factors and extend its service life.
The difference between installing a built-in dishwasher and a freestanding model is that additional design is required for the front wall - the machine door.
Dishwasher installation conditions
Before purchasing and installing a dishwasher, you need to find a suitable place for it.
The easiest way is with free-standing units - even a piece of free space on the floor or table is enough for them. But what to do when you plan to buy a built-in model that can be hidden behind a decorative panel?
You need to arm yourself with a construction tape and check which cabinets are suitable for installing a PMM. Finding out the sizes of dishwashers is easy - information is posted on the official websites of stores that sell household appliances.
When making machines, manufacturers are guided by human height and furniture sizes, and accordingly adapt their models to uniform standards.
For example, most dishwashers from well-known brands have a width of 60 cm (more precisely, 598 mm) or 45 cm (448 mm). 45-centimeter models are called narrow, and they have more options for embedding in a finished kitchen.
Narrow models usually have a height of 815 mm to 875 mm, which is equal to the standard height of kitchen tables and cabinets. If the set is made to order, the level of the countertops may be lowered for technical reasons, for example, a pipe is in the way, etc. Therefore, accuracy is needed when measuring - just one extra centimeter can be decisive.
The depth of the machines is 550 mm. During installation, a few centimeters remain for comfortable connection of hoses and wires so that they are not pinched. There is a category of compact cars that differ from full-size ones in height. For ease of use, they are usually built into the upper modules.
If you have found a cabinet that is suitable in size, do not forget to take into account the location of communications:
- cold water pipes;
- sewer pipe;
- free power line with socket.
An additional electrical cable can be laid if necessary, but it is hardly possible to move pipes in a ready-made kitchen, so the installation location of the machine is usually chosen next to the sink - this is where the main water supply and drainage units are located.
If at least one of the conditions is not met, for example, there is no suitable module or there is no access to communications, then you will have to postpone the purchase of a built-in dishwasher or think about remodeling the kitchen.
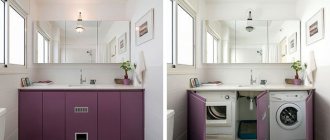
Where to put?
Even in a small bathroom there is always room for a dishwasher. Moreover, the housewife can choose how to place the equipment: move it to the sink or build it under it, place it separately in a free corner near the bathtub, directly on the washing machine, or build a special rack for the unit. But before you move the machine, you should think about preparation.
First of all, we think about the design of the dishwasher. We remember that it is better to choose a machine that matches the color so that everything looks organic and aesthetically pleasing. We also plan where the machine will stand in order to prepare a box to disguise the supplied communications or order a special cabinet for the functional use of the space. If there is enough space in the bathroom, then it is recommended to choose full-size models, as they are more spacious and reliable.
Possible embedding options
A cabinet for embedding a PMM may look different. We suggest considering several popular options that are convenient for installation.
Each type of installation is associated with difficulties. To minimize them, it is important to comply with the above conditions and requirements specified by the manufacturer in the instructions. We offer several recommendations for installing a dishwasher in different places.
Solution #1 – built into a closet
If there is a cupboard with a width of more than 45 cm next to the sink, then it can be used to install a dishwasher. The advantage of installation close to communications is the ability to integrate machine hoses into an already installed system under the sink.
You will have to remove the shelves and back wall from the cabinet, and, if necessary, the bottom panel. The built-in housing must be brought into a strictly vertical position; for this, adjustable legs are used.
Then you need to connect the machine one by one to the communications: sewerage, water supply and power supply. If necessary, an additional water seal with a drain pipe should be installed.
The decorative front panel, which is attached to the machine door, is usually assembled from removed cabinet doors or ordered additionally. Partially built-in models do not need to be decorated, so their installation is a little easier.
Solution #2 – installation in a separate module
If there are no free cabinets for new equipment, but there is enough space in the kitchen, you can order a separate module, but you need to install it near the communication nodes.
It is important to level and secure the unit so that it does not vibrate during operation or move the cabinet. Hoses and pipes are laid along the wall, but they are easier to access. To get to the communications, you don’t have to dismantle the car, but simply move the cabinet away from the wall.
Dishwasher front - what is it?
A dishwasher facade is a decorative panel that hides its body. It has not only an aesthetic, but also a practical purpose.
The advantages of such designs include:
- the ability to disguise equipment that does not fit the overall interior design;
- performing a protective function that allows you to protect the case from aggressive influences - high temperatures, humidity and greasy contaminants;
- the façade covers the control panel from small children who may press buttons out of curiosity;
- providing additional sound insulation.
Installation procedure for the built-in model
The dishwasher installation algorithm is described in the instructions provided by the manufacturer. Usually it consists of several stages, the first of which is preparatory.
In advance you need to purchase some parts for connecting to the pipes, take care of the socket arrangement, prepare a tool - a screwdriver, a screwdriver, a hammer, as well as flax or fume tape for plumbing connections, sealant, double tape.
Step 1 – checking the PMM equipment
In addition to the dishwasher, the kit usually contains templates for installing decorative trims, fastening tools, a protective rubber apron, gaskets, and hoses.
To make sure everything is in place, you need to find a list of components and check the presence of each of them. If something is missing, you will have to buy more.
Be sure to check if there are installation instructions in Russian. Famous manufacturers duplicate the description of the installation process on official websites in special sections.
Step 2 - installation in place
Before you begin installing the built-in model, you need to make sure that the cabinet is the right size and that there are holes in its walls for hoses.
- place the machine opposite the niche for embedding;
- pull the drain and inlet hoses through the holes to the connection points, and the power cord towards the outlet;
- carefully push the machine body into the place intended for it and make sure that the length of the hoses suits you;
- pull out the machine and prepare it for installation - carry out the manipulations described in the instructions: glue a vapor barrier film to the inside of the tabletop, attach sealing tapes to the edges, install a mounting plate, damping elements, etc.;
- adjust the height of the legs so that the body stands strictly vertical, check the distance to the walls of the niche with a tape measure;
- Attach noise protection to the bottom part, if included.
Next, you can begin installing decorative overlays. So that they do not differ from the kitchen facade, you can take the removed cabinet door and the panel from the drawer and fix them one by one on the car door, having previously processed and adjusted them to size.
Some tips for installing homemade trims.
How to select and calculate the size of the façade for a built-in dishwasher
The dimensions of the facade for the dishwasher are selected according to the dimensions of the equipment.
The standard panel size is:
- width - 45 or 60 cm;
- height - 82 cm.
There are also more compact options with a height of 60 and even 50 cm. Please note that some manufacturers may “round off” the width of the equipment. For example, instead of 50.2 cm, simply indicate 50 cm. Therefore, before purchasing a cabinet with a front, be sure to measure the car yourself.
After all, if you purchase a facade of the wrong dimensions, it will no longer be possible to cut it or adjust it to the size of the equipment. If you try to do this, the integrity of the decorative coating of the panels will be compromised.
The height of the facade should be slightly larger than the car door. The thickness of the products ranges from 1.6 to 2 cm.
Optimal dimensions of PMM
The dimensions of the purchased PMM are largely determined by the size of the kitchen and the features of the kitchen unit. The height of built-in models is usually the same; it corresponds to standard niches in furniture (820–870 mm). Width may vary. If you are purchasing a model for an existing niche, it is recommended that you measure this niche yourself in order to select a model that matches it when purchasing. If this has not been done in advance, such measurements will still have to be made before installing the dishwasher.
The situation is simpler with stand-alone machines. They are not tied to a niche; there may be several installation options. If the equipment is installed incorrectly, it can be rearranged. It is better, of course, to pre-determine the place where the PMM will be placed and, based on this, select a device of optimal dimensions. How to install it correctly is described below.
In some cases, the optimal dimensions of equipment are dictated not by any restrictions related to the size of the kitchen or furniture, but simply by its sufficiency for the family. In fact, why buy a full-size model, if even the narrow one has more than enough capacity.
At what stage should the façade be attached?
The dishwasher is installed in several stages. The main connection is considered to be connection to communications: water supply, sewerage system, dedicated power line.
Decorating the front side is usually done at the very end, when the rest of the work has already been completed.
Is it possible to run the dishwasher without the decorative trim installed? It is not recommended to launch before installation work is completed for several reasons.
Only a dishwasher that is completely closed on all sides can fully perform its functions; in addition, the panel plays the role of an additional sound and heat insulator.
Sometimes they mask the machine first and then make the connection. This option is appropriate if there is a delay in connection for objective reasons, for example, at the same time the riser in the toilet is being replaced or a new power line is being laid.
In order not to waste time, decorate slowly.
Professional installation advice
To avoid the most common mistakes, we suggest using recommendations from experienced furniture makers:
- be sure to use a tape measure or ruler, do not use your eye, do not be lazy to check the even position of the template and the panel - the appearance of the kitchen facade as a whole depends on this;
- choose the correct length of the screws: they must fit confidently and deeply enough into the panel surface, without coming out from the front side and not deforming it;
- when using a paper template, be sure to secure it on all sides;
- you can use a regular screwdriver, but using a screwdriver speeds up the process;
- Attach the handle, focusing on the location of the handles on adjacent cabinets, try to maintain not only the position (parallel/perpendicular to the floor), but also the height;
- To prevent the PMM door from closing during installation work, place a couple of large books or another heavy object, such as an iron, on it.
If a former cabinet door is used as a dishwasher front, when trying it on, pay attention to the location of the old holes.
It is important to ensure that the old mounting holes do not come into contact with the new ones, otherwise the screws may pop out and the panel may partially come off.
After completion of all installation work, you can begin operating the equipment. But first, it is advisable to carefully study the rules of operation and maintenance of the dishwasher.
Preparation of tools and materials
No special tools are required to secure the façade trim.
The same items that are used to install the dishwasher as a whole will be useful:
- drill;
- screwdriver;
- awl;
- screwdriver;
- tape measure or ruler;
- pencil or marker.
If you don’t have a power tool, then one screwdriver is enough - you can screw in the screws by hand if the holes for them are pre-drilled.
The work is simplified by the presence of a stencil for the façade overlay included in the delivery set. It is a large sheet of thin paper with marked attachment points.
The stencil is placed on the back side of the decorative panel and the places where the screws are screwed in are marked.
In addition to the tools, you will need double tape. Several “Velcro” pieces of tape will come in handy when you need to try on the facade. It is not recommended to immediately “mount” it on screws, since an error of 2-3 millimeters will mean all the work is in vain.
To ensure that the surfaces of the door and facade adjoin as tightly as possible, the heads of the screws should be recessed into the canvas.
It is easier to attach the workpiece than a homemade overlay. If you make the panel yourself, you may need carpentry tools, sandpaper for sanding, antiseptic impregnation and paint to finish the entire surface or just the ends.
DIY façade installation instructions
Having chosen the right time and prepared the tools, you can begin installation. However, during the installation process they often encounter unpleasant nuances that can delay the installation of the facade indefinitely.
Let's consider installation features that are best taken into account before starting work.
Stage #1 - determine the dimensions of the decorative panel
To find out the exact dimensions of the facade panel, you do not need to make calculations or draw diagrams - the manufacturer did everything for us. The instructions indicate all the indicators of interest - length, width, thickness, allowances.