What determines the height of the sewer outlet under the washbasin? Whether it is a sink in the kitchen or in the bathroom, the sewage system in an apartment and a private house is a network of pipelines connected to each other.
The requirements suitable for one plumbing fixture must correspond to the technological features of the installation of other products. In this regard, the height of the sewer outlet under the washbasin is of particular importance, since it is installed above all other appliances. The issue is quite complex and deserves detailed consideration.
What determines the height of the sewer outlet?
The placement of the sewer outlet directly depends on the installation height of the sink. There are no specific norms or rules in this regard, but recommended values exist:
- an adult of average height - 80 cm from the floor to the top of the washbasin;
- teenager of average height - 70 cm;
- child - 60 cm.
These parameters are usually maintained when arranging public sanitary departments. When building a private house or installing sinks in your apartment, the height of the sewer under the washbasin is determined by your own height or the physique of family members. In any case, the standard level for installing a sink is usually in the range of 75-85 cm.
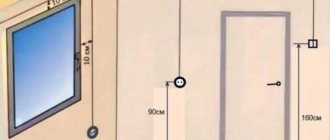
Height and example of wall outlet
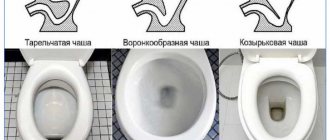
Based on the height of the sink, its dimensions, its design features and the type of outlet, it is easy to determine the point of the sewer outlet. If the type of sink does not provide for a hidden pipeline location, then the location of the sewerage system is selected according to the general requirements of SNiP. First of all, the height of the sewer outlet under the toilet must be taken into account, which usually determines the lowest point of the horizontal part of the intra-apartment section of the system. The sewage level under the attached toilet is 16-19 cm (usually less, since most structures have an inclined outlet), and wall-hung models require 22-24 cm from the floor.
The usual height of the sewer pipe from the floor for a horizontal section of an intra-apartment system is 10-15 cm. This value is due to the design features of the bathtub outlet, located at this level above the bathroom floor. The height difference between this pipeline and the toilet outlet is compensated by using different pipe diameters - a 110 mm tee is used for the toilet, and the rest of the system, as a rule, has a diameter of 50 mm.
For general cases, use a standard universal outlet set, which can be connected at any height. For more specific sink design options, the sewer outlet under the washbasin is made based on the size and installation features of this device.
Schemes and standards for the placement and installation of plumbing equipment and appliances
Previously, waste and overflows were used in bathrooms, but then they became widespread for sinks.
Flat sink drain
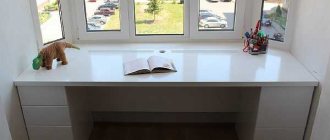
In the case where the sink needs to be installed above the washing machine, as a rule, it has a flat shape. This saves space and is the most suitable option in this case.
Such a sink, which is called a “water lily,” must have a special flat drain. It must be included in the package, since it is almost impossible to select it separately.
In addition, the “water lily” is a sink with a side drain. Its peculiarity is that the hole for water drainage is located on the side, and not at the bottom. This may cause some inconvenience as the water may not drain completely. To avoid siphon blockages, you will need to remove the liquid yourself by soaking it with a rag.
If you are willing to put up with these shortcomings, this will allow you to free up additional space in the bathroom.
Therefore, the choice of sink drain should be given special attention as it will ensure the efficient operation of the system. Plumbing measures in the home can be divided into three types:
Plumbing measures in the home can be divided into three types:
- Maintenance work, for example, fixing a leaking faucet or clearing a clogged shower drain;
- Work to replace pipes or broken equipment;
- Installation of new plumbing and pipeline communications.
Routine plumbing repairs are not regulated by any regulations or standards. However, measures to replace pipes or install new plumbing equipment will necessarily entail the need for coordination with the relevant organizations, which will require strict compliance with the rules for installing plumbing fixtures in accordance with current standards.
The motivation of bureaucrats is simple and clear:
- The transfer of utility networks and the installation of plumbing fixtures in a new location is called redevelopment, which may entail changes in the configuration and size of the room, requiring changes to the apartment’s registration certificate;
- Relocating plumbing fixtures is also a remodel.
Naturally, it is easier to do everything according to the letter of the law, then the preparation of technical documentation for housing will not cause problems.
- SNiP 2.08.01−89* “Residential buildings”;
- SNiP 2.04.05−91* “Heating, ventilation and air conditioning”;
- SNiP 3.05.01−85 “Internal sanitary systems”;
- SNiP 2.04.01−85* Internal water supply and sewerage of buildings.
The modern market of plumbing equipment is represented by a wide range of bathtubs, showers, sinks and sinks, toilets and bidets, valves and mixers. Despite all the variety of devices in terms of functionality and methods of controlling their operation, the methods of connecting household sanitary equipment with residential pipeline communications are completely unified and “submit” to the requirements of GOSTs and SNiPs.
It is recommended to install household plumbing after installation of utilities before finishing the room. Water connections for installing appliances must end with water sockets, which are a mandatory attribute of a home’s water supply system. Water outlets are specially rigidly fixed to protect the water supply system from vibration effects that occur during the operation of connected household plumbing fixtures.
The distance between the axes of the outlet fittings provided for hot and cold water must be strictly 15 cm.
Instead of sockets, it is allowed to use elbows, tees, couplings or manifolds for connecting mixers or other types of taps.
Another general requirement for the installation of plumbing fixtures is to ensure free access to the equipment, for which SNiP stipulates the size of the free space around each type of fixture (bathtub, washbasin, etc.).
The height of placement of plumbing fixtures is regulated in clause 3.11 and clause 3.15 of SNiP 3.05.01−85 “Internal sanitary systems”, and pipeline fittings to the devices are installed in accordance with clause 10.5 of SNiP 2.04.01−85* “Internal plumbing and sewerage of buildings."
Types of plumbing fixtures with different outlet heights
There are different designs of sinks equipped with a stand or cabinet (pedestal). There are also a number of models designed for wall-mounted installation. Open structures in which the sewer outlet goes into the wall require an accurate calculation of the height of the pipe placement. If a wall-hung toilet is used, the horizontal part of the system is installed in a hidden way and hidden in the wall. The pipeline is laid in a recess in the floor, and then it is masked with a cement screed and floor covering. In such situations, the height of the sewer for the sink is determined by the difference in the level of installation of the pipes.
It is necessary to take into account that the parameters for the location of the sewerage system often depend on the characteristics of the water supply. Pipes placed on the surface of the wall do not allow the sewer system to be installed as needed, forcing one to adapt to existing conditions. Most often, the height of the outlet of water and sewerage pipes depends on each other and requires taking into account the specifics of installation or connection. When installing a water supply system, you should remember about the sewerage system, and vice versa.
The lowest outlet level required for shower enclosures is 60 mm. Most often, they have to draw their own line, located much lower than the common horizontal plank. For example, they build a podium of the appropriate size on which a shower stall is installed.
You may also like: Connecting the sink to the sewer yourself
Dimensions for connecting non-standard plumbing equipment
Let me clarify: the above values are common and standard, but with the current variety of manufacturers and models, it is necessary to approach them individually in each case.
If you intend to install some new, exclusive plumbing equipment, you should first look at the technical map of the installation and connection dimensions for this particular equipment. This needs to be done before supplying water and laying a sewer system - so as not to have to redo it, so it is better to purchase the desired plumbing fixtures in advance (if there is space for storage).
Features of sewer line for kitchen sink
As a rule, the sewerage system in the kitchen under the sink is the highest point of the horizontal section of the intra-apartment line. The installation height of the sink is determined either by the size of the kitchen unit or by the personal preferences of the homeowner. In addition, you should take into account the height of the starting point of the sunbed and add to it the difference in levels to ensure the required slope. This is important if the kitchen, bathroom and toilet are connected to one horizontal deck, which is connected to a common sewer riser. This scheme is used in multi-storey buildings, although it is often used in private housing construction because of its convenience and efficiency.
diagram - example
The upper permissible limit for the height of the sewer outlet under the sink in the kitchen is considered to be 50 - 55 cm. Above is the siphon and the sink itself. As a rule, sewer pipes are not installed even at this distance from the floor. This is too high and can only be found on long sections of a horizontal intra-house system, where the need to ensure proper slope forces the pipes to be raised to a greater height. In addition, the specifics of connecting kitchen plumbing allows drainage to be discharged into pipes located at any height not exceeding the level of the lowest point of the siphon. Most often, a tee or outlet is installed on the deck chair, to which a corrugated tube is connected, connected to the sink siphon. A hidden method of installing kitchen sewerage is extremely rare; most often the pipes are hidden behind the lower tier of a furniture set.
There are sinks located on island-type cabinets. They are installed in the middle of the room, which requires hidden installation of the sewer system below the floor level. Such systems can only be created in private homes and planned in advance when creating a general house project. The sewer bed is laid in the trench, all other plumbing fixtures are connected to vertical outlets installed at the required points in the line.
Preparation of the foundation according to SNiP
The document provides for maximum quality during preparatory work. For example, if floors are planned on the ground, then according to SNiP it is recommended to remove the top fertile layer of soil and then fill the resulting pit with gravel and sand. The most optimal layer thickness should be observed - according to the regulations, it should be from 20 to 50 cm, depending on the conditions.
“Pie” option for floors on the ground.
This bedding is done in layers. Each layer has a thickness of 10 to 12 cm and is recessed. It is necessary to carefully compact the layers - this requires the use of special electrical, mechanical or manual tools.
If the soil is sufficiently porous, it is removed and replaced with bulk substrate materials. In soils that do not have stable indicators in terms of density and bearing capacity, the concrete base should be made from cement grades from B20 to B40.
Fill the base in parts. In this case, the strip should be up to 4 meters wide. It is recommended to fill the seams that will form between such strips with special means.
Thermal insulation materials are placed on top of soil or concrete rough foundations. The standards for this provide for bulk mixtures, such as expanded clay or perlite. In addition, the use of board materials such as polystyrene is allowed.
For bathrooms, SNiP provides for mandatory waterproofing, which is 150 mm or more for each wall. Waterproofing is also provided in any rooms with high humidity.
If it is necessary to level the base, the use of a screed is recommended. For their arrangement, SNiP data should be taken into account. Thus, for concrete floors the layer thickness is provided from 30 to 50 mm. As for tolerances, a slope of 2 mm per 2 m of screed length is allowed. This is an acceptable deviation.
Sink drain height
The standard sewer height for a bathroom sink is tied to the level of the horizontal pipeline. Since most types of sinks have cabinets, pedestals or other additional items that hide the outlet set, there is no fundamental importance of height. For wall-mounted sinks, where the pipeline from the siphon immediately goes into the wall, the height of the location is selected by the method of preliminary installation and fitting of the outlet point locally. Most often, a vertical recess is made in the wall, in which a sewer outlet is located, and a hole for entering the wall is made in a tile, behind which it is hidden.
You may also like: Step-by-step connection of a washing machine to water supply and sewerage
This installation method is very attractive, but inspection of pipes or repairs in the event of leaks becomes extremely difficult, as with all hidden installation options. Pipe connections must be made as tightly as possible, using sealant or other means to prevent leaks.
Siphon connection diagrams
Regardless of the design of bathtub sinks and methods of their installation, siphons are traditionally used:
- single-turn;
- double-turn;
- bottle.
The use of a one- or two-turn siphon is typical for “water lilies”, when it is necessary to free up as much free space under the sink as possible to accommodate a washing machine or other household items.
The name “single-double turn” was obtained due to the presence of one or two pipe bends in the circuit. Due to such bends, a hydraulic seal is created inside the line.
Another option, “bottle”, is the most common. It differs from the first in the absence of bends, the functions of which are performed by a special “bottle” with a drain pipe diverted from the top of the structure. This scheme is more convenient than the first when performing maintenance - cleaning the line in case of a blockage. At the bottom of the “bottle” there is a technical cap that can be easily unscrewed.
A few words about the jacuzzi
This type of plumbing fixtures is in extraordinary demand these days. If previously a jacuzzi was a luxury and an indicator of wealth, today many people have it in their homes. If you also want to get one, then you should take into account certain nuances, since correct installation plays a significant role. Plumbing with hydromassage capability consists of the following elements:
- main thicket;
- water intake hole;
- special nozzles designed to supply air;
- hydromassage system;
- aeration network;
- pump;
- air compressor;
- Control block;
- support system;
- a mixer that allows you to regulate the water heating temperature;
- Remote Control.
Despite the complex design, the operating principle of a jacuzzi is quite simple. But, as in the case of a bathtub, you need to choose the right height. The best option is 70 centimeters.
How to install the bathtub correctly?
The height determined by building codes will make it possible to more economically and aesthetically arrange the facing tiles in two or three rows, without resorting to trimming or unnecessary fragmentation of the material.
In order to install a bathtub perfectly, you must follow the advice of experts:
- Place it strictly horizontally, and to achieve maximum accuracy it is better to use a building level.
- The angle at which the edge touches the wall should be exactly 90 degrees.
- If it is impossible to install the bath in a perfectly horizontal position, you will have to use substrates. For example, you can adjust the position using metal plates. Most often, small gaskets are used with a thickness of about five millimeters and sides of 10 centimeters. The use of aluminum plates is unacceptable due to the high softness of the metal.
- In order to prevent sagging of a heavy, for example, cast iron product, the gaskets must be installed on a relatively soft base. Most often, in such a situation, wooden blocks with strong wood are used.
For the siphon to function fully, it should be taken into account that the required height of the drain hole in relation to the floor must be at least 15 centimeters. Otherwise, stagnation may occur, and in some cases, the inability to use the bath due to lack of outflow.
When choosing and installing a bathtub, you should adhere to a small list of recommendations for quality installation. Compliance with state standards during installation will protect against possible dangers in the operation of the product. Therefore, the installer is required to be attentive, knowledge of technology and respect for construction legislation.
Well-selected materials and the bath itself will make the room cozy and safe for all family members.
Watch a video on how to properly install a bathtub using a laser level:
Nuances of installation work for installing an acrylic bathtub with a frame
An acrylic container, as a rule, has a metal body and adjustable supports. The bathtub kit includes fastening elements in the form of four legs, four studs, four thrust bearings, self-tapping screws and sixteen nuts.
Reference! First, assemble the frame based on the instructions.
The finished frame is installed in the center of the bottom of the container, which is turned upside down. The frame is equipped with legs. Two of them are attached to the center of the bottom, three supports are attached to the edge in front, the remaining two are attached to the far edge. Adjust the height of the support.
Next, you need to turn the bathtub over and use a building level to check that it is level. If everything is correct, then install a siphon. Then the edges of the structure are fastened to the walls using corners or hooks. The installation is completed by installing a decorative screen.
If there is no metal frame, you can install the container on bricks, making a kind of podium out of them. Instead of a podium, you can build columns of bricks. The number of columns is determined by the length of the bath.
Errors
The following omissions cause discomfort during operation:
- Failure to comply with recommended levels and spacing between equipment.
- Lack of unoccupied space at the front.
- Problems with installation marks of plumbing fixtures with sewerage and flooring.
- Unaccounted for blocking access, creating obstacles with doors, curtains, and rotating parts of equipment.
- Ignoring the individual characteristics of users: height, age, physical limitations.
People with disabilities.
Mismatch between bowl and niche sizes . With the right choice of type, the gaps between the cladding and the flanging are covered with a suitable plinth, otherwise you have to sew up the gap.
Grooving the partition.
Unaccounted for or excessive thickness of the finish makes it difficult to fit the bowl in the opening. The groove firmly holds the side, the tiles fit together beautifully, but replacing the product will result in damage to the tiles.
The non-perpendicularity of the lined panels leads to similar consequences if the linear dimensions are calculated without a margin. The corner pallet will have a wedge gap, the distortion will be noticeable under the curb.
Square check.
Slow water flow often occurs due to insufficient slope of the sewer outlet connected to the riser. Mud deposits partially block the cross-section of the pipe and reduce the original angle.
The optimal slope is maintained when assembling the site before installing the font. The gasket is controlled using a bubble level, laser tools or a cord stretched along the extreme marks.
Highly raised bowl . Maintaining the slope of the route with a remote riser results in lifting the structure - suffering when landing in the font. It is advisable to place the tank with the drain neck towards the riser, then the length of the pipe is minimal.
Excessive rise
Solution
The advice to raise the floor with a screed will entail an unwanted additional load on the floor, the difference in the threshold. It is preferable to lower the riser tee, but it will not be possible to implement the plan without destroying the tiles. The idea can be recommended for a shower room being renovated from scratch.
A thorough approach
the slope of the bathroom intentionally towards the drain, so that “the water flows out completely.” Don’t repeat the misconception: modern models have a bottom slope that eliminates any remaining liquid. The drainage problem is solved by proper sewer installation and timely cleaning of the system. An inclined installation is disharmonious with the finish, especially with tiles.
"Slide"
Horizontal alignment.
Container deformation . The situation is typical for acrylic and steel modifications installed on a flexible frame (supports). Don’t skimp on the frame; choose profiles with reserve.
Pliable supports for the acrylic model.
Many practitioners advise placing the container on a brick support and foaming the space between the slab and the bottom with foam. The solution guarantees rigidity, and the foam provides warmth and sound insulation. However, ventilation under the tank is disrupted, and access for cleaning the siphon and pipes may become worse.
"Floating" legs . The standard supports of budget products have a flimsy design; purchase a replacement, taking into account the connection method and the weight of the filled tank.
"Flimsy" supports.
Popular stick-on legs are inferior to classic types of fastening; adhesion strength depends on many factors. Defects in the floor surface are corrected before installation.
The lag of the curb occurs due to the movement of the bowl. The disadvantage is eliminated by increasing the rigidity of the structure, as suggested earlier. The edging is glued by filling the volume with water so that the structures assume a loaded position.
Hidden leaks . The screen is performed after completion of plumbing work. The tightness of the connections and the functioning of the drain are checked by completely filling the container. If the results are positive, stitching begins. They provide an inspection hatch, a movable or removable section.
The hatch (on the right) is not blocked. Sources
- https://kanalizaciyadoma.com/montazh/kakaya-vysota-vanny-ot-pola-schitaetsya-standartnoy-normy-i-pravila-montazha.html
- https://J.Etagi.com/ps/razmery-vanny/
- https://roomester.ru/interer/vannaya/razmer-vanny-standartnoj.html
- https://vplate.ru/vanna/razmery/
- https://o-vannoy.ru/vanny/razmery-vanny/
- https://iseptick.ru/santekhnika/vanny/vysota-vanny-ot-pola-standart-vysoty-ustanovki-avtosoxranennyi.html
- https://remont-om.ru/vannaya/vysota-vanny-ot-pola.html
- https://bouw.ru/article/visota-vanni-ot-pola
- https://santatrade.ru/skol-ko-vysota-vanny-ot-pola-standart/
What do you think of this article?