Electrical outlets are essential in every home, but we often underestimate the need to install them in the right number and in the right places. As a result, it turns out that to connect all devices you need to use several splitters and extension cords. If you want to avoid this, learn how to properly place outlets in your home when building or renovating it. In the article you will find detailed diagrams, drawings, plans for installation and wiring in the main rooms: living room, bedroom, bathroom, kitchen.
Number of sockets
The number of outlets in the bedroom depends on two important factors:
- Layouts;
- Room size;
- Number of electrical appliances in the bedroom.
If the bedroom is small, 2-3 sockets are usually enough. They are usually located near the bed and another functional area.
To understand how many sockets you need, you need to think in advance what functional load will be placed on the bedroom. If this will be exclusively a place to sleep, a couple of sockets on either side of the bed will be enough.
If the bedroom is supposed to be a place for relaxation, such as a reading chair or a TV, then you will need a couple more outlets. If the ironing board is built into the cabinet, you need to provide another power source for the iron.
To avoid mistakes, even before the renovation, draw a diagram of the location of all the furniture and electrical appliances, and mark the places where the outlet will be convenient.
Children's
Children have the highest safety requirements. Sockets must be kept out of reach of children and be equipped with plugs - removable or built-in.
Where to install: in a baby’s room, sockets should be at least 1.8 meters above the floor.
Group 1. Near the table. 2-4 sockets
Primarily for a table lamp. The remaining amount depends on the needs: whether gadgets, batteries for toys are being charged, whether the child uses a computer.
Group 2. Near the bed. 1-3 sockets
At a minimum, you need to connect a sconce or table lamp. You may need an outlet to charge your gadget. In the baby's room you need an outlet to connect a night light. And it is worth providing an outlet for a heater if there are problems with heating.
Safety regulations
To make your bedroom not only cozy, but also safe, follow a few important rules:
- Place sockets and switches in a freely accessible area. The socket must be located in such a place that the device can be turned off from it at any time if an emergency arises. Never place sockets behind a cabinet or other furniture.
- Use only high quality sockets; do not trust too cheap products.
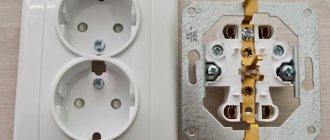
- The outer cover of the socket should fit snugly against the wall and not be pulled out every time the appliance plug is removed from it.
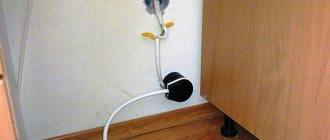
- Sockets must not be placed below 30 cm from the floor. Homeowners often sin with this when installing bedside sockets in the bedroom. Dust can get into such an outlet, which can lead to a short circuit.
Bathroom
There are not as many sockets needed in the bathroom as in other rooms. But the requirements for them are the most stringent.
Do not place 220V appliances in the inside of the bathtub, washbasin or shower You can only install waterproof ones, the maximum allowed is 12V. It is prohibited to install sockets.
under the sink or above the bathtub . Water heaters are usually installed in this area. It is prohibited to install sockets.
Within a radius of 60 cm from the wet area. You can install devices without a switch, connecting only through a solid cable. It is prohibited to install sockets.
Further 60 cm from the wet area. You can install sockets, but with a moisture protection rating of IP44. Choose models with covers and curtains for plug contacts.
In the bathroom you will need sockets for:
- washing machine;
- electric razors, hair dryers and similar devices.
The remaining devices are connected to external switches via a solid cable.
Wiring rules
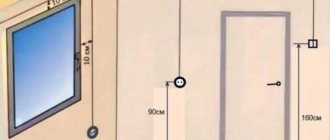
Having marked on the diagram of the room where you want to see sockets, you need to draw the locations of the wires inside the walls. To ensure safe wiring, you need to adhere to several strict rules:
- The height of the socket must be at least 30 cm from the final floor height;
- The height of the wires inside the wall must be at least 15 cm from the floor;
- Along the ceiling, the wiring should run at a height of 10-15 cm from the ceiling;
- The height from the edge of the door frame or the upper slope of the window should be 10 cm or more;
- The vertical wire can be laid at a distance of 10 cm or more from the corner;
- The wire should not be closer than 50 cm to the central heating radiators;
- If the wire runs vertically along the door, you need to step back at least 10 cm from its frame.
Hallway
Let's start with the hallway. There should be a pass-through switch at hand immediately after the front door. It is a pass-through device, not a simple one-keyboard player. Why will become clear later.
This switch controls the light in the corridor. If you open the door with your right hand, and your left remains free, then it is advisable to place it on the left, at a height of 90 cm from the floor.
In case there is an intercom, you should lay a power cable and one twisted pair near the door. It is necessary for video signal transmission.
If you want this video signal to be transmitted to a TV in the living room or bedroom, install two twisted pairs.
Under the ceiling in the hallway, be sure to plan a place for a miniserver with its own outlet, Wi-Fi router, etc.
In modern conditions it should be in every apartment.
This will be the very place where initially all the TV and Internet cables flow from the entrance, and then the signals from them disperse throughout all the rooms.
Naturally, the electrical panel itself should be located in the hallway.
In the hallway, most of us have a mirror with small cabinets. This place can be called a makeup area.
This area must also be electrified. Place 2 sockets for it:
- for connecting hair dryers and other feminine beauty devices
And also a separate switch:
- he is responsible for illuminating this very makeup area
At the end of the hallway, a second pass-through switch must be installed. It works in conjunction with what you placed to the left of the door at the entrance to the apartment.
The basic rule for lighting in the hallway is to make a light switch for the “dirty” area, in the “clean” area.
That is, you got into the apartment - turned on the light. They took off their shoes and went into a clean kitchen or living room. So that you don’t have to come back in your socks on a dirty floor, you simply turn off the light at the exit from the hallway and that’s it.
A block of two sockets at floor level would also be useful in the hallway. It is very convenient to include a vacuum cleaner when cleaning not only this space, but all rooms.
An ultraviolet shoe dryer is also connected here.
In the fall and spring, you will thank the electrician who advised you to install it.
That's all for the hallway. In total, if we sum up all the electrical points, we get the following result:
- space for electrical panel
- space for a server room
- 220V power cable and twisted pair cable for intercom
- 2 pass-through switches
- 1 simple switch
- 5 sockets
Socket design
To ensure easy access to sockets, they are installed on open parts of the walls. As a result, sockets are constantly in sight. In order for them to fit organically into the interior, you need to choose sockets that will suit the style of your bedroom. You can now find many types of sockets in stores. They differ in color, shape, and may have a lid or decorative elements.
For ultra-modern interiors, built-in sockets are suitable, which are hidden in the wall and have a very small external cover.
For interiors in the style of classicism, vintage, Provence and country, sockets decorated in an antique style are suitable. Such sockets, complete with toggle switches and open twisted wiring, beautifully complement the interior. In this case, the wiring, in addition to its practical function, also has a decorative function.
In specialized stores you can find shaped covers that can be placed around any standard socket or switch and make them more elegant.
You can also purchase a special cover for the outlet. These covers are made of plastic; they cover the socket, leaving only the holes for the plug visible. The lid can be smooth or decorated.
The color of the outlet should be chosen to match the wallpaper or the color of the furniture. The most versatile are the classic white sockets and the same switches. If you want to completely hide the outlet, you can paint it to match the wallpaper.
Unusually shaped linings will help diversify the appearance of the sockets. Traditionally, they are made square, but in stores you can find rosettes with oval, round and even shaped overlays that repeat the shape of flowers, animals or cars.
In stores you can find special stickers that are attached around or above sockets. If the rosette cannot be hidden, you can always play around with it by fitting it into some kind of design.
The location of sockets and their installation is an important and critical stage of repair. Once you have decided on the number and location of power supplies, entrust the wiring and installation to a professional electrician. This way you will protect your home from short circuits and significantly speed up repairs.
Living room or hall
Let's move on to the next living room. A switch is installed immediately at the entrance to the hall. Place it on the opposite side of where the door opens.
Installation height – 90cm.
On the side where you will have furniture, lay the power cable and socket for connecting the lighting. Not a single modern “wall” can do without it.
Most often it is made with an LED strip, and a 12/24V power supply is powered from this cable itself. The backlight is turned on and off using miniature contactless infrared switches.
Mount a block of two sockets there for connecting portable devices.
Usually in the corner of such a living room there is a study and work place with a computer and a desk.
Which electrical points are best to display here? A minimum of 3 sockets and a separate twisted pair output are required for the computer and monitor. This block is placed under the table.
Another block of 4 sockets is mounted above the table:
- for laptop
- table lamp
- USB Hub
- any other computer-dependent equipment
Don't forget about the slopes in the windows. It is very convenient, sitting at the table, to turn off the general light on the ceiling, without returning to the front door of the room, but simply by clicking the corresponding switch at hand in the slope.
Thus, the light switch at the entrance and in the slope must be pass-through. Plus, in the same block with the switch, another socket must be placed.
It is most often used to charge smartphones.
A block of three electrical points is installed in the sofa area. First, two switches.
They are responsible for two light sources located on the wall along the edges of the sofa.
Remember once and for all, you cannot install one lamp above the sofa. Otherwise, when you watch TV in the evening, you will see not the screen, but a light bulb reflected in it.
And this light will really annoy you.
Low-power wall lamps are required if you don’t want to damage your eyesight when watching movies in complete darkness.
By the way, to turn ordinary lamps into low-power ones, you can install dimmers instead of two ordinary switches. However, be careful when choosing models; not all of them are ideal for LED light sources.
The third switch in this block should again be a pass-through switch. He is responsible for the main light.
You won’t get up from the couch every time and go to the door in order to turn off the chandelier before watching TV. Thus, all three switches:
- at the entrance to the living room
- above the sofa
- in the window slope
must be connected with each other. How you can make a connection using this scheme is explained in detail in the article below.
TV area.
A block of two sockets, a TV cable and an Internet socket is installed here.
The last point is mandatory, since all modern TVs can independently access the Internet.
Another corner of the room, opposite the computer desk, is usually allocated by the owner of the house for a makeup area. In this place, install two sockets for a hair dryer, curling iron and other feminine beauty devices.
There is also a separate switch here, which is responsible for illuminating this very makeup area.
The last cable that runs through the grooves in the living room is the power supply for the air conditioner. Not everyone installs it initially, but if it is included in the plans, then do not forget about this electrical point.
It is most often connected via a separate circuit, directly from the electrical panel.
Let's summarize the living room. For almost perfect electrics in this room you will need:
- 10 sockets
- 3 pass-through switches
- 3 regular switches
- 2 Internet sockets for twisted pair
- 1 TV socket
Dressing table
For a piece of furniture such as a dressing table with a mirror, it is reasonable to install two sockets on the sides - they are necessary for a table lamp or floor lamp, as well as for connecting a curling iron or hair dryer.
If the mirror has built-in lighting, one socket is installed behind the mirror, and a backup one in a convenient place, preferably 15-20 centimeters above the table level.
Measures against electrical radiation in the bedroom
If you want to completely disconnect your bedroom from the power supply at night, you can easily do this by installing a mains disconnect switch. It interrupts the mains voltage at the fuse box until electricity is required.
As soon as the consumer is turned on again, the supply voltage is automatically switched back to the line without delay. In everyday life, these network outages are not noticeable.
Why is this necessary?
According to rough estimates, at least 6 household appliances are used per day in each apartment. This number is constantly increasing, but the number of electrical outlets remains unchanged, so it is important to properly plan their location. If power points are installed randomly in the house, you will have to turn off some devices to charge others. This leads to inconvenience of use and the risk of increasing the maximum power for which the mechanism is designed and causing damage to the connected device.
When planning a room yourself, you need to understand its purpose, what devices to use and how to be located. The arrangement is carried out taking into account technical standards.
Comments:
Eugene
Right in the first picture it shows that the sockets are where the door opens. Very “convenient” The door will hit the wires every time you open it. Nothing to say - thought out
Victor
Evgeniy, I think that in this case it was impossible to place them anywhere else. And a door that hits a fork is not that scary in my opinion. Firstly, the door does not open/close so often as to wear out the plug, secondly, the interior door does not weigh so much as to render the socket mechanism unusable, and thirdly, if this contact is so confusing, you can install a floor or wall stopper to limit door opening to a certain level
ElectroMaste
Great article. Everything is described in detail and nothing superfluous. With proper planning, I install at least 60 sockets for a three-room apartment. And this is not a lot, this is the necessary amount for convenient operation and complete abandonment of extension cords, tees and other electrical equipment.
Kirill
Good article, I used the advice from it. I bought sockets on voltgetic.ru, they sat for a month, waited in the wings, and finally the time came and I installed them. The quality of the sockets is good, they fit tightly, do not fall out, and do not even move when you remove the plug.
Leave a comment Cancel reply
Related Posts
How to assemble a convenient distribution board with your own hands How to connect a Lezard pass-through switch and what circuit to use. A remote controlled socket is an indispensable help at home
How to choose the right machine according to load power for an apartment
