Kitchen owners often encounter problems connecting household appliances. Either there is no way to connect the refrigerator without an extension cord, or there is nowhere to put the electric kettle. This is due to the fact that there are only one or two sockets in old apartments, and they are installed anywhere and anyhow - who could have predicted such a scale of scientific and technological progress. Let's figure out how to make sockets in the kitchen, taking into account the use of specific equipment, the arrangement of the proposed furniture, as well as a number of other issues.
Power supply for additional kitchen outlets
The power supply for additional outlets can be “taken” from existing outlets or a new power supply can be provided from the electrical panel.
1. The first option for power supply (from sockets) to additional sockets is suitable if you have a fairly modern house and the electrical wiring is made according to modern standards (cable with copper conductors and a dedicated group for the kitchen).
2. If you have an old house and the wiring is made of aluminum and the apartment has a minimum number of groups of electrical wiring (1 group of lights + 2 groups of sockets), then it is better to route the power supply to additional kitchen sockets from the electrical panel. 3. There is no need to wire new additional sockets from old kitchen sockets. Or rather, it can be done, but it is dangerous. As the load on the old electrical circuit increases, the circuit breaker will begin to “knock out”. If you increase the rating of the circuit breaker, it will not be “knocked out”, but the electrical wiring will become dangerously hot and it is quite possible that the wiring will catch fire or, at a minimum, melt and, as a result, it will need to be completely replaced. 4. But options are possible. For example, in the example of the article, and this is the P44 house series, in the kitchen there was initially planned one power outlet above the kitchen work area, and with grounding. From the wires of this outlet we will “power” additional kitchen outlets. Having decided on the power supply, we move on to planning.
Related article: Dry kitchen screed: level the kitchen floor with your own hands
Electrical panel installation
Electrical wiring for the kitchen begins with the installation of a distribution panel. Since a corresponding machine is installed here to power all the wiring. The rating of the machine for powering the wiring in the kitchen should correspond to the most powerful devices, so it can be as close as possible to the input unit.
For large kitchens that include built-in appliances and furniture, a large number of connected devices, you can install a separate electrical panel in the kitchen. It will simplify access to various devices and make it possible to de-energize some node in the wiring for repairs while the rest are available for use. It will also help localize emergency situations by disconnecting only the section of wiring in the kitchen where the short circuit occurred.
Rice. 2: Kitchen distribution board
Additional outlets in the kitchen - wiring plan
The electrical wiring plan is made based on the location of the future furniture. As a rule, additional sockets are placed above the kitchen work area, in the middle of the work tables. One outlet needs to be planned for the refrigerator, one for the hood.
In the example of this article, the wiring diagram for additional kitchen outlets looks like this:
additional sockets in the kitchen diagram
The plan is drawn up, we buy the material.
Safety precautions
When replacing old or installing new electrical wiring, observe the following rules:
- Work begins after the network is de-energized. You can check the voltage with a voltmeter.
- For electrical installation, tools with an insulating coating are used.
- Sockets are not placed above or below the sink. It is prohibited to install elements near gas stoves. The distance must be at least 50 cm.
- Separate lines are laid for household appliances that handle water.
- Food points are located in places hidden from children. Install the safest models of sockets.
- A power supply point is installed for the electrical network.
- Connecting the wiring to the electrical panel is done last.
Purchasing material for additional sockets
To make additional sockets in the kitchen we need:
- Electric cable VVGng 3×2.5 mm2. An alternative is NUM cable, of the same cross-section;
- Mounting boxes for hidden electrical wiring (socket boxes);
- Distribution boxes. They can be replaced with the same mounting boxes;
- To connect aluminum and copper wires, connecting blocks are needed;
- To “freeze” the cables in the groove, alabaster is needed;
- You will need electrical tape.
Types of postings
Cables are laid in 2 methods: open or hidden.
When choosing a method, they are guided by the interior features and safety requirements.
Hidden
In this case, the wire is laid in walls or ceiling slabs. The most difficult stage of the work is considered to be drainage of canals. You won’t be able to do the installation yourself if you don’t have the skills. In addition, chipping is carried out using special equipment. The hidden method is used in apartments; it is not suitable for wooden private houses.
Open
When using this method, cables are attached to surfaces, first laying them in trays or corrugation.
The method is not particularly safe and aesthetically pleasing, so it is used when hidden installation is not possible.
Stages of work on installing additional kitchen sockets
Let's divide the work into the following stages:
- Gating;
- Installation of boxes and laying of electrical cables;
- Opening boxes;
- Sealing the grooves.
Grilling
We make grooves and niches for mounting boxes (socket boxes) using a hammer drill along pre-marked routes. The work is noisy and dusty. Warn your neighbors about the noise if necessary. The furrows must be of such depth that the cable in them is covered with at least a 5 mm layer of plaster mortar.
Related article: Do-it-yourself laminate flooring in the kitchen
Installing boxes and laying electrical cables
“Freezing” of boxes (distribution and installation) and electrical cables in the grooves is done with alabaster.
In the mounting boxes, the holes for the cables have already been made; you need to cut out the plugs.
Level the boxes and secure them in a niche on several alabaster “spatulas”. After the first portions have hardened, strengthen the fixation with an additional portion of alabaster. Do not block cable openings.
Related article: Making a battery box in the kitchen
If you are installing several boxes in a chain, then lay the cables for the socket cables immediately before installing them.
If the kitchen backsplash is made of tiles, then the mounting boxes should protrude from the wall by 8-10 mm.
In concrete walls it will be difficult to secure the cables in the grooves. Here you can go in two ways: after 40-50 cm, widen the furrows and secure the cable with staples, or use spacers to hold the cable in the furrow (as in the photo). After “freezing” with alabaster, the spacers are removed, and the cable lies in the furrow.
Sealing furrows with gypsum plaster
We seal all furrows and mounting boxes with gypsum plaster. After it has dried, you can proceed to disconnecting the wires in the junction boxes.
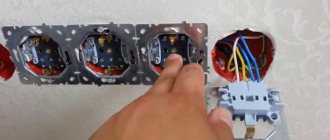
Wiring
Wiring or disconnection is the connection of wires to the power supply line and the installation of wire connection nodes, if they are planned.
Important! Before work, turn off the power supply and check that there is no power supply to the additional outlets.
To connect aluminum and copper wires, we use power terminal blocks. To connect copper wires we use twisting. You can use welding (if you have a welding machine) or connect the wires through terminal blocks. When using terminal blocks, look at what load they are intended for. The connections are insulated with two layers of electrical tape and placed in a box. I make wire connections according to all the rules and usually wall up the junction boxes.
Where to begin?
The final decision on the choice of installation location for sockets should be made only after determining the configuration of the kitchen set. It is necessary to take into account all cases, shelves, drawers, type of hood, etc. All this is done in order to place the outlet in the most convenient place from the point of view of operation.
To begin with, think about what kind of apron you will have in the kitchen - for example, panel or tile? This determines whether there will be a need to install mounting boxes.
If the furniture is made to order, you will probably have a diagram of the future set on hand, which will significantly simplify the further design process.
If you are using an old headset, you will need to make a small sketch and enter the actual dimensions into it.
Once you have the diagram in hand, you can proceed to calculating the required number of sockets.
Often a separate point is designed for a hob, oven, refrigerator, microwave oven and hood. Optionally, additional blocks are installed for a mixer, electric kettle, blender, etc.
Advice! It is quite acceptable to use a universal scheme that can be found on the Internet. The only thing that is required is to make minor adjustments regarding the connection to stationary electrical devices.
Hob and oven
Even at the stage of rough work, the wiring diagram must be correctly drawn up, and all the nuances of consumer power must be taken into account.
Typically, the hob and oven are connected separately. This is due to the technical characteristics of each device. A wire with a cross-section of 6 squares is usually installed under the hob. It is designed for loads up to 6–7 kW, and often no socket or junction box is installed.
The oven can easily get by with a stationary 16A household socket. It can withstand up to 3.5 kW load and is powered by a 2.5 square wire.
If the oven is installed under the panel, the sockets are installed at a height of 150–180 mm from the floor surface, next to each other. This is explained by the fact that at this level there is usually a drawer “for frying pans” and other utensils, by removing which you can provide access to the network and cables.
Often, socket blocks are placed behind an adjacent housing, 150–250 mm from it. Recommended height for their placement: within 200–800 mm from the floor.
When an oven is supposed to be built into a column, it is necessary to design a corresponding outlet for it at chest level. It is allowed to install the socket block 150–250 mm above or below the oven. Then the power supply to the plate can be located at a height of 650–800 mm due to the absence of the need to maintain the connection points.
When it comes to a free-standing electric stove, it is advisable to place the outlet on the left or right side, behind the adjacent housing. The height of its location can vary from 150 to 800 mm.
Fridge
Taking into account the short length of the cord for a built-in refrigerator and the manufacturers' recommendations, it is obvious that the outlet should be somewhere nearby. The use of extension cords and temporary carriers is not permitted.
For obvious reasons, it is advisable to choose the location of the power supply on the side of the household device. Ideally, it should be behind the adjacent cabinet, at a height of 150–800 mm from the floor and no more than 250 mm from the refrigerator itself.
Connection of a free-standing refrigerator is possible behind its rear wall. Ideally, there should be a distance of no more than 100 mm from the edge of the socket to ensure free access to it.
Attention! Some models of refrigeration units are manufactured with separate power supply to the main compartment and freezer compartment. In this case, you should add another outlet. Usually a wire of 2.5 squares and 16A fittings intended for equipment up to 3.5 kW of power are laid under it.
Washing machine and dishwasher
Usually the “dishwasher” is placed not far from the kitchen sink - accordingly, the socket for this appliance should be made in one of the adjacent lower cabinets.
Electricity is discharged at a height of 150–500 mm from the floor and at a distance of 150–200 mm from the adjacent kitchen building.
The mistake is to install the outlet directly behind the dishwasher. This is fraught with the fact that the built-in equipment will subsequently not be able to fit in depth into the niche intended for it.
Important! The socket must be installed at least 500 mm from the water supply.
Microwave
It is normal to install the microwave oven at eye level of the user. Regarding the built-in device, it is better to install the corresponding socket below the cabinet where the microwave will be installed, at a height of 150–800 mm from the floor.
If you plan to permanently install the stove on a countertop, there should be a 16A socket nearby, up to 3.5 kW, with a 2.5 square meter wire.
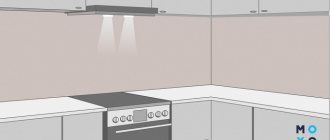
Hood
Based on the type and model of the hood that you plan to use, a separate electrical outlet is selected or a mounting box is installed for the fittings.
Most devices are covered by kitchen cabinets, so the outlet can be placed inside them, on the left or right side of the ventilation duct. This is usually a height of about 1700–1900 mm from the floor. It is allowed to install a socket above the cabinets - 2400–2600 mm.
Open hoods are often connected directly, so the power wires can be terminated even behind the ventilation pipe. It should be noted that manufacturers of household appliances stipulate this point in the relevant instructions.
Regardless of the chosen hood, for its operation it is enough to supply a 2.5 square wire and, if necessary, install a regular 16A, 3.5 kW socket.
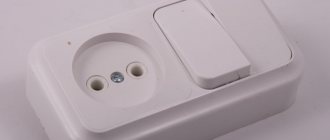
TV antenna socket
I supplement the additional outlets in the kitchen with a new outlet for the TV antenna. I put it next to the electrical outlet.
additional sockets in the kitchen for TV.
I lay the antenna cable in a groove and wall it up with alabaster. The cable is imported, double insulated, so it is quite suitable for bricking. Although it would be more correct to lay it in a corrugation or box.
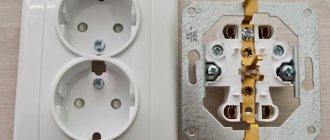
After finishing, additional kitchen sockets look like this.
Groups of sockets on the kitchen apron.
Socket block on the kitchen apron.
Refrigerator socket.
Electrical and TV socket block for kitchen TV.
©Remont-kuxni.ru
Other articles in the “Kitchen doors” section
- No entries found
Wire selection
Based on the number of consumers and their power, it is necessary to calculate the wire cross-section and determine the number of supply lines.
If aluminum wires are often used in older housing stock, it is now recommended that all wiring be made of copper with appropriate insulation.
This is due to a number of reasons. Copper has lower resistance than aluminum, better ability to resist oxidation, greater reliability and durability. Regardless of the type of housing, be it a brick or panel house, the insulation must be non-flammable, and it is recommended that the wire itself be laid in appropriate corrugation.
It is important to say that under the same conditions and identical cross-sections, the aluminum cable will heat up more than the copper conductor. Of course, this will not bring anything good to the insulation, since it will dry out faster and crack. Ultimately, such a situation will cause a short circuit.
This is why it is so important to replace wires in the kitchen if they are aluminum. The disadvantage of “copper” is its higher price, greater weight, but the risk of fire and unplanned repairs, after correct calculations and high-quality electrical installation work, is virtually absent.
Common Mistakes
It is necessary to install or replace wiring in the apartment taking into account the requirements of the PUE. Novice electricians often make the following mistakes:
- Incorrect calculation of the expected load. A downward deviation in power from the electrical network leads to frequent operation of the circuit breakers.
- Formation of a large number of connections. It is desirable that the network in the room be complete, without distribution boxes.
- Use of low quality materials and parts. Such products cannot withstand the load, as a result they overheat and melt, which leads to a fire.
- Laying low-current and power lines in one channel. This may cause interference with your TV, phone, or Internet. It is recommended to lay low-current and power lines in different grooves.