Natural wood floors are rightfully considered the most environmentally friendly. But many now refuse such coverage due to the fact that this material is supposedly outdated and uninteresting. But a plank floor can easily outperform any floor covering, especially in terms of comfort. It is warm, reliable, is not a source of harmful substances and can be very beautiful if made according to all the rules.
Plank floor
About the advantages of plank flooring
Wood is one of the oldest building materials. Previously, everything possible was made from it - houses, fences, furniture were built, and interior decoration was done mainly with natural wood. At the same time, such material is now considered one of the most expensive and indicates the significant status of a person. Even despite the fact that a lot of synthetic materials have appeared on sale, characterized by ease of installation and beauty, wood does not lose its position.
Plank floors are still popular
Natural wood floors continue to be one of the most popular and in demand. This is due to the undeniable advantages of this material:
- beautiful appearance - no one can argue with this factor, because wood has its own unique natural pattern, which can only be replicated by laminate or linoleum, which are much inferior to natural wood in terms of environmental friendliness;
- wood fits easily into any interior style. Even high-tech and other similar styles can be played up quite well using plank flooring, and what can we say about eco-style, one of the most popular among designers;
Eco-style interior
- durability – the average lifespan of a typical wooden floor is about 50 years. During this time, the coating may darken and begin to creak, but the creak is easy to eliminate and the floor will still serve the apartment owner well;
- environmental friendliness is an undeniable advantage of plank flooring. The material created by nature itself is not a source of harmful substances; it can easily be installed even in the apartment where a person suffering from allergies or upper respiratory tract diseases lives;
- ease of maintenance - wooden floors are easy to clean and wash;
- strength and non-slip coating - plank floors, even just washed, will not allow the apartment owner to slip and fall. They are also not subject to temporary deformation under pressure from furniture legs and are able to withstand very heavy loads without collapsing;
- tactilely pleasant material - walking on the plank floor is very pleasant: your feet do not feel cold.
It's nice to walk on this floor
But it’s also worth talking about the disadvantages of plank floors, of which, fortunately, there are very few. Disadvantages of using plank wood floors:
- Such floors are not cheap , however, like all environmentally friendly materials;
- complex installation , which involves laying joists and adjusting boards, often discourages many from installing such a floor;
- wooden floors are able to absorb odors - both pleasant and unpleasant;
- Laying wooden floors alone is quite difficult - you need to attract help;
- cracks appear some time after use urgently requires additional floor repairs;
Gaps in the wooden floor
- Over time, wooden floors can begin to creak.;
- The appearance of seasonal deformation has also been noted in plank floors - they react sharply to changes in temperature and air humidity levels and can begin to creak because of this.
Despite a fairly large number of disadvantages, plank floors are still a very good floor covering, and with proper installation it is possible to cope with most of the disadvantages of use.
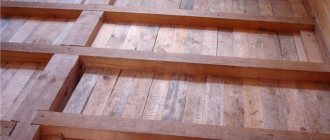
Installation of plank floors
Installation of plank floors
The design of a wooden floor made from planks is quite simple and includes only a few basic elements. These are wooden logs and the boardwalk itself. Also, when installing the floor, additional materials can be used - heat and waterproofing, which are laid directly under the boards.
Beam construction
Construction of a rough plank floor
The logs are long bars (usually those made of solid wood are used, or the use of glued bars is allowed).
On a note! Previously, logs were made from large hewn logs, but now this option is unacceptable due to the high price.
The logs themselves are laid on the ceiling, which can either be made of timber of a larger cross-section or be a concrete slab. Also, logs can be installed on bricks if the base for the floor is soil. In the private sector, the base can be a metal floor.
Monolithic concrete floor
The creation of a plank floor is completed by laying or applying a finishing coating. This can be varnish, paint, and if the floors are laid as a sub-base, then a number of other types of floor coverings.
Advice! If plank floors are made of high-quality and beautifully colored wood, then it is better to cover them with transparent varnish, preserving the natural shade, and leave them as the final floor covering.
Beautiful plank floor
↑ Flooring made of boards
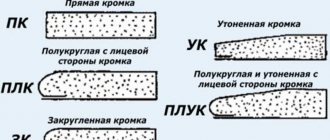
↑ Types of boards and laying methods
a) - “butt”, b) - “in a quarter”, c) - “in a tongue and groove”. The most common types and methods of laying plank flooring
Plank flooring is the final step in creating a wooden plank floor. The work to create it requires the most attention and is the most labor-intensive. For the flooring itself, you can use a solid board with a thickness of 25 to 50 mm. The board itself must have edges processed in a certain way. In total, there are three ways to lay boards and three ways to process the ends. The first method is “butt” - the edge is cut at a right angle and planed for a perfect fit. The second method is “quarter” - the edge of the board on different sides is processed in such a way that an overlap is created when laying. The third method is “tongue and groove” - the edge of the boards is a tongue-and-groove system. When choosing one type of board or another, remember that the edges must be free of any damage and absolutely smooth, otherwise cracks will appear during operation and the floor will begin to creak.
Types of boards and their choice
Floor boards are usually made of larch or pine - these are the most affordable, but at the same time high-quality and reliable types of wood. Sometimes there are floors made of ash, oak, maple, and alder.
On a note! Boards made from aspen or alder are considered the most environmentally friendly and are recommended for use by home owners who care about their health.
Plank floor in a private house
If the final finishing layer is varnish, then the choice should be made in favor of light wood species with a pronounced, beautiful pattern. Oak boards, as well as walnut or mahogany, will look best as a floor. Among the listed options, oak wood is the cheapest.
Table. Floor boards depending on the wood used.
| Board type | Description and characteristics |
| Pine or spruce | The Brinell strength index for spruce is 1.5, and for pine – 1.6, which indicates some softness of the board. The moisture resistance of coniferous wood is low; these materials are also most susceptible to insects and parasites; they deteriorate faster than other boards. For such floors, it is necessary to treat the boards with antiparasitic compounds. The main advantage of spruce/pine boards is their low cost, since the average cost of the material is only 520 rubles/sq. m. |
| Berezovaya | Strength on the Brinell scale is 2.5. The texture of birch is very beautiful and pleasant, and if it is additionally tinted, the floor will turn out very beautiful. Price per 1 sq.m. is approximately 660 rubles. |
| Larch | Such a board does not tend to absorb moisture, and therefore can be used where the humidity level is quite high, that is, even in a sauna or bathhouse. Larch almost does not rot, and its Brinell strength is 3.1 - it is not even necessary to varnish the material. The color of this wood is very beautiful and noble. Cost of 1 sq. m. boards can vary from 600 to 1620 rubles. |
| Ash and oak boards | The Brinell strength is 4 and 3.7 - the material is very durable. Resistance to humidity is moderate, but lower than that of larch. Such floors look very noble and rich. The cost of this material is high - from 1800 to 4400 rubles / sq. m. |
| Exotic breeds (wenge, kempas, merabou) | The strength of these rocks is maximum – 4-5 points on the Brinell scale. The materials are moisture resistant and almost resistant to parasites. The floors are unique and very beautiful. Such boards are expensive - up to 6,000 rubles / sq. m. |
Prices for construction floor boards
floor boards
Brinell wood hardness chart
Pine wood floor
Floor boards come in several types, the main ones are:
- regular board with straight ridge;
- tongue and groove;
- and a quarter.
Grooved floorboard
When choosing a material, the thickness of the boards is often determined by the distance between the logs, and vice versa - the distance between the logs may depend on how thick the boards are used.
Table. The ratio of the distance between the logs and the thickness of the boards.
| Board thickness, mm | Distance between lags, cm |
| 20 | 30 |
| 24 | 40 |
| 30 | 50 |
| 35 | 60 |
| 40 | 70 |
To create the finishing floor covering, it is recommended to use boards with a tongue-and-groove connection type. The most commonly used material is 28 mm thick - this is the most common board size. If the floors will experience significant loads, it is recommended to use boards with a thickness of at least 36 mm. On average, the width of this building material varies from 68 to 138 mm.
Floor board
↑ Wood selection
Laying plank flooring requires knowledge and ability to choose the right wood. The quality of the materials used directly affects the result of the work. To create a beautiful and warm plank floor, coniferous wood is suitable - pine, spruce, larch, cedar. You can also use oak or ash. These breeds will delight you with their durability and strength, as well as their exquisite appearance. When choosing a particular type of wood, you should adhere to certain rules:
- Wood moisture content should be about 12%. The tree’s ability to maintain its shape directly depends on this indicator;
- boards must be free of cracks, chips or other damage. Such boards must be immediately rejected, otherwise the floor section will have to be replaced or frequently repaired;
- selected boards should be treated with fire retardants and antiseptics. These measures are necessary to protect them from pathogenic flora and bark beetles, as well as to reduce the fire hazard of the tree;
- To create a durable and strong plank floor, you should choose hardwood or at least hardwood such as oak or ash.
Plank floor installation options
Plank floors can be installed in different ways. Basically, three methods are used - installation of a wooden floor on regular joists or on adjustable ones, as well as installation using compression.
Basics of installing floors on regular joists
In this case, installation begins with laying wooden blocks with dimensions usually 5x5 or 4x6 cm on the concrete floor. The logs must be laid so that they are on the same level - for this it is most convenient to use a construction laser level. Also often a soundproofing pad is placed under the bars. The elements are fastened using anchors.
Installation of wooden floors using joists
The lags are installed from the walls oriented perpendicular to the windows, and then the boards are laid perpendicular to the lags. When laying the boards, their second row is mounted with a slight offset relative to the first (checkerboard order). Then the floors will look better and more interesting. A small gap of about 1 mm is allowed between adjacent boards. The boards are attached to the joists using self-tapping screws or regular nails. In this case, the latter are driven at an angle of 45 degrees into the end of the board.
Important! When installing boards near the walls, it is necessary to leave a small gap - about 1 cm. This is necessary to ensure that the floors do not deform during expansion when exposed to moisture or temperature.
Basics of installing plank floors on adjustable joists
This method of installing plank floors is used if the base of the floor is uneven, with large differences in height, which complicates the installation of any floor covering. It is the arrangement of adjustable joists in this case that allows you to speed up the installation process and place some communications under the boards. In this case, the load on the floors, in contrast to the case when a concrete floor screed is installed, is minimal, and the thermal insulation properties of the floors increase significantly.
Adjustable joists
To create such floors, you will have to drill holes in the joists at intervals of about 40 cm, and screw special metal posts into them. The logs themselves are laid in increments of about 50 cm, leveled and secured with dowels passing through the racks. Before laying the boards, excess posts are cut off.
Prices for adjustable floor joists
adjustable joists
Basics of floor installation using compression
Clamps are special devices that allow you to connect boards together. These can be construction staples, wedge clamps, movable brackets and compression clamps. Also, for this method you will have to make wooden wedges with sides inclined at about 15-20 degrees. The wedges will be used as workers and spacers.
Clamps for holding floor boards together
Clamps for holding together floor boards: a - construction clamp, b - clamp-bracket, c - wedge clamp with a movable clamp; 1 - wedge, 2 - bracket, 3 - lag, 4 - wedge compression, 5 - spur, 6 - movable stop
The order of work is as follows: the first board is fixed, and another 10-15 pieces are placed next to it. When installing the last board, two clamps are installed so that wedges fit between them and the boards. The latter are driven in with a hammer so that all the boards fit together tightly, without gaps. After this they are secured with nails. The remaining gap near the wall will be hidden by the baseboard.
Attention! It is recommended to place the ends of the boards strictly on the joists.
Useful tips
Sealing seams
To prevent troubles that arise during the installation process, you should use the following tips:
- The board floor is installed so that the growth rings have different directions. This guarantees a perfect surface and an attractive pattern.
- If edged boards are used for flooring, they should be planed from the front side, which will allow them to fit as tightly as possible to each other.
- The last board should be adjusted to the width and laid using a spacer and light tapping with a hammer. Only after this can it be fixed to the base with nails.
Selection of material and preparation of the base
The key to a beautiful and high-quality floor is the use of good material. Floor boards should not have various defects - for example, knots, cracks, etc. Also, if the floor will be varnished and will serve as a finishing coating, it is important to pay attention to the beauty of the wood texture.
The boards are varnished
To install the floor, in addition to the boards, you may need the following tools and materials:
- bars for logs;
- insulation;
- waterproofing material;
- fasteners - nails or screws;
- jigsaw with wood blades;
- hammer;
- baseboard;
- finishing coating;
- drill;
- building level (preference should be given to the longest option);
- protective composition for wood.
Preparing tools
The nuances of installing a plank floor
It is not enough to know the technology of arranging floorboards in an apartment. It is also recommended to listen to the advice of experienced craftsmen and know the nuances of carrying out such work.
- The best time of year to install plank flooring is the end of the heating season.
- In summer, work is carried out only in dry sunny weather, so that the tree does not absorb excess moisture.
- The optimal air humidity in the room where work is being carried out is no more than 60%.
- The best air temperature for work should not be less than +8 degrees. By the way, according to SNiP, plank floors should be used at this level.
In the photo - pine boards
- Before installation, wood must be treated with anti-parasite, mold and rot products. If this is not done, the service life of the flooring will be reduced by several decades. The greatest damage to wood is caused by colonies of putrefactive fungi, which destroy this material in record time. The floor affected by these parasites changes its sunny yellow tint to greenish and acquires an unpleasant odor. However, antiseptics are applied only to the inner surface of finishing boards and joists - the front side is rarely treated.
- The nails that secure the boards to the joists must be 3 times the width of the board.
- For floor installation, it is important to use only dried wood (no more than 12% humidity). Otherwise, the floors may become deformed after installation and cracks will appear.
- Ventilation must be present under plank floors - it will provide ventilation and reduce the risk of mold or mildew.
- If the work on installing a plank floor is carried out by a novice craftsman, then they should start from a small room, where it will be faster and easier to correct mistakes.
- During the process, it is important to ensure that the floor slope is 0 degrees.
- In long narrow corridors, logs are laid across the direction of movement in the room, and boards, on the contrary, along.
Wooden floor in the bathhouse
SNiP 3.04.01-87. Insulating and finishing coatings. Downloadable file (click the link to open the PDF in a new window).
SNiP 3.04.01-87
Preparation for laying the base
Laying and installing plank floors is best done at the end of the heating season. In summer, this procedure is performed in dry weather; it is advisable that it lasts for at least a week, which guarantees normal air humidity in the room.
The order of technological operations that will need to be performed when installing the floor is as follows:
- laying logs on the base;
- laying boards;
- sharpening floors, cleaning surfaces;
- installation of baseboards and ventilation device;
- finishing.
You need to start with choosing the material, tools and preparing the base.
Tongue and groove boards are ideal for installing wooden floors.
For the installation of wooden floors, tongue-and-groove boards made of coniferous wood (if, larch, pine) are excellent, which have good performance properties and an attractive appearance. This is the best option in terms of price and quality ratio; oak or walnut floors will look much more presentable, but the price of such pleasure is much higher. Flooring boards are selected with special care. They must be dry, without chips, cracks or other defects. If you plan to varnish the floor, then special attention should be paid to ensuring that the wood has a beautiful texture, is dense, and free of stains and other flaws.
Before laying the floor, all wooden elements must be treated with special antiseptic and other preparations to protect them from rot, insects and fire. The boards are treated with the solution only on the underside, since the outside is coated with varnish, paint or other compounds that have protective properties.
In addition to boards of materials, you will need: logs 5/5 cm of standard length 3 m, insulation, soundproofing substrate, nails, anchor bolts, self-tapping screws. The standard set of tools that may be needed for this type of work includes: level, saw or jigsaw, hammer, drill or screwdriver, axe, nail puller.
DIY plank floor
Let's consider the process of creating a floor from boards in the case where soil acts as the base.
Step 1. The first step is to dismantle the old flooring, if any. In this case, the old boards and joists are completely removed.
Removing the old floor
Step 2. If the room is located on the ground floor of a private house, then the sand cushion is also removed to a depth of approximately 30 cm.
Removing the sand cushion
Step 3. Then the metal frames for future column piles are installed. This will allow the beams to be raised if the groundwater is located close to the surface. To do this, depressions are created in the ground, into which metal bases are then dug. All columns are installed at the same level.
Ready holes
Metal frames for piles
Step 4. Rectangular shapes are made from plastic lining and placed on metal bases. Next they are filled with liquid concrete. After drying, the mold is removed from the lining.
The form is placed on the base
Form after pouring concrete
Ready pile column
Advice! It is recommended to add lime to the concrete solution - it will act as a kind of antiseptic for pathogens and mold.
Step 5. Small plates are cut from 6 mm thick metal and installed on the top of the concrete columns. Beams will be attached to the plates. A hole 14 mm wide is made in the middle of each plate.
Installing a metal plate
Another photo of the process
Step 6. A layer of polyethylene film is laid on the ground for waterproofing. You can secure the film to the columns using regular tape.
Laying polyethylene film
Step 7. The metal plates are coated with paint, which will protect them from moisture.
Painted metal plate
Step 8. Using metal cone washers and a powerful bolt and nut, wooden logs (100x60 mm) are fastened. Before this, a layer of thermal insulation material is laid on the concrete column.
Fasteners
How the joists are attached
Important! Beams are treated with antiseptic materials and drying oil before installation.
Step 9. The required number of lags is set in the same way.
Logs are installed
Step 10. A layer of heat-insulating material is laid between the beams, and a layer of vapor barrier material is attached on top of them. The latter is attached with a slight slack.
Attaching the vapor barrier
Step 11. To lay the decking, you will use a board with joint grooves, which will allow you to connect the boards without gaps. Depending on the size of the room, the boards are sawn in such a way that after laying the flooring there is a gap of 1 cm on all sides between them and the walls.
This is how the boards will be connected
Boards are marked
Step 12. The boards are treated with a brush with a special primer for wood. It is especially important to apply a thick layer of product to the inside and ends of each board.
The boards need to be treated with primer
Application of primer
Step 13. The first board is laid along the wall. Don't forget to leave gaps along the walls!
Laying the first board
Step 14. The first 10 boards are laid. Part of the flooring just ends near the edge of the vapor barrier. Here the rest of the vapor barrier is laid. The joints are connected using double-sided and foil tape. The first allows you to connect two layers of fabric together, the second will protect the joint from above. The overlap of two sheets of material is about 10-15 cm.
The process of laying boards
Laying a vapor barrier
Step 15. A small block is laid along the end of the last laid board. With hammer blows, the boards are pressed closer together. This will get rid of possible gaps between the boards. The board is punched along its entire length.
The boards are hammered
Step 16. Using a screwdriver, screw the screws into the corner of the board at an angle of 45 degrees where the joists pass.
The self-tapping screw is screwed in at an angle
Step 17. The ends of the boards are also fastened with self-tapping screws.
Fixed ends of the boards
Step 18. Before laying the boards continues, wood chips and chips that appeared in the places where the screws were screwed in are carefully removed.
All this needs to be removed
Step 19. After all the boards have been laid, they are sanded. This is necessary to reduce the gloss. It is recommended to wear safety glasses and a respirator when sanding, as the work is very dusty. After sanding, the floor surface is thoroughly cleaned of dust.
Sanding boards
Step 20. The final stage is applying varnish to the surface of the boards. The varnish is applied with a brush along each board in two layers, the second is applied approximately two hours after applying the first. The floors can also be painted.
Applying varnish