During renovation work in an apartment or private house, a huge variety of materials are used. They must not only be used correctly and efficiently, but also be able to combine them with each other, creating a single composition. One of the very popular types of flooring is linoleum, but this does not mean that it should only be used for laying on the floor.
If you combine this material, for example, with floor tiles or laminate, you can create not only a functional, but also a beautifully decorated floor.
To make the transition between different floor coverings, and even individual parts of linoleum, unnoticeable, special thresholds for linoleum are used. Let's figure out what their functions are, what types and sizes they come in, what materials they are made from and how to install them correctly so that this element lasts a long time.
Functions
Main functions of the threshold:
- Protects joints from contamination - if you install this element on the floor, your floor covering will be protected from dust, dirt and moisture. Thanks to this joining, the linoleum will be protected from delamination, and mold will not form under it.
- Protects linoleum from tearing at joints and joints.
- Eliminates differences - when connecting two floor coverings that differ in height, such a joining strip will smooth out differences in height as much as possible and will not allow the material to delaminate. Such a threshold can be used to connect, for example, linoleum and laminate.
- Acts as a decorative element - even if you try to connect the individual elements as much as possible, a seam or joint will remain visible, which does not look at all aesthetically pleasing. To avoid this situation, you need to use a linoleum threshold.
- Improves the perception of various types of coatings. Thanks to this, different floor coverings look like a single element, without contrasting with each other in color, texture and shade.
- A similar threshold is also used as a connecting strip between rooms.
Thanks to the listed functions of such planks, you will be able to create the perfect designer coating, even without the help of specialists.
Features and tips for joining linoleum
Having loaded yourself with good tools and patience, you can safely begin planning the linoleum flooring with your own hands. At first glance, there is nothing complicated, but there are still certain features that you definitely need to know before starting work.
How to trim material correctly
This stage is the most important, because the condition of the seam will directly depend on the quality of cutting. First you need to have the necessary tools:
- sharp knife
- metal ruler
- roulette
- pencil
After laying the first sheet of linoleum, its edges need to be attached with double-sided tape; the entire sheet should not be glued yet. This must be done to cut the edges evenly without moving the material.
Instruction:
- We place one sheet on top of the other, overlapping about 5 cm, do not forget to attach the base with tape. If you have chosen linoleum with a pattern, then it is worth making a selection so that it matches on two canvases. Of course, this will lead to the consumption of material, but it will not be possible to bypass this process, because the seam will already be visible to the naked eye.
- We mark with a pencil the place where we should cut later; if the linoleum has stripes, then this should be done along them, then the joint will be less noticeable.
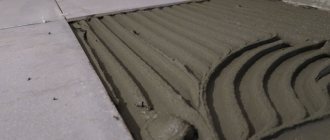
- Next, you should apply an iron ruler and use a sharp knife to cut two sheets at the same time.
- At the end, all that remains is to remove the remaining material.
Please note that when cutting on a concrete floor, it is necessary to place a piece of old linoleum or something else under the flooring material so that the knife does not become dull.
If you do everything carefully and correctly, you will get a perfect joint. Often at this stage the work ends, and the edges of the material are glued with double-sided tape. But we will consider all possible options.
"Cold" method
You need to prepare the following tools: a sharp knife, a spatula to apply the glue, the glue itself for gluing the linoleum, a special glue for the joint, which has a needle nozzle, a roller and masking tape.
First of all, it is worth gluing the material in the joint area. You should unscrew the linoleum sheets at the joint; 20 centimeters is enough. Then you need to carefully apply the glue with a spatula and press the material with a roller.
After completing all these steps, you need to glue the pieces together:
- We put tape on the seam, and then cut it straight along the seam
- then glue is applied along the entire seam
- after this the tape is removed and after drying the seam is cleaned with a knife
Scotch tape is needed to protect the material from glue, which can damage it.
The video shows cold welding of linoleum:
Types and sizes
Depending on the functional features, there are several types of thresholds for linoleum:
- Direct (another name is single-level) - used to join one or more options of different materials. Such floor coverings are located at the same level or have a minimum difference of no more than 1 mm.
- Drop (the second name is multi-level) - used to connect materials that differ in height. Similar strips are used to join linoleum with floor tiles, laminate or parquet. They are able to level out even significant differences in the height of floor coverings; the size of such a difference can range from 0.3 to 1.8 cm.
- Finish - they are laid in the place where the linoleum ended, and joining with another coating is not carried out. Most often, such thresholds are used in doorways.
- Corner (also called staircase) - this plinth has an angular shape and acts as a fastening element to join and secure materials on stairs. Such elements are very flexible, as they are made from rubber.
- Final – used to design the approach to a threshold or podium, which has a large difference in height.
Please note that thresholds for linoleum must be selected based on the floor covering used , existing differences in height, and requirements for service life. The service life of this product will be influenced not only by the correctly selected type of threshold, but also by the material from which it is made, as well as how correctly it was installed.
The size of the thresholds can be either wide or narrow. Most often, wide thresholds are used to hide a large gap between different floor coverings. A narrow plinth is less noticeable against the general background and does not attract much attention.
Features of finishing a doorway with laminate with your own hands
When the door frame is already installed, it has a threshold, and the flooring is laid according to the standard scheme. The laminate elements are arranged in a checkerboard pattern, which gives additional strength to the entire finish. In relation to the geometry of the room, the slabs are laid lengthwise, across, and diagonally. The optimal option is chosen taking into account the location and number of windows and doors.
Important! Laying slabs diagonally is considered a non-budget method, as it increases material consumption.
If necessary, the installed door frame can be trimmed when laying the slabs
When finishing a doorway with laminate with an installed or missing frame and there is no threshold, pay attention to the difference in height between the floors of two adjacent rooms. The indicator should not exceed 2 mm/2 linear. m. Moreover, in the area of the door passage, the floor is adjusted perfectly evenly without differences.
When installing flooring in two adjacent rooms, start drawing up the layout of the slabs from the interior door. First, boards are temporarily laid near the opening on both sides. From them they try to draw up an optimal layout for the remaining elements of the covering over the entire floor area.
Manufacturing materials and design
Thresholds for laminate flooring are made from various materials. The most common options are:
Metal
One of the most popular skirting boards are metal models, as they are characterized by a long service life and a presentable appearance. Such products are made either from brass or aluminum. Aluminum thresholds are more common than brass counterparts, as they are lower in cost.
The main advantages of aluminum thresholds include:
- They are lightweight and durable, so they will last a very long time, maintaining their original appearance.
- They are used in both residential and non-residential premises, as they perfectly withstand temperature changes, loads and high humidity.
- They are made in various sizes: both narrow and wide. If an aluminum threshold fits into a doorway, which is characterized by non-standard dimensions, then such a product is very easy to shorten, just use a hacksaw or grinder.
- The smooth surface helps make even significant differences in height less noticeable.
Laying laminate flooring near a door frame: is a backing needed?
The technology for laying boards requires preparing a perfectly flat surface. The difference in height of the subfloor should not be more than 3 mm/1 m. If the figure exceeds the norm, fill the screed or level the surface with putty. The underlay must be laid, as it smoothes out small differences that cannot be eliminated even with a screed.
When finishing an opening for a door, lay a backing under the boards
When laminate flooring is laid near the door threshold, the installation technology is no different. The substrate is laid under the boards. The exception is cork laminate. There is no need to lay a substrate under it.
Installation and mounting methods
In order to hide the joints between the laminate and linoleum, it is necessary to correctly install the threshold. The most popular method of installing it is dowel fastening. In this case, a decorative plinth with an aluminum strip is used. This fastening is called hidden, since the dowels are hidden under the overlay and do not spoil the aesthetic appearance of the floor covering.
In order to secure the planks correctly, carry out the process in stages:
- measure the seams;
- cut the threshold, adjusting it to the required dimensions;
- clean the seams from dirt and dust;
- lay the planks, moving from the center to the seam with the marked place for laying;
- mark where the dowels should be;
- using a drill, make holes into which the fasteners will be inserted;
- Next, you should screw the screws and install a decorative strip on top of them.
There are also small tricks on how to fasten linoleum when laying it, which is distinguished by curved or arcuate joints. There are two ways to secure the planks at such joints:
- Soft joint - in this case, a flexible plinth is used, which is attached to the floor, and a decorative strip is placed on top. Such products are very easy to bend. They are able to hide the joints between the laminate and linoleum by 1 centimeter on each side.
- An aluminum profile can hide small joints (a few millimeters on each side).
The process of attaching the strip is as follows:
- Drill holes in the floor for the dowels.
- Measure the threshold to the appropriate length and insert the dowels into the holes.
- To give the profile the desired shape, it must be immersed in water heated to 70 degrees and left there for 20 minutes. After this time, the threshold will become very flexible and will be easy to bend.
- Next, you need to screw the baseboard onto the self-tapping screws and insert a plug on top.
The balcony threshold is most often attached to polyurethane foam:
- It is necessary to clean the base under the threshold from dirt.
- Measure the opening and cut the threshold to the required length.
- Next, you should lay down an even layer of polyurethane foam.
- Place the threshold on top and place a weight that will hold the structure in the desired position.
- After the foam has dried, the gaps formed at the joints should be sealed with silicone sealant.
- The ends of the threshold are closed with special plugs.
The most popular floor coverings of the last decade have been laminate and linoleum. Owners decorate residential or commercial premises, fully trusting reviews about these products. And rightly so, because they are beautiful, practical and durable. So why not use them when decorating an apartment or office. But which material should you choose if they are both so good?
How to connect laminate between rooms
Where to make a laminate joint between rooms? It is most logical to connect laminate to laminate so that the seam is under the door leaf. Then, when the door is closed, the joints are not visible. If there are several doors opening into a room, it is advisable to arrange all connections in the same way.
How to join laminate flooring between rooms
Between rooms the laminate is connected using:
- connecting profiles;
- thresholds;
- cork compensator.
The connecting profile and the threshold are not the same thing. These are two different types of connectors. Thresholds can be used with any floor covering, but they differ in appearance, as they are usually made of a different material. Connecting profiles are produced by the same companies that make laminate. They are covered with the same film that is used for laminating dies. This allows you to select a connecting strip for the laminate with an exact match of color and pattern (if you're lucky).
Connecting profiles
How to join laminate so that the seam is minimally noticeable? Using laminated joining profiles. They are made of aluminum alloy or MDF, covered with a film that covers the laminate. Connecting profiles for laminate consist of a guide and a decorative strip. The guide can be plastic or metal. It is attached to the floor using glue (plastic) or dowels (metal).
The decorative strip can be metal or MDF. In any case, the material is laminated with film. This type of molding is produced by the same companies that make laminate. The colors and textures match the laminate. If your company does not produce such strips, you will have to take a sample and try to find it from other manufacturers.
Types of joining profiles for laminate
According to the shape of the top bar, the connectors can be straight (in the photo above in the center) or rounded (in the photo on the left). Straight lines are less noticeable, but materials of the same thickness must be joined. Rounded ones can be installed at a slight angle, which makes it possible to join laminates of different thicknesses.
Primo docking laminated profile
Straight joining profiles for connecting laminate flooring come in one thickness. They are called direct or connecting. There are options for coatings of different thicknesses, they are called “transitional”. The height of their shelves is different. Selected according to the thickness of the coating used.
The width of the strip can also be different. The wider it is, the larger the expansion gap can be made. The minimum width of the strip is 22 mm, the maximum is 44 mm. There may be more or less, but they are very rare.
How to join laminate flooring using thresholds
Thresholds for connecting floor coverings are strips made of wear-resistant material. What distinguishes them from connecting profiles is that they are only a strip. It simply closes the gap at the top.
Thresholds are made from the following materials:
- Metals and their alloys. Most often these are aluminum alloys and brass. The coloring usually imitates one of the metals - brass, bronze, aluminum, etc. They can be shiny, matte, with a satin surface (semi-matte), etc. There are options laminated with wood-like film, but they must be selected according to the color of the coating.
- Made from wear-resistant plastic. There are many planks in brown tones, some colored, with imitation wood.
- Wooden. Sold unpainted, you can try to choose the color yourself.
To ensure that the thresholds look normal and do not “scratch” the eyes, they are selected to match the tone of one of the coatings being joined. Before joining the laminate, take samples of your coatings and go in search of thresholds. Neither by eye nor by photo you will understand which option will be optimal. Only by applying it to a specific material can you choose.
Without “trying on” you won’t understand which one is better
According to the type of fastening, thresholds can be hidden or open mounted. Open mounting - with through holes in the bar into which fasteners are installed. Fasteners - self-tapping screws. It is advisable to select their color to match the color of the threshold, and the shape of the cap should be conical and straight on top. If the kit does not include fasteners, it is better to take with you a bar or a section of it with a hole for the magazine. There you can “try on” different screws and choose the best option.
One of the thresholds is a profile that closes the gap. And that's it
Concealed thresholds are usually made of metal. Most often made of aluminum and brass, you can find stainless steel (for the price of an airplane wing). It is better if the aluminum is anodized - it does not change color longer. Aluminum can be laminated with a wood-like film, which increases the chances of making the joint less noticeable. Fasteners are included with the bar. It must have a certain cap shape so that it fits into the groove.
Cork expansion joints
If you don't like the thresholds, you can put a cork in the seam. There are special cork expansion joints. They are usually used when laying parquet. They can be 7-12 mm in width, 15, 18, 20 and 22 mm in height. The cork strips are painted and sanded. Cork expansion joints are sold in pieces of 90 cm, 120 cm. You can also find strips 3 m long.
Cork expansion joints are installed when one of the coverings has already been laid, and the second will be installed. This is convenient if the doors open onto a corridor and two coverings from different laminates are connected, and with different laying directions.
Cork in the joint between laminate and laminate
To install a cork expansion joint, you will need wood glue and silicone sealant (preferably transparent, it is almost invisible). Apply glue to the floor in a zigzag or two parallel strips, install a strip of cork and press. We take the silicone, bend the plug, coat the joint with the laminate, return the expansion joint to its place, and press it.
When the second coating reaches the joint, the cut of the laminate must be coated with silicone - this will protect against moisture and debris. Be sure to remove excess silicone immediately, otherwise you can tear it off from the cork only by damaging the surface. So, once again: we glue the bottom of the cork strip with universal glue, which glues wood and concrete (if you have concrete), and glue the sides with sealant to the sections of the floor covering.
What is the difficulty of docking?
As mentioned above, the most popular floor coverings are linoleum and laminate. And if you decide to use them together, you will have to study some of the nuances of docking.
The complexity of this activity lies in the fact that the thickness of these two materials is different. Linoleum is thinner than laminate. Therefore, the main task is to make their joint as invisible as possible on the floor.
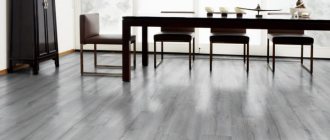
Laminate laying diagram
This is not difficult to do if you become familiar with the ways to solve the problem.
- Leveling the height of the linoleum so that its surface is flush with the laminate.
- Sealing the joint while maintaining the difference and using additional elements - aluminum profiles or thresholds.
In each specific case, it is worth approaching the issue from a practical point of view. After all, the aesthetic appearance of your room depends on the correct combination of linoleum and laminate.
Expert advice
In order to avoid mistakes when carrying out work, you need to carefully calculate, measure, and think about the optimal installation method. Recommendations from a specialist will help you solve some of the nuances yourself:
- Before starting work, measure the gap between the subfloor and the bottom end of the door. It must have a minimum value of 10 mm. Otherwise, the sash will not open, as the floor will rise to the thickness of the laminate and underlay.
Trimming the box is done after making sure that the gap at the bottom of the sash is sufficient for it to open freely - Laminate topcoat is laid over the old floor if it is strong and level. You can make a base from a concrete screed or lay particle boards. However, in any case, there must be a suitable level of humidity inside the room. If the room is damp, laminate finishing is abandoned.
- You cannot finish the door by laying boards on high-pile carpet. The soft base is unstable. At the joints, the slabs will move apart over time.
The finishing option is not suitable for a room with a xylolite floor. The base has a high residual moisture content.
Single-level joints
From a practicality point of view, single-level laminate-linoleum joints are the most profitable. The work uses overlays and moldings, which make the joint on the floor between the two materials smooth and invisible. But it is recommended to take their choice responsibly and check how well they meet the requirements listed below.
Requirements for overlays:
- Waterproof, only in this case they will qualitatively connect two joints of different materials. Otherwise, when moisture gets in, the linoleum or laminate will become deformed, which will lead to damage to the floor.
- Resistant to UV rays. The joints of linoleum or laminate are not always protected from this influence, therefore, when exposed to sunlight, the overlay should not fade or deform so that the joint does not deteriorate.
- Easy to install, otherwise you risk fiddling with this event for a long time, significantly spoiling your mood.
- Durability and wear resistance. These qualities will help you use overlays to connect the joints of linoleum and laminate for many years.
The joining of laminate and linoleum at the same level occurs as follows:
- another dense material is laid under the linoleum to raise it to the same level as the laminate. Typically this material is multi-layer plywood;
- Using a special pad, the two materials are joined.
It is important! It is recommended to join the two materials using a T-shaped molding, which will give the floor a finished look.
Slats and thresholds for joints
To adhere the joints of laminate and linoleum on the floor, aluminum thresholds or slats are often used. This can be explained by the fact that aluminum is a practical material that makes it possible to decorate the floor covering depending on the color. Such slats are painted bronze or gold, thanks to which the possibilities of artistic imagination are unlimited.
For the adhesion of two materials, the following rail options are intended:
- Anodized, which is recommended for use in high traffic areas. Their coating is very resistant to abrasion, thanks to which the bronze-colored slats will delight the eyes of homeowners for a long time.
- Covered with laminate, which is recommended for installation in rooms with low traffic. They are not very resistant to stress, but do not lose their popularity.
- Plastic. The price of this material attracts a large number of consumers, but you need to be careful with them. They cannot be used in places with high traffic, and they are not recommended for joining laminate flooring with linoleum. However, due to lack of funds, you can consider a similar option.
This is the main thing! Although plastic planks have several disadvantages, you can hardly do without them when making curved joints between linoleum and laminate. They can even do a radius connection.
- There are also brass thresholds, which stand out for their good quality and durability. Naturally, the cost of this pleasure is high, but if the price is not an obstacle, then it is impossible to imagine another option. There is only one disadvantage of this material - darkening over time. This happens because the brass used for these slats is not finished, causing it to darken. But it’s easy to help solve this problem - just rub the rail with felt, and it will play brighter than before.
Docking thresholds
Multi-level joints
Multi-level joints of laminate with linoleum are suitable if you need to level a floor of two levels. For these purposes, thresholds of various heights are produced.
- straight thresholds for joints of single-level floors;
- transitional - to connect two floor levels;
- finishing - for decorating the edges of linoleum or laminate;
- corner or staircase - for connecting linoleum to the stairs.
In a hardware store you can easily find products for joining coatings. The only thing you have to decide on is the material of manufacture. The most popular thresholds:
- metal;
- plastic;
- cork;
- rubber;
- wooden;
- laminated.
products are also selected according to their external design. The width and color of such devices can also be any, so you have the opportunity to choose a product to suit your taste.
Advice! To make a multi-level floor joint aesthetically pleasing, it is recommended to use joining profiles or thresholds. They will protect the joints from moisture, and the floor will become smooth and neat.
A chamfer is not a gap in the laminate
Let's give a unique definition of the concept of “gap”.
A gap in a laminate is an unplanned gap formed not as a result of a technological solution, but due to defective material or illiterate actions of a craftsman. It also appears due to prolonged use or temperature and humidity factors that influence changes in the size of the laminated board.
A chamfer is a technological solution for processing the edge of a plank, and therefore is not a gap.
Methods of fastening thresholds
The joints are connected using special strips and thresholds, which are secured in several ways:
- End-to-end connection. In this case, the connecting strip is placed on top of two materials - linoleum and laminate - and screwed to the floor with self-tapping screws.
- Concealed connection using fastening strips. The back side of such a strip has special grooves. The front part is flat, which allows you to connect two materials without visible fasteners. Due to this, linoleum and laminate are on the same level.
- Instead of joining, gluing the covering to the floor. This method is less practical, but is still sometimes used. Use liquid nails or transparent silicone-based adhesives. This connection is suitable for areas with low traffic, otherwise the joints will sooner or later be damaged.
What you should know
The most basic task of the process of installing laminated panels near a doorway is to create an invisible, but fully meeting all the requirements, seam between the laminate and the door frame. The nuance itself is that it is not recommended to join it closely to the door frame, because such a coating needs a gap in case of thermal expansion. If the gap is not left, then there is a possibility of the panel swelling, which is why special methods have been developed for laying the laminate around the door frame.
In addition, before starting installation near the doorway, you should do the following:
- Check the gap between the door and the floor. When laying laminate flooring, this gap must be at least 1 cm, because the door must close and open freely, otherwise scratches will be visible on the surface of the new coating. If there is no gap, then you should first adjust the location and height of the door, and only then proceed with installation.
- The surface must be prepared - completely leveled and free of debris. To prevent dust and other particles from entering, it is better to sweep the installation area again.
- In the room where the laminate will be laid, you should definitely check the humidity level, because it may be that the humidity in a given room exceeds the norm; naturally, it is not recommended to lay laminate in it. Also, laying laminate flooring depends on the type of subfloor. The base must be absolutely smooth, dry and clean.
There are certain recommendations that should be followed when laying laminate flooring in a doorway without a threshold:
- Laying laminate flooring near the front door must be done leaving gaps between it and the door frame, since deformation may occur under the influence of expansion of the material. At the end, the gaps left are hidden under the baseboards.
- The humidity in the room should not be exceeded, otherwise the panels may swell and swell. It is better to let the material lie in this room for a certain time before laying it for acclimatization - at least two days.
- The joining seam in the area of the door opening between the laminate and the other floor covering must be covered with a special profile, which must match the color of the two coverings at the same time.
- The gaps are initially closed with plugs, which are removed after installation is completed.
Note!
The laminate is laid exclusively on the underlying material, and in the area of the opening the laminated covering is installed exclusively in a floating manner. If glue is applied, then only on the lock joint so that the joints do not move.
Docking without strips
If you decide to connect linoleum to laminate without additional planks, you will have to be prepared for the fact that the costs of such work will be significant. To do this, you need to select materials so that they completely coincide with each other. This applies to the directions of the laminate planks and the pattern on the linoleum.
It is important! With the right selection of material, your floors will always be smooth and beautiful.
But if you can do without thresholds when laying laminate flooring on the floor, then in the case of the second material you will have to try to ensure that the edges are well secured so that they do not curl up. This is especially true in places where there is a lot of people passing through.
Connection without strips
To ensure reliable fixation of linoleum to the floor, transparent silicone glue is used. The material is cut as precisely as possible so that the joint is barely noticeable. After joining the two materials, the gap between them is filled with the same glue.
Advice! To prevent glue from getting onto the front surfaces when joining two materials, use masking tape.
What gap is required between the door, floor and frame
Beginners will always face some difficulties when installing doors. The most important stages of door installation are fastening the frame and installing the leaf. During this process, many people are confused about how much space to leave between the door and frame. How to understand the subtlety of installation?
Norms and rules for the formation of gaps between the door and the frame
The further operation of the door structure depends on how well the gaps are calculated and laid. Under the influence of moisture, the door can expand, and then problems with its functionality cannot be avoided. Also, too much gap prevents the doors from being securely locked in the closed position.
There are standards and rules regarding this. According to the rules, gaps are always calculated individually and depend on the geometric parameters of the structure: weight, height and width of the door. In this case, the reasonable error is ±1mm. If, according to its dimensions, the door should have gaps between the leaf and the frame of 5 mm, then, taking into account the possible error, they can range from 4 to 6 mm.
Gaps between the leaf and frame of standard doors
What gap should be left for a standard door leaf with a height of 200 cm and a width of 60 to 90 cm? In such cases, the required gaps of up to 5 mm wide are usually left. And usually it is enough to have gaps of 3 mm. For rooms with high humidity and doors made of materials that absorb moisture well, it is more effective to leave 4 mm or more.
It is necessary to leave a gap of at least 2 - 2.5 cm between the interior door leaf and the floor to ensure natural ventilation. A gap of 4 cm is allowed for convenient and safe opening of the door.
How to create gaps when installing interior doors
- When installing the frame and during initial formation, gaps of 1-2 cm should be left “for foaming”. This is extremely important because during the setting process the foam increases significantly in volume and creates pressure on the box. When this happens, there are no proper gaps between the frame and the door - the frame bends in an arc and the door loses its ability to close.
- Between the surfaces of the frame and the door leaf with the door closed, a strip of any material with a thickness of 3 to 3.5 mm should be installed. Usually this material is door packaging cardboard.
- To prevent the door frame from moving in the doorway, it is fastened with door wedges.
- Afterwards it is necessary to adjust the building level again. A well-balanced door, despite its weight, should stand on wedges. In the open position, the supporting structure must remain motionless.
- After checking the frame, you can gently foam it and the foam will expand.
- If, after the foam has set and the strut has been removed, the structure does not undergo deformation, has a flat structure and gaps of the planned width on all sides (except the bottom), then the installation was carried out correctly.
How to fix a gap that is too big or too small
Sometimes when you close a door (especially an old wooden door), the gap is too narrow or even missing. First, make sure that there is no warping: the frame should be level and maintain the configuration of the corners and diagonals. In this case it is possible:
- for washing off paint;
- to remove the sash from its hinges and cut out the contours with a plane to create the right hinge.
On the other hand, if the door has dried out and decreased in size during use, then too large gaps (more than 6 mm) have probably formed between the frame and the sash. In this case, the door is probably hanging on its hinges or the latch handle does not fit into the slot. The situation can be corrected if:
- You move the door up, rearranging the hinges to eliminate the extra top gap;
- you attach a piece of wood to the hinge side of the door to ensure there are no too many gaps.
Gaps between the front door and frame
Unlike interior doors, the gaps between the front door and the frame must comply with standards not so much because of the possible expansion of the leaf, but because of the danger of penetration of cold air and extraneous sounds from the outside. Such troubles can be avoided by installing a seal, and this is the manufacturer’s problem. If the door is certified according to the standard, there are no problems. But if the design is not certified, the gaps can be of any type and you need to glue the seal yourself.
Thus, in most cases, the gaps of interior doors at the top and on each side are 3 mm, the hinges at the bottom should not be less than 2 cm. If you initially follow these simple rules, in the future you can avoid many problems and possible reinstallation of doors.
.
Applicable options
As already noted, there are several methods of laying laminate used in doorways.
First option
This method is used mainly for properly planned major repairs or construction from scratch. It consists of the following:
- The laminate is laid before the interior doors are installed. That is, the installation of the laminate occurs in the usual manner, observing all technological gaps and other nuances.
- After laying the laminate, the door frame and trim are installed, which hide all the technological gaps and cut edges of the boards.
Second option
This method involves cutting the door frame. In more detail this technology is as follows:
- A cut is made on the door frame equal to the width of the lamella.
- The cutting depth is about 1 cm, since making the gap smaller does not make sense.
- The end of the lamella is inserted into this peculiar groove, forming an even joint.
This method requires a wood saw with fine teeth, accuracy and prudence.
Advice! The cut should be made as carefully as possible to avoid chips and splinters. It will be difficult to repair such defects later.
Third option
This method allows you to lay laminate flooring under the door without resorting to filing. This technology is more complex and at the same time simpler than the previous one and consists of the following:
- A standard doorway is about 80 cm. Accordingly, a laminate board of the same size is installed. The thermal expansion of such a small board can be neglected.
- Therefore, the laminate is measured and cut in such a way that there remains the smallest possible gap, almost flush.
- The remaining gap is filled with sealant or putty of a suitable shade.
Advice! This method also requires accuracy and patience. It may take several tries to get the best results.