I want to show you right away what will happen if you start installing the roof in the same order that was described in the previous article (see Fig. 1)
Picture 1
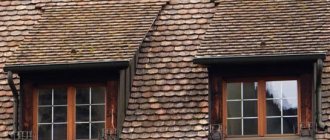
We see that one gable will be 6 meters wide, the other 7 meters. In this case, the angles of inclination of the rafters will not be the same, and this will lead to the fact that the ends of the rafters in the eaves will not coincide vertically (bottom figure). In this example, the difference will be almost 10 cm.
In this case, you can go two ways:
1) One skate is made lower than the other. Moreover, such a roof already has three pediments (see Fig. 2):
Figure 2
We will talk about this design in the next article, using only the example of a T-shaped roof.
2) The roof is made with the rafters supported on the floor beams. In this case, skates can be made at the same height. We will now consider this option.
A small digression. In this and the previous articles, I always talk about gables. But instead of gables there can be hips and half-hips. See, for example, Figure 3. Here everyone is free to fantasize.
Figure 3
So, our example:
STEP 1: Install the floor and extension beams. (see Fig. 4):
Figure 4
STEP 2: Install the corner extensions.
To do this, you first need to sew one wind board on the outer corner of the house box to find the corner of the cornice. Then we pull the cord between the outer and inner corners (see Fig. 5):
Figure 5
We do not sew all the wind boards at once, because they will get in the way when marking and installing the rafters of the slopes.
Figure 6
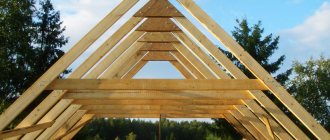
STEP 3: Install the ridge board and rafters (see Fig. 7):
Figure 7
STEP 4: Place the corner rafter on the outer corner of the house frame (see Fig. 8). This operation has also already been described in detail - step 8.
Figure 8
STEP 5: We make and install a corner rafter in the valley. Just as we did in the previous article, the halves of the corner rafters will be cut together, but by different amounts, since, let me remind you once again, the angles of inclination of the slopes converging in the valley are different.
So, we tighten the lace in the valley, as shown in Fig. 9:
Figure 9
Using a measuring stick, measure the angle of the bottom cut of the corner rafter??? (see Fig. 10):
Figure 10
Calculate the angle of the upper cut:
? = 90° — ?
We take a small piece of board the size of the rafter and saw one end of it at an angle. We apply it at the top of the valley, as shown in Fig. 11. We mark a line parallel to the ridge board on the right.
Figure 11
We make a gash and again, applying the template, measure the distance shown in Fig. 12:
Figure 12
Using an ax or chainsaw, cut off the upper edge of the right half of the corner rafter to this distance
So, the angle of the bottom cut??? We know that there is a template for the top cut. Now we measure the length of the rafters with a tape measure, make cuts and trim the top edge.
We mark the left half and make it in the same way. The size to which the top edge is cut will differ.
The result is shown in Fig. 13:
Figure 13
Oh, I also forgot to say that the lower end of both halves of the corner rafter will need to be filed down a little. In Figure 14, using the example of the right half, the cut location is shown (in blue):
Figure 14
A hip roof is a roof that has four slopes, two of which (the end ones) have the shape of a triangle. They are called hips and are located from the ridge to the eaves. Two more slopes have the shape of a trapezoid. If the end slopes break off before reaching the eaves, then this design is called a half-hip or Dutch roof.
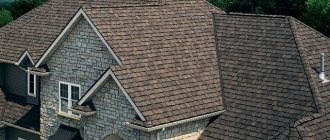
A hip hip roof is often erected on private houses in a city or village. Thus, the owner has a spacious and comfortable attic, and his house gets an attractive, pretty appearance.
Making a hip roof with your own hands is not as difficult as it might seem at first glance, especially to a person without sufficient knowledge and experience in the field of construction. The process, of course, is not a simple one, but it is quite possible for a person whose hands are growing as they should. There is nothing supernatural here, especially if you use our advice.
Those interested in a hip roof can find videos and instructions on how to build one on the Internet. But without proper markings and planning, it will not be possible to carry out the work. A competent approach will allow you to avoid various troubles and difficulties that often arise directly in the process of work performed.
Before starting construction, you first need to find out all the nuances regarding this roof structure, especially about the rafter systems of hip roofs. In addition, you need to carefully take all the necessary measurements and make the appropriate markings.
Drawings of a hip roof are made using a regular marking strip and the Pythagorean theorem, known to everyone since school days. The main thing in this process is not to rush and do everything thoughtfully.
A correctly completed hip roof project with the correct markings will allow you to independently make all the cuts on the structure that will be required during the construction process.
The main part of the measurements for the construction of a hip roof is made starting from the bottom rib.
Basic rules for constructing a hip roof structure
It must be remembered that the intermediate parts of the rafters are always steeper than the corner parts, therefore the size of the boards and logs used in the manufacture of the rafter system must be at least 50x150 mm.
Unlike a conventional pitched roof, short rafter structural members must be attached not to the ridge board, but to the corner portions of the rafter system. The slope of the intermediate parts of this system must be the same as the slope of its short elements.
During the construction of a hip roof, the same material is used to make the rafter system and ridge board.
The hip roof is erected using an intermediate central type of rafters, which are attached to the two edges of the ridge board.
In addition to the ridge board, the intermediate rafters must also be supported against the upper level of the trim.
When taking measurements, it is better to use a marking strip instead of a regular tape measure. This will make it possible to complete all the markings more efficiently; accordingly, the drawing of the hip roof will be made more accurately than if you used a standard tape measure for measurements.
When taking measurements, it is better to use a marking strip instead of a regular tape measure. This will make it possible to complete all the markings more efficiently; accordingly, the drawing of the hip roof will be made more accurately than if you used a standard tape measure for measurements.
Marking the hip roof
Before erecting a hip roof, you first need to mark it. First, you should mark the center line, which is located at the top level in the frame of the part of the wall that is located at the end of the building.
Next, one end of the marking strip is applied to the previously marked line for the first element of the rafters. To its other end it is necessary to transfer the line of the side internal wall, which will mark the location of the intermediate element of the entire rafter system.
To clarify the exact length of the rafter overhang, it is necessary to move the marking strip to a line that corresponds to the outer contour of this wall. The second end of the batten must be installed on the resulting roof overhang.
After this, we mark the place where the second rafter element of the central intermediate type will be located. To do this, we need to place the rail on the edge of the side wall. On it we mark the exact position of the rafter element, which we planned to place between the upper edge of the frame and the side wall. This is exactly what the hip roof scheme provides.
In the remaining corners of the building, the same sequence of actions must be performed. This will allow us to make accurate and competent markings of all parts of the center of the rafter system, in addition to taking the correct dimensions of the ridge board.
The huge advantage of this marking procedure is that the hip roof, its structure and structure will be designed by us without hypotheses, assumptions and guesses about whether it is necessary to lower the rafter corner elements, since the entire rafter system will be made of a material that has the same width and section.
The design of the hip roof is designed in such a way that due to the use of boards of the same size 150x50 mm throughout the entire system of rafters, it can sometimes happen that the uppermost parts of the rafter elements are slightly higher than the upper parts of the corner elements. As a result, a gap may form between the roofing material and the rafters, allowing for additional air circulation in the attic.
The design of the hip roof is designed in such a way that due to the use of boards of the same size 150x50 mm throughout the entire system of rafters, it can sometimes happen that the uppermost parts of the rafter elements are slightly higher than the upper parts of the corner elements. As a result, a gap may form between the roofing material and the rafters, allowing for additional air circulation in the attic.
Since all parts of the rafter system that are used in the construction of a hip roof are in the shape of right triangles, a more accurate calculation can be made using the Pythagorean theorem, which we already mentioned above.
Next comes the angle template.
Now let's create a template for the corner of the top cut from a small board. Having attached it to the top of the valley, we mark the line so that it runs parallel to the ridge block. Let's lay out the template again and measure the length to the cutting point.
One edge of the right side of the corner rafter is trimmed to this length. The left side is made in the same way. It will differ from the right one by the already measured length. At this point, the work with the upper edges of the rafters is completed; the lower ends will need to be filed a little.
At subsequent stages, the installation of racks, crossbars, and extensions is carried out. The roof is being sheathed. They hem the cornices and so on.
A rod that is used for measurements
Before you start taking measurements and applying markings, you first need to study in detail all the elements that make up the roof: the hip, the slopes, and so on. Having studied its structure, it is also necessary to foresee in advance a way to connect the parts of the rafter system to each other.
After we have figured out how the hip roof is constructed, we can begin making the slats that will be used for measurements.
For greater convenience of marking the roof, when the mark is located on the batten at a great distance from the builder’s eyes, the width of this batten should be more than 5 centimeters.
For greater convenience of marking the roof, when the mark is located on the batten at a great distance from the builder’s eyes, the width of this batten should be more than 5 centimeters.
In order to mark the location of the intermediate elements of the rafter system, it is necessary to attach the lath to the mauerlat of the side wall.
It is also necessary to directly measure the thickness of the wall, which will make it possible to make the correct selection for the supporting element of the rafters and roof overhang.
In order not to take all the measurements several times, it is necessary to put on the rail all the dimensions that are used for marking.
In order not to take all the measurements several times, it is necessary to put on the rail all the dimensions that are used for marking.
This will save time, and, unlike measuring with a tape measure, you will avoid errors of several millimeters.
Such seemingly minor errors can result in inconsistencies in the entire rafter system, which will require correction and additional work.
In addition, you need to prepare in advance a complete list of all the coefficients that are used when marking the rafter system. This will allow you to make the roof structure as accurately and correctly as possible.
Such coefficients include such indicators as: the ratio of the length of the rafter elements used to their location, as well as various proportions, characteristics of various slopes and slopes, and so on.
Conclusion
Now you know how different rafter systems work, and you can start designing them yourself. If you have any difficulties, write comments and I will be happy to help you with advice.
Did you like the article? Subscribe to our Yandex.Zen channel
December 29, 2021
Roofing, Structural elements
If you want to express gratitude, add a clarification or objection, or ask the author something, add a comment or say thank you!
Marking corner elements
Marking the corner elements of the rafter system for hip roofs is carried out in several stages:
- We mark the junction of the marking contour with the upper inner part of the trim; We measure the distance from the intended location to the marking contour, as well as the distance to the nearest intermediate element of the rafters, which will allow us to calculate the horizontal projection. This will help us calculate the rafter length of the corner element of the system; A marking strip will greatly simplify marking work. With its help, the markings of the side walls, which have already been completed, can be transferred to the end walls of the house. In addition to saving time, this will also allow you to maintain precise distances between the central elements of the rafter system.
Useful: for greater convenience of measurements and markings, it is advisable to make a special template, for example, from an unnecessary sheet of plywood that has right angles.
For example, if we have a slope value of 612, the template needs to be marked as follows: at one end of the corner we mark 30 cm, and at the other – 60 cm. After this, by connecting the marks we obtain the required triangle, a sheet of plywood is cut along its contour.
After this, you should attach a beam measuring 50x50 mm to the larger side of the resulting figure. In addition, we mark the slope coefficient of the slopes.
Marking
In order for the L-shaped roof to be correct, it is important to mark the Mauerlat and tie rods. This includes marking where certain elements of the skeleton will be located. To apply this marking, a construction pencil, a special measuring ruler and a drawing are used to guide you.
To begin with, a mark is placed on the central part of the end walls of the house in the shape of an G, and straight lines are drawn from the central parts along the walls. A ridge run will be installed along this marking. The length of the two skates is outlined as indicated in the drawing (the location of the support posts too).
The next step is to mark the locations of the rafter legs. The step is indicated in the drawings. The marks are applied on the Mauerlat.
Advice! The joining of corner and regular rafters is carried out using the cutting method. Cuts are made only on the rafters so that they are no more than ¼ of the section. Cuttings cannot be made on the Mauerlat. This will lead to weakening of the structure.
At the end, all that remains is to mark the location points of the corner rafter legs and spigots. Now we’ll find out how to make an L-shaped roof with your own hands.
Half hip roof
In some cases, instead of an attic, the owners decide to build a second floor. In such cases, the classic hip roof model will not work, since windows need to be installed on the walls. Therefore, a slightly different design is needed.
The half-hip roof is a conventional gable structure at the top, and a trapezoid at the bottom (between the first and second floors). This roof design gives the entire building a very original and interesting appearance, and also clearly emphasizes the line between floors. This design is most often used for small houses.
The half-hip roof (hatched) has the appearance of a mansard structure with a broken slope. It is often used in cases where the area of the desired room cannot be fit into a triangular shape. The fact is that there is quite a lot of free space under the roof, and it can be used at your discretion. So that the space under the roof does not disappear, it can be used as a living space.
In their design, such roofs are something between a regular hip roof and a regular gable roof.
Where should construction begin? Like the hip roof, this design also requires detailed and accurate calculations. If your knowledge in this area is not deep enough, it is better to order a detailed calculation - half-hip roof + drawing + table from specialists.
After this, in accordance with the obtained indicators, it is necessary to purchase the material. When purchasing, special attention should be paid to the quality of the material. The wood must be dry, without cracks or knots. Before starting work, it is necessary to carefully treat all wooden elements with a protective solution.
The roof must be reliable and strong, so accurate calculations and high-quality execution of all construction work are very important.
The roof must be reliable and strong, so accurate calculations and high-quality execution of all construction work are very important.
Experts do not advise beginners to take on such complex designs, since one minor mistake can lead to unforeseen consequences.
If you really want to build a roof with your own hands, then it’s better to entrust the installation of the rafter system to professionals, and you can do the subsequent installation and insulation of the roof.
Marking the structure
In order for the roof of a corner house to be assembled correctly and accurately, you need to apply markings to the Mauerlat and tie-downs. That is, the exact locations of certain skeletal elements. To apply markings, use a construction pencil, a special measuring ruler made of plywood and, of course, a drawing on hand with all the parameters of the frame elements.
- First of all, they mark the central parts of the end walls of the L-shaped house and draw straight lines from them along the long walls of the building. It is along these lines that the ridge run will be located. The lengths of both skates are outlined in accordance with the drawing, as well as the locations of the support posts.
- Now you should mark the locations of the rafter legs. They are mounted with the pitch indicated in the drawing. That is, original marks should be applied to the Mauerlat - the support points of the rafter legs.
Important: corner rafters and regular rafters should be joined using the cutting method. But cuts are made exclusively on the rafters in such a way that they do not exceed a quarter of the cross-section of the lumber. Making cuts on the Mauerlat is strictly prohibited. This will weaken it and the roof, installed by yourself, will become warped over time.
- Lastly, mark the location points of the corner rafters and spigots.
Hip L-shaped roof
As you know, not all houses are shaped like a square or rectangle; therefore, L-shaped houses need an L-shaped roof. It is better to invite specialists to take dimensions and draw up drawings of this design, since this model requires certain knowledge and skills.
A hip roof is not too difficult to manufacture, and most importantly, during construction, make all the markings and calculations correctly, using a special rail, as we said earlier, and a table of coefficients.
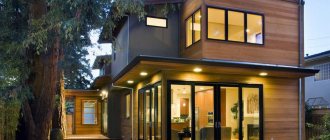
When thinking about building your own home or even a summer cottage, you want the house to be beautiful, unlike its neighbors, comfortable and functional. It would also be nice if it were inexpensive. A mansard-type roof allows you to solve almost all these problems. The appearance of the house turns out to be interesting, and the building can be decorated in different styles - all the options for combinations of roofing, type and shape of the roof, windows and balconies are probably impossible to count. It’s worth talking about the cost separately.
The combination of slopes directed in different directions gives a very unusual effect. You wouldn't call a house like this ordinary
We carry out calculations for the roof
The first step before making an L-shaped roof is to carry out calculations. They must be accurate. It is necessary to calculate the load on the rafter system and other parameters.
The following factors are taken as a basis:
- Constant load level. Here we are talking about the total weight of the roofing pie. It will place a large load on the structure. The roofing pie includes a system that consists of insulation, a hydro- and vapor barrier layer, sheathing and roofing material.
- Seasonal roof load. This includes different types of precipitation: rain, snow and wind. In addition, you need to take into account that snow can be constantly on the roof in winter. That is why you need to take into account the climatic characteristics of the region and choose the correct angle of inclination of the L-shaped roof. This will reduce the seasonal load. For example, if there is a lot of snow and rain in your region, then the angle of inclination is made larger. But in regions with strong winds, it is better to build a roof that has a gentle slope. Windage decreases, as does the wind load on it.
- Additional load on the roof. We are talking about additional communication devices, such as a water tank, satellite dish, chimney or ventilation pipe.
Note! It is better to entrust all calculations to a specialist.
This is a crucial moment that must be verified correctly. Taking into account all the data listed above, he can make a corresponding drawing with all the exact instructions: the selected slope angle and other design parameters. Based on the drawings, all the work is done.
How much does it cost to build an attic
The construction of an attic floor is considered profitable due to the fact that there is no need to spend money on erecting walls. This is only partly true.
Firstly, a lot of money will be spent on creating a rafter system. Its cost depends on the type of mansard roof chosen (see below) and on the price of lumber in your region.
Secondly, you will have to shell out a considerable amount of money. It is clear that roofing material alone is far from sufficient to ensure the required air conditions for residential premises (if the attic is planned for residential use). It will be necessary to insulate, and the layer of insulation should be significant. For example, for central Russia, the layer of high-density mineral wool should be from 200 mm, plus a layer of waterproofing and vapor barrier.
Thirdly, windows are much more expensive. If you make them auditory, you build a special structure from rafters, which complicates the roof topography, and therefore increases the cost of materials and installation. Even on an ordinary gable roof you have to think about constructing valleys and retaining snow above the windows.
The second option - windows in the roof plane - require particularly careful sealing so that precipitation cannot get inside. This makes installation 1.5-2 times more expensive. The windows themselves cost about the same amount: they must have a reinforced frame and reinforced glass that can withstand snow loads. In addition, for maintenance the frame must be rotary, and this further increases the cost.
There are two types of windows in the attic - vertical and in the plane of the roof. Both types can be used in the same project. The photo below is a good example of such a combination. You can’t really say that the house is unmemorable. How many more options could there be?
Attic roofing in several levels is also a common technique
In addition, such popular and inexpensive roofing coverings - metal-based materials such as corrugated sheets, metal tiles, roofing iron - are not recommended to be used when installing the attic roof of a private house. There are two reasons:
- High thermal conductivity. Due to the fact that metal conducts heat very well, it is necessary to lay a large thickness of thermal insulation materials. Otherwise, the attic will be too hot in the summer and cold in the winter. Increased noise level created by the coating during rain. Even an ordinary roof covered with metal sounds like a drum when it rains. The attic room is much larger in area and the “tool” is more powerful. If you can combat the noise level indoors with additional sound insulation, then you can’t do anything to reduce the sound outside. If the neighbors' houses are located at a considerable distance, this may not be a problem, but if the buildings are dense, conflicts may arise.
If you do the math, additional thermal insulation and sound insulation will minimize the cost savings when purchasing roofing material. Perhaps another, initially more expensive roofing covering will turn out to be more profitable as a result. So here you need to calculate your options.
All this was described so that you have a more complete idea of whether building an attic floor is really that cheap. It turns out - not very good. Nevertheless, this solution has its advantages:
- The attic floor turns out to be light. Therefore, the foundation for private houses will require only a little more powerful than when constructing one floor. Since the cost of the foundation is a significant part of the cost, the gain here is tangible. If there is a shortage of funds, insulating the attic and putting it into operation can be delayed for the required period. Moreover, this delay will be useful. That's why. During construction, wood with high humidity is almost always used. If you start insulation right away, moisture will be absorbed into the insulation. If the “pie” is done correctly, it will go away naturally. But if there are violations, problems may arise. If the roof under the roofing material stands for some time without insulation (but with waterproofing installed under the roofing), then the wood will dry well and there will be fewer problems. The attic allows you to make your house original and non-standard. In any case, the building turns out to be more expressive and individual - there are a lot of design options.
We tried to describe as fully as possible the disadvantages of a mansard roof and its advantages. If the difficulties do not frighten you, choose which design you prefer.
Types of mansard roofs
The attic type roof used in the construction of private houses has various design options. You can make all existing types of roofs, except, perhaps, flat. All others can be implemented both in “pure” form and in combination.
Single-pitch
Houses with pitched mansard roofs look unusual. Its device is the simplest due to the lack of a ridge and the problems associated with its arrangement. The beams rest on a mauerlat mounted on multi-level walls. The bevel is formed due to the difference in height of two opposite walls. In this case, the slope angle should be in the region of 35°-45°. A smaller slope will lead to the accumulation of a large amount of snow, which requires strengthening the load-bearing beams and installing additional supports, and this reduces the already not very large living area in such an attic floor.
If we talk about the external design of the house, the buildings look non-standard. Most often, a large window is made in the high wall of the attic floor: the structure itself is conducive to this. See the photo below for examples.
The construction of a pitched roof is the cheapest if the distance between two opposite walls does not exceed 4.5 meters: you can lay standard-length beams on the walls and not make supporting structures. Apparently this is the reason for the decision in the photographs below, but it turned out very interesting.
If the distance between the walls is smaller, the design is quite simple
Gable
The gable mansard roof is the most widespread: given the general structure, there can be many solutions. The design itself is the most optimal: at relatively low costs it allows you to satisfy various requirements for the required room area.
The easiest way to implement an attic is under a regular gable roof, but its height must be sufficient so that a living space can be allocated under it (if the floor is intended to be residential). May be:
- symmetrical - the ridge is located above the middle of the building; asymmetrical - the skate is offset from the center.
The gables are straight. The room turns out to be trapezoidal; in fairly wide buildings it can be square. The disadvantage of a gable roof of the mansard type is that a large space is cut off on the sides, which is not always acceptable in private houses. To prevent large areas from being wasted, they are used for storage rooms or closets.
With this arrangement, windows are made in the roof; their location depends on the angle of inclination. They can be auditory, as in the photo above, or in the plane of the roof, as in the photo below.
There is another option for installing an attic roof for a private house with two slopes - a one and a half floor. It is installed on walls that have been raised to a certain level. The house is then called “one and a half stories high” (one of these houses is pictured above).
These are two types of gable mansard roofs. There is also a third one - broken ones. They can be separated into a separate category - the device has significant differences.
Broken
The construction of a sloping mansard roof is both more complex and simpler. Essentially these are the same two slopes, but consisting of two parts with different slopes. This structure allows, without spending money on building walls, to get a living space that is only slightly smaller than on the ground floor (by about 15%). In this sense, its structure is simpler. But the rafter system has a more complex structure, and in this sense its structure is more complex.
The design of a sloping mansard roof is the most commonly used version of the rafter system - with part of the rafters being moved beyond the surface of the wall. This creates an overhang that protects the junction with the walls from precipitation.
This type is the most common for self-construction. It easily allows you to increase the usable area, build on small buildings such as a garage, or get additional, almost separate, housing. Since the materials used in construction are usually light, the bearing capacity of the foundation is usually sufficient, but the calculation does not fit. ().
There is a small room made of logs below, and above there is a vast attic supported by racks
Four slopes
These are already complex systems that must be calculated. The surface becomes large, the cost of insulation increases significantly, and at the same time the size of the attic space decreases: parts of the rooms are cut off on all four sides.
Their advantage is their high resistance to strong winds: all surfaces are inclined and the wind load does not put so much pressure on the slopes. The structure is such that the overhangs can be made low, protecting the walls from the effects of precipitation and winds. In addition, many consider houses with such roofs to be the most attractive. The classic version of a hip roof is hip.
One of the types of hipped roofs is a hip roof with an attic space underneath. You can only stand at full height in the central part
When installing them, inclined rafters are reinforced - they account for most of the load. In general, its rafter system is one of the most complex, material-intensive and, therefore, expensive. So that you can evaluate the entire scope of work and costs, consider its design in the photo below.
The top picture shows all the stops and slopes that need to be installed; the second picture shows the structure and location of the rafters more clearly.
There is also a transitional option - half-hip. It is something between a gable and hip roof. In this case, the hip is made only for part of the floor height.
Only the main types of mansard roofs are described. There are also combinations of them. For example, a hip roof can also be a broken one, just like a single-pitched one. There really are a lot of options. The main thing is to avoid gross mistakes when developing a rafter system, and then implement everything correctly.
“Cutting” roofs into each other. L- and T-shaped roofs. Endovy
Architects call the roof the fifth facade - it is one of the most expressive elements of the house. However, here it is necessary to maintain a balance between the design solution and the functionality of the roof. From an engineering point of view, the simpler the roof, the less hassle it will cause during construction and subsequent operation. When designing a roof according to a budget option, you should, if possible, avoid a large number of valleys, height differences in the ridge, turrets and arched forms.
The drawings show the main types of simple roof structures, but this is just a sketch. To properly build a roof, a roof plan and main sections must be developed, taking into account the linear dimensions of the building and elevations.
How to build a roof plan? Let's look at this with examples (Fig. 49). Modern country houses rarely have a rectangular plan; most often they are built in the form of the letters G, T or in the shape of a cross. There are other planning solutions; now it is more important for us to understand the basic principles of constructing a roof plan. The layout of the house can be mentally divided into rectangles. We will conditionally call the largest rectangle the main room, and the smaller rectangles - extensions.
rice. 49. Building a roof plan
Having drawn a plan of the walls, step back from the wall lines by 50 cm (normative roof overhang) and draw the outer perimeter of the roof to scale. Then we draw purlins ab on the main roof, and perpendicular to it we draw purlins on the extensions cd. Now if we connect the closing angles of the main roof and the extensions, we will get a valley line - the inner corner of the intersection of the roofs. Here the slanted rafter legs will be made.
With the same height of the roof ridges, the sloped rafters are installed along the entire length of the valley and will rest on the Mauerlat and purlin of the main roof; the angles of the slopes of the main roof and extensions will be different. The slopes will only be of the same slope if the width of the extensions is equal to the width of the main room.
Shortening the purlins cd on the side of point c changes the valley lines. Its location in plan at an angle of 45° leads to the fact that the slopes of the main roof and extensions will have the same slope, but the ridge of the extension will be lower than the ridge of the main roof. By changing the angle of the valley (in plan), you can change the height of the ridge of the extension to the required value. The sloped rafter installed in the valley, in this case, will rest on the mauerlat and the extension girder.
Shortening the purlin on the side of point a or b or on both sides leads to the formation of hips on the roof. The same can be done with purlin cd; shortening it from the side of point d we get a hip on the extension. By the way, you can lengthen the purlins, then on the roof you will get triangular roof overhangs, enlarged at the ridge. If you completely “drive” the purlin, for example, purlin ab, to one point, we get a hip roof in which the slanted rafters will converge and rest on a single post.
Mansard roof with balcony
How roof windows are made has already been described above. Balconies are built using almost the same principle. There are even special window systems that allow this to be done in the surface of the slope. Although the implementation is simpler, such a window costs a lot.
If the load-bearing capacity of the walls allows, by increasing the size of the dormer window, you can make a hanging balcony.
The balcony area can be supported by columns. Only in this case the removal is made above the entrance. Then the columns fit organically and also serve as decoration.
A balcony on the pediment of a house with an attic is built according to a different principle. It is protected by an overhang extended forward; if the wall allows, the platform is made hanging.
In small houses, a balcony is often made by moving the pediment of the attic floor away from the load-bearing wall. Due to this indentation, a platform is obtained. Canopies in such roofs are made by extending the roof to at least the same level as the outer wall, and even better - further. This overhang will also protect the gable wall and reduce the amount of rain that will fall on the open area.
The design of this type of roof is such that by extending it you can even create a covered terrace. Its edge can rest on a decorative wall or on pillars.
The difficulty of this project is the long rafters
A similar idea is implemented in this project, but the roof here is multi-gable. It’s difficult to calculate it yourself, and it’s even more difficult to make valleys correctly, which is why they are rare
If we talk about non-standard solutions, then an “L”-shaped mansard roof from two lean-to roofs will turn out to be functional. In addition, this is an inexpensive way to decorate such a non-standard building.
"L" shaped single-pitched mansard roof
When building a private house, bathhouse or utility buildings, the roof truss system requires a special approach. It is important to perform the calculations correctly and prepare high-quality material for installation.
Angular roof: definition
An L-shaped roof is a structure above a house, which consists of two standard gable roofs connected to each other at right angles. That is, the most complex unit in such a structure is the joints of two gable rafter systems. Namely, their external and internal angles. However, here too it is worth remembering that an angular roof whose gables have the same width is easier to implement. That is, if the end walls of two parts of an L-shaped house also have the same width parameter.
A more complex roof will be one whose gables have different widths. In this case, the height of the ridges of both parts of the roof will be different, and this complicates the joining of the rafter legs of both parts of the structure at an angle to each other. In most cases, such a roof is made broken, where one of its gable parts is located slightly lower than its other gable part.
That is, these types of roofs are used mainly on buildings that have the shape of the letter G.
Important: with correct calculations and installation of the roof, such a rafter system is even more reliable than a simple gable roof. Since the rafter legs of the corner ceiling skeleton themselves serve as a kind of rigid support for the remaining elements.
Design of truss structure
The calculation of load-bearing structures in construction is usually performed using the limit states method, i.e. at the moment of loss of resistance by the structure under the influence of external loads up to destruction or unacceptable damage.
The rafter system reaches its limit state if:
- the strength of the structure is completely exhausted and it collapses; Deflections of the elements of the supporting frame provoke unacceptable violations in the nodes of the rafter system, and further operation of the roof is impossible without repairs.
According to building codes, the maximum permissible deflection of a rafter leg or tie is 1/200 of the length of the element. To ensure high reliability of the structure, it is recommended to design the roof taking into account the maximum permissible deflection of 1/250 of the rafter length.
The calculation of the roof truss structure is carried out taking into account the maximum loads from:
- own weight; wind pressure; snow weight; the weight of people servicing or repairing the roof (the load from a person is usually taken as 80 kgf/sq.m).
To obtain information on the basis of which calculations are made, it is necessary to have:
- SNiP for roofing structures; table for calculating the cross section of the rafter leg; table of cross-sections of rafters; climate map of the region (determination of wind and snow load).
The cross-section of the timber from which the elements of the rafter structure are made is calculated using a special formula, which takes into account the length of the rafter leg, the pitch between the rafters, and the resistance of the selected type of wood to external loads.
Tables for selecting sections of elements are used when designing simple roofing structures. Developing a roof project of complex shapes requires a professional approach.
Concept of valley
The concept of valley refers to the internal angle of the roof, which is formed at the junction of two slopes. This structural element is a key component in the design of the roofing system.
The valley is subject to significant loads, since it is more exposed to atmospheric precipitation than other roofing elements.
Such factors determine strict requirements both for the quality of roofing materials and for the technologies used to construct a valley roof. Special attention is paid to its design, be it the roof:
- cruciform;
- hip;
- gable;
- tent.
Attention. Any errors in design or construction can lead to damage to the roof - from holes to the collapse of the entire roof structure, for example, as a result of the accumulation of a large amount of snow.
Knots of the rafter system
The reliability of the truss structure is influenced by the following factors:
- correct choice of rafter system configuration; strength of connections in structural units; accuracy of engineering calculations when designing a roof; correct choice and quality of materials; installation quality.
The type of rafter system and the presence of certain element nodes is dictated by:
- designed roof shape; dimensions of the overlapped space; the presence and location of internal supports or load-bearing walls.
When building houses with a usable attic or attic floor, truss structures with layered rafters are usually used. Their main nodes include:
- support unit for rafter legs; ridge knot; “rafter-strut-post” assembly; “beam-post strut” assembly, etc.
When designing, it is important to immediately decide on the methods of fastening the elements. The choice depends on some of the characteristics of the lumber, as well as the preferences of the people conducting construction work.
Key stages of roof construction
Installation work begins after the preparation of the project, which indicates all the dimensions of the elements and their relative positions, as well as the principles of connection. In addition, you should purchase and bring the necessary building materials, tools, fasteners, etc.
The principles of constructing a pitched roof, in general, do not depend on its configuration. The work technology includes the following stages:
Before starting independent work, it is recommended to familiarize yourself with the thematic video.
Installation for soft roofing ↑
Let us dwell on the basic principles of the structure in the case of a soft roof.
Preparatory work ↑
You can design a negative fracture in a complex roof in at least two ways:
- open;
- undercut method.
The base is prepared depending on the chosen option.
- Open. Along the length of the valley, a valley carpet (KE) is laid on the lining barrier, displaced horizontally by 20–30 mm. From the inside out, along the entire perimeter, it is coated with mastic, say, bitumen TechnoNikol with a strip 100 mm wide. The layer thickness is selected in accordance with the consumption rate. On the front side, the carpet is fixed using roofing nails in increments of 200–250 mm with a distance of 20–30 mm from the edges.
- When using the “undercut” option, KE is not needed.
Open installation ↑
- ordinary tiles are laid on the KE up to the central axis;
- all tiles that cover the inner corner between the slopes are additionally secured to the upper apex using nails.
- the distance from the axis to the fastening element must be more than 0.3 m;
- then, using a coated cord, beat out two lines; ordinary tiles will be cut along them;
- the waterproofing carpet can be damaged when trimmed, so a plank is placed under each tile during work;
- before final fastening, bitumen mastic is applied to places without a self-adhesive layer;
- if the difference between the slopes of the slopes is large and, accordingly, the water flow also differs noticeably, the gutter is shifted in the direction of the lower water flow. Otherwise, water will wash away the joint between the valley carpet and the ordinary tiles;
- The width of the gutter ranges from 50–150 mm. The choice depends on the characteristics of the location of the object. If it is built in a forest thicket, it is recommended to increase the width of the gutter so that foliage can be easily washed away.
Installation using the “undercut” method ↑
- The laying of ordinary tiles begins with a slope that has a smaller angle of inclination. In this case, it is expected to enter the second slope, which is steeper. It should not be less than 300 mm.
- similar to the previous case, additional fixation of each panel in the upper corner is necessary.
- after the first slope, which has a smaller angle of inclination, is covered, a chalk line is “beaten off” on the other at a distance of 70–80 mm from the axis. This is the place where the tiles will be cut.
- This applies to each tile, and before they are finally fixed, mastic is applied to the places where there is no self-adhesive layer on the back side.
Features of a roof with a valley
The construction of a roof truss system of complex shape (multi-gable roofs) requires the creation of connections for ridges and slopes. The planes of the slopes can have different geometric shapes: triangle, rectangle, trapezoid. The endova is the junction of the slopes with the formation of a negative angle.
In the house plan, roofs with valleys look cruciform, T-shaped or L-shaped. These are the two main ways to create roof junctions. At the design stage, a roof plan (top view) is drawn up, taking into account attic and dormer windows, all junctions, roofs over terraces or verandas, indicating all linear dimensions. The general plan of the roof is divided into rectangles and squares; the main rooms and extensions are indicated on it.
On the roof plan, the main purlins should be indicated, and in the perpendicular direction, the secondary purlins over smaller rooms should be indicated. Then lines are drawn connecting the corners of the roof above the secondary rooms with the corners of the main roof. These diagonal lines indicate the location of the valleys - the internal corners formed by the junction of the slopes.
When installing a rafter system, the valleys at the joints of roofs of the same height (i.e. if the ridge girders are located at the same level) are diagonal rafters, resting with the upper end on the ridge girder, and with the lower end on the mauerlat. The installation of such rafter legs is carried out similarly to the installation of diagonal rafters for a hip roof.
Depending on the size of the extensions, the angles of the roof slopes can have different values. The geometry of the roof can be changed by shortening the size of the purlins. The angle of inclination of the valley changes accordingly. The roof truss system with a valley can be made using a spacer or non-spacer method. If spacer rafters are installed, then to relieve excess stress, a horizontal tie should be secured at the bottom of the structure.
Installation of the valley
The design and installation of a roof with valleys is quite complex. In this case, mistakes can lead to roof collapse or leaks. One of the purposes of the valley is to ensure the removal of precipitation. Valleys differ in their design:
- open; closed; intertwined.
To install a valley on mating slopes, it is necessary to install a continuous sheathing. Waterproofing is laid along a wooden gutter - it is better to lay it in two layers. Then the valley is secured with self-tapping screws. If its joints are horizontal, the overlap should be at least 100 mm (recommended value is 300 mm). If the valley is mounted on a slope with a slight angle of inclination, it is recommended to add another layer of waterproofing, and when installing the valley on a metal tile roof, additionally use a self-expanding sealant.
An open-type valley is easier to install and removes precipitation better. Closed and interlocking structures are typically used on steeply pitched roofs covered with certain roofing materials. Their disadvantages include increased costs for additional waterproofing and some installation difficulties. Intertwined and closed valleys drain precipitation worse, and in cold climates in winter they serve as a place for accumulation and compaction of snow.
Video instructions will help you understand the intricacies of constructing rafter and roof structures of the most popular types.
Author Pavlov Yuri Nikolaevich
Materials for creating a roof
Since our L-shaped roof is shaped like the letter L, and the component parts are joined at an angle of 90°, it is logical that a large number of elements will be required for the work. If we compare, the necessary materials will be spent as much as creating a hip roof. To make the design, you will need the following elements:
- Mauerlat as the basis of the roof.
This is a wooden beam that is installed around the perimeter of the entire house on the top of the wall. It is the Mauerlat that takes on the main load, distributing it along the entire perimeter. The beams are fixed with anchors to the wall. Note! If the L-shaped roof structure will be erected on a wooden house, then it is not necessary to additionally use a Mauerlat. Its role will be played by the last beam of the wall. - Run. This is the name of a long wooden beam. It fits in two parts of the house. It is placed in the center of the axes between one and the other end wall. The purlins act as a base for the vertical posts of the ridge beam. The photo shows where they are.
- Zyatyazhki. These are wooden boards that serve as stiffeners and floor beams.
- Roof support posts. This is a wooden beam laid in a vertical position. It serves as a support for the ridge run and is mounted at both ends. If we talk about an L-shaped roof, then you need 3 such support posts: one of the posts is installed at the junction of the ridges, and the other two are located at opposite ends.
- Horse. A timber purlin used for the upper base of the rafter legs.
- Main roof rafters. Wooden elements, which are installed at an angle to each other, are connected at the top point by joining (at the ridge). It turns out that two rafters installed parallel to each other form a triangular truss. Each rafter leg is mounted in increments of 50 to 70 cm. It all depends on the thickness of the roofing pie and the total weight.
- Diagonal or corner rafters. It is these rafters that are the main ones in a hip roof. You need to understand that such elements bear the load from all parts of the roof. That's why they need to be doubled in thickness. Diagonal rafters are installed along the outer and inner corners of the roof.
- Narozhniki. This is what short rafters are called. They are installed with one end resting on the corner rafter and with the other end resting on the mauerlat. The frames are mounted parallel to the main rafter legs.
- Raskosin. A wooden beam that gives the roof frame more rigidity.
- Sprengel. Another element for structural rigidity, which is mounted on the corners of the Mauerlat.
Note! To create the main structure of an L-shaped roof, a beam is used, the cross-section of which is 10x15, 15x15, 15x20 cm.
Corner rafters are created from double timber or edged boards (section 10x5 cm or 15x5 cm). If the rafters are ordinary, then it is not necessary to double the elements. All lumber should have a moisture content of no more than 15–20%. This is necessary so that the frame does not shrink too much. This may destroy the structure.