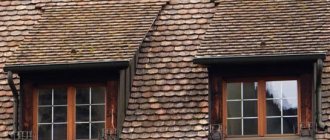
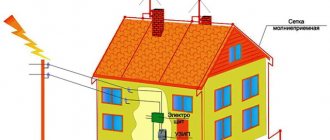
In the case where the “box” of the walls of the house has a complex configuration with various extensions, or the project involves the installation of dormer windows and remote or recessed balconies on the roof, as a rule, a multi-gable roof rafter system is chosen, which has a very complex design.
Multi-gable roof rafter system
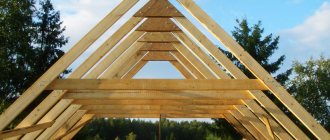
Such roofs differ from standard ones in the presence of several gables, of which there may be three or more. In addition, the multi-gable rafter system includes several sections in its design, thanks to which the house will look more presentable, especially in cases where a finish is selected for the facade of the building that matches the architectural style decision.
Variety of multi-gable roof shapes
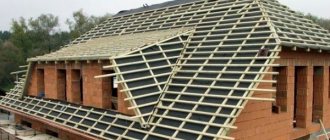
If the decision is made to create a multi-gable roof, then you cannot do without valleys.
In this case, one way or another, junctions of two slopes will appear, and you need to pay special attention to the junctions. Since these are the inner corners of the roof, the load on them will be significantly higher than on the rest of the roof.
Therefore, the correct construction of the joining of the slopes is the reliability and durability of the roof being built.
House with multi-gable roof
In another way, a multi-gable roof over a square house is also called a hip roof, since this roof option has four slopes located on opposite sides of the house. The slopes themselves are called nothing more than hips.
Such a roof requires the construction of additional gable walls, and the entire rafter system in this case becomes more complicated. In rare cases, you can find a half-hip four-gable roof, where two slopes running on the sides are slightly cut off from a large gable.
This is what explains the difference between half-hips and the main slopes; they usually have a much shorter length in the part where the slope line goes. Such half-hips can be built in the upper part of the roof, in the form of a triangle, and the gable in this case will be in the form of a trapezoid. In this case, this tong will protrude forward from the wall.
Stages of the construction process
To install a multi-gable roof with your own hands, you will need a work plan, from which it is strictly not recommended to deviate. Now let's move on to the construction stages:
- First of all, you need to take the dimensions of the house.
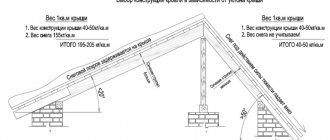
- Next, the cross-section of the rafters is determined and a scheme (project) for installing all roofing elements is developed.
Drawing of a multi-gable roof truss system - Now you can begin laying the Mauerlat, which is fixed on the reinforced belt, and installing the rafter legs. If you plan to install a half-hip or hip roof, it is necessary to install diagonal rafters reinforced with spigots.
- Metal brackets, plates or corners are used as fasteners for installing rafter legs on the mauerlat.
It is also possible to fix these elements using technological cuts. To install rafters, metal brackets, plates, and corners are used - If the house has a large area, it will most likely require the installation of ceiling beams (longitudinal or transverse) that serve as tie-downs.
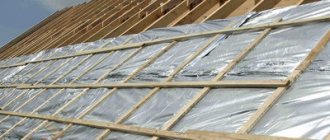
- The upper part of the rafters is attached to the ridge, then the vapor barrier material, lathing and counter-lattice (ventilation system) are laid.
Before installing the roof, a ventilation system is installed - The final stage of work is the installation of roofing material (metal, bitumen, ceramic tiles, etc.).
When installing such a complex roof with your own hands, do not forget that the attic space will require additional insulation, otherwise it cannot be used as a living space. Mineral fiber (basalt or glass wool) is best suited for such purposes. If you neglect this rule, you may encounter an accumulation of condensation in the under-roof area, which will lead to rotting of the wood from which the roof structure is assembled.
Video description
Installing the Mauerlat is a responsible procedure, since it serves as a support for the rest of the structure. For a better understanding of the Mauerlat installation method, it is recommended to watch the video:
- Laying the bed. One or two beams are placed on the central axis (or on the sides of it at a calculated distance).
- The outer stands are installed at the ends of the bed. Intermediate elements are installed between them in increments of 3-6 m, if the length of the roof allows this.
- A ridge girder is strengthened on the top of the row of posts. It is fixed with metal brackets or special corners.
- The rafters are being installed. The lower part is attached to the Mauerlat, the upper part rests on the ridge with fastening to it, or is connected to the opposite rafter leg with support on the ridge girder. The installation pitch of the rafters ranges from 0.6 -1.2 m. They are evenly distributed along the entire length of the roof.
- The rafters are strengthened with struts and crossbars according to the design diagram. If the width of the slope is large enough, the number of elements can be increased.
- Laying a vapor barrier membrane. It is placed in overlapping stripes, starting from the bottom.
Laying vapor barrierSource stroytvoydom.ru
- Installation of fillies, design of eaves overhang. Lining the bottom with boards or siding.
- On top of the rafters, a continuous plank flooring or a thinner sheathing is installed. Typically, a 40 mm thick edged board is used for it.
- Roof installation. The work is carried out in accordance with the installation technology of this coating.
The assembly procedure given is valid for any type of roof. Minor adjustments are made to it to give the desired shape or configuration.
Design nuances
Typical designs of houses with a multi-gable roof include a pitched rafter system with a slope towards the walls of the building. This makes it possible to effortlessly ensure the drainage of rain and snow removal. The structural elements that make up the roofing device are as follows:
A slope is a fragment of a roof without bends or turns; Gable (pediment) - the upper fragment of the outer wall, the boundaries of which are determined by the slopes of the roof. There is a minor difference between a gable and a gable: a gable has no cornice at the bottom; Valley (gutter) - internal corner joints of the roof that appear at the junctions of the slopes. At the end, the valley ends at the border of the pediment. The valley is the most loaded part of the roof structure, as snow and rain streams constantly collect in the inner corners (see photo above)
During construction work, it is this area that needs to be given special attention in order to avoid problems associated with leaks in the future. Rib (ridge - a horizontally located joint that is formed when connecting adjacent slopes; The overhang provides the connection of a roof fragment with a width of 300-500 mm. The main function of the overhang is to protect the building from rain and snow, the maximum possible drainage of rain and melt water; The drainage system drains water from roofing into the drainage system; The junction is a fragment of the junction of the slopes with the outer wall.
Valley roof
Pediment elements
- Skate;
- Pediment detail - wind or end batten;
- Lower valley;
- Upper valley;
- Drip edge - cornice strip;
- Snow retention bar;
- Adjacent strip;
- Ventilation shaft cover;
- Low tide on the window;
- Pediment L-strap for external roof corners;
- Soffit;
- Ventilation duct covered with corrugated sheet;
- Window in the attic;
- Wall J-channel;
- Gutter.
Elements of a multi-slope roof
Octagonal roof - photo The slope angle at which the multi-gable roof rafter system is erected and the roofing covering is laid is calculated when drawing up the project, and depends on the following parameters:
- Climatic conditions in the region;
- Roofing and other materials used;
- Architecture of the house.
The simplest solution when building a multi-gable roof is two gable planes adjacent to each other at an angle of 900 (see photo below). The top view clearly shows the cruciform shape of the roof. This design is welcome not only in a single version - you can combine several such pitched structures on the roof of one house at once. This technique is designed to construct original gable roofs that improve the design and architecture of the building.
4 stingrays
Stages of the construction process
To install a multi-gable roof with your own hands, you will need a work plan, from which it is strictly not recommended to deviate. Now let's move on to the construction stages:
- First of all, you need to take the dimensions of the house.
- Next, the cross-section of the rafters is determined and a scheme (project) for installing all roofing elements is developed.
Drawing of a multi-gable roof truss system
Now you can begin laying the Mauerlat, which is fixed on the reinforced belt, and installing the rafter legs. If you plan to install a half-hip or hip roof, it is necessary to install diagonal rafters reinforced with spigots. Metal brackets, plates or corners are used as fasteners for installing rafter legs on the mauerlat. It is also possible to fix these elements using technological cuts.
To install rafters, metal brackets, plates, and corners are used
If the house has a large area, it will most likely require the installation of ceiling beams (longitudinal or transverse) that serve as tie-downs. The upper part of the rafters is attached to the ridge, then the vapor barrier material, lathing and counter-lattice (ventilation system) are laid.
Before installing the roof, a ventilation system is installed
The final stage of work is the installation of roofing material (metal, bitumen, ceramic tiles, etc.).
https://youtube.com/watch?v=17lft-kzOjk
When installing such a complex roof with your own hands, do not forget that the attic space will require additional insulation, otherwise it cannot be used as a living space. Mineral fiber (basalt or glass wool) is best suited for such purposes. If you neglect this rule, you may encounter an accumulation of condensation in the under-roof area, which will lead to rotting of the wood from which the roof structure is assembled.
Briefly about the main thing
Installation of the rafter system is the main stage of roof construction. This is a supporting structure that receives and distributes snow and wind loads, holds the roofing in a given position, and protects the walls and foundation of the house from moisture.
The rafters include many elements, each of which performs its own task. Some serve as a frame for the perimeter of the walls, others support the rafter legs, and others connect them and keep them motionless. The result is a strong, balanced structure that is light in weight. And the load-bearing capacity is very significant.
The elements of the system can be connected in several ways, which allows you to obtain different roof designs. The choice of one form or another is made at the design stage, but, if necessary, you can change the shape and configuration of individual sections or the entire roof.
It is recommended to entrust installation to experienced specialists who can perform the assembly correctly and avoid mistakes.
Brief step-by-step instructions for construction
Installation of a multi-gable structure must be carried out in strict accordance with the design documentation.
All work is carried out in stages.
- Climatic data that is typical for the region of the facility under construction is collected. This information is taken into account when carrying out technical calculations and developing the project.
- Object design and calculations. It is better to entrust a thorough preliminary calculation of all components of the roof to experienced specialists. In addition, it is necessary to determine in advance the types and volumes of materials that will be used in construction.
- A Mauerlat is laid around the perimeter of the building.
- Vertical support posts are installed and horizontal beams are mounted - purlins that form the ridge.
- Installation of main and additional supports forming the transitions of the planes.
- The posts and rafters are reinforced with rafter legs or struts. They help distribute the load evenly and also prevent structures from sagging.
- The elements are connected using metal fasteners - plates, brackets, threaded rods or anchors. To strengthen the connection of the boards, wooden bosses are used.
- On top (along the rafters) lathing in the form of horizontal strips is laid.
Waterproofing and protecting attics from heat loss
Roll waterproofing is laid in overlapping strips and perpendicular to the direction of the roof slope. An overlap of at least 15 cm in width must be made. The joints of the strips are glued together using a special adhesive tape or construction tape
Particular attention is paid to valleys, as they receive the largest amount of rain or melt water, and therefore are the most vulnerable place
It should be noted that traditional waterproofing products in the form of roofing felt or glassine can no longer provide long service life and strength. They do not fully comply with modern standards of environmental cleanliness and safety. Therefore, membrane materials are becoming increasingly widespread. In addition to their main function, they are able to significantly reduce heat loss by increasing the thickness of the insulation to the full height of the rafters.
The construction of a multi-gable roof involves the formation of an attic space spacious enough to accommodate residential or utility rooms. Therefore, the roof must be well insulated and insulated from excess moisture entering it. Insulation based on mineral wool is ideal for this. They prevent the appearance of “cold zones” where condensation can form. Among the features, it is worth noting the particularly soft structure, which allows the use of this material in hard-to-reach areas.
For the production of mineral insulation, glass or basalt is used. Their undoubted advantage is the simultaneous combination of the following properties:
- ease;
- fire resistance;
- environmental friendliness.
In addition to all of the above, this type of building material is distinguished by a high degree of sound absorption and sound insulation, which is especially important during heavy rain or hail.
Step-by-step process for constructing a multi-gable roof
The assembly of the multi-gable roof is carried out in compliance with the requirements specified in the project. The steps are as follows:
- First, it is necessary to systematize climate data in the region; climate data will be useful in calculations and in the preparation of project documentation;
- Project development and calculation of building materials, drawing up project estimates. This step is quite difficult to complete on your own, so don’t skimp – leave the job in the hands of professionals. It is also recommended to first make a list of construction materials, their quantity and approximate dimensions;
- The first practical step is to fasten the Mauerlat along the perimeter of the external walls of the house;
- Installation of vertical supports and fastening of horizontal purlins to form the ridge;
- Assembly of support beams that determine the shape of the transition and the joining of the slopes;
- The rafter structure is strengthened with the help of struts for a more even distribution of loads;
- Parts are fastened with metal hardware - steel plates, brackets, threaded rods or anchors;
- A frame of slats for fastening the roofing material is assembled on the rafters along the outside.
Elements of roof and multi-gable roof construction The design of the frame is determined by the choice of roof covering. When installing a soft roof, it is better to mount a continuous frame, without gaps. If the roof will be covered with rigid roofing materials (metal tiles, corrugated sheets, corrugated sheets), it is allowed to make gaps between slats or boards in the frame.
Let's sum it up
A multi-gable roof is a technically complex structure, for the proper construction of which accurate calculations and knowledge of installation nuances are especially important.
Such roofs look great both on square or rectangular buildings, allowing them to acquire a more interesting appearance, and on houses of complex shape, when this is the only possible option for arranging the roof.
It is important to remember that any complication of the roof structure does not have the best effect on the cost and strength of the roof. Any element of the roof should, first of all, be of practical benefit, and not be built to please taste.
Peculiarities
A multi-gable roof is a complex structure that consists of several interconnected roofs, which is why it has more than two gables and more than two slopes. A house with such a roof resembles a fairy-tale tower or palace. Despite the complex installation and the large amount of resources spent on the device, this design solution is often used in private housing construction due to its high decorative effect. The construction of a multi-gable roof is carried out in the following cases:
- Initially. Then, when creating a project, an accurate calculation of the loads on the roof is carried out, a diagram of the rafter frame is created, and then the installation itself takes place.
- During the reconstruction of a structure. A house often grows with its owners, adding the necessary living space as needed. To “make friends” the roof of the main structure and the extension, a multi-gable roof structure is installed.
- When organizing vertical lighting in the attic. The installation of a multi-gable roof is carried out in order to abandon expensive roof windows in favor of more affordable conventional ones.
- During the construction of buildings with complex layouts. If the house has many rooms or a complex shape, then the multi-gable design allows you to cover them more aesthetically.
Advantages and disadvantages
The advantages of such roofs include:
- Aesthetics and variety of design options.
- Good self-supporting ability, strength and stability.
- Possibility of laying under the roof of residential premises due to the large share of “useful” volume and installing windows in numerous gables.
- Compatible with houses of different floors, heights and styles.
- Overall balance of the frame.
The disadvantages are obvious:
- Roofs have a complex configuration and require an individual approach to design and installation.
- Construction is accompanied by the generation of a large amount of waste materials, which negatively affects the cost estimate and construction time.
- When laying such roofs, the requirements for the foundation, load-bearing walls and gables are significantly tightened (how to lay a gable from an aerated block with your own hands?).
- Many roofers consider the presence of valleys and the need for their enhanced sealing to be a disadvantage.
Features of designing multi-gable roofs
It is believed that the installation of a multi-gable roof should be carried out on those houses that have a very non-trivial layout in their design features. It is also used in cases where it is necessary to increase the attic space, creating more space for additional living spaces.
A multi-gable roof over a square house is the most common option, and much less often the base of the roof has the shape of a polygon, as this requires additional calculations. If the roof design involves the use of slopes in the form of equilateral triangles, then their vertices should converge at the same point.
Today there are ready-made projects of various forms of multi-gable roofs. If we talk, for example, about a hipped hip roof, then this structure must have valleys. A necessary condition in this case will be the presence of a ventilated attic space; it must be completely isolated from other warm rooms.
Another point to consider is that such roofs consume more building materials, i.e. After installation, quite a lot of waste remains.
If we consider, for example, the construction of a half-hip roof, then its main feature is the installation of several rafters. Such a design will be quite complex to implement, and this must be remembered.
When making such a design, the number of slopes obtained also gives a certain number of internal corners, the so-called valleys. This is a necessary element of the roof, because it is along the valleys that unnecessary precipitation rolls off
Therefore, you need to pay special attention to this particular element, which is necessary for insulation from water.
Valleys are also characterized by the fact that in these places the probability of snow accumulation in winter is greatest, which can lead to additional load on the roof. Therefore, in winter, the roof (multi-gable) must be periodically cleaned, freeing it from excess precipitation.
Basic roof elements
Scheme of a four-gable roof
The structural diagram of a four-gable roof consists of the following elements:
- inclined planes - slopes;
- rafters;
- lathing;
- Mauerlat;
- horizontal and inclined ribs;
- skate;
- valleys;
- grooves;
- overhangs;
- gutters.
Installing a multi-gable roof is a rather labor-intensive process, since additional diagonal rafters should be installed at the intersection of the slopes when constructing such a structure.
In this case, elements such as grooves are formed, which are also called “snow bags”
And when installing a roof, special attention should be paid to these elements, since if the installation is poor, the roof will definitely leak in these places
Technology of the rafter system
An example of a rafter system for a multi-gable roof
In private houses, the roof options for houses can contain a whole complex of roofs of different types, which are combined under one roofing structure. Naturally, anyone who is not a professional in installing roofs may be faced with the question of how and where to start constructing this complex structure.
Roofs differ from each other in their purpose. They can have different appearances and include roof windows, the installation of which will require not only additional slopes, but also valleys and rafters, ribs and sheathing, made in minimal sizes.
The installation of a multi-gable roof over a square house begins with laying the Mauerlat, which is the basic element of the entire rafter system. Moreover, this does not depend on its complexity and on what roofing options you use for your home. After all, the transfer of forces from the rafters to the load-bearing walls of the house is carried out exclusively through an element such as the Mauerlat.
In order not to worry about the fact that the walls may move apart over time due to these efforts, the Mauerlat is firmly and very securely fastened to a reinforced belt, which is erected during the laying of load-bearing walls. Only after this the rafter legs are installed.
When the house is large, it is possible to install ceiling beams, which can be longitudinal or transverse. It often takes on the function of puffs.
Rafter legs, as a rule, have a normal appearance. In the case where the roof is of a hip or half-hip type, the rafter legs can be made diagonal (sloping).
In this situation, it is necessary to strengthen the slanted or diagonal rafters by installing spigots. The roof design allows that the rafters in this case can be double or paired.
The rafters are attached to the mauerlat in such a way that special sawing is done, and metal brackets, plates and corners are also used. The fastening is chosen depending on what type of rafters will be chosen in a particular case.
The connection of the rafters is made at the top point of the roof in the area of the ridge, which is made of timber or formed using two upper sheathing boards.
Vapor barriers, battens and counter-battens are installed along the rafters. What type of lathing will be, and at what step it will be installed, depends on the material of the finishing coating.
For soft surfaces, you need to make a continuous flooring. When covering with profiled metal, the lathing must be made sparse.
The material for the rafter system is coniferous wood (spruce, pine). The moisture content of the wood at the time of starting work on the roof can be within 18-20%.
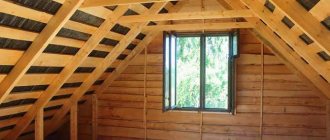
For attic rooms, additional slopes, the same valleys and ribs, as well as rafters and sheathing are required
Due to their structural design, multi-gable roofs often contain an attic space located in the attic space. For this reason, the roof needs good insulation, as well as enhanced protection against the penetration of external moisture into it.
As insulation, you can use a material made from mineral fibers (glass or basalt). They have a soft structure that allows them to penetrate the most inaccessible and complex places in the roof structure. The roof plan helps to anticipate where cold bridges may occur. They, in turn, inevitably lead to the formation of unwanted strong condensation. Moisture accumulating in the under-roof space affects the quality of the thermal insulation. At the same time, processes begin that lead to rotting of roofing elements made of wood.
After installing the rafter system, a waterproofing film is laid. This is done in the form of strips, which are located in the direction perpendicular to the slope and have an overlap of at least 15 centimeters. The joints must be glued using connecting tapes.
Options for roofs of houses with multi-gable roofs are distinguished by their diversity and complexity of design. Those who are not familiar with the drawings and do not have special knowledge may find it difficult to cope with such a difficult and responsible task. Therefore, it would be wise to entrust your architectural masterpiece to experienced professionals.
Advantages
The installation of a multi-gable roof is characterized by increased complexity, however, its installation can be beneficial if the calculation is carried out correctly and the slope of the slopes is determined. This design is more expensive than other types of roofs, but its original appearance pays off the costs a hundredfold. The advantages of multi-gable roofs are:
- Space saving. The multi-gable type design allows for more efficient use of the under-roof space for organizing an attic than other types of roofs.
- Possibility of using vertical lighting in the attic. If the house is equipped with an attic, then most often it is necessary to install skylights, which are expensive but provide little light. Vertical lighting mounted on additional tongs successfully solves this problem.
- Improved water outflow and snow removal. Steep slopes allow snow and water to slide off the roof by gravity, making it easier to maintain.
- Spectacular appearance. A house with a multi-gable roof compares favorably with its “neighbors” of the same type; with the help of this architectural element it gains individuality.
Please note that a multi-gable roof, if calculated and installed correctly, can withstand intense weight, wind and snow loads. However, many additional elements lead to the fact that it weighs more than other types of roofing.
Multi-gable roof frame
Roof units
Installation of the rafter frame
Roof rafter system
The basis of a multi-gable roof is the Mauerlat. The base element is subject to high load, so a beam with a cross section of 150x150 mm is used for it. It is attached to the walls of the building with anchors laid during the construction of the house. The rafters rest on the mauerlat. Rafters can be layered or hanging. Their choice is determined by design features.
In the case of hip and half-hip roofs, diagonal rafter legs are installed at the junction of the slopes. These elements bear the main load, so they require reinforcement by specialists. Such rafters can be made double, connected from two boards 150x50 mm. Rafter legs, reinforced with struts and crossbars, form trusses. To ensure the attractive appearance of a multi-gable roof and the necessary structural rigidity, all truss parts are made using templates. Beginning builders can assemble trusses not by cutting them, but by fastening them with overhead metal elements.
After installing the rafters, the sheathing is placed on them; at the joints of the slopes, where the valleys are located, it is continuous. The waterproofing scheme for the internal corner provides for laying an additional layer to ensure the reliability of the structure. Waterproofing is laid on the boards and the bottom strip is mounted. If the valley consists of several parts, they are attached from below, with the upper part covering the edge of the lower element. The junction of the bottom strip and the roofing is insulated. To give the structure a finished look, a top valley strip is installed.
Related article: Soft roof installation technology flat roof
Laying the Mauerlat
Installation of the rafter system of a low-rise building begins with laying the mauerlat. This term refers to the support beam, which is mounted on the upper frame of the load-bearing walls where the roof slope rests on them. The number of mauerlat bars involved in the design always coincides with the number of slopes. The Mauerlat is made from thick wooden beams 10-15 cm thick. The laying of this frame element is carried out in accordance with the following rules:
- The Mauerlat is installed only if the frame of the house is made of brick, concrete, gas silicate, or foam block. In wooden buildings, the role of the mauerlat is played by the upper crowns of the frame, firmly fixed with metal brackets or dowels.
- Some types of layered rafter systems do not provide for the installation of a Mauerlat, since they do not exert a bursting load on the walls of the structure.
- Strong waterproofing is always laid between the wall of the house and the mauerlat to prevent condensation from settling or rotting of the wood. For these purposes, use glassine, roofing felt or roofing felt.
- It is not allowed to make a tie-in under the rafter legs in the mauerlat, since each violation of the integrity reduces the strength of the beam.
- The Mauerlat beam is fastened using studs embedded in the wall of the house, or long anchor bolts.
Rules for installing the Mauerlat