Lightning is an electrical spark charge accompanied by a bright flash of light. A lightning strike can lead to the most devastating consequences, as it is accompanied by the release of a large amount of thermal energy, which often leads to fires.
However, the most dangerous consequence of lightning is not the destruction of property, but the danger to human life and health. Thousands of people die or become disabled from lightning strikes every year. Properly installed lightning protection in a private home is the most important measure to ensure the safety of residents and the safety of property.
Types of lightning damage
There are two factors for being struck by lightning:
- Primary factor. Direct hit to the building. As a result, some degree of damage to the structure of the house occurs. In some cases, a fire may occur. The primary factor is the most dangerous, since we are talking about a direct blow.
- Secondary factor. Does not pose an immediate threat to residents. The negative impact comes down to the occurrence of electromagnetic induction in the electrical wiring of the building. The result of the impact of the secondary factor is a powerful voltage drop, as a result of which the microcircuits melt and electrical appliances fail.
To protect yourself from the secondary factor, it is enough to turn off electrical appliances during a thunderstorm. Lightning protection at home is the only way to protect yourself from the primary factor.
Lightning, although a strong electrical discharge, always follows the path of least resistance. The main task of lightning protection is to transfer the strike from the protected object to another environment. The protective system transfers the electrical discharge to the ground, and the building remains unharmed.
What is thunder
Thunder is air waves that appear as a result of a sharp increase in air pressure after the contact of a lightning discharge. The current strength in lightning can reach 500 thousand amperes, and the voltage can reach several million volts. Such a powerful eclectic discharge causes the air to heat up to high temperatures, and its volume sharply increases. As a result, sound waves from lightning arise, which are called thunder. Thunder is a consequence of lightning and does not pose any danger to the house; buildings must be protected not from it, but from lightning.
Thunder
Accordingly, build not a lightning rod, but a lightning rod.
Lightning rod
Types of lightning protection
Lightning protection systems are divided according to several criteria. According to the protection method, lightning rods are usually divided into two types:
- active;
- passive.
Active systems are a recent invention. Their essence is the presence of an ionizer in the lightning rod, which emits pulses and thereby attracts lightning. The receiver “pulls” the lightning towards itself, as a result of which the protected objects escape from the strike. Active protection equipment is expensive and is installed exclusively by specialists.
Another type of protection is passive. Such systems include an air terminal, a down conductor and a ground electrode. This is the most common type of security systems. The task of passive protection is to absorb a lightning strike and divert the discharge into the ground.
Another criterion is the type of protection. There are external and internal protection. The external one protects the building from direct lightning strikes, and the internal one protects electrical networks from overvoltage.
The last criterion is the design features of the lightning rod. Devices are divided into pin, cable and mesh.
Where can I buy
You can purchase protection devices as quickly as possible at your nearest specialty store. The optimal option, in terms of price-quality ratio, remains purchasing from the AliExpress online store. Mandatory long waits for parcels from China are a thing of the past, because now many goods are in intermediate warehouses in destination countries: for example, when ordering, you can select the “Delivery from the Russian Federation” option:
| Surge protection PV SPD, 500-1000V, 20-60KA | Surge protection device, 10KA | Lightning protection device up to 80KA |
| High quality brass roof zipper rod | Lightning protection for antenna | Lightning protection switch |
Lightning protection design
The lightning protection system consists of three components - an air terminal, a down conductor and a grounding conductor.
Lightning rod
The device is designed to receive a lightning strike. It is installed on the roof of the building so that the lightning rod is the highest point. The simplest type of receiver in terms of design is a rod one: a metal rod with a diameter of 10 to 18 millimeters and a length of 2.5 meters. A hollow metal pipe can also be used as a rod receiver, but its ends must be welded.
The number of lightning rods depends on the scale of the structure. For small buildings, one pin is sufficient, although it is recommended to provide two receivers. For buildings over 200 square meters, 2 - 3 or more rods will be needed.
To prevent the charge from transferring directly to the building, the lightning rod is fixed to the roof using wooden blocks or special clamps. The device is sometimes placed on a separate support near the building. In the latter case, they are guided by the reluctance to spoil the appearance of the roof. An exotic, but quite effective solution is to install the receiver on a tall tree. The main thing is that the device is located above the highest point of the building.
A less common type of receiver is the cable system. A cable is used, stretched along the entire length of the roof ridge and fixed on wooden supports. The cable must not come into contact with the roof material.
Another type of receiver is a mesh receiver. Made from metal wire with a 6 mm cross-section. The wire is stretched across the entire roof and attached to wooden supports at a distance of 6 - 10 cm from the roof.
Down conductors
The purpose of the down conductor is to transport an electric charge from the lightning rod to the grounding device. The current conductor is usually a metal wire with a diameter of more than 6 millimeters. A steel tape with a thickness of 2 millimeters and a width of 25 - 30 millimeters is suitable.
On walls made of non-flammable material, the down conductor is fixed in an arbitrary location. Areas near window and door openings should be avoided. The down conductor is attached to the lightning rod by welding, bolting or soldering.
The number of down conductors is determined by the number of receivers and their type. One tap is required for one rod receiver. For each cable or mesh device, two down conductors are required.
Ground electrode
The device is made of two steel rods. They are buried in the ground to a depth of 2 - 3 meters. There is at least a distance of 3 m between the rods. The rods are connected by a jumper at a depth of 50 - 80 centimeters in the ground. The current conductor is attached to the jumper.
Note! If groundwater is close, the ground electrode is placed horizontally at a depth of at least 80 centimeters.
Installation of rod lightning rod
This type of lightning rod has the form of a metal pin, the length of which ranges from 30 to 160 cm. You can use a pipe, but the upper end must be welded by mounting a plug.
The support for the rod lightning rod can be:
- A tall mast located directly on the ground;
- TV antenna;
- A tree that is taller than a house;
- Roof frame.
The lightning rod is attached to the mast by welding or bolts. Next, a down conductor is installed. When the work is completed, the resistance of the finished structure must be checked, which should not be more than 10 ohms.
Installation of lightning protection
Installation work is carried out according to the prepared project. In the process of creating a plan, you need to perform a number of actions:
- Make a choice in favor of any of the receiver designs (rod, cable or mesh).
- Determine the mounting height of the rod.
- Find a place to install a grounding device. It is installed at a distance of at least one meter from the walls of the building and no closer than 5 meters from the paths and entrance to the house. There should not be playgrounds, recreational areas, etc. near the grounding loop.
- Calculate the distance from the receiver to the most distant point of the ground loop.
- Select construction materials for the manufacture of the system.
To complete the installation you will need a bayonet shovel, a welding machine, plastic clamps for the down conductor, a hammer and an electric drill.
First, they dig a trench to place a ground electrode in it. The trench is made in the form of an even three-meter line or triangle. If a line is selected, the electrodes are installed in the ground at the ends of the trench. The electrodes are combined with a metal rod and then secured by welding. In the case of a triangular shape, three electrodes are installed at the tops of the shape and combined into a metal structure using a welding machine.
Grounding is located at a depth of approximately 80 centimeters. Constantly damp soil is preferable. Dry soils will require regular moistening. To improve the electrical conductivity of sandy soil, it is treated with a saline solution.
One end of the down conductor is welded to a lightning rod, and the other to a grounding conductor. It is important to ensure that the down conductor adheres along the entire length of the jumper between the rods. The down conductor must be welded in several places. Welding areas are painted with anti-corrosion paint and varnish material.
The down conductor must not come into contact with the walls of the building. Its fixation is carried out with non-conductive fasteners. The distance between the wall and the down conductor should not be less than 10 centimeters.
Installing a cable receiver
The steel cable is pulled over several metal masts (their number ranges from 2 to 4, depending on the size of the roof). The masts are installed on wooden blocks to avoid contact with the roofing material (we are talking about metal). The ends of the cable are attached to the masts, which must be perfectly tensioned. A down conductor is welded to one end of the cable. Instead of welding, a bolted connection is suitable.
If there is a chimney, wrap the cable around it several times. The ends of the cable are attached to the already installed receiver.
Installing the Rod Receiver
The basis of the rod system will be a steel pin with a length of 40 to 150 centimeters or a pipe. The following elements can serve as support for the receiver:
- a tall mast standing on the ground;
- TV antenna;
- tall tree;
- bed.
The receiver pin is attached to the mast using a welding machine or bolts, after which a down conductor is installed.
Note! After completing the installation work, it is necessary to test the system resistance. The indicator should be less than 10 ohms.
Installation of cable lightning rod
The receiving device is a metal cable placed horizontally above the ridge, where two or four masts are mounted, attached to wooden beams. The ends of the cable are attached to the masts, and sagging is eliminated. A down conductor is secured to one end of the cable with bolts or welding.
If there is a chimney on the roof, then you need to make several turns of the cable around it, and then fasten its ends to a horizontal lightning rod system.
To use a wire as a lightning rod, its diameter must exceed 6 mm.
Tips for caring for lightning protection
In order for the lightning protection system to remain in good condition, it requires maintenance. It is recommended to carry out the following activities:
- Every year, check all system components for functionality. This should be done in the spring - after the end of the winter season.
- Check the material for rust. If necessary, replace rusted elements.
- Once every 2–3 years, paint the lightning protection parts, clean the contacts, and test the connections for functionality.
- Every 5 years, dig out the ground electrode and check its technical condition.
Video description
Watch the video on how to inexpensively make a lightning rod with your own hands:
Advice! The protective area in space is the shape of a cone with the apex at the peak point of the receiver and the base in the form of the calculated radius. Knowing this allows you to choose the only correct way to install a lightning rod in a private house so that it protects nearby buildings - a greenhouse, a bathhouse, a garage, a barn, a gazebo, etc.
Selection of materials
You can effectively solve the problem of how to make a lightning rod in a wooden house if you choose the right materials. It is recommended to use copper, steel or aluminum as conductors. For example, to build a standard pin lightning rod, you will need to purchase the following consumables:
- Steel rod for the receiver with a diameter of at least 50 mm².
- Copper wire for down conductor with a cross section of 16 mm².
- Asbestos cement pipe of suitable height.
- Copper pins for ground loop.
- Fastening elements.
It is cheaper to use steel to construct a lightning rod for a private house, but copper has the best conductive properties and requires a smaller cross-sectional area of conductors, which means the installation will be easier and faster.
Rod for lightning rod Source ytimg.com
Internal home protection
Passive external protection works around the clock; it does not need to be constantly monitored for serviceability. However, when a lightning strike enters an area inaccessible to a lightning rod and electromagnetic induction occurs, all equipment in the house is at risk. To ensure high safety, not only external protection is needed, but also an internal safety system.
Internal protection involves taking measures aimed at preventing overvoltage in electrical networks. Overvoltage occurs as a consequence of a lightning strike when currents are directed through inductive and resistive connections. The result of overvoltage will be the melting of microcircuits and breakdown of electrical appliances in the country house or in the apartment.
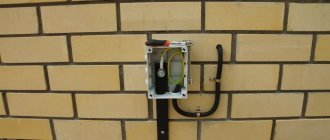
Internal lightning protection consists of using a special device - a surge protection device (abbreviated SPD). There are several classes of such equipment. The first class is designed for protection against direct lightning strikes. Installed at the entrance to the building in the input distribution device or switchboard. The second class of devices helps cope with switching interference. Class 1+2 equipment is produced, designed to protect small buildings, including residential buildings.
To truly reliably protect against lightning strikes, it is recommended to use a set of measures: an external passive system must be combined with an active one. You can install a lightning rod system either with your own hands or by hiring specialists. If you also install internal protection for your home, you don’t have to worry about your household appliances during a thunderstorm.
DIY making
There are many folk ways to make a lightning rod at your dacha with your own hands. It is best to entrust this matter to a professional team specially engaged in the installation of protective anti-lightning systems. However, for those who decide to act independently, it is recommended to follow a proven algorithm. First, you need to correctly calculate the design, then select the right materials, as well as determine the installation location, and only then proceed with the installation procedures. Let's look at each of these stages in detail.
Correct calculation
The first thing you should start building lightning protection with is determining the height of the top point of the receiver. The easiest way is to calculate it for the pin modification using the following formula:
H=(Rx+1.63Hx)/1.5
H – distance from the ground surface of the highest point of the receiver,
Hx – height of the ridge of the house,
Rх – protective radius of action,
The numbers 1.5 and 1.63 are calculated coefficients.
For example, if it is necessary to create protection within a radius of 15 meters on a site with a house 7 meters high, the height of the top point of the lightning rod, according to the formula, should be:
(15+7x1.63)/1.5=17.6 meters.
In this case, it is necessary to take into account that the protective zone in space has the shape of a cone with its apex at the receiver’s peak point and its base.
PT beam with PC slab
• PC slab is sometimes used in conjunction with PT beam to optimize design and performance under certain favorable conditions: - To reduce time. Construction of floor formwork due to the very high floor height. - To improve the efficiency of slab design, when a deep section PC element (e.g. double tee) is considered more efficient than a PT slab. — Overcome the difficult problem associated with on-site construction. • To ensure best slab performance, it is best to pour concrete for both the monolithic beam and the PC floor slab in one operation. • The above construction sequence will give the following advantages: – Better connection between beam and slab, hence minimizing rotational cracks at the interface. - Improved PT beam design (use of in-situ flange) and optimization of loading sequence.
Briefly about the main thing
A properly constructed lightning rod protects a house from fire, equipment from damage, and people and animals from the terrible consequences of electric shock. The device does not prevent lightning, but effectively catches and safely transmits it to the ground. There are several options for making a lightning rod at your dacha :
- Kernel.
- Cable.
- Net.
All of them consist of a lightning rod, a down conductor and a grounding circuit. When making a lightning rod with your own hands, first of all you need to correctly calculate the height of its installation, based on the required protective radius. Next, you need to choose the right materials for its main parts, correctly determine the installation location and perform installation in accordance with recommended safety requirements.
Ratings 0
Video description
Watch in this video how complex lightning protection for a cottage is designed and works:
DIY installation instructions
Self-installation of a lightning rod is carried out as follows:
- The installation height of the receiver is calculated based on the required protective radius.
- The material is selected.
- The installation location is determined.
- The lightning rod is being secured.
- A down conductor is being carried out.
- A trench or pit is dug, the grounding rods are driven in and connected to each other.
- The down conductor is connected to the ground loop.
Recommendation! Upon completion of installation and connection of all parts, it is recommended to check the lightning rod with an ohmmeter. The resistance on the device should not be more than 10 ohms.