When we hear the words “suburban area,” we imagine a cozy house, a smooth lawn, spreading trees, and green beds. But it is impossible to turn these dreams into reality without drainage of the site. In the article we will talk about different schemes of drainage systems that make it possible to protect the area from unwanted accumulation of water.
Drainage is a mandatory measure that protects the site from the accumulation of atmospheric, flood, and groundwater. A dangerous consequence of neglecting site drainage is rotting of tree roots and damage to the foundation of a house and other buildings located on the site.
Rules and nuances of design
The choice of drainage type for a country house or the location of channels is influenced by many factors.
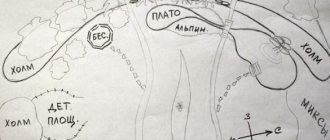
For example, the terrain is of great importance. If the house is located on a hill, and the rest of the territory is located at a slight slope, then wall drainage is most likely not required, and groundwater can be drained from the site by creating a canal system. The location of groundwater is important. Difficulties with installing buried objects may arise if the level is high enough - from 1.5 m in depth
With this arrangement, installation of a drainage structure is necessary both to ensure the protection of buildings and for the safe development of the soil layer
Difficulties with installing buried objects may arise if the level is high enough - from 1.5 m in depth. With this arrangement, installation of a drainage structure is necessary both to ensure the protection of buildings and for the safe development of the soil layer
The nature of the surrounding area should also be taken into account. If the area around the site is swampy or a river flows nearby, and the plot seems dry, then for preventive purposes it is also necessary to design a drainage system.
Let us consider in more detail the nuances that should also be taken into account when laying pipelines and trenches.
#1: Line depth and dimensions
The location of the pipes of a closed drainage system is chosen based on the design development, taking into account the slope towards the drainage basin. The depth of installation of system elements depends on the groundwater level. For a wall-mounted device, trenches are dug at the level of the foundation base, since its goal is to enhance the waterproofing qualities of the underground structure and protect the basement.
Pipes arranged in a ring pattern are located at a distance of up to 3 m from the foundation. The depth of the pipes is greater than that of the wall structure, and most often below the location of the foundation (+)
Ring drainage is chosen if the construction of the house has already been completed, and accordingly, all waterproofing and protective measures have been completed.
If the soil of the garden plot constantly suffers from flooding by precipitation or seepage of groundwater, systemic drainage is required throughout the entire territory. There are many options - from arranging a system around the perimeter to an extensive network that includes all dacha objects (buildings, road surfaces, garden plots).
The direction of canals and pipelines is strict - towards drainage structures or ditches located outside the territory of the personal plot.
#2: Slope standards for drainage pipes
Water in horizontally located pipes will stagnate if installation is carried out without a slope, the parameters of which are specified in regulatory documents. For clay and sandy soil, which has different degrees of water permeability, the standards are different:
- loams and clay – from 0.003 or more;
- sand and sandy loam - from 0.002 or more.
If you convert the values into millimeters, you get 3 mm/linear. meter and 2 mm/linear. meter respectively.
The minimum parameters are taken taking into account the fact that the lowest speed of water movement through channels and pipes is 1.0 m/s. This is possible if the drains are in working condition, that is, not silted or clogged with sand.
When calculating the maximum possible speed, the properties of the surrounding soil, as well as the quality of the sprinkling, are taken into account. You cannot make a slope at intervals - it must be observed throughout the entire length of the pipeline/channel
For hilly areas, options for installing drainage with differences are possible, with the installation of adapters in inspection wells.
Classification of drainage structures
In practice, various types of drainage are common. They are divided by design, depth and installation method.
Example of a drainage system
Their classification is presented in the table.
| Separation criteria | Kinds | |
| burial depth | superficial (external) | underground (internal) |
| design | linear and point | vertical, horizontal and combined |
| installation method | mounted along the contour of the structure | ring, wall and layer |
Additionally, you can also highlight biodrainage.
The integrated use of horizontal and vertical types of drainage in construction (combined version) leads not only to maintaining the hydrological level, but also promotes the rational removal of moisture from the surface of the serviced area.
Do-it-yourself site drainage on clay soils - step-by-step instructions for installing various systems
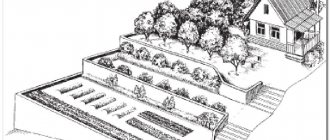
Surface drainage can be organized with your own hands using a diagram and selecting materials. A simple system consisting of trays, a well and other elements will ensure timely removal of moisture. Surface drainage is supplemented with deep or backfill drainage, which enhances the efficiency of drainage.
Deep drainage does not spoil the landscape design of the site
Deep drainage: step-by-step instructions
To create deep drainage you will need pipes. For the main line, elements with a diameter of 110 mm are used, and for additional ditches, pipes with a diameter of 60 mm are optimal. The well is constructed from concrete rings or a special polymer container is inserted into the recess. Crushed stone of fraction 20–40, coarse sand, and geotextiles are also necessary to create a drainage complex.
The work package includes the following actions:
- For a well, you should dig a hole, the depth of which is 2–3 m. Concrete rings are installed from the very bottom. The finished container is mounted in the same way. Sand is poured at the bottom in a layer of 20 cm, and then crushed stone at a depth of 30 cm. There must be holes in the rings or walls of the finished container for incoming pipes. The height of their location is equal to the depth of the pipes in the ditches, that is, about 100 cm from the top edge.
- Next you need to dig trenches according to the diagram. Their width is 50 cm, and their depth is 120 cm in the main highway and 100 cm in the side ones. The main channels reach the well, with a slope of 5 cm per 1 linear meter of pipe length. You need to pour sand in a layer of about 20 cm at the bottom of the ditches, and then lay geotextiles. The edges of the canvas should be higher than the edges of the pit. Next, crushed stone is poured in a layer of 20 cm, perforated pipes are laid, observing the slope.
- The pipes are connected to each other using coupling or socket joints. In the area of turns and on straight sections, inspection wells must be installed every 25 cm. The height of such elements should ensure their elevation above the soil level. Inspection wells are necessary to monitor the condition and clean the system.
- Crushed stone must be poured onto the pipes so that the filter material completely covers them. Next, the geotextile is wrapped. The remaining space in the trench is filled with sand, and a layer of turf or decorative gravel is laid on top.
Installation of surface drainage
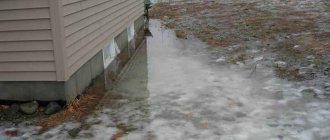
Deep drainage is designed to remove moisture from the soil, and the surface system prevents water from stagnating in the upper layer of clay soil. Rain moisture or melt water is immediately discharged into the well, transported through special gutters. This allows you to remove water from the roof of buildings and avoid the appearance of puddles in areas with clay soil.
Trays are easy to install and have small sizes
For a surface system, you need to mark on the site plan the direction of the ditches that should lead to the well. The slope is the same as for deep drainage. The following steps are followed:
- According to the scheme, small trenches are dug, which are well compacted. It is necessary to observe the slope of the ditches towards the well or catch basins. If the site has a natural slope, then the depth of the channels may be the same. The depth of the trenches is up to 80 cm, and their width is 40 cm.
- Sand is poured into the bottom of the trenches in a layer of 10 cm, and then the same amount of crushed stone of fraction 20–40. Next, you need to pour a concrete solution onto the filter material and immediately install trays for removing water.
- Sand traps should be installed at the end of each line of gutters using the same installation method as for gutters. Stormwater inlets under drainpipes of buildings are installed using the same method. All parts are well connected to each other, forming a single system. Next, the trays need to be covered on top with special grilles.
Point drainage around the house
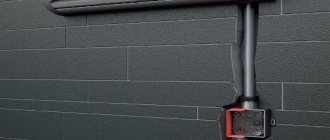
Point drainage is simple, does not require special design and can be easily done independently. In the most general sense, its design includes a funnel through which water flows into a water intake. Each such “point” is supplied with outlets that are adjacent to the storm sewer or deep drainage system, depending on the situation.
Water inlets for point drainage are easier to buy than to make: modern designs are made from polymers that are resistant to annual temperature changes, or from cast iron. Point drainage looks aesthetically pleasing thanks to the grate covering the catch basin.
To install point drainage you must:
- dig a pit larger than the inlet;
- strengthen its bottom with a layer of concrete ≈10 cm;
- install a water intake;
- connect it to the drainage system;
- install the grate;
- concrete the space between the walls of the water intake and the slopes of the pit.
A typical mistake in installing a point drainage system is installing the outer grate of the water intake at the same level as the surface on which water accumulates. To ensure effective water drainage, calculate the depth of the pit and the thickness of the concrete pad so that ultimately the drainage grid is buried 3-5 cm in relation to the ground or path. This is true if you do point drainage around the house with your own hands - the described defect leads to flooding of the basement and damage to the foundation.
Drainage system design
What should the project contain?
The start of drainage installation should be preceded by the development of a system design. The drainage design is created based on engineering hydrological studies of the site. Its purpose is to determine and describe the fundamental technical characteristics of the drainage system.
Typically, the project contains the following data:
- schematic representation of the laying of drainage pipes (deep and surface systems);
- design parameters of drains - cross-section, slope, assembly of the wellhead part, depth of installation in the ground and distance relative to each other;
- standard sizes of drainage system components (drains, wells, connecting elements, etc.);
- list of building materials required for installation of the structure.
Site drainage project
The project must take into account the following factors:
- landscape of the site;
- average annual precipitation volume;
- composition and characteristics of the soil;
- ground water level;
- location of nearby natural reservoirs, etc.
If you decide to create the project yourself, draw a simplified diagram
What should the estimate include?
Before constructing a drainage system, a local estimate for drainage installation is drawn up, which consists of the cost of the operations listed below:
- dismantling of reinforced concrete foundations;
- manually creating trenches 2 m deep in the soil, installing fasteners across the entire width and laying a waterproofing layer of polymer film;
- installation of transverse drainage with double-sided outlet;
- laying a sewer pipeline from polyethylene pipes;
- backfilling the base for crushed stone pipelines;
- installation of drainage communications, strengthening of underlying layers and concrete layers (reinforcement);
- dismantling of existing asphalt concrete pavements;
- creation of new asphalt concrete pavements;
- installation of bridges, passages, decking, etc. made of wood;
- preparing the soil for crops (filling a layer of soil up to 20 cm thick);
- manual sowing of various lawns and other plantings.
The cost of drainage depends on its length and installation depth
To install a drainage system you will need the following materials:
- crushed stone;
- sand;
- corrugated drainage pipes wrapped in geotextile;
- geotextiles (needle-punched non-woven fabric used to create an additional filter that may be required depending on the characteristics of the soil at the site);
- inspection wells.
Installation of a collector well
Jheka did not immediately cut and deepen the rotary wells; he postponed it until the stage of landscaping the yard.
The collector well was assembled from two concrete rings with a diameter of 90 cm, a lid and a hatch. The rings were lowered into place using a manipulator.
Sample Project
To understand how much it will cost to install a drainage system on a site, let’s look at an example of a project offered by specialized companies.
This includes:
Drainage project
- site drainage;
- arrangement of a trench with an average depth of 1 meter;
- laying a pipe with a diameter of 110 mm;
- wrapping the pipe with geofabric;
- laying a layer of sand about 15 cm high;
- crushed stone layer 40 cm;
- backfilling geotextile pipes with gravel;
- backfilling with soil.
Drainage calculation project
So, one meter of such a system will cost approximately 1,550 rubles.
If you need to arrange drainage for an area of, for example, 15 acres, you will need 200 linear meters of drainage. The total price will be about 295,000 rubles.
This includes drainage design according to SNiP standards, materials and work.
Site drainage
If you do the work yourself, you will only have to pay for the materials.
The calculation of the drainage system will include:
- pipe with a diameter of 110 mm – 80 rubles per coil (50 meters);
- drainage well with a diameter of 355 mm - 1609 rubles per meter;
- hatch for a well - 754 rubles;
- bottom-cover for a well – 555 rubles;
- quarry sand – 250 rubles per cubic meter;
- crushed stone with a fraction of 20-40 mm – 950 rubles per cubic meter;
- geotextiles – 35 rubles per square meter;
- plastic well with a diameter of 1100 mm - 17,240 rubles per meter.
Design of drainage systems on site
Of course, by designing drainage systems on site and installing them yourself, you can save money.
But you can do this work yourself only if you have special knowledge and skills.
First, you will need to perform all the necessary measurements and calculations to determine the required amount of materials, and accordingly, their cost.
In this case, you will not have to pay for the work.
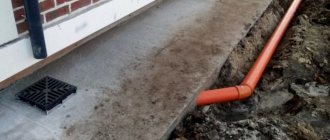
Excavation
The top point of the drain was planned opposite the door, at 50 cm, but in the process 50 cm turned into 60 cm. At the same time, an underground electrical cable entry was organized. The slope in the trench is 1 cm per linear meter. For sampling in the lawn area, plywood and PE film were laid.
We performed a puncture.