About stairs
Website about stairs. We combine the experience of professionals and private craftsmen in one place
Popular
1 person discussing
Stainless steel staircase to the pool: characteristics, models, manufacturing instructions
4 people discussing
Staircases in Art Nouveau style: tips for creating a style
Wooden staircase on a slope - making your site comfortable and beautiful
How to assemble a wooden staircase - yourself and from ready-made elements
Finishing a monolithic staircase: considering possible options
Do-it-yourself staircase to the attic - installation of a stationary structure
Production of wooden stairs: ideas for small businesses and more
Iron staircase to the second floor - cold metal as an addition to home comfort
Do-it-yourself staircase in a wooden house - bringing beauty and comfort to the masses
Unusual and original stairs to a private house - choose your option
The steps must be securely held on the frame
If you don’t know how to quickly and correctly attach steps to a metal frame, then this review will tell you about two options for carrying out the work. Each of them has its own characteristics, so choose what is most convenient for you and repeat all the steps described in the corresponding section.
The installation process is not complicated, and if you wish, you can handle it without outside help.
- How to attach elements Option No. 1
- Option No. 2
Types of metal frame according to assembly method
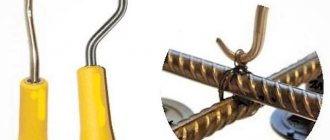
To attach wooden steps to the frame you will need metal bolts.
There are many types of metal staircase frames. They can be monolithic elements made from stringers or fillies, suspension systems using bolts, or specialized modular structures. The most common are monolithic and modular systems.
Monolithic
The use of monolithic stringers is a traditional method of creating a metal base for any staircase. You can install one or a pair of stringers. The second option is more preferable. Because it provides two identical supports for future steps.
When using one stringer, the second side of the step must be fixed directly to the wall, which can create some inconvenience. Typically, holes are drilled in the boards through which they are mounted on the frame.
Sometimes it is advisable to use a system of one standard and one side stringer pressed against the wall. The role of such a stringer can be played by a corner. In this case, it is more logical to use special pins as fastenings, on which the board is mounted.
Modular
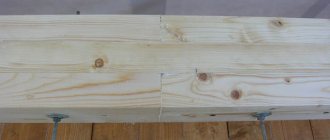
Welded metal frame for steps
Modular stairs have appeared on the market not so long ago, but have already gained popularity due to their ease of use and ease of assembly of structures of any size. Typically, a set of parts is created in factories and only assembled directly at the installation site.
The standard kit includes the following parts:
- basic modules;
- floor;
- intermediate.
Middle or intermediate modules can be custom-made with different heights and widths of steps. The base elements begin and end the staircase.
The material usually used is durable stainless steel or structural steel. Additionally, the surface can be coated with varnish or polymer.
Types of docking
To produce staircases on a bowstring, several options for joining the steps and the bowstring are used. However, before studying the types of fastenings, you should determine what a tread and riser are:
- tread is a horizontal part of a step on which a person’s foot rests when descending or ascending;
- a riser (or riser) is the vertical part of a step, which gives additional rigidity and strength to the structure.
The structure of steps on bowstrings
Flights of stairs can be made without treads and cannot be done without. Based on this, it is worth highlighting several options for attaching the steps and the bowstring - the supporting beam:
- solid step - grooves are made in the string for the tread and riser, which together form a right angle;
- one-piece step with an overhang - recesses are also cut out in the supporting beam for both parts of the step, but for greater rigidity, the horizontal part protrudes slightly above the vertical one;
- one-piece version with wedging - wedges are inserted into the recesses for steps and treads for better fastening;
- free option - step without riser;
- free step with wedges - similar to the previous version, but using wedges.
Recently, steps without risers have become increasingly popular.
Metal frame calculations
The main parameters of the frame - length, height, angle of inclination of the stairs
Before calculating the frame, it is necessary to accurately determine several basic parameters:
- height - the distance from the floor of the first floor to the floor of the second floor;
- length – the distance from the beginning of the first step to the end of the last step;
- tread depth;
- riser height.
The first two indicators are measured directly at the installation site. It is advisable to select the depth of the steps based on specific safety and ergonomic requirements.
The length of the stairs must be divided by the depth of the steps, the result will be the required number of steps. The length of the stringer can be determined using the Pythagorean theorem, taking it as the hypotenuse, and the height and length of the staircase as the legs.
Final finishing of the stairs
The fencing makes the stairs reliable. It consists of balusters and railings. The gap between them should not exceed 15-20 cm. They can be fastened from the outside of the bowstring using screws. Dowels, tenons, and pins can be used to fasten balusters. For studs, a hole with a diameter of 12 mm is drilled at the end of the product to a depth of 80 mm. The studs are placed on glue, leaving about 7 cm outside. You need to drill holes in the bowstring to a depth of approximately 100 mm. First, install the outer columns. The twine is pulled between them and the remaining balusters are placed. All that remains is to attach the railing, made from a block 8-10 cm wide.
The entire structure is covered with a protective layer of varnish or paint. Anti-slip materials can be laid on the steps. They may be the following:
- carpet;
- linoleum;
- animal skins;
- plywood;
- cork mats;
- polyurethane;
- rubber;
- rubber;
- other materials.
Options for fastening wooden steps to a metal frame
You can attach the steps to the metal frame in several ways, depending on the specifics of the structure used and the preferences of the home owner.
Furniture bolts
Furniture bolts are used to attach wooden steps.
The simplest and most affordable method of attaching steps to a frame. The process involves drilling the required holes in the step and then using the appropriate bolts.
When installing, it is important to tighten the nut moderately, since too much force can damage the integrity of the wooden part.
A disadvantage of the method is the permanent location of the bolt head on the surface of the stairs. In some designs, tightening may be inconvenient. At the same time, the bolts are extremely convenient, easy to use and allow you to disassemble the structure if necessary.
Self-tapping screws
If you do not want to damage the outer surface of the steps, you can fasten them with self-tapping screws. In this case, powerful models with cross-shaped or hexagonal grooves are suitable. The best option is roofing screws with a hexagonal head and a sharp tip in the form of a drill. It is important to select screws specifically for wood, since similar models for metal may not provide the required engagement area.
For decorative stairs, special models of self-tapping screws with a countersunk head are suitable. A secret groove for the cap is created in the metal structure, which will not be visible even from the inside.
Futorka
Invisible fastening of steps to metal or stone
Futorka is a metal sleeve with external and internal threads. This fastening method is discreet and convenient. In addition, there are no problems with dismantling the steps.
To carry out installation, stationary preparation will be required, as well as precisely designed drawings. The steps can be fastened both from below and from the end.
Fisher fasteners
This method of attaching wooden steps to a metal frame appeared relatively recently. Based on the use of special polymer fastening Fisher. It includes a large diameter bushing on one side and a small bushing on the other side that opens when screwing in the self-tapping screw.
Immediately before installation, cores are installed in the holes on the frame, and the steps are then pressed through with marks. The fasteners are installed in the corresponding sockets, after which they are expanded using self-tapping screws. Due to this, the step will be securely fastened in its place, without slipping even under load. The structure can be further strengthened using glue.
Fastening risers
This process can be carried out in various ways. It depends on what material your staircase is made of, taking into account whether it will be hemmed underneath. The fastening parameter is also influenced by the arrangement of the stringers.
There are three main ways to perform fastening. Let's look at each of them.
- Classic installation, where fastening is carried out in a groove.
- Fastening to the end using self-tapping screws. The same method involves installing fittings using glue.
- Installation of risers using a corner.
You should choose one method or another based on your own preferences and the scope of use of the staircase structure.
Required tools and materials
To attach wooden steps, you will need the following tools:
- screwdriver;
- hammer;
- set of self-tapping screws;
- plane;
- a set of carpentry tools;
- building level;
- pencil or pen for marking;
- ruler;
- set of studs.
This is a set of tools that will suit most mounting methods. In some situations it turns out to be excessive or it needs to be supplemented with special components.
Cladding boards
The last step is installing the cladding boards. It goes from the first step of the second flight to the second floor. Then from the first step of the first floor to the end of the march. If the staircase is straight and there is only one flight, which happens quite rarely, then you can start from the very bottom.
Along the bottom edge you need to make an allowance of 15 mm. It will cover the drywall that will later be used to cover the staircase. Then all that remains is to measure all the angles, transfer them to the finished product and install.
The most difficult thing in installing a ladder is to strictly comply with all dimensions and requirements. If a person does not have practical skills, he may begin to make mistakes, in which case he will have to redo everything additionally, use new materials and lose money.
Therefore, before you start working on your own, you need to familiarize yourself with the instructions for measuring the staircase opening and general recommendations for work. Only then can you count on everything going well on the first try.
If you still have any difficulties, you can watch the following videos on the topic:
DIY installation
It is necessary to make sure that the frame is securely fastened to the walls.
It is important to be careful and take into account some specific nuances of the process.
- Before starting work, it is important to make sure that the frame is securely fastened to the floor and walls.
- It is advisable to thoroughly clean the surface of the metal frame on which the steps will lie and paint it with special mixtures with anti-corrosion additives. This will protect the structure from rust.
- The holes in the frame and steps should not be on the same axis, but with a slight offset to ensure greater reliability.
A staircase with a metal frame makes a lot of noise and transmits sounds. The more wood cladding there is, the better the sound insulation will be. Additionally, you can use various risers, posts and railings. More effective sound insulation can be achieved using specialized materials, which are often used in cars.
Preparatory activities
Installing a staircase is a labor-intensive task. This process can be made easier through careful preparation. Preliminary work consists of three main stages:
- project development (drawing);
- selection of required materials;
- selection of tools.
The first stage was given to the development of a high-quality scheme. Maximum information content can be achieved by making the drawing in three different projections: top, side and front views. When making a drawing with a top view, you should draw up the localization and vector of the staircase span.
At the second stage, using calculations, consumables are purchased in the required volume. Usually materials are purchased with a reserve.
The choice of tools is also an important process.
Experienced professionals use: pencils, a level, a triangle, a plane and a hammer, a clamp, a drill and a screwdriver, a grinding machine, a saw and fasteners.