When installing a chimney in a house or bathhouse, you not only need to secure it correctly, connect it and calculate the aerodynamics for good draft. It is extremely important to ensure proper passage of the chimney through the roof so that in the future there are no leaks in this place and the rafters do not become charred.
And here it is necessary not only to make a neat hole in the covering, but also to seal the penetration as much as possible, select sealants and at the same time maintain the aesthetic appearance of the entire roof. There really are a lot of subtleties and nuances here!
Design rules and regulations
First of all, even at the roof construction stage, you need to design the exact location of the chimney. For this, there are certain rules that regulate the height and location of chimneys on the roof:
Today in Russia, the passage of a chimney through the roof of a house is carried out in accordance with the requirements of SNiP 41-01-2003. They are a little outdated, but they are the ones that guide the supervisory services, and therefore this document is important.
Be careful also with combining the chimney and other pipes, ventilation and sewer, into one large box, which is so fashionable today. Sometimes architects want to reduce the number of unnecessary visual details on the roof.
The result is huge boxes on the roof, which are sometimes up to 6 meters long and up to 1.5 meters wide. Moreover, it is much more difficult to correctly bypass them with roofing elements than the same 6-8 pipes, but separately.
When you have determined the location for the future chimney, then it’s time to prepare the rafter system for installation. And this depends on how wide the chimney itself is and what shape it is.
Ensuring fire safety
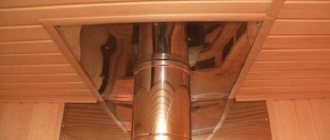
The smoke that passes through the chimney has a high temperature. Because of this, wooden parts, layers of vapor barrier and waterproofing can ignite. To prevent this from happening, it is necessary to install a special box where the pipe passes through the roof.
Next we will tell you how to seal a pipe on the roof. The box is made from wooden parts. It is placed on the sheathing from the outer part.
Layers of vapor barrier and waterproofing from the outside are fixed along the perimeter. Since they are located at a considerable distance from the hot pipe, they are safe. The first of them is located on the inside, and the second on the outside of the roof.
For this purpose, you can use cross-cut material. If there is a vapor barrier and waterproofing in the inner layers of the roof, the resulting corners are folded down. A photo of a pipe on the roof will help you figure out how to do this correctly.
When the pipe passes through the roof, it is covered with insulating material. For this purpose, you can, for example, use mineral wool. The insulation layer cannot be placed close to the chimney. To prevent the heat from damaging the mineral wool, there must be a gap of 5-7 cm thick.
Metal apron and flexible tapes for rectangular chimneys
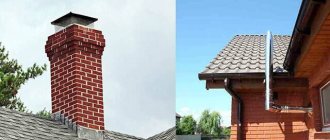
So, let's start with the traditional, although rather outdated, option - a square brick chimney.
After all, its installation, starting from a special separate foundation to sealing the joint with the roof, is quite complicated. But at the same time, of course, the quality is still not guaranteed, because a lot depends on the selection of materials and the professionalism of the stove maker.
Design and fixation of the chimney
A conventional brick chimney has a regular rectangular cross-section, which is not always good for internal aerodynamics. At the same time, more modern metal and ceramic chimneys are much easier to maintain and install.
In any case, the chimney is located as close as possible to the ridge, which reduces the snow load on the pipe itself and reduces the volume of water that will flow around it. This means that the risk of leaks will be significantly less.
Typically, a rectangular pipe is placed along the direction of the slope:
In general, you need to proceed with the rafters in such a place as follows. Here's how to install the apron:
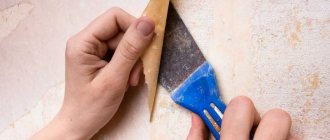
- Step 1. First of all, use the lower junction strips, which are applied to the chimney wall and mark a line at the top.
- Step 2. Using a grinder, make a groove along this line.
- Step 3. Next, remove the dust so that small particles of cement and sand do not fall on the surface of the roof waterproofing. It’s just that over time they will turn into an abrasive that can damage the roofing material.
- Step 4. If the chimney does not fit into the hole between the rafters, and you have to cut more than one rafter, then the outer rafters need to be strengthened. To do this, they are made paired.
- Step 5. If the pipe passes directly through the ridge, then the ridge run is installed on both sides of the pipe, and the rafters of the upper part are supported by the crossbars.
- Step 6. If the chimney is located away from the ridge, then place one edge of the apron over the chimney, and hide the other end under the roofing material. If the pipe is located close, then place a protective apron directly under the ridge beam and secure it with special elements, and then treat it with a moisture-resistant sealant.
Here is the layout of the rafters:
But when using additional bars in the rafter system, remember that wood and polymer materials are sensitive to high temperatures. Therefore, SNiPs indicate the minimum distance between the chimney pipe and the elements of the roofing pie - at least 130 mm.
If you use a ceramic pipe without insulation, then this clearance should be at least 250 mm. And right where it passes through the roof, the pipe must have an indentation - a special thickening.
In addition to support bars, today many chimney manufacturers recommend using special fastening kits:
The very passage of the chimney through the roof also implies the use of a special fastening called a okapnik. It is installed directly on the chimney pipe as a decorative and functional element.
And to ensure the required draft, the height of the pipe must be at least 5 meters from the grate to the mouth. In this case, the mouth of the chimney must be reliably protected from precipitation. For this purpose, there are such special elements on sale as deflectors, an umbrella and other attachments, including metal mesh catchers.
Let's move on. If the pipe is sufficiently less than one meter wide and falls directly into the valley, then it is positioned so that one of the upper corners of the bases is as close as possible to the middle of the valley. In such a solution you will need non-standard additional elements.
If the chimney width is more than 80 cm, then a small gable roof is created on the side of the ridge - a slope. Moreover, it is important to make it from the same material as the roof itself, although sometimes it makes sense to give preference to metal.
Just remember that the slope itself is a problematic element, which creates two valleys on the roof at once (and valleys are always the weakest points). In such a structure it is difficult to install heat, vapor and waterproofing, as well as to ensure the required level of ventilation.
Also, a rather wide chimney usually prevents the ventilation of an insulated roof, and additional ventilation elements must be installed next to it before and after the chimney. For example, aerators or ventilation tiles.
Also, the lower the chimney is in the valley, the more snow will accumulate behind it. Therefore, it will be necessary to install reliable snow retainers above the pipe level. But avoid placing the chimney close to the attic windows, otherwise combustion products will constantly be drawn into the under-roof space.
And finally, most often the fact that the chimney pipe is installed incorrectly is discovered already at the stage of assembling the roof rafter system. At this stage, it is still allowed to move the chimney pipe, if possible. For example, if it is not yet made of brick, although this is more an exception to the rule than usual practice.
Sealing passages through different types of roofing
Here, for example, is how to install a chimney through a roof made of composite tiles:
These are the instructions for passing a square chimney through a soft roof:
As you can see, the chimney is protected from any leaks by an apron with special components. In addition, today for natural roofing, such as ceramic or cement-sand, very convenient flexible abutment tapes are produced. They are made from lead or aluminum, and an adhesive layer is applied to the inside.
As for metal roofing, special elements are also sold for it. Although you still have to tinker:
By the way, usually the installation instructions for the selected roofing material always contain a detailed explanation of exactly how to bypass the chimney pipe, and there is always the opportunity to purchase the necessary strips from the same manufacturer that produced the roofing covering you like.
How to seal a chimney on a roof
Combustion products are removed through the pipe. Their temperature can reach 200 degrees. Sealing is designed to achieve the following purposes:
- Smoke must not be allowed to enter the room.
- The fire hazard of using the pipe must be ensured.
- Sealing must be done aesthetically.
This stage of work is carried out after the pipe and box have been installed.
Roof penetrations and pipes for chimneys with a round cross-section
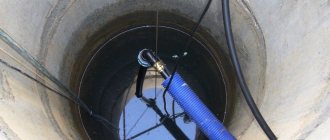
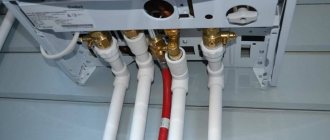
Metal round systems always require additional fixation. Such elements must be fastened with crimp clamps. For every two meters of such a chimney, a bracket is installed that secures them to the wall, and for the tee - another support bracket. Also, special brackets are used to fasten steel pipes.
The chimney pipe passage itself depends on its cross-section and shape, the slope of the roof, as well as the type of roofing material used:
Here is a very detailed video of a chimney with a circular cross-section being installed on the roof:
Ready-made soft penetrations for any structures
It is a little more difficult to get around a round pipe than a square one. But for this purpose, today roof penetrations for chimneys are produced in the form of a universal glass or master flush:
What is such a passage? This is a special chimney nozzle in the form of an elastic material made of silicone or EPDM rubber. Both options tolerate temperatures from -74 to +260°C. The penetration itself rests on a steel sheet, well fixed to the roof.
This collar is pulled onto the round pipe using a soap solution, and then coated under the flange with roofing sealant. This penetration is good because it can take any shape, and therefore it does not matter at what angle of the slope it is mounted. The whole process turns out to be much faster and more accurate than in the case of a brick chimney.
So, this elastic apron must be applied directly to the passage and pressed with a metal sheet in the form of a circle or rectangle (make holes in it for self-tapping screws in advance).
Next, a special fire-resistant sealant (not regular roofing sealant) must be applied to the place of contact with the roof and the entire structure must be secured with a screwdriver.
Here's what proper installation of a chimney through a roof looks like in practice:
Metal pipes for rigid fixation
In the case of installing chimneys on a roof without a relief (not always), instead of flexible passage products, a metal passage pipe is used. These are also finished products, painted or made of galvanized steel:
Such pipes are made mainly from alloy steel of standard sizes and at standard roof angles.
Here the instructions are slightly different:
- Step 1. Make a suitable size hole in the roof. To do this, use a marker and a suitable tool - a grinder, jigsaw or scissors.
- Step 2. Carefully remove the insulation from the hole and saw off the grille that will get in the way.
- Step 3. Attach a sheet of fire-retardant material to the inside of the roof so that there is a margin of 15 cm on each side in a circle.
- Step 4. Route the chimney and secure it with a clamp.
- Step 5. Put on the passage element and secure it to the roof surface with screws and special sealant.
- Step 6. Continue increasing the pipe segments to the desired height - until the pipe itself is at least a meter higher than the ridge.
If you want to insulate the entire structure where the pipe passes, then use only a non-flammable thermal insulator, such as stone wool. It can simply be stuffed between the wooden structural elements and the chimney itself. It is needed to prevent condensation from occurring in this area.
A couple more important points. If the chimney pipe rises higher than 2 meters on the roof, then additional braces need to be installed for it:
Round chimney pipes also tend to complicate the whole process because they have bends in their path and sometimes they even have to be passed through the walls, and only then through the roof:
Consequences of poor installation
As a rule, the work of a stove maker or gas equipment installer does not include chimney installation services; the homeowner must ensure the passage of the chimney pipe through the roof independently. The imaginary simplicity of the task makes home craftsmen refuse the services of professional roofers. However, poor-quality pipe installation on the roof can have serious consequences:
- Through an unsealed pipe passage, moisture seeps into the masonry, gradually destroying the brick chimney.
- High humidity inside the chimney pipe stimulates the spread of mold and mildew. Spores of some types of fungus are dangerous to the human condition, so it is unsafe to use an infected tube. In advanced cases, both the chimney and the stove masonry must be replaced
- The penetration of water into the passage of the chimney pipe through the roof reduces the thermal insulation properties of the insulation by half. Moreover, after the thermal insulation layer dries, its characteristics will never return to their previous level.
- Even the rafter system suffers from poor-quality pipe removal through the roof, since moisture penetrating into it through a leaky passage leads to rot and destruction.
- Gaps near the pipe passage disrupt the normal air circulation inside the attic, leading to increased energy losses and heating costs.
By the way, not only stove chimneys are brought to the roof; pipes from gas boilers and ventilation outlets are also placed there, for the installation of which the same methods are used.
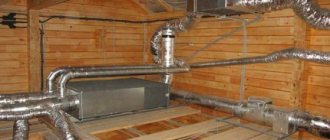
Installation of a passage box for dissimilar materials
There is also the practice of running a pipe through the roof using a passage box. This is beneficial when the roof itself is made of different types of materials, which have different resistance to fire.
In this case, make a box of the required size from a fire-resistant material, pass a pipe through it so that at least 15 cm remains to the walls, and fill the space with expanded clay.
Here is an example of organizing such a box:
When installing a chimney on the roof, did you encounter any difficulties?
What are the consequences of violating the installation rules?
If the chimney box on the roof was installed improperly, this can lead to the following problems:
- Gradual destruction of the chimney.
- High level of heat loss.
- Formation and deepening of cracks in the structure.
- Disruption of the gas circulation process.
- Ingress of moisture, which leads to destruction of the pipe and duct.
- The presence of moisture can lead to rotting of wooden parts and the formation of fungus.
Therefore, it is important to install the pipe and the duct for it in accordance with the technological requirements.
Sewerage
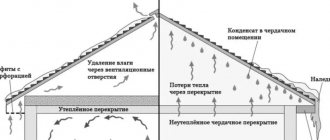
Why lead the sewer riser through the roof? The fact is that the air heats up when it comes into contact with wastewater, becomes saturated with moisture and rises.
If the risers are hermetically sealed, an unpleasant odor can penetrate into the kitchens, bathrooms on the upper floors, and in cases of leaky joints between plumbing and sewerage. The installation of ventilation systems is in many ways similar to the installation of ventilation.
Soft surface
The soft surface has its drawback: it is flammable. Therefore, it is necessary to leave a gap of approximately 14-25 millimeters between the surface and the chimney.
Moisture insulation of such a surface proceeds in the same way as other surfaces, but it uses a valley carpet rather than a flexible tape.
How to route a chimney pipe through a roofing surface
Stages of installing a chimney pipe:
- Determining the location for the passage;
- Installation of the box;
- Drilling a hole for the chimney pipe;
- The roofing material is folded outward, the insulation inward. A pipe is inserted into the created hole;
- A moisture-proofing belt is placed on the pipe device;
- The box is filled with heat-resistant material;
- Sealant is applied to the joints.
Installing a chimney device through the roof requires a serious approach and compliance with installation rules, because... This determines whether leaks will appear and whether the chimney will collapse.
Basic Rules
If your home has heating, you will need to create optimal conditions for removing flue gases. There are several ways to remove the pipe depending on the installation location. Its choice is influenced by many factors, and the chimney can be installed:
- in the ridge itself;
- at a distance from him.
Each of the described methods has its own differences and features, but preference is given to installation according to the second option. To maintain the required draft force, the total height of the smoke channel must correspond to the limits of 5-10 m.
How far should the pipe be raised above the ridge of the bathhouse?
When installing a pipe, the following rule applies: “The closer to the ridge, the higher the pipe should be raised.”
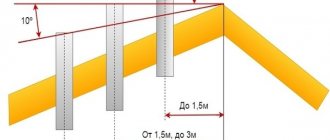
Elevation of the chimney above the roof plane
- If the distance from the center of the chimney to the ridge of the roof does not exceed 1500 mm, the pipe must be raised above the ridge by at least 500 mm ;
- With a distance from the center of the pipe to the ridge from 1500 to 3000 mm, the top of the pipe can be at the same level as the roof ridge;
- At a distance of more than 3 meters, the top of the pipe must be no lower than a line drawn down from the ridge at an angle of 10 degrees to the horizontal.
Passage through ondulin
Ondulin looks like regular slate, but its material is completely different. This is compressed cellulose, which is treated with bitumen impregnation. It comes in a variety of colors, is water resistant, but burns quite well. Therefore, when a passage through the roof is organized, maximum attention is paid to filling it with fire-resistant materials. The hole for the pipe in the ondulin is made large. To insulate the junction of the roof and the chimney, an apron is used, which is placed under the roof. In this case, elastic self-adhesive tape “Onduflesh” is used, made of bitumen with an aluminum insert.
Brick pipe passed through ondulin Source seaside-home.ru
How to protect your roof from fire
To do this, you need to consider two points:
- Passage through walls and ceilings. Here it is necessary to use polyurethane foam with mineralite, since the outer pipe of the sandwich heats up to a temperature of 200*.
- When passing through the roof, roof trim and all other associated elements are required.
According to the standards, the minimum permissible distance between the chimney and load-bearing beams or rafters should be 130-250 mm. The inside of the structure is filled with heat-resistant material.
You can find passage diagrams in the Ferrum catalog in the “advertising and printing products” section of the website.
Profiled surface
Today, corrugated sheets are very popular. But this material is no exception, and leakage is also possible on its surface if the chimney is not installed correctly.
It is recommended to install the chimney pipe in a vertical position. A passage in the roofing surface is created using a grinder. It is very important that nicks do not appear on the edge of the corrugated sheet.
When laying a round pipe through a profiled sheet, roll bitumen moisture insulation or bitumen foil tape is used.
Next, a roof penetration is installed on the chimney (it is attached to the sheathing), and then a heat-resistant sealant is applied. To prevent the passage from melting due to high temperature, a clamp with heat-resistant material is installed under it.
Ondulin surface
Ondulin is otherwise called “Euroslate”. According to its characteristics, it does not have reliability and durability. Therefore, it is necessary to cut a hole in the roofing surface and fill it with heat-resistant material, which, in turn, will prevent the penetration of moisture.
To waterproof the ondulin surface, install an apron or use a flexible tape - Onduflesh. This coating requires additional ventilation.