Thermex RZL 30-150VS, IS 30-50V, IR 80-150V are high-quality and technologically advanced water heaters that are installed in the water supply system and provide rapid heating of water to a given temperature. Using these water heaters, you will always be provided with hot water. But, unfortunately, like all equipment, they do not last forever and from time to time they require routine maintenance and sometimes repairs. In this article we will try to present in as much detail as possible step-by-step instructions for repairing TERMEX water heaters with our own hands.
External inspection and identification of causes of malfunction
Before we begin the repair, we need to understand what exactly we need to replace. To do this, we will perform a preliminary inspection to look for the failed part. The most common cause of malfunction of any water heater is the failure of the heating element, so this article will focus specifically on replacing the heating element in a TERMEX water heater. These models have the same heating element, so this article is suitable as a guide for repairing models RZL 30-150VS, IS 30-50V, IR 80-150V. Below are the main signs by which you can understand that the heating element has burned out:
- The RCD (residual current device) is triggered
- Automatic knocks out traffic jams
- The water does not heat up at all or heats up very slowly
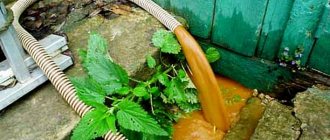
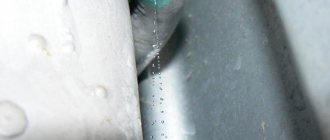
- The water heater hisses and the water comes out cloudy and has an unpleasant odor.
If you notice these signs in your water heater, then the first thing you should do is replace the heating element, in 90% of cases this will help. Also, the fact that the heating element is not functioning can be determined by visual inspection. If the integrity of the shell is lost, periclase (looks like white powder) and a nichrome spiral are visible, which means the element has burned out. But sometimes there are cases when a nichrome spiral burns out inside the shell, in this case the reason will not be so obvious and you can check the integrity of the spiral with a tester. In any case, the heating element will need to be replaced. We will also list the main reasons for the failure of the heating element below:
- The heating element has exhausted its resource
- The water heater was turned on without water
- The water heater was left unused for a long time without draining the water
- Voltage surges in the electrical network, almost all household water heaters are designed for 220V +/- 10%.
Whatever the reasons, the need for repairs is obvious, since it is much cheaper than buying a new boiler. Of course, it is easier and sometimes better to turn to the services of professionals. But this is not always possible, so we will consider the option of replacing the heating element with our own hands.
Before starting any repair, it is necessary to purchase a failed part, in our case it is a heating element. You can go to our commercial section of the website using this link Heating elements for the TERMEX water heater, select and buy the heating element you need. Our company offers only high-quality Termex heating elements made in Italy by Thermowatt, one of the best manufacturers of heating elements today. By purchasing a heating element manufactured by Thermowatt, you will be sure that with proper use it will serve its intended life.
We would like to note right away that consistency is extremely important in work; this is one of the secrets of successful repairs. Complete all the stages one after another, without jumping from one to another, and then everything will go quickly and smoothly. So, we have determined the cause, let's begin the repair.
Carrying out preparatory work
Installing a water heater requires determining where it will hang or stand. For rooms with a small area, you can install a small boiler that will hold 50-80 liters of water.
Such tanks are most often hung on the wall. You can choose a water heater with any diameter and design.
If you need to install a container larger than 220 liters, then you cannot hang it on the wall. For such a tank you need to choose a place on the floor.
Video:
When mounting a water heating tank on a wall, it is worth choosing a load-bearing wall so that it can support the weight of the unit.
To secure the tank, you need to have anchor bolts available. In some models they come complete with the tank, sometimes you need to purchase fasteners separately.
For water heaters that are placed vertically and have a volume of 30-100 liters, you will need 2 anchor bolts.
If you need to install a horizontal unit with a volume of 50-100 liters, then you need to have 4 fastening elements.
The place where the boiler will be located must meet the following requirements:
- The water heater must be accessible throughout its entire service life;
- Installing the tank on the wall provides the ability to withstand a load equal to double the weight of the water heater;
- It is worth checking the wiring; it must withstand the operation of the water heater. If the wiring is old, it will need to be replaced;
- It is necessary to check the condition of the pipes in the room, connections must be created to connect the water heater.
Preparing the water heater for repair
First, we de-energize the boiler, that is, we simply remove the plug from the socket. Next, you need to empty the container of water, to do this:
- Turn off the cold water supply tap
- Open the hot water tap to allow air to enter the tank
- We unscrew the check valve (which prevents draining) and drain all the water through the water inlet
Once the water heater is empty, it can be removed. Here it is better to use the help of a partner, since depending on the displacement, they weigh quite a lot even without water.
Boiler device
Before we begin repairing the boiler with our own hands, let’s look at the design features. The design of the water heater is quite simple, the main components are as follows:
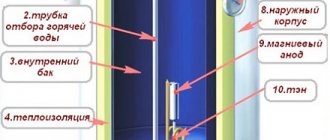
Diagram of the Termex water heater
- body made of steel sheet with stainless steel coating;
- Inner tank made of alloy steel, durable and corrosion resistant;
- the steel flange is a platform on which the elements of the device are attached: heating element, magnesium anode, thermostat;
- a large magnesium anode is a metal rod that is coated with a magnesium alloy; thus, the element reduces the corrosive activity of water, protecting the tank and increasing the durability of the water heater;
- stainless steel tube for releasing hot water;
- thermal insulation made of high-density polyurethane foam;
- The heating element, which, in fact, heats the water;
- a thermostat that acts as an auto-regulator of water temperature (turns off the boiler when the water is heated, and vice versa);
- cold water supply tube made of stainless steel.
Diagnostics and dismantling
In order to get to the “insides” of the tank, you need to remove the bottom cover. It is under it that all the electrics of the water heater are located, so all procedures must be carried out carefully. Pay attention to a little trick - manufacturers often hide the bolts, for example, under a sticker, to protect it for repair at a service center. Now you can begin dismantling the thermostat, wiring and the heating element itself. But before that, it’s better to take a photo of connecting all the contacts so that there is no confusion or questions during the installation process. Further steps step by step:
- We remove all contacts from the heating element.
- We disconnect all fastons from the contacts of the protective thermostat (usually it is gray).
- Unscrew the nut that holds the protective thermostat and move it to the side.
- We remove the sensors of the protective and control thermostat from the hollow tubes in the heating element.
- Unscrew 4 or 6 nuts and remove the mounting flange holding the heating element.
- We remove the heating element from the water heater body.
- Visually inspect the heating element for rupture of the shell.
We call the dismantled heating element with a tester to make sure that it has burned out. A signal that the heating element has failed and needs to be replaced will be the absence of a sound signal and the absence of resistance readings in Ohms on the tester display.
Useful tips
To protect the heating element from high voltage in the network, you can connect the boiler via a control relay. If the set maximum is exceeded (for example, 220-230 V), it turns off the device, preventing the tube from burning out. If there are frequent surges or the voltage in the network is too low, it is recommended to install a stabilizer.
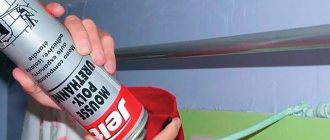
In addition to the heating element and anode, when disassembling it is advisable to pay attention to the rubber gaskets of the boiler. Timely replacement of sealing elements will prevent leaks
Before starting the boiler, you need to check it for leaks: assemble it, wipe it dry, fill it with water and let it stand for 3-4 hours. If there are no traces of water on the body and connections, the device can be connected to the network.
Rinsing the tank and descaling it
Further, all experts strongly recommend not to immediately install a new heating element, but to first thoroughly clean the container, since it, like the rest of the internal parts, is covered with scale. Try to do everything carefully, without damaging the surface of the tank. Also carefully inspect the magnesium anode; most likely it needs to be replaced; by the way, depending on the hardness of the water, it is recommended to change the magnesium anode annually. You can select and buy magnesium anodes by clicking on this link Magnesium anodes for a water heater.
Chemical method
How to clean a water heater heating element chemically? The modern domestic chemical industry produces a lot of special cleaners for removing scale and lime deposits.
A variety of express descaling cleaners for electric kettles are often used. In any enamel container, prepare a solution, according to the instructions, in an amount sufficient to immerse the heating element. It is cleansed within the time specified in the instructions on the packaging of the product.
More recently, an effective preparation “Melon ZhS17” has appeared on the market for removing old lime deposits, which is harmless to rubber parts of equipment. Contains a corrosion inhibitor.
From available means, use solutions of acetic acid in the proportion: 1 glass of essence per bucket of water, citric acid - 2 packets per 2 liters of water. The heating element is immersed in the cleaning solution for a day. To enhance the effect and reduce the chemical reaction time, it is good to heat the solution over a fire for 30-40 minutes.
When using chemicals, avoid contact with rubber seals. This can lead to loss of elasticity and leaks.
You also need to strictly follow the instructions in the instructions for the drug - do not exceed its concentration.
Monitoring the surface condition of the heating element will show when it can be removed from the solution. Before installation, rinse the element with water and then wipe dry.
If the unit is correctly connected to the water supply network, there is a cleaning option without disassembling or removing the device. The selected chemical solution is poured into the tank, one-third filled with water, through a hose attached to the drain fitting. The hose is raised above the tank level and fixed for several hours. Then the solution is drained and the tank is thoroughly washed with water.
How to descale a water heater at home is not a particularly difficult problem. If this process is carried out in a timely manner, it will require a minimum of time and labor costs.
Final stage of repair
Now you can install a new heating element instead of the old one. It is extremely important here that the element is completely similar to the burnt element, especially in the landing part, and there must also be an identical number of tubes for the thermostat sensors. In water heaters with models RZL from 30 to 150 l., IS from 30 to 50 l., IR from 80 to 150 l. There is a two-zone heating element RF 2000W/220V copper, vertical, in/out 66052. Dual-zone means that on one clamping flange there are two heating elements at once for 700W and 1300W , but at the same time three contacts come out (one pair of contacts is connected into one). This design will allow for two modes of heating water in the tank - regular and express heating.
So we bought a similar heating element and it’s time to install it in the water heater, then step by step:
- Be sure to put on a silicone gasket, preferably a new one (it is not expensive, but if it causes a leak, the problems will increase dramatically)
- We screw the magnesium anode into a special threaded area on the flange
- We insert the heating element with an anode and gasket into the body of the water heater
- We press the heating element with the mounting flange and tighten it with nuts
That is, we carry out the same procedure as during dismantling, but in a different sequence. Next, using the photo of the contact connections, we restore the electrical system, close the cover and fasten it with bolts.
With the help of a partner, we install the water heater in place and connect it to the water supply and electrical network. Now you need to completely fill the tank with water, and at this time carefully observe whether there is a leak anywhere. If everything is in order, you can turn on and check the boiler for operation. Water heaters TERMEX RZL 30-150VS, IS 30-50V, IR 50-150V have very practical designs, so replacing the heating element will take no more than 1-2 hours, even for a novice master. It is important to maintain consistency and not lose bolts and nuts.
We hope that this article on DIY repair of TERMEX water heaters will be useful and informative for you.
Thermex company is the main manufacturer of water heaters in Europe. This is a specialized enterprise founded in 1949.
The only products produced by this company are water heaters, of which it produces two million per year.
The company includes design bureaus, factories producing equipment, components and water heaters, scientific laboratories, a service department (in order to repair Termex water heaters with or without warranty), etc.
But, although Termex products are considered to be reliable, sometimes the water heater breaks down, which becomes a headache for users. During operation of water heaters, heating elements often fail, and in this case there is a need to replace them. This article tells you how to check and replace the heating element yourself if the need arises.
Instructions for starting a Thermex boiler
If installation of equipment is usually carried out by specialists, then the owners themselves have to deal with its startup at least once a year. Let's take a closer look at how to turn on a Termex water heater so as not to negatively affect its performance properties. After all, the duration of operation and frequency of maintenance largely depend on the correct execution of the process.
Work order
Turning on the boiler: The steps for starting the water heater and the settings may vary slightly. It all depends on whether a flow or storage device is used. However, despite the design differences, the order of their inclusion has the same principle. The universal instructions for starting a Termex boiler are as follows:
- Before turning on the water heater, the shut-off valve for supplying hot liquid from the common riser is closed. This occurs even if a check valve is installed on the pipe. After all, if there is a slight malfunction, the device will heat the central water supply without blocking the channel.
- Before connecting the Termex storage water heater to the network, it is filled with water. The outlet of the hot liquid device and the mixer open in turn, and after them the inlet of the cold flow. These manipulations are necessary to displace air from the system.
- After the water has flowed in an even stream, you can turn it off, turn on the unit to the power grid and, after setting the settings and waiting an hour or two, start using it.
The connection diagram for a Thermex water heater when using flow-type devices will be similar, except that the result will be felt immediately.
The next stage after switching on is checking the functionality. Before using the Thermex water heater you need to:
- Make sure that the power indicators light up when plugged in.
- Measure the temperature of the liquid supplied to the mixer.
- After 20 minutes, look at the equipment sensors; if the connection of the boiler with the touch panel is done correctly, the temperature indicator on the device should already increase. If there is no electronic panel, you must once again measure the degree of heating of the water at the outlet of the mixer.
What to do if Thermex does not turn on
The installation process of a Thermex instantaneous water heater or any other model requires the presence of serviceable network elements: sockets, circuit breakers, cables of sufficient thickness. The devices have very high power, so if they do not work, first of all, armed with a tester, you need to check the presence of electricity in the outlet, then the power terminals. Video instructions for installing a Termex water heater will help you find their location, and the tester will help you take readings. If the voltage is zero, then the cable of the electrical appliance is broken.
What to do if the Thermex water heater does not turn on, or rather, power is supplied, but it gives an error - the most popular question. In this case, you need to open the device instructions and look at the explanation corresponding to the code indicated on the display. If this option is not available, the causes of the problem may be the following:
The heating element has a damaged or burnt-out coil. A sign is often a breakdown of electricity on the housing, then the RCD automatically trips and cuts off the power supply. The only way to combat this is by replacing the heating element. The protection is triggered if the heating of the coolant rises above the set limit (usually more than 90 degrees), which occurs both when the control thermostat breaks down and when scale accumulates on the heating element, after which it overheats. The tank is not filled with water. How to turn on a Thermex ID 50V boiler or another model for the first time was discussed above, and if the requirements for removing air from the pipes are not met, a protective mechanism is triggered
Please note that this must be done even if the system is full but has not been used for a long time.
How to disassemble
The main working element of the water heater is the heating element, and if a malfunction occurs, it is this that needs to be checked first.
To check the serviceability of the heating element, it is necessary to disassemble the water heater in order to gain access.
The device is disassembled as follows:
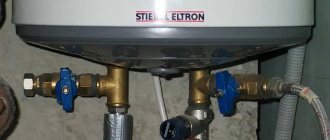
- The water supply is cut off. When installing the water heater correctly, there should be a valve at the bottom of the body to shut off the water; using a tee, if installed, or a valve, it is necessary to drain all the water from the boiler.
- De-energizing the water heater, after which it must be completely disconnected from electricity.
- Carefully remove the protective cover using a straight screwdriver. If it sits tightly, then it is slowly removed with movements reminiscent of opening a tin can. During this operation, it is important not to damage the enamel.
- Use an indicator screwdriver to check the voltage at the terminals. The disassembler must touch the iron cap of the screwdriver and sequentially ring the contacts. The light in the screwdriver should not light up in any case.
- The boiler tank is emptied of water.
- The heating elements are thoroughly cleaned of scale.
- In some cases it is necessary to remove the water heater from the wall, but in most cases this is not particularly necessary.
- It is necessary to photograph or sketch the connection diagram, and then disconnect the wires.
- The nuts securing the heating element and thermostat are unscrewed one at a time. This is necessary in order to allow any water that may remain in the tank to glass gradually.
After removal, the heating element and thermostat should be wiped with a dry cloth. Check the wear of the gasket on the heating element flange. If the gasket has surface defects in the form of tears, dents, etc., it must be replaced with a new one.
You may be interested in an article about Thermex storage water heaters.
Read an article on how to properly disassemble a Termex water heater here.
Product reviews
Andrey, Moscow : “Advantages: Heats the water quickly. Lasted a long time. We have our own service center. This makes me happy! Disadvantages: I took a tank with a volume of 50 liters, this volume is not enough for our family, hot water is consumed too quickly and we have to wait for some time for it to heat up. A year later the tank failed. The guys from the Termex service center fixed the problem (changed the heating element), because the shutdown button began to act up.”
Marina, Moscow : “Advantages: A convenient thing for a summer house if there is a problem with hot water. I periodically carry out maintenance and call a technician from the Termex center. Clean the tank elements from scale. Thank you for your efficiency and professionalism!”
Sooner or later, any owner of this device will have to replace a burnt-out heating element in a storage electric boiler. Don’t think that it will serve you for decades, no matter how high-quality and expensive the model is.
Heating elements fail for two reasons:
- scale formation and burnout of the working element (heating coil)
- corrosion and mechanical failure
Scale forms primarily in the presence of hard water. Just 1mm of scale gives 75% additional thermal insulation. Thus, the heating element under such a large layer of salts simply begins to overheat.
Disassemble the boiler, as shown below, and begin cleaning. This can be done in two ways:
- a regular knife or wire brush
- if the scale is very hard, then use citric acid or special products
How to check
You can check the heating element for operation in three ways:
- If there is a spare heating element, they replace the one they want to check and connect the unit. If after replacing the heating element the water begins to heat up, then the fault was in the heating element itself. If the heater still does not work, then the reason is something else.
- The heating element is checked using a test lamp, which is assembled in series with the heating element and connected to electricity. The illuminated light will serve as an indicator of the integrity of the heating element. If the lamp does not light up, then such a heating element is faulty and must be replaced.
- The heating element is checked for resistance using a tester. If the ohmmeter shows zero, it means a short circuit. If there is infinite resistance, there is an open circuit. In both cases, the element must be replaced.
Replacing a heating element is not a particularly difficult operation, but there is a high probability that in addition to the heating element, the magnesium anode will also need to be changed.
Reasons for the formation of deposits in a water heating tank
Scale is a hardened deposit that appears when a boiler is used for a long time. There are several reasons that contribute to the formation of plaque:
- Using too hard water. This liquid contains a lot of salt, which is gradually deposited on the walls of the boiler. Boilers in which hard water is heated are cleaned at least once every nine months.
- Strong heating of the liquid. If the water heater often heats the water to 65-70 degrees, traces of scale appear inside faster.
- Frequent use of the boiler. Water heating equipment that is used every day should be cleaned every 4-5 months.
What is a magnesium anode
The magnesium anode protects the heating element from electrochemical corrosion and is mounted, like the heater, in the boiler body.
Since magnesium is a more active material, it absorbs all the harmful environment that would otherwise end up on the heating element.
An electrochemical reaction occurs in which a substance similar to rust is formed, as a result of which it is not the heating element that wears out, but the magnesium anode. Anode wear is checked visually. If the degree of wear is high enough, it needs to be replaced.
In the event that a worn out anode is not replaced in time, a situation may arise where the heater very quickly fails again. The anode itself usually lasts no more than 15 months.
During the operation of checking and, if necessary, replacing the heating element, it is imperative to clean the inner surface of the boiler from scale and dirt.
In addition, the decomposing anode settles in flakes to the bottom of the boiler, and as a result, a dirty mess is formed, which further increases the wear of the water heater parts and reduces the service life of the device.
It is also necessary to clean the surface of the heating element, if, of course, it is in working order, and the surface of the anode. After which the water heater is assembled in the reverse order. These are the main features of the Thermex water heater belt.
An article on the use of an electric instantaneous water heater on a tap is located here: https://teplo.guru/vodonagrevateli/protochnyj-ehlektricheskij-na-kran.html
Watch detailed video instructions for replacing the heating element in a Termex water heater:
Replacing a heating element, if we are not talking about a dry heating element, in a water heater is quite labor-intensive work and requires a certain procedure. This order does not vary much among different manufacturers, however, there are characteristic features. Let's look at how to change the heating element on a Thermex boiler.
Main types of breakdowns
The functionality of the device may be impaired for a number of reasons. Characteristic signs indicate problems with the heating element.
Types of faults
The following phenomena are observed:
- The water takes a long time to heat up.
- The liquid does not reach the required temperature.
- The user is “pinched” by an electric current.
- The heating element turns on frequently.
- A hissing sound is heard as the water heats up.
- At the outlet, the water has an uncharacteristic odor and color.
If the water takes a long time to heat up and does not reach the required temperature, this indicates a breakdown.
You should stop using the boiler and carry out repairs.
Causes of malfunctions
Heaters are susceptible to the following types of breakdowns:
- Burnout.
- Scale fouling.
- Insulation breakdown.
Scale is a loose solid formation of calcium and magnesium salts. They crystallize on hot surfaces.
The substance has low thermal conductivity, as a result of which:
- The heating element is overheating.
- The rate at which heat enters the water decreases, which increases the operating life of the product.
If the scale is thick, the heater may burn out.
Water with a high content of magnesium and calcium salts is called hard. To reduce its effect on the tubular heater, a magnesium anode is used.
This is a consumable material: it gradually dissolves and therefore requires regular replacement. The average service life of this part is 15 months.
A little about the company
It is quite clear that Thermex company declares itself to be the best “in the whole world and Siberia”, that they are already 66 years old, and they work in all Europe and abroad, but there are no mentions among European brands, and even more so among leaders in the production of climate control equipment We could not find it in authoritative sources. The facts are that the company has a plant in Russia and has been operating quite successfully since 1995.
Success in the Russian Federation is ensured, first of all, by the price of manufactured products, and low prices, as is known, very often affect the quality of the final product. But more about the quality below.
Features of replacing heating elements in Termex
As already mentioned, the company has been operating since 1995 and produces only water heaters of “various” modifications. Why in quotes? Yes, because the difference between the models is minimal and this directly relates to the topic of the article.
The fact is that all Termex storage water heaters, both white and shiny and with remote control and with a display, have one feature, the company’s feature - flanges for attaching the heating element to the body. The diameter of the hole into which the heating element is inserted is 60 mm. Neither a tool nor a hand will fit into such a hole.
For those who are not in the know, we explain that every time you replace the heating element in any water heater (if we are not talking about a dry heating element), you need to clean it from the scale that has formed inside. And in the case of other brands, this can be done through the same flange for attaching the heating element. This is, for example, what cleaning a boiler looks like when replacing an Ariston heating element (the sight is not very pleasant, but better than with Termex, believe me)
You will definitely need a Termex boiler:
- Remove from the wall
- Fill with water
- Turn over in anticipation that all the “slurry” will come out of the scale
- Repeat steps 2-3 as long as you have the strength or until clean water flows
no way to manually remove the scale !
Another surprise from customer reviews is that the bolts on the flanges are tightly stuck to the nuts and there is no way to unscrew them. They are cut with a grinder. Do you have a grinder at home? Didn't come with the boiler?