If your garage does not have a well-functioning ventilation system, you will have to forget about real comfort: the constant presence of harmful impurities in the air, coupled with the unhealthy smell of dampness, will reduce the pleasure of even the most spectacular and modern decoration to zero. That's why normalizing air flow is one of your main responsibilities. We’ll talk about how to do ventilation in a garage with high quality and in accordance with all the rules with your own hands. For clarity, there is a detailed process flow chart, diagrams and numerous photos that will help keep everything under control.
Ventilation schemes
There are three ways to establish air circulation in a garage, and there is no fundamental difference whether the garage box is equipped with a basement or not. The diagrams look like this:
- Natural ventilation. It works due to the fact that the temperature inside and outside the garage is different. Despite the simplicity of implementation, it requires some (simple) calculations.
- Forced (mechanical). It is divided into three types: supply, when outside air is forced in, exhaust, when air is removed from the room, and supply and exhaust. In the latter case, equipment (fans) is used for both air inflow and air outflow. The most effective, but also the most expensive scheme.
- Mixed (combined). Combines the two previous schemes: natural ventilation is supplemented by an exhaust duct fan. The combination provides a good result in spacious rooms.
Ventilation grille for air intake Source gazeta-pravo.ru
How to calculate everything correctly?
Ventilation calculations in many cases require special knowledge and the use of complex techniques. If there is a desire and your wallet allows, the creation of a project can be ordered from specialists. Fortunately, the garage is a small space with a simple configuration.
The dimensions of the ventilation holes are calculated using the formula:
Psech=Pgar×15
Wherein:
- Psech – cross-sectional area of the ventilation hole;
- Pgar – garage area;
- 15 – coefficient reflecting the size of the ventilation hole per unit area of the room.
Those. you need to multiply the garage area by 15 mm. According to this simplified technique for a garage of 24 square meters. m. (6*4) you will need an inlet hole with a diameter of 360 mm. These calculations are very arbitrary, since the technique does not take into account the height of the room and its other features.
In practice, these indicators can be varied. For the garage discussed above with an area of 24 square meters. m. in one particular case, two 150 mm pipes were successfully used in the inflow and one such pipe in the exhaust.
To increase the efficiency of natural ventilation, you can use additional means:
- A deflector is a special cap that is installed on the edge of a vertical section of the exhaust pipe to create a rarefied atmosphere inside the structure and accelerate the movement of air masses.
- A diffuser is a weather vane for the outer part of the supply pipe; wind pressure is used to operate it.
- An ordinary incandescent lamp - it is installed inside the exhaust pipe and heats the air flow, accelerating its movement.
These simple devices can significantly improve the quality of ventilation in your garage.
The following article will introduce you to the general principles of calculating the power of ventilation systems, which we recommend that you read.
Problems solved by the ventilation system
The need for ventilation is specified in SNiP, which specifies air exchange standards and related parameters. Air circulation established according to the rules allows you to solve the following problems:
- Removes high humidity from the air. If moisture has nowhere to go, it will begin to settle on the car. Constantly forming condensate will inevitably lead to metal corrosion.
- Condensation is harmful not only to the car, but also to the building structure, tools and things stored in the garage box (for example, a bicycle). Reducing humidity extends their service life.
- The ventilation system removes not only excess moisture, but also gasoline vapors, as well as chemical compounds derived from a running engine. The less you inhale this bouquet, the safer it is for your health.
- Air exchange maintains a comfortable temperature, which creates suitable conditions for long-term storage of food.
Ventilation diagram for a garage with a cellar Source nikastroy.ru
What do you get by installing ventilation?
- Due to the influx of fresh air, you normalize the temperature in the room, achieving maximum comfort for yourself;
- eliminate the environment favorable for condensation and dampness;
- remove from the premises harmful gases and impurities that are dangerous to human life and are inevitable when storing flammable substances;
- extend the life of your car by protecting it from corrosion;
- you get the opportunity to store in the garage not only components and tools, but also food;
- achieve a pleasant microclimate for repairs and relaxation in the garage.
SNiP on dimensions and ventilation
SNiP rules provide for ventilation in garages without a basement (as in non-residential premises) with the following features:
- Constant air circulation is organized, and its parameters do not depend on the material from which the garage is built, whether it is brick, concrete or metal.
- The standards provide for an air exchange of 180 cubic meters per hour per passenger car. Conditions can be ensured using natural, forced or mixed ventilation systems.
- Additional (increased multiple) air exchange standards apply for rooms in which vehicle maintenance is carried out (repair, assembly, painting). In this case, the volume of the box is multiplied by the coefficient (multiplicity) of air exchange (standards are indicated for different types of work). For example, the coefficient for service stations is 6-8.
- The rules provide for the possibility of heating or not heating the garage space. Winter temperature +5°C is considered the most rational for storing a car. The owner would be more comfortable at +10-15°C, but in such conditions, ice and snow on the car create a humid environment.
Painting or welding work requires increased ventilation Source project-home.ru
To determine the amount of air that needs to be replaced in the garage per hour, perform the following calculations:
- The volume of the garage is calculated by multiplying its length, width and height. For example, for a building with dimensions of 6x4x2.5 m, the volume will be 60 cubic meters.
- If the owner is engaged in repairs and minor restoration, a coefficient for a service station of 6-8 is used.
- Multiplying the unit volume and the multiplicity gives 360-480 cubic meters per hour. This is the volume of air that should change every hour. Such circulation can be organized using only a mechanical ventilation system with the installation of round duct fans.
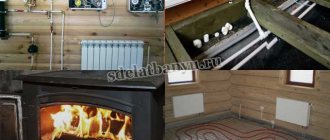
Stove chimney as an element of the ventilation system
Since in winter many motorists heat their garages with wood and oil stoves, a number of points should be taken into account when organizing air exchange:
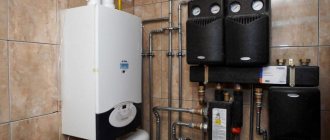
- A boiler or furnace requires air to burn fuel. The heater takes it directly from the room, so you need to take care of replenishment - ensure an influx from outside.
- A properly installed stove chimney is a good exhaust hood that works constantly, even when the flame in the firebox goes out.
- From the previous paragraph it follows: the chimney pipe easily replaces the ventilation duct, so there is no point in assembling a separate hood. One condition: after extinguishing the stove and leaving the box, fully open the damper - the draft regulator in order to improve air exchange.
The stove chimney, with the draft regulator open, is capable of removing a sufficient amount of air
Food for thought. Often, owners of garages and private houses are prejudiced against ventilation. Argument: together with the removed air mass, the building loses heat. We answer: the amount of losses directly depends on the inflow - how much air the grille lets in, how much air the hood releases to the street.
Conclusion: adjust the cross-section of the inlet openings with doors and gates. The ideal option is to install a supply wall valve.
Adjustable inlet valve built into the external wall
Features of different types of ventilation
The natural scheme involves the movement of air through some kind of air duct (for example, ventilation is often built in a garage from sewer pipes). Due to the temperature difference, warmer (and lighter) air flow moves from bottom to top, giving way to cooler air mass.
Natural circulation has many advantages to become widespread enough. It is reliable and inexpensive, operates silently, is designed for long-term operation and does not require energy sources.
Calculation of ventilation system sizes Source nataros.ru
See also: Catalog of companies that specialize in engineering systems (heating, water supply, sewerage and others) and related work
From time to time, a shortcoming of the system appears: efficiency decreases noticeably in the summer, when the temperature difference becomes minimal. Performance is determined by the following characteristics:
- Temperature difference. The system works best when it is much warmer in the garage than outside. In this case, warm air is actively displaced by cold, denser outside air.
- Atmospheric pressure. From the physics course we know that with increasing altitude above sea level, pressure drops. To arrange air circulation in the garage, a very small pressure difference is enough. This can be organized by placing the inlet and outlet openings with a height difference of 3.5-4 m.
- By the wind. The wind creates a zone of high (windward) and low (leeward) pressure. This can be used to advantage if you install the inlet along the wind rose (from the side of the prevailing wind).
The mechanical system creates forced air exchange using electromechanical devices. It includes one or more fans, sensors, dampers with manual or automatic control.
A duct fan will ensure effective ventilation of the garage Source serebklych-uk.ru
The system is assembled according to one of three schemes: supply, exhaust or supply and exhaust, and has the following advantages:
- Its effectiveness is not affected by weather conditions and time of year.
- Allows you to adjust (if there is a controller) air exchange parameters. You can change the performance and temperature to achieve a comfortable environment.
- It is possible to organize a warm influx, that is, in fact, alternative heating.
- The forced scheme is convenient to use in a garage located in the basement (below ground level).
The disadvantage of the automatic circuit is its complete volatility. It also requires funds for the purchase and installation of equipment. During operation, it needs increased attention, and periodically, qualified maintenance.
Combined ventilation is implemented as natural ventilation, supplemented by a fan. If you use a garage box only for car storage, you can use a household fan for the hood; Ventilation of the garage basement requires additional equipment.
The right microclimate will help preserve the harvest Source nataros.ru
The main advantage of the combined scheme is its efficiency: it mainly operates in natural mode, the fan is connected when the natural outflow cannot cope. Disadvantage: the need to install additional elements.
Ways to improve natural ventilation
Without using mechanical tools to enhance air exchange, you can achieve a stable renewal of the atmosphere in the garage in two ways - by heating the exhaust pipe and installing a deflector on it.
Warming up the exhaust duct
Warmed air is lighter than cold air masses entering through the supply air intake. Striving for the highest point, it exits through the exhaust ventilation duct, being replaced by fresh air from outside - the pressure of the internal (in the garage) and external (on the street) atmospheres should be equal.
When building natural ventilation in a car box, it is enough to follow the recommendations of this diagram
To improve the heating of air in the upper layer of the atmosphere inside a cold garage, you need to paint the exhaust duct black. As a result, the walls of the duct will absorb the maximum amount of solar energy and will heat the air inside the duct, causing it to move upward more intensely.
When planning natural ventilation taking into account the black color, you should not insulate the ventilation duct. However, for the “heating with an incandescent lamp” method, it is extremely necessary to thermally insulate the exhaust duct.
It gets cold in the garage in the fall. This is not a problem for a car, but for supply and exhaust ventilation it is very bad.
If the hot engine for the first hour after entering the box still serves as a source of heat for the air, then after a couple of hours in the unheated garage the temperature will be almost equal to the street temperature. And natural ventilation will stop working.
The wind flow blows over the deflector (diagram a), the air from the exhaust duct is divided into several directions (diagram b). In this case, multiple zones of low (-) and high (+) pressure appear
A regular 40-watt incandescent lamp will allow you to maintain air exchange and prevent icing of the exhaust duct (condensation will accumulate in it).
It is enough to hang its cartridge under the opening of the vertical exhaust duct and leave it on. The heat generated by the lamp is enough to move air at a speed of 0.2-0.4 m/s.
Moreover, the air duct must be wrapped in thermal insulation material and make sure that no moisture enters the insulation. There is little heat from the incandescent lamp; it may not be enough for the full length of the exhaust pipe and the air will quickly cool down.
Note that the use of fluorescent or LED lamps does not improve air exchange - they generate significantly less thermal energy. Only incandescent lamps are suitable.
Installing a ventilation deflector
This device helps to increase the exhaust draft by up to 20% without the use of any mechanical devices - due to the formation of a low pressure zone at the head of the air duct.
Based on Bernoulli's law, deflectors change the movement of air flows due to their design (section).
The parameters of the TsAGI deflector elements are tied to the diameter of the exhaust ventilation duct. The numbers in the diagram indicate: hood head (1); diffuser glass (2); outer casing (3); hood struts (4); cap (5) (+)
The wind is forced around the curved body of the deflector, which leads to the formation of miniature zones of relative vacuum, causing the mass of air in the pipe to move upward.
Structurally, the ventilation deflector (using the example of the TsAGI project) consists of the following elements:
- A diffuser (glass) in the shape of a truncated conical pipe. The narrow side fits onto the exhaust pipe. Helps establish air pressure differences and increase traction.
- A cap (umbrella) that protects the air duct from the penetration of flying debris and precipitation.
- Outer body having a cylindrical shape. Creates low pressure zones by cutting wind flow.
The TsAGI deflector type is widely used to enhance the natural draft of ventilation pipes in Russia. Along with it, disc-shaped, weather vane, H-shaped and rotary deflectors are known.
By the way, domestic natural ventilation hoods are especially often equipped with a Grigorovich deflector.
The efficiency of exhaust deflectors of any design is directly related to atmospheric conditions, namely the presence of wind.
That is, in strong winds this device develops maximum thrust in the natural ventilation system, but in calm conditions it does not work at all.
The defining moment is the proximity of the roof ridge. The closer it is to the pipe, the higher it should be raised (+)
The deflector can not only improve draft, but also prevent “clogging” of the exhaust pipe during strong winds, which low-current natural ventilation cannot overcome.
In addition, the ventilation complex equipped with a deflector device is most protected from draft overturning.
We draw attention to the need to raise the headband of a hood equipped with a deflector above the roof plane by half a meter or more. The location conditions regarding the proximity of the roof ridge, discussed in the diagram above, also apply.
Natural ventilation device
Questions about how to properly install ventilation in a garage often have to do with organizing natural circulation, which is not surprising: there are several subtle points in a seemingly simple scheme.
Before starting work, you need to calculate what diameter pipes you will need. SNiP rules stipulate that a square meter of garage area corresponds to 1.5 cm2 of air duct diameter. For example, for a box with an area of 20 squares (5x4 m), a pipe with an internal diameter of 20x1.5 = 30 cm2 is required. If you want to install not one, but two hoods (and, accordingly, two supply channels), their diameters will be half as large (two 15 cm each).
The system is attractive due to its ease of installation; construction consists of the following stages:
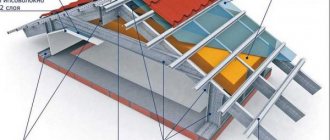
- The exhaust hole is made 10-15 cm below the ceiling. The pipe is brought above the roof to a height of half a meter and protected with a mesh and a cap.
The simplest natural ventilation Source nataros.ru
Process flow chart
Let us consider in detail the algorithm for arranging natural ventilation from sewer pipes. As an example, we take a conventional garage with a total area of 20 square meters. meters.
Step 1. Calculations.
For every 10 sq. meters of room area should be at least 15 cm in diameter of the channel. Accordingly, for a garage of 20 square meters you need a channel with a diameter of at least 30 cm. But if you make several exhaust holes, then divide these 30 cm by their number.
Step 2. Draw a diagram of the location of the ventilation holes.
To simplify the process, we offer you ready-made options that may well be suitable.
Step 3. Create an opening into which air will flow.
This is done with a hammer drill - just count at least 10 cm from the floor.
Step 4. Make an exit.
It is best to do it on the opposite wall - with the only difference that 1 cm this time is counted not from the floor covering, but from the ceiling.
Step 5. Install the pipe. It can be metal or plastic and must extend above the roof at least 30-40 cm.
Step 6. Fill any voids between the pipe and the wall with sealant. This will prevent condensation and the spread of dampness.
Step 7. Place the deflector on the pipes.
This is a simple device that will significantly speed up the movement of air back and forth through the pipes. In addition, it prevents precipitation from penetrating the pipes.
Ventilation diagrams with inspection pit and basement
Very often there is a need to arrange ventilation for a garage with a cellar and an inspection pit. Air circulation is necessary both for comfortable work in the pit and for removing moisture from stored products.
As a rule, the power of the ventilation system organized in the garage is sufficient to ventilate the pit. If the pit is covered with boards or shields, there is no need to install a separate structure; The ventilation problem is solved in two ways:
- Boards are periodically removed from the pit.
- The pipe from the supply channel is extended into the pit. For installation, you can use plastic sewer pipes.
In a garage with a basement, a natural, mechanical or combined ventilation scheme can also be implemented; The first option does the job quite well. However, if you need to ensure ventilation of the vegetable cellar, the work becomes somewhat more complicated. To ventilate a garage with a basement, you need to organize:
- Supply air duct. As in the case of the inspection pit, the supply channel is extended down into the cellar. It ends at a distance of 20-50 cm from the basement floor.
Scheme with extended channels Source pinimg.com
- Additional exhaust duct. It starts under the ceiling of the cellar and connects to an exhaust duct that discharges air to the street. The exhaust pipe is equipped with a tap for draining condensate.
- Pipes indoors are insulated to reduce the formation of condensation (it will inevitably appear due to temperature differences).
Why ventilate your garage?
Of course, a garage is a technical, not a residential facility, although some car owners may disagree with this statement. If a car enthusiast spends a significant part of his personal time in the garage, and even uses the basement or the garage itself to store food supplies, all the more one should be concerned about the problem of proper air exchange in such a specific room.
To begin with, there is a high concentration of exhaust gases, fuel vapors and other technical fluids. Even a short stay in such an atmosphere is extremely harmful for a person.
Image gallery
Photo from
Natural ventilation scheme for garage
Air exchange system in an insulated garage
Removal of substances harmful to owners
Ventilation system exhaust pipe
The second problem associated with improper garage ventilation is excess moisture. Water vapor accumulates indoors and condenses on various surfaces, including the car. As a result, the risk of occurrence and the speed of corrosion processes increases sharply; in other words, the vehicle rusts.
Vegetables, canned food, and other foods or things that do not have a place in a house or apartment are often stored in garages or cellars built underneath them. Contact with moisture, as well as exposure to technical vapors, will not bring any benefit to all these objects. And the problem can be solved simply, just take care of effective ventilation.
If ventilation is poor, droplets of condensation may appear on the walls and ceiling of the garage. This moisture then gets onto the vehicle, which can cause corrosion.
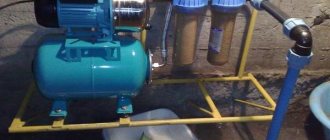
Forced (mechanical) system equipment
A simple scheme that provides mechanical air circulation has some features:
- The arrangement of inflow and exhaust channels is carried out according to the rules of the previous scheme.
- A supply and exhaust duct fan of round cross-section is installed in the openings; in a warm box, a heater is used to heat the inflow. Fan parameters (power, performance) are selected taking into account the required performance; Additionally, you can install a timer and a humidity sensor.
Option for forced exhaust in the garage Source rushoros.ru
Installation of a mechanical ventilation system
Its main advantage is its independence from natural factors. There are two main disadvantages: dependence on electricity; quite high cost. Centrifugal fans provide air inflow and exhaust air volume removal.
The following mechanical ventilation systems are installed in car boxes:
- Modular. The supply and exhaust complex is assembled from several independent blocks that ensure the injection and preparation of supply air, as well as the removal of polluted atmosphere. Such modules operate independently; control sensors are required for their joint operation.
- Monoblock. Each such block is a complete mechanical ventilation device; it is responsible for supply and exhaust simultaneously. Among monoblock ventilation devices, models equipped with recovery plates are considered economical. Recuperation allows minimizing energy consumption for heating the supply air.
Monoblock mechanical ventilation is easier to install by preparing a single hole in the garage wall. However, an air supply complex equipped with the necessary modules is more productive.
The ability to build a complex with the required “air” characteristics is the advantage of a modular supply and exhaust complex (+)
Fresh air is filtered before entering the air ducts and, in the cold season, heated. It is supplied to the garage through air ducts through grating-covered holes made in the floor or walls almost flush with the floor, as well as in the walls of the inspection pit.
The exhaust air is taken in through an exhaust pipe, in the channel of which a fan of sufficient power is installed.
In large car boxes designed for several cars, it is more efficient to exhaust through air ducts and using a duct ventilation unit.
Combined hood
In such a system, the relative position of the channels does not play such a role as in previous versions. The supply and exhaust openings can be made, respectively, at the floor and at the ceiling, or at the same height or on the same wall. The only limitation is that the channels are not made opposite each other; with this arrangement, air flows between these points without affecting the rest of the space.
Grilles protect ventilation from rodents Source nataros.ru
The peculiarity of the combined system is that the supply channel operates in a natural mode, and the outlet channel operates in a forced mode. A fan is built into it; for a garage, this means that a process is started in which air is forcibly removed from the garage box, and fresh air from the street enters in its place.
The combined scheme has a pleasant balance of economy and practicality. It is designed for year-round operation, while costs remain minimal. It is better to give preference to devices with a plastic body and a special impeller design.
Such models are not afraid of corrosion and operate in constant ventilation mode. A suitable model is selected based on dimensions, recommended service area, and other parameters (for example, silent operation). Before installing the fan, it is advisable to insulate the air duct.
Supply fan for organizing forced ventilation Source nataros.ru
Internal insulation of the garage
Ventilation may not cope with condensation - you may need to insulate the garage from the inside to change the location of the dew point. To do this, choose moisture-resistant materials with low thermal conductivity. Most garages in Russia are insulated with polystyrene foam, although its modern analogues, polystyrene foam or penoizol, are thicker and insulate better.
To insulate a garage, it is not recommended to use mineral wool and other fibrous materials, which get wet, lose their properties and inevitably lead to local disasters in the garage.
Alexb4FORUMHOUSE Member
I insulated the ceiling in the garage with mineral wool, which I don’t recommend. When the temperature changed, condensation accumulated on the floor slab, and as soon as the stove was heated, it all began to flow down. The mineral wool was getting damp and was of no use.
When insulating a garage, remember that:
- Polystyrene foam and its derivatives are mounted on the sheathing, and sheets of finishing sheathing are attached to it.
- There is no point in installing thermal insulation in a damp and cold room, so before starting work, the garage is heated with a heat gun or a hair dryer.
- Thermal insulation will not work properly without sealing the joints between the materials. One of the reasons for the appearance of condensation is poor sealing of seams.
- In brick garages and shell rock garages, the walls are insulated on both sides. There is no external insulation in a metal garage.
Briefly about the main thing
A garage needs a well-thought-out ventilation system, because insufficient or ineffective air exchange can make the room uncomfortable for both the car and its owner. The situation can be corrected by organizing natural, forced or mixed ventilation.
The device of natural ventilation is considered the simplest option, which does not require financial investments and special skills. You should start by calculating the minimum permissible pipe diameter that can adequately ventilate a room of a given size. If the garage has an inspection hole or basement, the system is slightly modified.
Ratings 0
Calculation of ventilation air volume and channel cross-section
The vast majority of motorists do not bother with calculations - they studied the diagrams on the Internet, watched a video and installed air ducts from Ø100 mm in-house sewerage pipes. If you want to delve deeper and calculate the parameters of a garage ventilation system, we suggest that you familiarize yourself with the requirements of regulatory documents:
- Air exchange inside the boxes is regulated by the regional document MGSN 5.01-01 “Parking areas for passenger cars.” Paragraph 3.17 states: the minimum air flow rate for 1 car is assumed to be 150 m³/h, or a double renewal of the air environment is provided.
- Departmental standards VSN 01-89 put forward the following requirement for inspection pits: the exhaust ratio from the ditch must be 10.
- Air exchange standards for storing vegetables are prescribed in clause 8. 1. 4 of document NTP-APK 1.10.12.001-02. The volume of inflow and exhaust is 3.5 m³/h for every 100 kg of potatoes and 7.5 m³/h per 100 kg of other vegetables.
Reference. The air exchange rate shows how many times within 1 hour the influx renews the air environment in the volume of the box.
The progress of the calculations is easiest to show using the example of the garage shown above in the drawings. We preliminarily determine the internal volume of the room - 95 m³, ditch (6.6 m³) and cellar (12 m³). Further calculation is performed as follows:
- According to MGSN 5.01-01, we multiply the volume of the box by a factor of 2, we obtain an air flow of 95 x 2 = 190 m³/h. The figure meets the minimum requirement for 1 machine 150 m³/h.
- The exchange rate in the pit is assumed to be 10, the amount of air is 6.6 x 10 = 66 m³/h.
- Suppose 400 kg of potatoes and 200 kg of other vegetables are stored in the basement. We calculate the ventilation air flow: 3.5 x 4 + 7.5 x 2 = 29 m³/h.
Comment. A tenfold exchange in the ditch must be laid when constantly carrying out repair work from below the car (as in a car service center). Under normal conditions, a twofold renewal of the air environment is sufficient: 6.6 x 2 = 13.2 m³/h.
Knowing the costs in each garage compartment, it is easy to find out the cross-section of the supply and exhaust air ducts using the formula:
- F – channel cross-section in square meters;
- L – inflow volume (flow), m³/h;
- ʋ — air flow speed in pipes and grilles; with natural exhaust, it is recommended to take 1 m/s.
For an ordinary garage, where the ditch is used periodically, we include in the calculation the minimum costs of 150 and 13.2 m³/h. We sum up these values and determine the cross-section of the ventilation duct: F = 163.2 / 3600 x 1 = 0.045 m². Using the formula for the area of a circle, we find out the diameter of the air duct - 240 mm. With a slight stretch, the use of two plastic pipes Ø150 mm is allowed.
Example: a grid measuring 230 x 230 occupies 0.053 square meters. m., and its open cross-section is only 0.02 square
The figure 0.045 m² also shows the required flow (live) cross-section of the supply grille, which is approximately 50% smaller than the actual dimensions of the product. This means that we take a cross-sectional area of 0.045 x 2 = 0.09 m² and, by selection, find out the dimensions - 0.3 x 0.3 m or 300 x 300 mm. This grid is too big, it is better to make 2 openings in the wall and install two grids with dimensions of at least 150 x 300 mm.
The size of basement air ducts is calculated in a similar way: F = 29 / 3600 x 1 = 0.008 m². The diameter of the pipe will be 0.1 m or 100 mm. For details on the nuances of installing ventilation in a garage and the passage of pipes through the ceiling, see the video:
Air purification in the cellar
As a rule, a garage is used not only for parking a car, but also for storing food. Accordingly, this also provides additional moisture. But even if storage is not carried out, ventilation of the pit must be organized for comfortable work in it.
As experts note, natural ventilation is the best option in the cellar.
Provided there is good air exchange in the room, it is possible to use pipes with a diameter of 10 centimeters.
One of them is installed around ten centimeters from the floor, and the second on the opposite side, ten centimeters from the ceiling. The end of the top pipe is brought out.
It is also worth taking care of the protection of the hood.
Garage roof insulation
When they get tired of the drops falling from the garage ceiling every time the heater is turned on, car owners think about insulating the ceiling.
The easiest way to insulate a garage ceiling is to pour a thick layer of brick chips or expanded clay onto the roof. These materials:
- perfectly absorb moisture;
- dry well.
Typically, these bulk materials are covered on top with roofing felt, which is placed on a screed, or plywood (OSB). This design lasts for 10 years.
If you don’t want to spoil a good roof made of corrugated sheets, there is an option to glue sheets of 55mm EPP or other insulation onto the mounting foam from the inside.
Ventilation in the vegetable pit of the garage
Ventilation of vegetable storage is necessary all year round. Condensation collects inside the cellar if there is insufficient air exchange. This negatively affects both the crop and the air environment of the entire garage. Excess moisture will certainly get to the place where the car is parked, provoking oxidative reactions of the metal.
Natural ventilation in the vegetable pit in the garage operates using exhaust and supply pipes. They are installed in diagonally opposite corners. The inlet is low near the floor, the exhaust is near the ceiling to effectively capture warm, stagnant air.
As a rule, two ventilation ducts are enough to ensure constant air circulation. It is best to arrange ventilation at the stage of laying the foundation of the building. But even for a finished building, there are options for arranging a ventilation system for a vegetable pit.
In the summer, cravings worsen or disappear completely. In this case, it is advisable to install an exhaust fan. Mechanical ventilation in a vegetable pit in the garage will regularly remove moist exhaust air regardless of the time of year, wind direction, etc.
It is recommended to make the ventilation of the vegetable storage independent from the ventilation system of the garage building. The exhaust pipe from the cellar runs indoors through the roof or outside along the wall. The inflow is also often installed separately.
Solid garage floor
Another important measure for eliminating and preventing condensation in the garage is concreting the entire surface of the earthen floor and the inspection pit of the garage so that moisture from the soil does not enter the room. If for some reason this cannot be done right now, you need to find another way to completely cover the ground.
AfavaFORUMHOUSE Member
The most budget-friendly option is to lay roofing felt, linoleum, or whatever you find from this range under the garage.
The problem of condensation in the garage can be solved by installing a blind area (without it, rainwater may flow under the garage) and eliminating possible foundation defects.
How to make natural ventilation effective
In order for the natural air exchange system to meet the minimum sanitary requirements for the garage premises, the following points must be taken into account when planning and arranging it:
- The inlet openings should be located at the lowest possible distance from the ground surface; they try to place the cut of the exhaust pipe at the maximum height. In this case, there may be several inlets, and there is only one exhaust pipe for the garage; for the basement it is necessary to install its own separate exhaust pipe;
- To reduce the number of stagnant zones and ensure maximum flow around vehicles stored in the garage, supply ventilation windows should be located at the maximum horizontal distance from the exhaust pipe.
- To ensure ventilation of a room of 15 m2 with a normal air exchange rate of 4-5 times per hour, a 100 mm exhaust pipe is required. As the garage area increases, with each additional square meter the pipe diameter increases by 10 mm.
Advice! Thus, for natural ventilation of a standard garage of 24 m2, a pipe of almost 200 mm is theoretically required. In practice, such exhaust ducts are not used; instead of one thick pipe, two “weaves” are installed.
In addition, the above calculation was performed for a standard ventilation pipe cut height of 3000 mm above the ground. One pipe for garage ventilation, raised to a height of 5 m, will show a performance of 40% greater than the total capacity of two pipes with an installation height of 3 m.
An increase in the diameter of the exhaust channel from the calculated value does not always lead to an increase in draft. Reducing the diameter makes natural ventilation more stable, but reduces productivity. The optimal value of natural ventilation performance can be obtained based on the above calculations. In this case, the dimensions of the supply windows must correspond to the diameter of the hood.
Summarizing
Condensation in a garage is a serious problem that leads to corrosion of the car body and slow but steady destruction of the garage premises. Therefore, it should be eliminated immediately. To understand how to get rid of condensation in the garage, you first need to find out the reason for its occurrence. But, in any case, a garage always needs good supply and exhaust ventilation, and if it doesn’t work, you need to move on to insulating the walls, ceiling, gates and waterproofing the floor.
At FORUMHOUSE you can learn more about how to get rid of condensation on the garage floor, how to properly arrange ventilation in the garage, and how to better insulate the garage. Read our article about the interior arrangement of a garage, watch a video on how to build a garage-workshop with an attic.
Subscribe to our Telegram channelExclusive posts every week
Ventilation above the painting area
Car enthusiasts often repair and paint cars in the garage. Of course, the dyeing process releases quite a lot of toxic compounds that are potentially hazardous to health.
It is important to provide this area with additional hood. At the same time, experts and more forward-thinking garage workers note that the ventilation system above the painting area should also be equipped with filters
Please note: forced exhaust must be done above the painting area. Natural ventilation in such a dangerous place will not be enough, since its efficiency is quite low
The air must be cleaned of harmful chemical compounds as quickly as possible.
The most successful solution is to install a forced ventilation system with two fans. One fan will enhance the outflow of polluted air, and the other will actively pump in clean air. It is better to install filters on both air ducts, for outflow and inflow.
It is also important to ensure normal conditions for the work itself in the garage. For example, when the body is being painted, any tiny speck that comes from the air instantly stands out on the fresh paint.
That is why the floor in the garage must be moistened before work, and the inlet must be reliably protected by a filter. Then particles of litter and dust will not penetrate into the room.
When a hood with a filter is installed correctly, it will prevent harmful toxic fumes from entering the atmosphere. Remember also about the correct location of the air ducts. The exhaust duct is located at the bottom, but the hole for the flow of fresh air is mounted under the ceiling of the garage room. Then harmful vapors will fall down and immediately and quickly be eliminated from the garage.
Calculation
The most important part of creating ventilation is making calculations.
A well-designed scheme will not leave dead zones and will ensure a sufficient flow of fresh air. It is important to calculate two parameters: the area of the holes and air exchange - the volume of air pumped into the room per hour
Air exchange is calculated using the formula:
P = Width*Length*Height* (temperature inside - temperature outside)*0.36, where dimensions are the size of the spray booth, and 0.36 is the correction factor.
When calculating temperature differences, adjustments are made for seasonality. It is believed that the temperature inside should be maintained at +22 °C. And outside they determine the maximum and minimum and count the 2 differences. Then the average is taken.
Example! There is a box 4X6X2.8 meters, the outside temperature is +10 °C. Then air exchange: P=4*6*2.8*(22-10)*0.36 = 290.304 cubic meters per hour. This means that in an hour in a room with a volume of 67 cubic meters, the air should completely change approximately 4 times. During drying, this parameter increases.
The dimensions of the ventilation duct are calculated from the ratio: there should be 1.5 centimeters of opening per 1 square meter. If the ceiling area is 6x4 meters - 24 square meters, then the ventilation area is 0.36 meters. During installation, you can divide one hole into several smaller holes, for example, into a pair - 0.18 meters each. If the room is actively used, then be sure to install a fan.
Recommendations
The criteria for installing ventilation system elements are the same for all garage compartments. Let us briefly list the main ones:
- the exhaust pipe is installed under the ceiling in the diagonally opposite corner from the inflow;
- the inlet inlet is located 15-20 cm above the floor and must be covered with a fine-mesh metal grille to protect against rodents;
- the diameter of the ventilation pipes is calculated in advance, based on the volume of the room, conditions, location, etc.;
- exhaust pipe - equal or less in diameter, but not larger than the supply pipe;
- to enhance traction, you can use mechanical means, diffusers, turbo deflectors, etc.;
- the exhaust outlet is located at a distance of at least 3 m from the supply inlet (for effective draft);
- the supply inlet is located above the ground at a level of 50 cm;
- In winter, it is necessary to insulate the hood so that frost and ice do not accumulate inside;
- in winter, you should ensure that the ventilation pipes always remain free of snow and frost;
- separate location of ventilation systems for garage buildings and basements.