The traditional floor covering for the kitchen is linoleum. It is practical to use and has a beautiful appearance. However, recently the trends have changed significantly, and many are resorting to using a combined solution consisting of tiles and laminate. We propose to understand what requirements are imposed on the floor covering in this case, what advantages the combined option has, and what solutions can be used as an idea for subsequent implementation
Requirements for a combined floor
When choosing a finishing material, attention is paid not only to its appearance, but to its technical characteristics. Subsequent operating conditions have a significant impact on the final result. Otherwise, the service life of the floor covering will be significantly limited.
When choosing tiles and laminate for the kitchen, you should make sure that the selected model has sufficient:
- mechanical strength and can withstand operational load;
- wear resistance, preventing the appearance of various defects on the surface;
- moisture resistance;
- practicality.
Attention! Considering the frequency of kitchen renovations, you should choose a model with a guaranteed service life of more than 10 years.
The selected floor covering should fit harmoniously into the interior of the kitchen. It should not be prone to the appearance of greasy stains: the top layer should be easy to wash off. Models that allow the use of special stain removers are preferred.
Combination ideas in different interior styles
In the minimalist style, a more restrained finish is assumed with rather modest and laconic color schemes, in gray, black or white colors; for the high-tech direction, choose a combination of glossy ceramic tiles with laminate boards in dark gray, black, anthracite or wenge shade.
Scandinavian design can be decorated using light tile finishes or models with imitation wood, stone or marble, which, in combination with beige, white, limestone or ivory laminate, will have a pristine and natural appearance.
The photo shows a Scandinavian-style hallway with a floor lined with patterned hexagonal tiles combined with beige laminate boards.
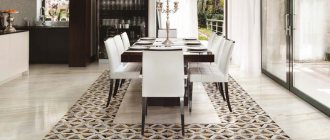
In rustic country, they often use laminate fabric in walnut, red, rich brown or beige shades in combination with multi-colored mosaics or patterned ceramics in the patchwork style, and for an industrial loft they prefer laminate that has a shabby and aged look in combination with dark tile cladding or products that imitate brick.
The photo shows a laminate floor combined with patchwork tiles laid in the center in a country-style kitchen interior.
Pros and cons of tiles and laminate in the kitchen
Installing laminate flooring alone or just tiles in the kitchen is fraught with certain difficulties. The first one quickly loses its original appearance. Tiles without special heating remain quite cold and uncomfortable. By laying combined flooring, you can immediately solve several problems. Successful:
- create a safe sanitary zone near the kitchen unit, which even the most durable and high-quality laminate cannot create. In terms of strength indicators, tiles are two orders of magnitude superior to laminated panels;
- prevent possible swelling of the floor covering when water flows under the kitchen cabinet. The tile retains its geometric shape during prolonged contact with water, unlike laminate, which swells, losing its appearance and shape;
- prevent the surface of the floor covering from being pressed under the influence of the load created by the metal supports of the kitchen unit. When laying laminate flooring, it is not possible to avoid such a problem. A layer of PVC or pressed paper is pressed through quite easily;
- lay comfortable and practical laminate flooring over almost the entire kitchen area;
- visually divide the flooring into separate zones, designating a work area for preparing lunch and a dining room for eating;
- optimize repair costs without sacrificing the practicality and functionality of the flooring;
- Make it easier to keep your kitchen clean.
Despite a number of obvious advantages, this option also has some disadvantages. Careful consideration must be given to the design of the flooring so that the materials look beautiful next to each other. Otherwise, there will be a feeling of some incompleteness.
Attention! A perfect combination of two different materials can only be achieved through proper selection of their color, texture and color.
How to care for tiles?
If the tiles are chosen and laid correctly, if all stylistic and technical recommendations are taken into account, the floor will initially be beautiful and comfortable. But how long this will last depends on proper care. Ceramic coatings must not be cleaned with hard steel brushes. It is better to spend more time scrubbing away dirt with gentler products than to create permanent cracks, scratches and splits. The detergent composition is selected individually for each type of material and even for its modification. In this case, you cannot neglect the recommendations and prohibitions of the manufacturers. So, ordinary soap is more likely to stain the tiles additionally than to remove dirt. Porous materials cannot be cleaned with abrasive agents - as a result, the contamination will only become deeper. An almost ideal option is to wash with warm water with the addition of ammonia or glass cleaner.
Stains containing grease are destroyed with an aqueous solution of baking soda. Blood stains will disappear in minutes upon contact with hydrogen peroxide. At the entrance to a tiled corridor, you should put a fabric or rubber mat. Street dirt will remain on it and will cause less inconvenience. The tiles are often treated with a mixture that reduces adhesion - it reduces the amount of accumulated dirt. The seams separating the tiles should be impregnated with sealant immediately after laying. This composition should prevent the formation of mold. As practice shows, it also contributes to the long-term preservation of the original color. If the grout is made with cement mixtures, you can clean it only with soft sponges and gentle reagents. Epoxy reagents are more resistant to aggressive substances.
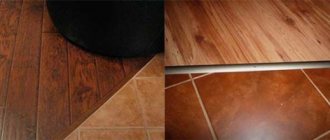
Transitions
The junctions between laminate and tiles should be properly designed. Only in this case will the laid floor covering have a finished appearance. This can be done with or without a threshold.
Without threshold
If you decide to abandon the threshold, the following will help to design the transition beautifully:
- cork compensator;
- liquid plug.
In the first case, a strip of cork is glued at the junction of the tiles and the laminate. The laminated panel at the junction must be impregnated with a composition that protects against moisture. Cork material is classified as environmentally friendly. Has a long service life. This makes it possible to use it when decorating any room, including the kitchen.
Attention! The choice in favor of a cork compensator should be made only if the height of the tiles and laminate is comparable. Otherwise, the opposite effect will be obtained.
The method can be used in the presence of straight and curved transitions. To enhance the effect, you should use a cork expansion joint with a designed top layer. The protective varnish, paint, and veneer look beautiful.
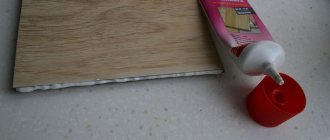
Liquid cork is a mixture based on cork chips and glue. Thanks to its thoughtful composition, the connection point is not afraid of significant temperature fluctuations and mechanical stress. Due to this, the liquid cork option is preferable to using a cork compensator. The prepared mixture is rubbed into the space separating the tile and laminate.
We use the threshold
If you don’t want to bother with the cork layer or liquid mixture, you can use a special threshold. In this case, the installation process is greatly simplified. Manufacturers offer ready-made thresholds of various widths and configurations. Can choose:
- straight with the same thickness of the laid laminate and tiles;
- angular, if the difference in height exceeds 5 mm and you want to create a smoother transition;
- bendable if the joint has the shape of a curved line.
In addition to the shape, when choosing a threshold, you should pay attention to the material from which it is made. Manufacturers offer:
- Vinyl. Allows you to design curved joints, ensure a smooth transition between single-level surfaces, and beautifully design a junction that has different finishing heights. Plastic thresholds consist of a base and a decorative nozzle. They allow you to level out height differences within 8 – 9mm. Flexible elements are easily transformed and take the required shape. A wide color palette allows you to choose the best option for any design solution;
- Aluminum. A fairly rigid element that helps to level out differences in height and hide minor problems that appear after the completion of finishing work. Manufacturers offer products with a special coating applied to the surface. The installation procedure for the aluminum threshold may vary slightly. They produce products with already cut holes for screws. There are powders with a hidden method of fastening and glued to the base using a special self-adhesive.
A wide selection of colors, standard sizes and configurations allows you to select the optimal threshold for a specific transition.
Main technical characteristics of the floor covering
When choosing material for the floor in the hallway or kitchen, you should not be too demanding about the technical characteristics - you still won’t be able to notice much of a difference, but still you shouldn’t completely discount them. Now we will look at the main ones that may influence the home master’s decision when purchasing.
Porosity of flooring material
This parameter determines the strength and frost resistance of the tile. Typically it ranges from 3 to 10%. The lower the percentage, the higher the quality of the material, and therefore its cost. But for the flooring of the kitchen and corridor it does not play a special role. Of course, if you don’t plan to roll heavy carts on metal wheels along it and freeze the hallway in the winter. During normal use, you can turn a blind eye to this indicator.
Hardness and wear resistance of floor tiles
This parameter is measured by class, in the PEI category and can be anything; for an apartment it also does not matter. But it is worth understanding that the higher the wear resistance, the more expensive the material will be. Then the question arises, what is the point of paying extra money for something that is completely unnecessary? It is up to the master to draw conclusions.
Professional styling using a laser level
Flooring strength characteristics
The Mohs scale requires a score of 5 or 6. It turns out that these are just average values. Nothing bad will happen if you take a more durable floor covering, but given the area of the hallway and kitchen, this can “make” a hole in the budget.
Safety requirements
This is where it is worth paying attention. On a thirteen-point scale, the friction coefficient should not be lower than 0.75, and the anti-slip index should not be lower than 10 out of 13
Otherwise, there is a high risk of injury from falling on a slippery floor.
Chemical resistance
This indicator is also quite important. After all, the apartment often has to be cleaned with the addition of various chemical-based detergents. After all, it won’t be very pleasant if the floor covering quickly becomes unusable due to their use. The indicator for this criterion for floor tiles must be A or AA.
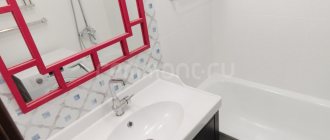
When cleaning the floor, this edging saves the wallsGrouting joints
If the tiles and laminate are located at the same height and the gap between them is minimal, instead of using special layers and thresholds, you can try to rub the joint with a special compound. The butt-to-butt method allows you to implement:
- Sealant. Depending on the size of the gap and the desired effect, you can choose a transparent composition or give preference to a colored material;
- Conventional construction foam;
- Special grouting paste, available in a wide range of colors;
- Fugue for tiles;
- Liquid plug described above.
The characteristics of the listed compositions may differ significantly. When choosing the appropriate option, you should make sure that they have sufficient adhesion to the surface of the tiles and laminate. Otherwise, the desired effect will not be achieved.
DIY installation features
Despite the apparent complexity, most of the finishing work in your home can be done on your own if desired. Laying a combined floor with your own hands is no exception. There are some installation features that you should familiarize yourself with in advance. This will allow you to avoid common mistakes and help you complete the planned amount of work efficiently.
To achieve a high-quality result, you should initially try to bring part of the floor surface, decorated with laminate, and the second part, covered with tiles, to the same level. To do this, before you start laying the tiles, you need to know exactly which laminated panels will be laid and how thick the backing will be.
If the difference is small and the tiles are thicker, the existing height difference can be compensated for using tile adhesive. Apply a layer of sufficient thickness and then lay the selected finishing material. Otherwise, you will need to fill the self-leveling unit to level the surface and compensate for the difference in height.
When starting to lay laminate flooring, you should pay special attention to the instructions provided by the manufacturer. It describes in detail the procedure and also indicates the need for compensating gaps between the wall and the floor surface to be laid. At the junction of the laminated panels and tiles, we cut off part of the backing and film, leaving about 10 cm of the base uncovered. We cut the laminated panels to size and check the quality of the joint. Remove the outermost row and put it aside.
We fix the outer row of the laminate using a plastic adhesive composition that has good adhesion to both types of flooring and has sufficient plasticity. Apply the prepared composition to the previously cleared substrate.
On the applied adhesive composition we lay the previously adjusted to size outer row. When laying laminated panels, we ensure the formation of an equal gap between the tiles and the laminate. To obtain the desired result and simplify the work, special devices are used.
After a day, after waiting for the adhesive composition to dry completely, the joint venture can be removed. As a result, a perfectly flat surface is formed between the tiles and the laminate.
We fill the gap between the tiles and the laminate with a sealing compound. It is advisable to choose a sealant whose color is close to the installed floor covering. We ensure high-quality filling of the space between layers.
We level the sealing compound and remove its excess using a special device. If desired, it can be placed at an angle and form a beautiful chamfer at the transition point of the laminate to the tile. We constantly dip a rubber spatula into the soap solution to prevent streaks from appearing on the floor surface.
This should be done as often as possible in order to get a quality result in the end.
If you decide to use a threshold to design the transition, the work will be performed slightly differently. In this case, it is not necessary to align the mating surfaces in the same plane. We invite you to watch a video that will help you get high-quality results without much effort:
The method for forming a non-standard joint is presented in the following video:
Combination with furniture
When working on the design of a combined floor surface, you should make sure that the color of the laminate and tiles will combine favorably with the colors of the furniture facade. It is worth choosing the optimal color scheme before the main repair work begins.
There are no special problems if the kitchen furniture is made in light colors. Almost all colors of floor coverings can be combined with a set in white, cream or beige. The main thing is to give preference to warm tones. For the rest of the floor I choose red-brown or dark colors. This combination looks the most advantageous.
If you prefer a kitchen set in dark colors, you will have to perform a color division. To do this, the dark facade is complemented with contrasting apron cladding or most of the wall is made light. Light tiles on the wall and floor of the room go well with each other and dark kitchen cabinets. The latter is complemented with a chocolate-colored laminate. The upper tier of wall cabinets in this case can make the overall impression heavier. In most cases, their installation is refused.
If the kitchen has large enough windows and the walls and ceiling are made in light colors, dark furniture is complemented with brown laminate, combined with light tiles. With this combination, the part of the floor surface covered with tiles looks wider, visually expanding the boundaries of the kitchen space.
Video description
The technology for painting OSB is described in the video:
Advice ! For processing and decorative finishing of the floor, it is advisable to use all products from one manufacturer.
If varnish is used, the first layer can be applied with a brush or roller. When it dries, the surface is slightly moistened and “smoothed” with a wide spatula, removing small splashes, stripes and other irregularities.
When finishing, a small amount of varnish is poured onto the floor and spread with a spatula using wide movements to obtain an even and thin layer.
All work must be carried out at air temperatures above +5 degrees.
Design Tips
Many designers use the combined option. This is a good opportunity for zoning space. Apartment owners are attracted by the possibility of simplifying the care of the floor surface.
When choosing a material, you should focus on the combination of shape, color scheme, and overall stylistic design. To make different materials look harmonious next to each other, you should choose tiles and laminate of the same color, but in different shades. The difference should be one tone. What will be lighter: tiles or laminated panels is not so important.
For a better combination, it is worth making one part of the finish more expressive, and let the other instead of the background. Some designers combine glossy and matte tiles of different sizes. Laminate is chosen with the simplest design to obtain maximum effect.
Hexagonal tiles look stylish and unusual. This is a good opportunity for zoning space. Thanks to the non-standard shape, it is possible to create a unique transition along a broken line between two types of flooring. In some cases, standard tiles are used, but they vary with different installation methods. You can choose longitudinal, transverse, diagonal. Lay in a herringbone or checkerboard pattern.
The imitation of various materials deserves special attention. If you are laying tiles with the texture of textiles, leather, or marble stone, choosing a darker laminate will add nobility to the floor surface. A good option for a kitchen decorated in a modern style is laminate, complemented by multi-colored honeycomb-shaped tiles.
Materials of the same tone allow you to give the interior a laconic appearance. However, a competent choice of contrasting shades will make it no less harmonious. To smooth out the situation, some use a combination of white and beige.
When working on the design, it is worth paying attention not only to the color combination, but also to the shape of the line along which the laminated panels adhere to the tiles. She may be:
- straight, curved or rounded shape;
- without threshold or with curb;
- at the same or different heights.
When choosing the shape of the joint, the following rules should be taken into account:
- the form must fully comply with the chosen style concept. If regular geometric shapes predominate in the interior due to rectangular cabinets and a square table, it is worth making the transition in a straight line;
- a connection along a wavy line is completely justified if there is a similar line on pieces of furniture and the design of other surfaces. A wavy line may be present in the design of a cabinet or ceiling surface;
- It is easier to form a transition along a zigzag line if the laminate is laid in a checkerboard pattern.
Thus, the correct selection of design will help to correctly delimit the space in the kitchen, add coziness, and help make it more spacious and bright. Attention should be paid not only to color, but also to texture and installation method. With this approach, even a small kitchenette can turn into a large, bright room.
Placement methods
There are several methods for placing laminate flooring on hallway walls. Let's take a closer look at each of them.
Horizontally
By fixing the slabs parallel to the floor, it is possible to visually stretch the room and expand its boundaries. Corridors decorated in this way become more spacious, light and airy; such a solution looks especially impressive if it is reinforced with small inserts of darkened mirrors.
The slats can be placed exactly above each other, or they can be laid in an intricate mosaic - here everything depends only on your personal preferences and the stylistic decision of the decor as a whole. The panels can be the same or have different lengths, but in any case their thickness must be the same, otherwise the pattern will be shifted and the design will lose its decorative effect.
Vertical
Vertical fixation of the slats visually lifts the ceiling, especially when the shade of the boards is combined with the finish of the floor. Moreover, the smaller the ornament on the slab, the more conceptual the entire room looks. It is advisable to choose only one wall opposite the window for vertical design - solar lighting will create stylish accents on it and make it much more catchy.
Vertically located lamellas are most often used for cladding hallways - this room in typical high-rise buildings is small, and thanks to a simple technique this shortcoming is visually compensated.
If you like unconventional solutions in the interior, then try installing laminate diagonally - such a design looks harmonious in both large and small spaces, the main thing is that the slats have the same width.